従来、UITableViewCellの内容に応じて行の高さを算出して可変にする実装はかなりめんどくさかった。
AutoLayoutとStackViewで自動的に可変になるように実装してみた。
AutoLayoutはSnapKitを使った。
- Xcode 10.1
- Swift 4.2
サンプルコードは以下に配置
https://github.com/yumemi-ajike/AutoFlexibleRowHeight
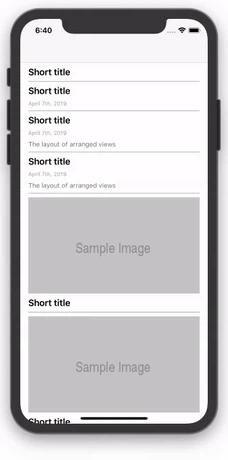
UITableViewCellの内部レイアウト
パターン
UITableViewCell のサブクラスとして TableViewCell を追加し、
イメージが縦に配置される VerticalTableViewCell と左横に配置される HorizontalTableViewCell をそれぞれ TableViewCell を共通の親としてサブクラス化した。
| イメージの縦配置 | イメージの横配置 | テキストのみ1行 | テキストのみ複数行 | テキスト1つのみ |
|---|---|---|---|---|
 |
 |
 |
 |
 |
組み合わせはもっとたくさんあるけどサンプルコードをビルドしたら確認可能なので割愛する。
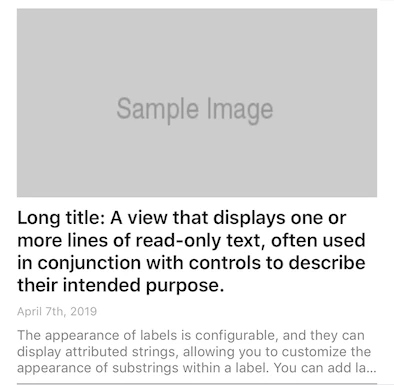
イメージの縦配置
VerticalTableViewCell クラスで実装している。
ビュー構造
UITableViewCell.contentView に以下のビュー構造で追加していて、
それぞれの UIImageView や UILabel の isHidden を変更することでレイアウト内容を変えている。
- UIStackView
- UIImageView
- UILabel
- UILabel
- UILabel
- UIView(下部separator)
表示順
addArrangedSubview した順番に表示される。
final class VerticalTableViewCell: TableViewCell {
    override init(style: UITableViewCell.CellStyle, reuseIdentifier: String?) {
        super.init(style: style, reuseIdentifier: reuseIdentifier)
        contentView.addSubview(stackView)
        stackView.addArrangedSubview(thumbnailImageView)
        stackView.addArrangedSubview(titleLabel)
        stackView.addArrangedSubview(dateLabel)
        stackView.addArrangedSubview(descriptionLabel)

        stackView.snp.makeConstraints { (make) in
            make.edges.equalToSuperview().inset(insets)
        }
        thumbnailImageView.snp.makeConstraints { (make) in
            make.width.equalTo(stackView.snp.width)
            // 16 : 9 and hidden priority
            make.height.equalTo(stackView.snp.width).multipliedBy(0.5625).priority(UILayoutPriority.defaultLow.rawValue)
        }
    }
    ...
}
stackView.axis = .vertical で縦方向に整列するようにし、 stackView.distribution = .equalSpacing で項目間のマージンを均一にしている。
セル内側のマージンは以下で定義して stackView の edges に inset する形でセットしている。
let insets = UIEdgeInsets(top: 8, left: 16, bottom: 8, right: 16)
イメージサイズ
ImageViewの表示サイズの制約は16:9で表示するようにし、
非表示時の対応としてpriorityを .defaultLow にセットしている。
これがないとAutoLayoutの警告が出るので注意。
        thumbnailImageView.snp.makeConstraints { (make) in
            make.width.equalTo(stackView.snp.width)
            // 16 : 9 and hidden priority
            make.height.equalTo(stackView.snp.width).multipliedBy(0.5625).priority(UILayoutPriority.defaultLow.rawValue)
        }
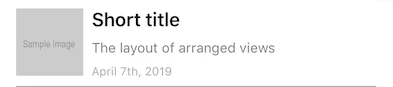
イメージの横配置
HorizontalTableViewCell クラスで実装している。
ビュー構造
UITableViewCell.contentView に以下のビュー構造で追加。
- UIStackView
- UIView
- UIImageView
- UIStackView
- UILabel
- UILabel
- UILabel
- UIView
- UIView(下部separator)
イメージの右横にテキスト行を配置する必要があるため、 UIStackView の入れ子構造とすることで実現している。
また UIImageView がひしゃげてしまったり伸びてしまったりすることを避けるため、 imageBaseView を追加することで回避している。
final class HorizontalTableViewCell: TableViewCell {
    private let imageBaseView = UIView()
    ...
    override init(style: UITableViewCell.CellStyle, reuseIdentifier: String?) {
        let horizontalStackView = UIStackView()
        super.init(style: style, reuseIdentifier: reuseIdentifier)
        horizontalStackView.axis = .horizontal
        horizontalStackView.alignment = .top
        horizontalStackView.distribution = .fill
        horizontalStackView.spacing = 8
        contentView.addSubview(horizontalStackView)

        stackView.addArrangedSubview(titleLabel)
        stackView.addArrangedSubview(descriptionLabel)
        stackView.addArrangedSubview(dateLabel)

        horizontalStackView.addArrangedSubview(imageBaseView)
        imageBaseView.addSubview(thumbnailImageView)
        horizontalStackView.addArrangedSubview(stackView)

        horizontalStackView.snp.makeConstraints { (make) in
            make.edges.equalToSuperview().inset(insets)
        }
        ...
    }
}
親のStackViewは horizontalStackView.axis = .horizontal で横方向に整列するようにし、
horizontalStackView.alignment = .top で上揃えになるようにしている。
イメージサイズ
ImageViewの表示サイズは固定で64 x 64になるように制約を設けている。
        imageBaseView.snp.makeConstraints { (make) in
            make.width.equalTo(64)
            make.height.greaterThanOrEqualTo(imageBaseView.snp.width).priority(UILayoutPriority.defaultLow.rawValue)
        }
        thumbnailImageView.snp.makeConstraints { (make) in
            make.size.equalTo(64)
            make.center.equalToSuperview()
        }
文字や画像のセット
各ビューに文字や画像などの情報を入れ、表示されないビューの isHidden を変更して表示を切り替えている。
    func configure(with item: Item) {
        thumbnailImageView.kf.setImage(with: item.imageUrl)
        isThumbnailHidden = item.imageUrl == nil
        titleLabel.text = item.title
        titleLabel.isHidden = item.title == nil
        dateLabel.text = item.date
        dateLabel.isHidden = item.date == nil
        descriptionLabel.text = item.description
        descriptionLabel.isHidden = item.description == nil
    }
動作確認
TableViewController.swift で TableViewCell.Item の配列を作ってパターンを網羅するようにしている。
private let items = [TableViewCell.Item(title: "Short title",
date: nil,
description: nil,
imageUrl: nil),
TableViewCell.Item(title: "Short title",
date: "April 7th, 2019",
description: nil,
imageUrl: nil),
...
省略
...
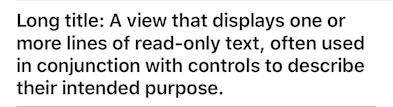
TableViewCell.Item(title: "Long title: A view that displays one or more lines of read-only text, often used in conjunction with controls to describe their intended purpose.",
date: "April 7th, 2019",
description: "The appearance of labels is configurable, and they can display attributed strings, allowing you to customize the appearance of substrings within a label. You can add labels to your interface programmatically or by using Interface Builder.",
imageUrl: URL(string: "https://via.placeholder.com/320x180.png?text=Sample+Image")),
TableViewCell.Item(title: "Long title: A view that displays one or more lines of read-only text, often used in conjunction with controls to describe their intended purpose.",
date: "April 7th, 2019",
description: "The appearance of labels is configurable, and they can display attributed strings, allowing you to customize the appearance of substrings within a label. You can add labels to your interface programmatically or by using Interface Builder.",
imageUrl: URL(string: "https://via.placeholder.com/320x180.png?text=Sample+Image"))]
感想
かなりシンプルになったし、コード量が激減するので嬉しい!
行高計算のめんどくささからも解放されて喜ばしいけど、AutoLayoutの制約エラーを解決していくのがメイン作業になってこれはこれで慣れが必要。。。
UIStackViewを入れ子構造にしたときにiOS10以前で発生する制約の不整合とかもあるのでその辺の解決にちょっと時間かかった。