はじめに
先日、AWS Step FunctionsにTestState APIが実装されました。
これを使うと、ステートの内部の途中データが見ることができます。
今回はこれを使って、Step Functionsのわかりづらい入出力処理を確認しながらステートを作る例を記事にしました。
概要
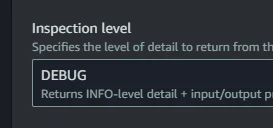
- TestState APIには、Inspection levelとして、
INFO/DEBUG/TRACEが指定できる -
DEBUGを使うと、データ操作の中身が確認できる- 各入力処理を確認することができる
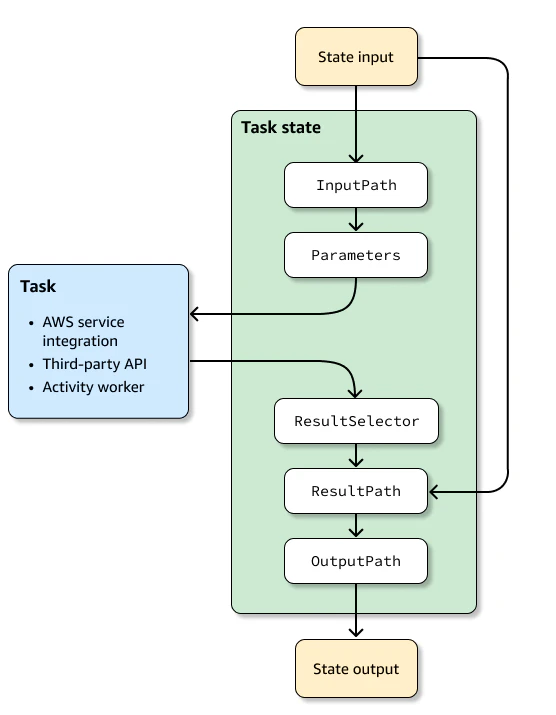
Step Functions の入出力処理は、InputPath、Parameters、ResultSelector、ResultPath、OutputPathがあり、いつ動くのかは、以下のページで図示されています。
やってみた
目標
以下のステートを、各入力処理を作ってみます。
- Auto Scalingの成功したスケールアウトイベントを入力として
- 対象のEC2インスタンスのENIの情報を取得して
- 入力のイベントのdetailにENIのIDを追加して
- detailのみを出力する
ステート
単純に、DescribeNetworkInterfacesのみのステートを定義します。
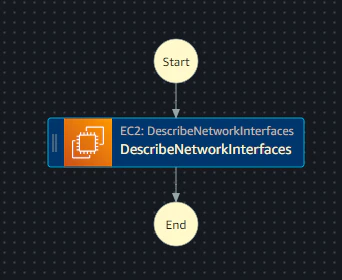
最終的なコードは以下になります。
{
  "Comment": "ENIIDをdetailに組み込み、detailのみ抽出",
  "StartAt": "DescribeNetworkInterfaces",
  "States": {
    "DescribeNetworkInterfaces": {
      "Type": "Task",
      "Parameters": {
        "Filters": [
          {
            "Name": "attachment.instance-id",
            "Values.$": "States.Array($.EC2InstanceId)"
          }
        ]
      },
      "Resource": "arn:aws:states:::aws-sdk:ec2:describeNetworkInterfaces",
      "End": true,
      "InputPath": "$.detail",
      "ResultSelector": {
        "NetworkInterfaceIds.$": "$.NetworkInterfaces[*].NetworkInterfaceId"
      },
      "ResultPath": "$.detail.NetworkInterface",
      "OutputPath": "$.detail"
    }
  }
}
入力イベント
以下のページから、成功したスケールアウトイベントを使います。EC2InstanceIdのみ、自分のIDに置き換えます。
{
  "version": "0",
  "id": "12345678-1234-1234-1234-123456789012",
  "detail-type": "EC2 Instance Launch Successful",
  "source": "aws.autoscaling",
  "account": "123456789012",
  "time": "yyyy-mm-ddThh:mm:ssZ",
  "region": "us-west-2",
  "resources": [
    "auto-scaling-group-arn",
    "instance-arn"
  ],
  "detail": {
    "StatusCode": "InProgress",
    "Description": "Launching a new EC2 instance: i-12345678",
    "AutoScalingGroupName": "my-asg",
    "ActivityId": "87654321-4321-4321-4321-210987654321",
    "Details": {
      "Availability Zone": "us-west-2b",
      "Subnet ID": "subnet-12345678"
    },
    "RequestId": "12345678-1234-1234-1234-123456789012",
    "StatusMessage": "",
    "EndTime": "yyyy-mm-ddThh:mm:ssZ",
    "EC2InstanceId": "i-1234567890abcdef0",
    "StartTime": "yyyy-mm-ddThh:mm:ssZ",
    "Cause": "description-text",
    "Origin": "EC2",
    "Destination": "AutoScalingGroup"
  }
}
InputPath
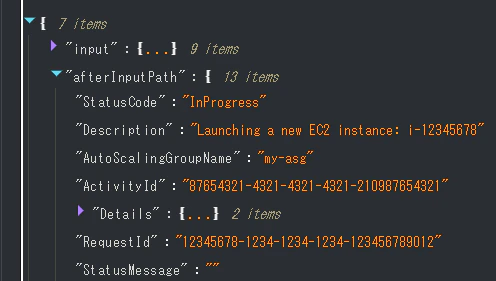
$.detailを指定して、入力イベントからdetailだけを絞り込みます。

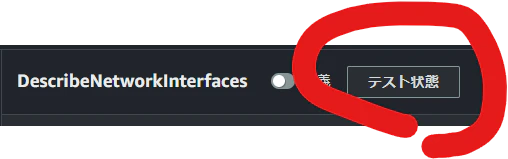
対象のステートを選択すると、右ペインの上ののほうにボタンが出てきますのでテストします。
状態の入力に、入力イベントを入力します。
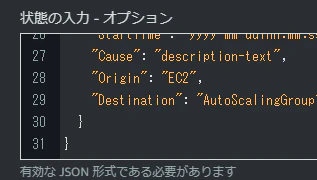
Inspection levelをDEBUGに指定して、テストを開始します。
右側の IO処理のタブで、途中データを見ることができます。

afterInputPathの中身を展開すると、detailが取れていることがわかります。
Parameters
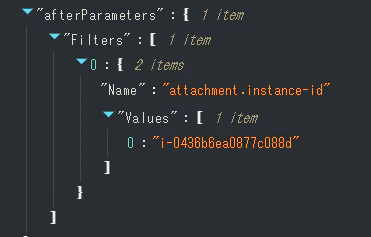
DescribeNetworkInterfacesのパラメータを指定します。
{
  "Filters": [
    {
      "Name": "attachment.instance-id",
      "Values.$": "States.Array($.EC2InstanceId)"
    }
  ]
}
TestState APIを実行して、パラメーターのパスの個所が置き換わっていることが確認できます。
ResultSelector
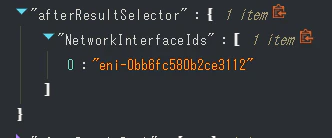
結果からEMIのIDのみ抽出して、以下のフィールド名で取得します。
{
  "NetworkInterfaceIds.$": "$.NetworkInterfaces[*].NetworkInterfaceId"
}
TestState APIを実行して、パス通りに取れているか確認できます。
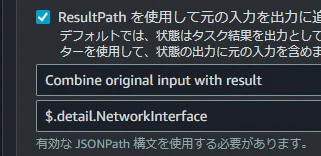
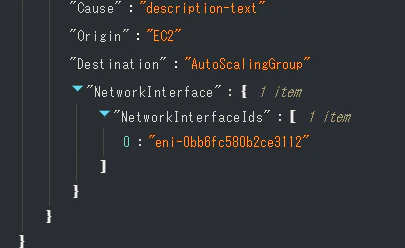
ResultPath
抽出した結果を入力の$.detail.NetworkInterfaceに組み合わせます。
TestState APIを実行して、afterResultPathの中身で、組み合わせた結果が確認できます。
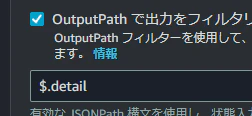
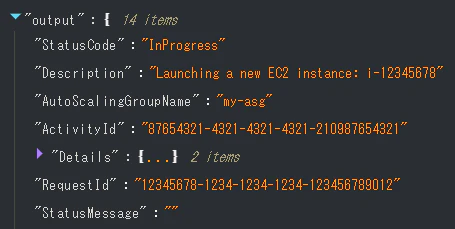
OutputPath
$.detailを指定して、detailだけにフィルタリングします。
TestState APIを実行して、outputの中身がフィルタリングされていることが確認できます。
おわりに
TestState APIを使って、Step Functionsの各入出力処理を確認しながら作ってみました。以前はパスが展開されているかわからなかったのですが、この機能を使えば途中のデータが確認できるので大変作りやすくなったと感じます。
この記事がどなたかのお役に立てれば幸いです。