はじめに
sam initでPythonのLambdaを指定した際、testsというフォルダが付いてきます。
Lambdaで単体テストを行いたいと思っていて、中がどうなっているのか確認してみましたので、その内容を記事にします。
概要
-
sam initでPythonのLambdaを作ると、pytest用のフォルダtestsが生成される - PythonのLambdaを作る場合は、pytestを使った方がよさそう
やったこと
環境
いつものClooud9です。コンテナを作るわけではないので、最安価インスタンスで十分かと思います。
sam init
まずはsamテンプレートを作ります。
$ mkdir dev
$ cd dev

$ sam init
Which template source would you like to use?
        1 - AWS Quick Start Templates
        2 - Custom Template Location
Choice: 1
What package type would you like to use?
        1 - Zip (artifact is a zip uploaded to S3)
        2 - Image (artifact is an image uploaded to an ECR image repository)
Package type: 1

Which runtime would you like to use?
        1 - nodejs14.x
        2 - python3.9
        3 - ruby2.7
        4 - go1.x
        5 - java11
        6 - dotnetcore3.1
        7 - nodejs12.x
        8 - nodejs10.x
        9 - python3.8
        10 - python3.7
        11 - python3.6
        12 - python2.7
        13 - ruby2.5
        14 - java8.al2
        15 - java8
        16 - dotnetcore2.1
Runtime: 2

Project name [sam-app]: samtest

Cloning from https://github.com/aws/aws-sam-cli-app-templates

AWS quick start application templates:
        1 - Hello World Example
        2 - EventBridge Hello World
        3 - EventBridge App from scratch (100+ Event Schemas)
        4 - Step Functions Sample App (Stock Trader)
        5 - Elastic File System Sample App
Template selection: 1
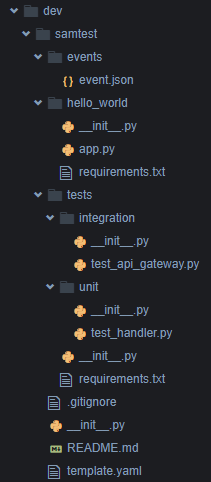
階層は以下の様になります。
$ pwd;find . | sort | sed '1d;s/^\.//;s/\/\([^/]*\)$/|--\1/;s/\/[^/|]*/|  /g'
/home/ec2-user/environment/dev
|--samtest
|  |--events
|  |  |--event.json
|  |--.gitignore
|  |--hello_world
|  |  |--app.py
|  |  |--__init__.py
|  |  |--requirements.txt
|  |--__init__.py
|  |--README.md
|  |--template.yaml
|  |--tests
|  |  |--__init__.py
|  |  |--integration
|  |  |  |--__init__.py
|  |  |  |--test_api_gateway.py
|  |  |--requirements.txt
|  |  |--unit
|  |  |  |--__init__.py
|  |  |  |--test_handler.py
コマンドは以下を使っています。
tests以下のファイルを一つ見てみます。pytestをインポートしているのがわかります。
import json

import pytest

from hello_world import app


@pytest.fixture()
def apigw_event():
    """ Generates API GW Event"""

    return {
        "body": '{ "test": "body"}',
…以下略
テスト用仮想環境
実マシンに直接テスト用環境は用意せず、仮想環境上に作ろうと思います。テスト環境名は、sam initの環境名と同じにしてみました。
devフォルダ直下に作成しました。
python -m venv .venv/samtest
source .venv/samtest/bin/activate
必要なモジュールを仮想環境にインストールします。
pip3 install pytest
pip3 install boto3
# Lambdaでは必要なモジュールは以下のファイルに記載されているはずなので、それを使ってインストール
pip3 install -r samtest/hello_world/requirements.txt
pytest実行
対象のフォルダに移って、pytestを実行します。移動先はtestsフォルダのある階層になります。
cd samtest/
pytest tests
以下の様にエラーになりました。hello_worldフォルダが見つけられなかったようです。
====================================================================== test session starts ======================================================================
platform linux -- Python 3.7.10, pytest-7.2.0, pluggy-1.0.0
rootdir: /home/ec2-user/environment/dev/samtest
collected 1 item / 1 error

============================================================================ ERRORS =============================================================================
__________________________________________________________ ERROR collecting tests/unit/test_handler.py __________________________________________________________
ImportError while importing test module '/home/ec2-user/environment/dev/samtest/tests/unit/test_handler.py'.
Hint: make sure your test modules/packages have valid Python names.
Traceback:
/usr/lib64/python3.7/importlib/__init__.py:127: in import_module
    return _bootstrap._gcd_import(name[level:], package, level)
tests/unit/test_handler.py:5: in <module>
    from hello_world import app
E   ModuleNotFoundError: No module named 'hello_world'
==================================================================== short test summary info ====================================================================
ERROR tests/unit/test_handler.py
!!!!!!!!!!!!!!!!!!!!!!!!!!!!!!!!!!!!!!!!!!!!!!!!!!!!!!!!!!!! Interrupted: 1 error during collection !!!!!!!!!!!!!!!!!!!!!!!!!!!!!!!!!!!!!!!!!!!!!!!!!!!!!!!!!!!!!
======================================================================= 1 error in 0.31s ========================================================================
python -m pytest testsと実行してもよいのですが、今回は以下を参考にパスを通してみます。
import sys
import os

sys.path.append(os.path.abspath(os.path.dirname(os.path.abspath(__file__)) + "/../"))
自作のモジュールなどをmodulesフォルダにおいて、そのファイルを単体テストしたい場合などは、さらにパスを追加すると良いかと思います。
パスを追加して実行した結果は、1つ成功、1つエラーになりましたが、pytest自体は動くことが確認できました。
====================================================================== test session starts ======================================================================
platform linux -- Python 3.7.10, pytest-7.2.0, pluggy-1.0.0
rootdir: /home/ec2-user/environment/dev/samtest
collected 2 items

tests/integration/test_api_gateway.py E                                                                                                                   [ 50%]
tests/unit/test_handler.py .                                                                                                                              [100%]

============================================================================ ERRORS =============================================================================
_______________________________________________________ ERROR at setup of TestApiGateway.test_api_gateway _______________________________________________________

self = <samtest.tests.integration.test_api_gateway.TestApiGateway object at 0x7f1a320c9490>

    @pytest.fixture()
    def api_gateway_url(self):
        """ Get the API Gateway URL from Cloudformation Stack outputs """
        stack_name = os.environ.get("AWS_SAM_STACK_NAME")

        if stack_name is None:
>           raise ValueError('Please set the AWS_SAM_STACK_NAME environment variable to the name of your stack')
E           ValueError: Please set the AWS_SAM_STACK_NAME environment variable to the name of your stack

tests/integration/test_api_gateway.py:20: ValueError
==================================================================== short test summary info ====================================================================
ERROR tests/integration/test_api_gateway.py::TestApiGateway::test_api_gateway - ValueError: Please set the AWS_SAM_STACK_NAME environment variable to the name of your stack
================================================================== 1 passed, 1 error in 0.19s ===================================================================
以降のテスト
pythonの関数ごとのテストはpytestで出来ますが、Lambdaとしてのテストを行いたい場合は、以下の以前の記事を参考にしてください。
おわりに
以前から、生成されるtestsフォルダが気になっていたので、今回調べてみました。
これをきっかけにpytestの使い方も習得して、より安全にLambdaを作っていきたいと思います。
