本記事は GCP(Google Cloud Platform) Advent Calendar 2023 の 11 日目の記事です.
昨年までは,機械学習で研究をしている大学 4 年生でしたが,2023 年 4 月からは新卒でエンジニアとして働いています.
現在は,MLOps エンジニア1をしています.
昨年は 『数独・ナンプレを画像から解く AI を作る』という記事を書いたので,興味があればぜひご覧ください.
1. 結論
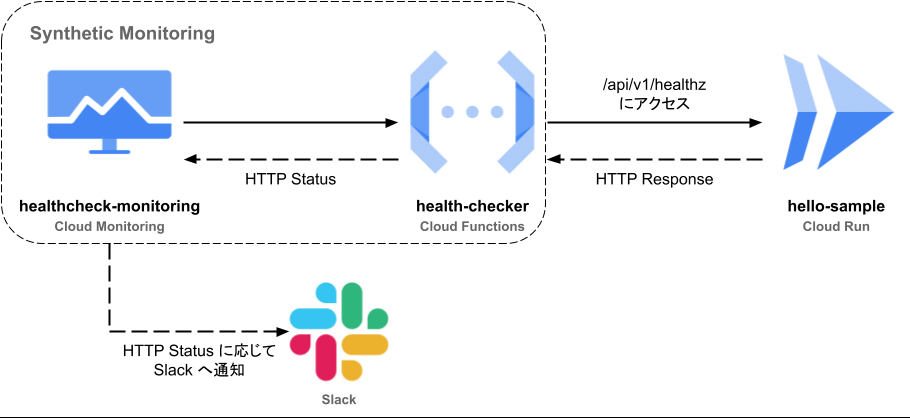
Google Cloud の機能である Synthetic Monitoring(合成モニタリング)を使うことで認証付きの Cloud Run に対して死活監視2をすることができました.
Synthecic Monitoring は Cloud Monitoring と JavaScript で動かす Cloud Functions の計 2 つを使用します.

2023/12 現在,Synthetic Monitoring に用いる Cloud Functions には JavaScript のみ対応です.
実際に,上記アーキテクチャをもとに Terraform3を用いて実装してみたので,ぜひご覧ください.
再現コマンドも記載しています↓
1.1. Synthetic Monitoring とは
合成モニターを使用すると、テスト内容と一連のテストを定義できます。たとえば、アプリケーションのログインページ、e コマースストアのチェックアウト プロセス、アプリケーションがサードパーティ サービスに対して行う API 呼び出しをテストできます。
Synthetic Monitoring は合成モニタリングと訳すようです.
上記ドキュメントによると,Synthetic Monitoring とは,テスト内容をカスタムした Google Cloud の Uptime Check(死活監視2)をできるということです.
2. 導入
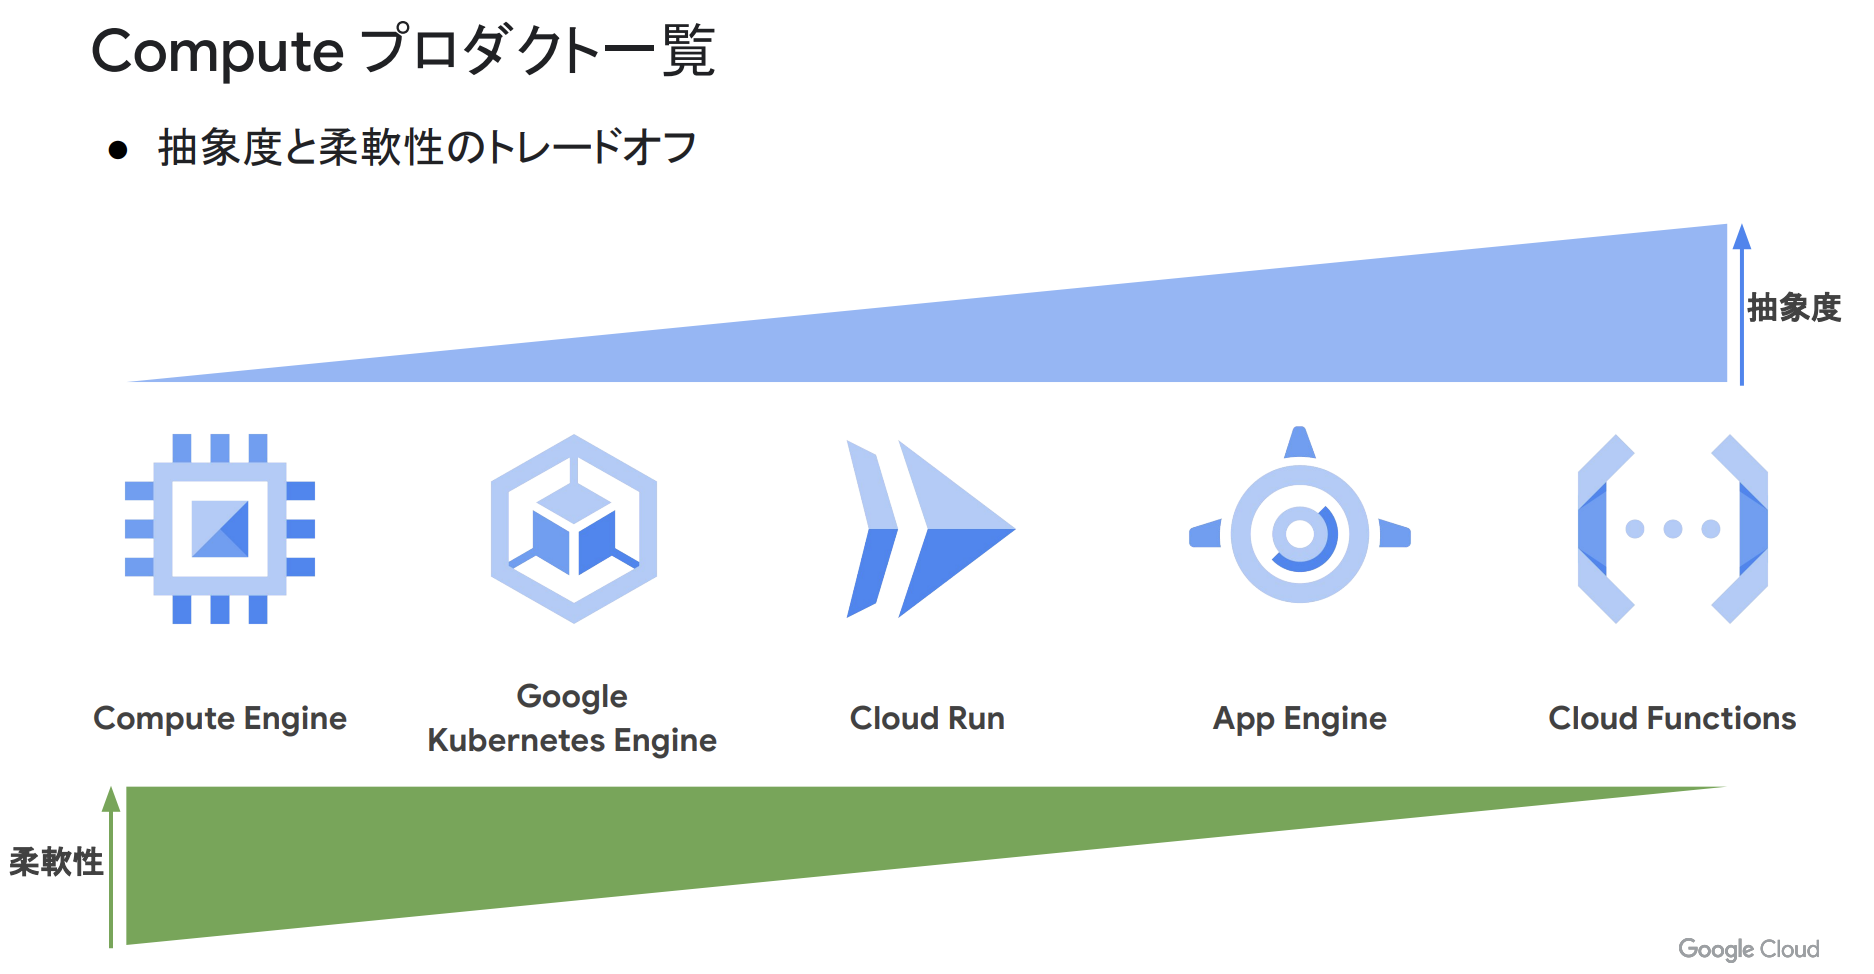
Google Cloud が提供している Compute プロダクト4は以下の 5 種類存在します.
- Compute Engine
- Google Kubernetes Engine
- Cloud Run ← 本記事ではこのプロダクトに焦点を当てて死活監視2をします
- App Engine
- Cloud Functions

2.1. 要件を満たさなかったアーキテクチャ
実務において,認証が必要な Cloud Run に対して死活監視2が求められました.
しかし,以下は認証がない Cloud Run に対しての死活監視2アーキテクチャの例です.
認証が必要な Cloud Run に対する死活監視2のベストプラクティスに関する情報がドキュメントに明示されていないため,本記事ではその手法を紹介します.

上図は認証が必要ない Cloud Run のヘルスチェック時に用いるアーキテクチャで,認証が必要な Cloud Run のヘルスチェックができません.
3. 実装
以下の公式ドキュメントを参考に,実装をしていきます.
Synthetic Monitoring を実装する上で,Cloud Functions に対応しているのはNode.js, TypeScript, Mochaの 3 種類ありますが,今回はNode.jsを使って実装していきます.
3.1. 方針

先に図示した,上図アーキテクチャを作成するにあたり,以下の技術を使って認証が必要な Cloud Run に対して死活監視2を実装します.
- Terraform3
- Cloud Run
- Cloud Functions
- Cloud Monitoring
- Uptime Check (Synthetic Monitoring)
- JavaScript
3.2. 階層構造
Terraform3のベストプラクティスに則って,以下の様なenvironments, modulesに階層を分ける構成にして実装していきます.
上記のリポジトリにおける,treeコマンドの出力を下記に示します.
.
├── environments
│   └── dev
│       ├── backend.tf
│       ├── main.tf
│       ├── provider.tf
│       ├── variables.tf
│       └── versions.tf
└── modules
    ├── main.tf
    ├── monitoring
    │   ├── bucket.tf
    │   ├── dashboard.tf
    │   ├── fuctions.tf
    │   ├── healthcheck.tf
    │   ├── policy.tf
    │   ├── src
    │   │   ├── index.js
    │   │   └── package.json
    │   └── variables.tf
    ├── run.tf
    ├── sa.tf
    └── variables.tf
3.3. ソースコード
以下に主なソースコードを説明付きで,上記サンプルリポジトリから抜粋します.
const functions = require('@google-cloud/functions-framework');
const fetch = require('node-fetch');
const { runSyntheticHandler } = require('@google-cloud/synthetics-sdk-api');
const assert = require('node:assert');
const { GoogleAuth } = require('google-auth-library');
const dotenv = require('dotenv').config();

// エントリーポイント
functions.http('SyntheticFunction', runSyntheticHandler(async () => {
  const auth = new GoogleAuth();

  // 環境変数から死活監視をする URL を受け取る
  const cloudRunUrl = process.env.BASE_URL;
  const reqUrl = new URL("/api/v1/healthz", cloudRunUrl);

  const client = await auth.getIdTokenClient(reqUrl);
  const resp = client.request({url: reqUrl});
  const status = (await resp).status

  // status が 200 の時のみ healthy とする
  return await assert.equal(status, 200);
}));
resource "google_cloudfunctions2_function" "synthetic_monitoring" {
  name     = var.synthetic_settings.functions.name

  location = var.location
  project  = var.project_id

  build_config {
    runtime     = "nodejs20"

    # エントリーポイント
    entry_point = "SyntheticFunction"

    # Cloud Functions のソースコード置き場を定義する
    source {
      storage_source {
        bucket = google_storage_bucket_object.main.bucket
        object = google_storage_bucket_object.main.name
      }
    }
  }

  service_config {
    max_instance_count    = var.synthetic_settings.functions.max_instance_count
    available_memory      = var.synthetic_settings.functions.memory
    timeout_seconds       = var.synthetic_settings.functions.timeout
    service_account_email = var.run_info.invoker

    # 環境変数に死活監視対象の URI を渡す
    environment_variables = {
      BASE_URL = var.run_info.uri
    }
  }
}
resource "google_monitoring_uptime_check_config" "synthetic_monitoring" {
  display_name = var.synthetic_settings.monitoring.name

  # どのくらいの頻度で死活監視をするか
  period  = var.synthetic_settings.monitoring.period

  # タイムアウトの時間を指定
  timeout = var.synthetic_settings.monitoring.timeout

  synthetic_monitor {
    cloud_function_v2 {
      # Clodu Run にアクセスする Cloud Functions の ID
      name = google_cloudfunctions2_function.synthetic_monitoring.id
    }
  }
}
4. 結果
以下に,構築したリソースをコンソールで表示して期待の動作をしているか確認してみます.
4.1. Cloud Run
Authentication が Require authentication となっており,API の使用には認証が必要であることがわかります.

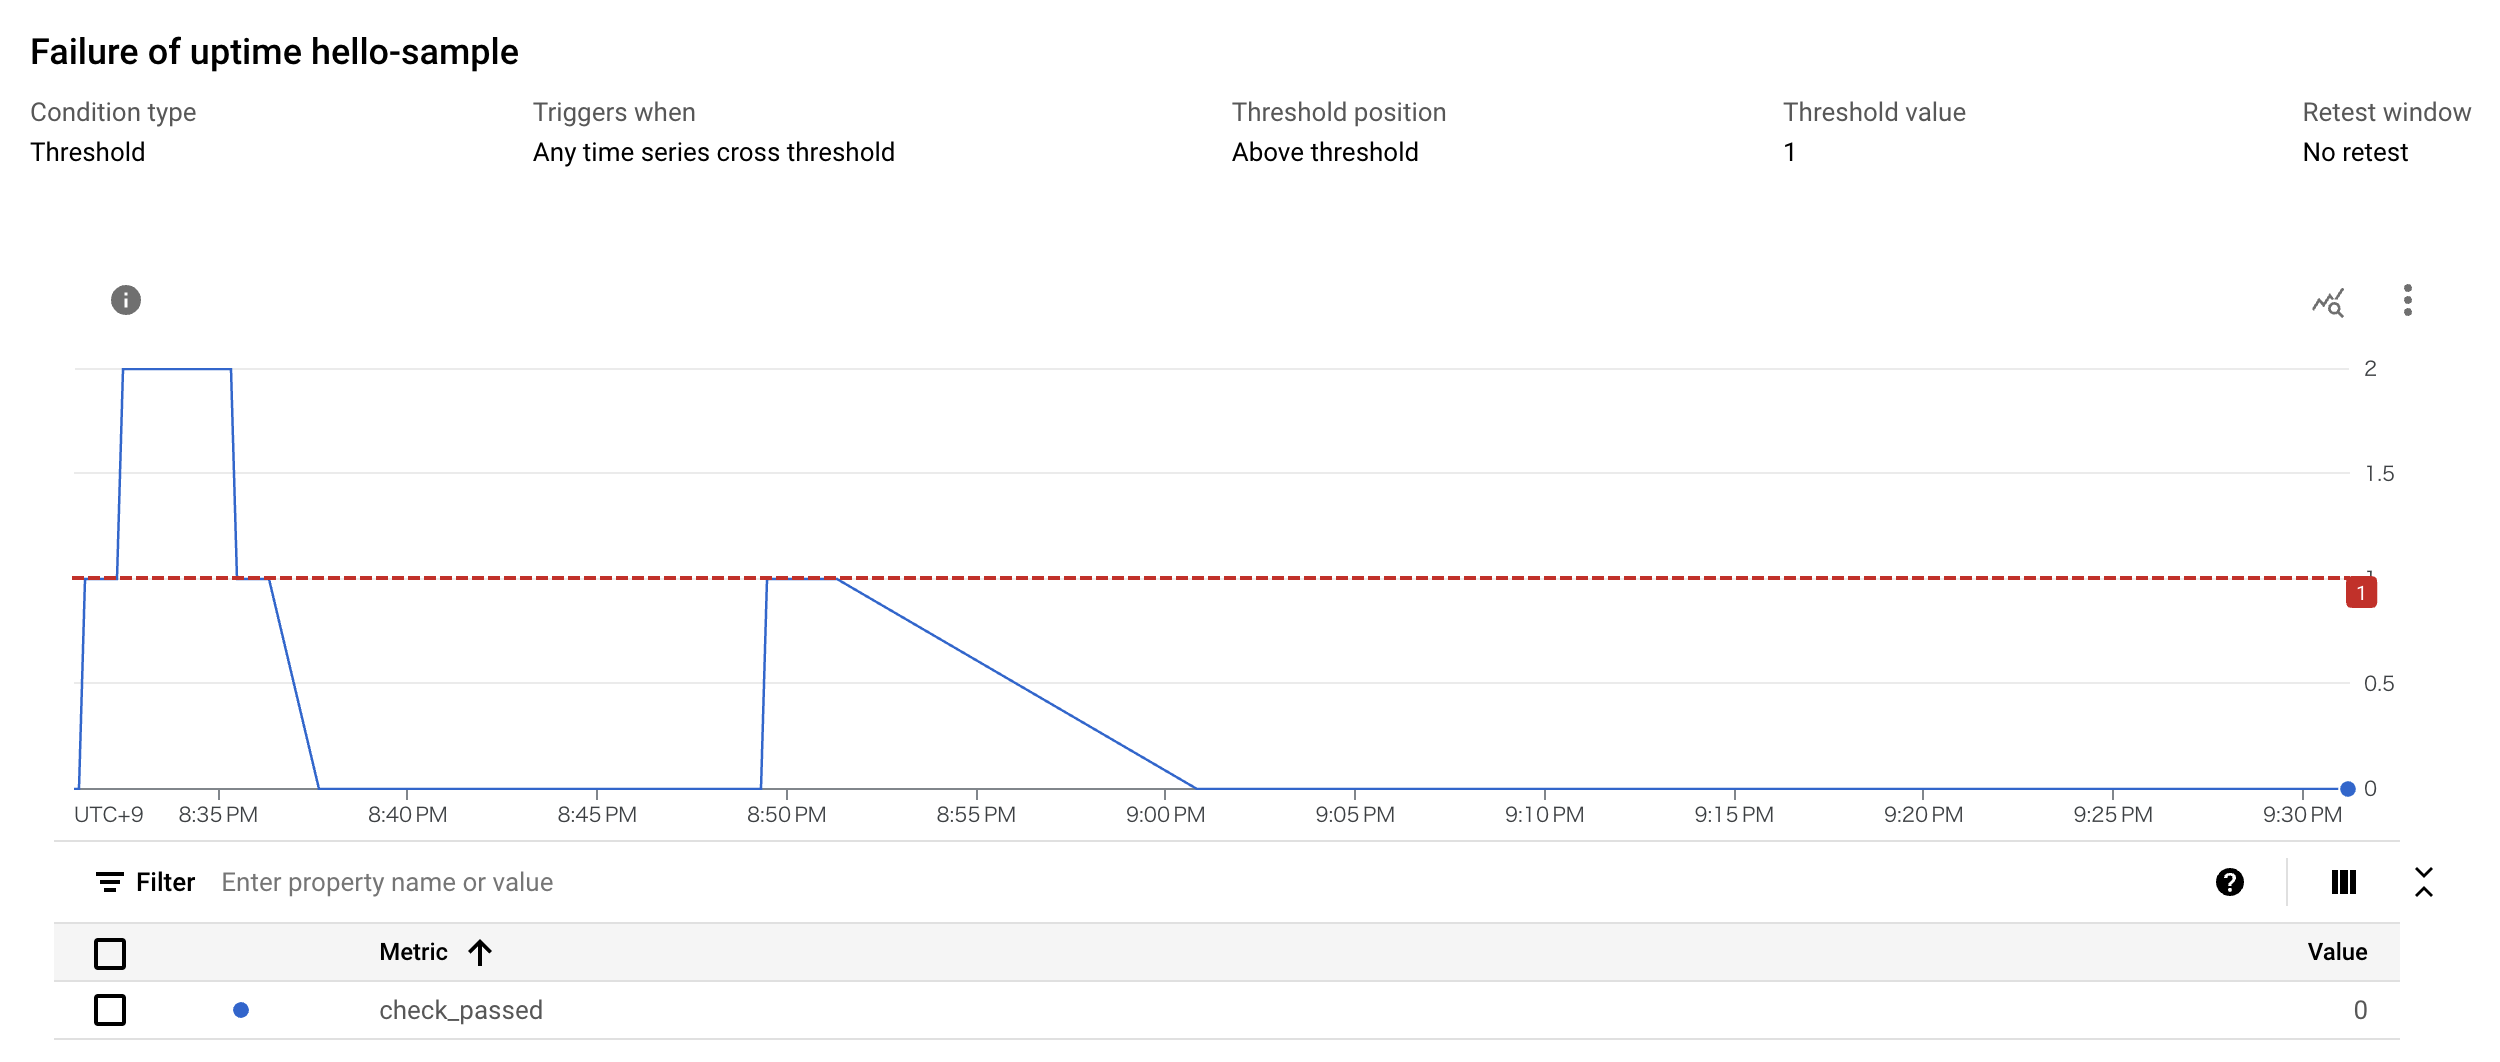
4.2. Cloud Monitoring
Cloud Monitoring でアラートを出すためのしきい値を決めることができます.
今回は 1 分間に 1 回でもアラートがあれば Slack に通知を出すように設定をしています.

4.3. Synthetic Monitoring
ヘルスチェックが通っており,全てのリソースが想定通りに動いていることが確認できました.
