前提知識
- nuxt
- Cognito
フロント側
以下をコマンドプロンプトなどに入力し、amplifyのライブラリをインストールする。(引用サイト:amplifyAPI)
$ npm install aws-amplify @aws-amplify/ui-components
amplifyのAPIを使用し、Cognitoへユーザー名やパスワードなど必要な情報を送信する。
import { Auth } from 'aws-amplify';

async function signIn() {
    try {
        await Auth.signIn(username, password);
    } catch (error) {
        console.log('error signing in', error);
    }
}
2段階認証では、1段階目の認証で作成したuserとバックエンド側で作成した認証コードを送信する。
import { Auth } from 'aws-amplify';

async function challenge() {
    try {
        await Auth.sendCustomChallengeAnswer(user, challengeResponses);
    } catch (error) {
        console.log('error signing in', error);
    }
}
.envファイルに以下のようにユーザープールIDなどを設定する。
COGNITO_USER_POOL_ID = 'xxxxxxxxx_xxxxxxxx'
COGNITO_CLIENT_ID = 'xxxxxxx...'
REGION='xxxxxxxxx'
Cognito設定
- カスタム属性に「auth_challenge」を追加
- カスタム認証を利用するため、MFAはオフに設定
- アプリクライアントを設定
- 認証フローの設定に全てチェック
- セキュリティ設定は有効(推奨)
- トークンを取り消しを有効化にチェック
- 他は全てデフォルトで設定
バックエンド側
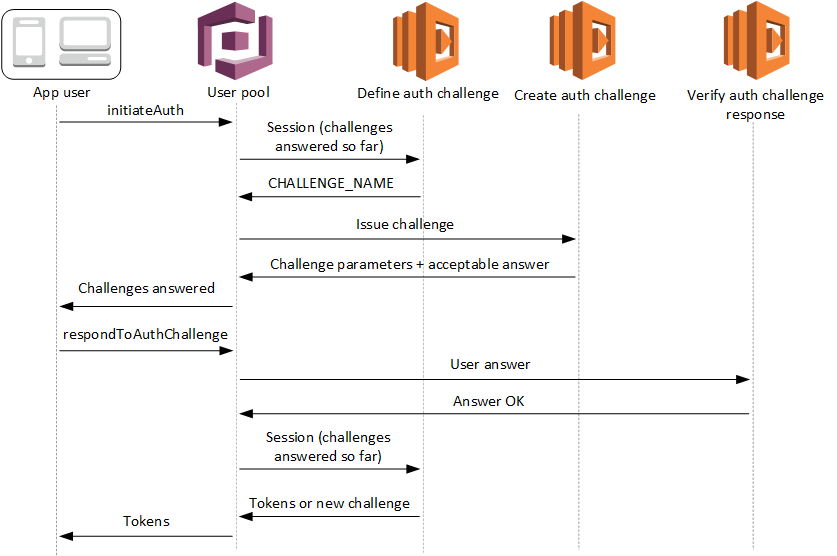
上画像のようなフローでカスタム認証を行います。
引用サイト(Amazon Cognito MFA with Email Using Lambda Triggers(以後Cognito MFA))の1~3つ目のプログラムをLambdaに登録し、上からCognitoの「認証チャレンジの定義」、「認証チャレンジの作成」、「認証チャレンジの確認」に設定します。
Cognito MFAのプログラムには認証コードを作成する処理がないため処理を追加する必要があります。