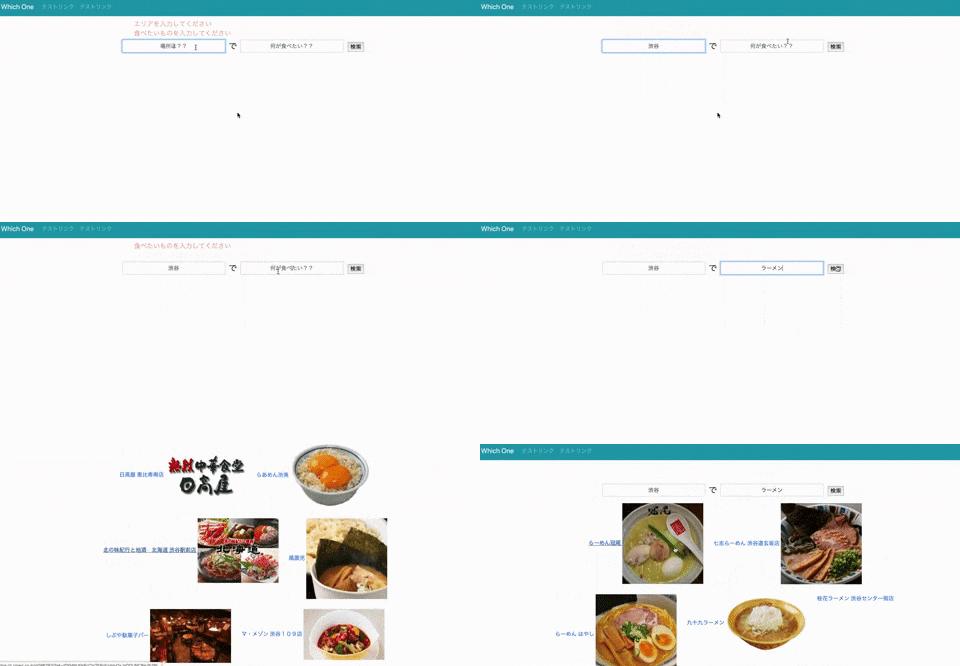
【完成イメージ】
環境
Ruby 2.6.3
Rails 5.2.3
vue.js
使用するAPI
ぐるなび
https://api.gnavi.co.jp/api/
実装したい機能
- 「エリア」「食べたいもの」をフォームに入力し、検索をすると、店舗一覧が表示される。
技術的なアプローチ
- RailsにVue.jsを載せる。(RailsはWEB API, Vue.jsはViewを担当)
- Rails側をWeb API化させる。
- Vue.js側でバリデーション処理をさせる。(無駄なリクエストを、ぐるなびAPIにしないため)
- Rails側にService層を作る。(ぐるなびAPIへの一連の処理(ビジネスロジック)の責務は、モデルでもコントローラーにも持たせたくないから)
処理の流れ
無駄かもしれないが、以下のような流れを想定しています。
1, Vue.js側でRailsにリクエスト。(リクエスト前にバリデーション処理をする)
2, Rails側で、Vue.jsから送られてきたパラメータを処理し、ぐるなびAPIから情報を取得。
3, ぐるなびAPIから取得した情報を、Rails側で処理し、Web API化したものを、Vue.js側にレスポンス。
4, Vue.js側のviewに描写。
1,RailsにVue.jsを載せる
避けた方が賢明なやり方
# この方法はオススメしない
rails new [アプリ名] -d postgresql -B --webpack=vue
Herokuにデプロイすることを想定し、まずは、Railsのプロジェクトを作成する
$ rails new [アプリ名] -d postgresql
gem "webpacker", github: "rails/webpacker"
追記したら、bundle install
$ rails webpacker:install

$ rails webpacker:install:vue
※「rails webpacker:install」でエラーを吐いた時の対処法(参考サイト)
https://qiita.com/bonoboz/items/52780af6a9d77d8a14ba
$ rails g controller homes index
<%= javascript_pack_tag 'hello_vue' %>
<%= stylesheet_pack_tag 'hello_vue' %>
起動し、「Hello Vue!」と表示されれば、OK。
※ルーティングは、routes.rbで、設定していることを前提。
特に何もなければ、「root to: "homes#index"」で良いかと思います。
2,foremanの導入
Procfileを使い、Webpackerの起動と、railsの起動を、簡単でできるようにする
gem 'foreman'
※必要があれば、「gem install foreman」も実行する。
web: bundle exec rails server -p $PORT
webpack: ./bin/webpack-dev-server
あとは、下記コマンドを実行するだけ
$ foreman start
「localhost:5000」でアクセスできればOK.
3,ぐるなびAPIとの連携
アクセスキーを取得している前提
今回、service層を作り、controllerをFatにしないようにします。
module Gurumes
  class SearchService
    def initialize(area, food)
      @area = area
      @food = food
      @hit = 20
    end

    def run
      uri = URI.parse URI.encode("https://api.gnavi.co.jp/RestSearchAPI/v3/?keyid=#{ENV["GURUNAVI_API"]}&address=#{@area}&freeword=#{@food}&&hit_per_page=#{@hit}")
      response = JSON.load(Net::HTTP.get(uri))
      response["rest"]
    end
  end
end
$ rails g controller api/v1/searches
class Api::V1::SearchesController < ApplicationController
  def index
    @shops = Gurumes::SearchService.new(params[:area],params[:food]).run
  end
end
このままだと、Serviceクラスが読まれないので、以下を追記
config.autoload_paths += %W(#{config.root}/app/services)
4,RailsをWeb API化させる
root to: "homes#index"

namespace :api, {format: 'json'} do
  namespace :v1 do
    resources :searches, only: [:index]
  end
end
今回は、jbuilderを使うことにしたので、ファイルを作成し、下記を記述
json.array!@shops
あとは、
「localhost:5000/api/v1/searches」にGETでアクセスし、値が返ってきていたら、OK
5,view側を作成する
ここでは、検索して結果を表示させるだけのアプリのため、最低限の実装にしている。
$ yarn add axios
$ yarn add vue-router
$ yarn add bootstrap-vue
vue.jsでbootstrapを利用する際、少し、記述方法が変わっているので、公式をチェックする。
https://bootstrap-vue.js.org/
<div id="app">
  <navbar></navbar>
  <div class="container">
    <router-view></router-view>
  </div>
</div>


<%= javascript_pack_tag 'gurume' %>
<%= stylesheet_pack_tag 'gurume' %>
import Vue from 'vue/dist/vue.esm.js'
import Router from './router/router'
import Header from './components/header.vue'

import BootstrapVue from 'bootstrap-vue'
import 'bootstrap/dist/css/bootstrap.css'
import 'bootstrap-vue/dist/bootstrap-vue.css'
Vue.use(BootstrapVue)

Vue.config.productionTip = false

var app = new Vue({
  router: Router,
  el: '#app',
  components: {
    'navbar': Header,
  }
});
import Vue from 'vue/dist/vue.esm.js'
import VueRouter from 'vue-router'
import Index from '../components/index.vue'

Vue.use(VueRouter)

export default new VueRouter({
  mode: 'history',
  routes: [
    { path: '/', component: Index },
  ],
})
<template>
  <div>
    <b-navbar toggleable="lg" type="dark" variant="info">
      <b-navbar-brand href="/">Which One</b-navbar-brand>
      <b-navbar-toggle target="nav-collapse"></b-navbar-toggle>
      <b-collapse id="nav-collapse" is-nav>
        <b-navbar-nav>
          <b-nav-item href="#">テストリンク</b-nav-item>
          <b-nav-item href="#">テストリンク</b-nav-item>
        </b-navbar-nav>
      </b-collapse>
    </b-navbar>
  </div>
</template>
<template>
  <div>
    <div v-if="errors.length" class="error-box">
      <ul>
        <li v-for="error in errors" class="errors-list">{{ error }}</li>
      </ul>
    </div>
    <div class="row justify-content-center search-box">
      <div class="col-offset-2 col-sm-8 col-offset-2">
        <form @submit.prevent="exec">
          <div class="input-group">
            <input v-model="area" class="form-control text-center" placeholder="場所は??">
            <span class="de-style food-form">で</span>
            <input v-model="food" class="form-control text-center food-form" placeholder="何が食べたい??">
            <span class="input-group-addon btn"><button type="submit">検索</button></span>
          </div>
        </form>
      </div>
    </div>
    <div class="row justify-content-center">
        <div v-for="shop in shops" v-if="shops" v-bind:id="'row_shop_' + shop.id">
            <div class="shop-list">
              <a :href="shop.url" target="_blank">
                {{shop.name}}
                <img :src="shop.image_url.shop_image1">
              </a>
            </div>
        </div>
    </div>
  </div>
</template>


<script>
  let alert = document.getElementsByClassName("errors-list");
  let alert_box = document.getElementsByClassName("error-box");

  import axios from 'axios';
  export default{
    data: function(){
      return{
        errors: [],
        shops: [],
        area:  "",
        food:  ""
      }
    },
    methods: {
      exec: function(){
        this.errors.length = 0;
        if(!this.area){
          this.errors.push("エリアを入力してください");
        }
        if(!this.food){
          this.errors.push("食べたいものを入力してください");
        }
        if(this.errors.length){
          for(let i = 0; i < alert.length; i++){
            alert[i].style.display="block";
          }
          setTimeout(function(){
             for(let i = 0; i < alert.length; i++){
                alert[i].style.display="none";
              }
          },3000);
          return;
        }

        axios.get('/api/v1/searches',{
          params: {
            area: this.area,
            food: this.food
          },
        })
        .then((response) => {
          this.shops.length = 0;
          if(!response.data.length){
            for(let i = 0; i < alert.length; i++){
              alert[i].style.display="block";
            }
            this.errors.push("指定された条件の店舗が存在しません");
            setTimeout(function(){
              for(let i = 0; i < alert.length; i++){
                alert[i].style.display="none";
                }
            },3000);
          }
          for(let i = 0; i < response.data.length; i++) {
            this.shops.push(response.data[i]);
          }
         }, (error) => {
           console.log(error);
         });
      }
    }
  };
</script>

<style scoped>
.search-box{
  margin-top:70px;
}

.shop-list{
  margin:15px;
}

.food-form{
  margin-left:10px !important;
}

.de-style{
  font-size:25px;
}

.errors-list{
  list-style: none;
}

.error-box{
  position: absolute;
  top: 65px;
  left: 25%;
  color:red;
  font-size: 1.2rem;
}

.errors-list{
  animation : fadeOut 3s;
  animation-fill-mode: both;
}
@keyframes fadeOut {
  0% {
    opacity: 1;
  }
  100% {
    opacity: 0;
  }
}
</style>
バリデーション発生時の表示方法を少しこだわり、fadeoutするようにしてます。
※一部、APIのerrorsを拾って表示させてます。
また、バリデーションを複数回発生させてもちゃんと表示されるよう、要素をCSSで「block,none」を使い操作しています。
また、別途、gem 'dotenv-rails'などを使って、環境変数の設定をする。
6,Herokuへのデプロイ
$ heroku buildpacks:add --index 1 heroku/nodejs
$ heroku buildpacks:add --index 2 heroku/ruby
通常のデプロイと違うところは、上記のアドオンを入れるところ
