はじめに
年末なので今年の写真を整理したり必要そうな写真をスマホからPCに送りたいと思う機会が増えていますが、ストレージサービスの容量やプライバシー保護の観点からインターネットを通したくないものもあるかもしれません。
また、かといってスマホをPCに有線接続するのも面倒くさいため、無線通信で写真をPCに送れるように簡易的なWebシステムを作ることにしました。
今回の環境
- PC
- Windows 11
- xampp導入済み(ApacheやPHPを使えるようにするため)
- php.iniを編集して一度に送信できるファイル数を512にしている
(一度に送られると想定される数を超える数値に設定している) - ルーターとは有線で接続されている
- スマホ
- iPhone SE 第2世代
- ブラウザはiOS標準のもの(Safari)を使用
- ルーターとは無線で接続されている
- ネットワーク
- Buffaloの無線ルーター
- インターネットに接続されているが、今回はそこまでファイルを流さないことを目標にする
- その他
- 簡易的で個人的な用途なので、セキュリティ面とエラーハンドリングはそこまで重視していません
そのため、この記事の内容を参考にされる際にはご目的に応じてその辺りをしっかりとご検討ください
- 簡易的で個人的な用途なので、セキュリティ面とエラーハンドリングはそこまで重視していません
HTMLの実装編
<!DOCTYPE html>
<html>
    <head>
        <meta charset="utf-8">
        <title>ファイル転送システム</title>
        <meta name="viewport" content="width=device-width, initial-scale=1, maximum-scale=1">
        <link href="css/index.css" rel="stylesheet" type="text/css">
        <script src="script/index.js" charset="utf-8"></script>
    </head>
    <body>
        <header>
            <h1>ファイル転送システム</h1>
        </header>
        <main>
            <form id="transferPanel" enctype="multipart/form-data" method="POST" action="transfer.php" class="file-panel-parent">
                <input type="hidden" name="MAX_FILE_SIZE" value="1073741824">
                <input id="files" type="file" name="files[]" multiple class="file-field">
                <input id="transferButton" type="button" value="転送する" onclick="OnTransferButtonClick('transferPanel', 'files', 'transferButton', 'result');" disabled>
            </form>
            <div id="result"></div>
            <script>
                // ファイルが選択されている場合にのみ転送するボタンを押せるようにする
                PrepareFileField("files", "transferButton");
            </script>
        </main>
    </body>
</html>
簡潔に説明すると、ヘッダー文字列とファイル選択フィールドと転送するボタンが見えるシンプルな構成のHTMLですね。
結果を表示するために、resultというIDを持つ空の<div>タグを配置しています。
また、転送するボタンのtypeをsubmit(フォーム送信ボタン)ではなくbutton(通常のボタン)にしているのは、ページを遷移させたくなかったためです。
CSSの実装
form.file-panel-parent{
    margin: 0 0 1em 0;
}

span.bold{
    font-weight: bold;
}

th,td{
    border: 1px solid black;
}

th.noborder,td.noborder{
    border: 0 none transparent !important;
}

.success{
    color: green;
}

.failed{
    color: red;
}
転送用のパネルと結果用の<div>の間に隙間を空けたり、太字を表現したり、テーブルのセルにフチを付けたり外したり、赤文字や緑文字を表現したりするスタイルが定義されています。
PHPの実装
<?php

/**
 * ディレクトリを作成する
 * @param string $path 作成するディレクトリのパス
 * @return false|true 処理結果
 */
function CreateDirectory($path)
{
    if (file_exists($path))
    {
        return false;
    }
    else
    {
        mkdir($path);
        return true;
    }
}


$result = [
    "isSuccess" => false
];

if (!isset($_FILES["files"]))
{
    $result["notSuccessReason"] = "ファイルの受け渡しに失敗しました";
    print(json_encode($result));
    exit;
}

$files = $_FILES["files"];
$fileNames = $files["name"];
$fileCount = count($fileNames);

if ($fileCount == 0 || empty($fileNames[0]))
{
    $result["notSuccessReason"] = "ファイルが選択されていません";
    exit;
}

$date = new DateTime();
$directory = "files/" . $date->format("Y-m-d_H-i-s");
CreateDirectory("files");
CreateDirectory($directory);

$result["totalCount"] = $fileCount;

$tmpNames = $files["tmp_name"];
$fileResults = [];
$isSuccessAny = false;
for ($i = 0; $i < $fileCount; ++$i)
{
    $fileName = $fileNames[$i];
    $tmpName = $tmpNames[$i];

    $fileResult = [
        "fileName" => $fileName
    ];

    $filePath = $directory . "/" . $fileName;
    $fileResult["isNew"] = !file_exists(($filePath));
    $isSuccess = is_uploaded_file($tmpName) &&
        move_uploaded_file($tmpName, $filePath);
    $fileResult["isSuccess"] = $isSuccess;
    $fileResults[] = $fileResult;

    $isSuccessAny |= $isSuccess;
}

if (!$isSuccessAny)
{
    $result["notSuccessReason"] = "選択されたファイルがすべて転送に失敗しました";
    rmdir($directory);
    exit;
}

$result["fileResults"] = $fileResults;
$result["isSuccess"] = true;
print(json_encode($result));

?>
送られてきたファイルを保存することを試行し、その結果をJSONで返すシンプルな構成になっています。
また、phpファイルと同じディレクトリに「files」ディレクトリがなければ生成して、その中に日付と時刻の名前が付いたディレクトリを生成し、その中にファイルを保存するようになっています。
ただ、このphpファイルには遷移しません。どう使われるかは次の節にて。
JavaScriptの実装
/**
 * ファイル転送結果のヘッダーの文字列
 */
const TableHeaderContents = ["#", "ファイル名", "個別の結果"];

/**
 *
 * @param {Array} 結果の文字列を取得する
 * @returns 抽出された文字列など
 */
function GetResultText(result)
{
    if (result["isSuccess"])
    {
        return {
            "isSuccess": true,
            "className": "success",
            "boldText": "成功",
            "afterText": (result["isNew"] ? "しました" : "しました(上書き)")
        };
    }
    else
    {
        return {
            "isSuccess": false,
            "className": "failed",
            "boldText": "失敗",
            "afterText": "しました"
        };
    }
}

/**
 * ファイル総数の行の要素を生成する
 * @param {number} totalCount
 * @returns ファイル総数の行の要素
 */
function CreateFooterTotalRow(totalCount)
{
    const row = document.createElement("tr");

    const header = document.createElement("td");
    header.innerText = "ファイル総数";
    header.className = "bold";
    header.setAttribute("colspan", 2);
    row.appendChild(header);

    const count = document.createElement("td");
    count.innerText = totalCount;
    row.appendChild(count);

    return row;
}

/**
 * アップロード成功/失敗の行の要素を生成する
 * @param {string} headerResultText アップロード結果の文字列
 * @param {string} headerResultTextClass アップロード結果のクラス名
 * @param {number} countValue 個数
 * @returns アップロード成功/失敗の行の要素
 */
function CreateFooterSuccessRow(headerResultText,
    headerResultTextClass, countValue)
{
    const row = document.createElement("tr");

    const header = document.createElement("td");
    header.innerText = "アップロード";
    header.className = headerResultTextClass;
    header.setAttribute("colspan", 2);

    const boldSpan = document.createElement("span");
    boldSpan.innerText = headerResultText;
    boldSpan.className = "bold";
    header.appendChild(boldSpan);
    row.appendChild(header);

    const count = document.createElement("td");
    count.innerText = countValue;
    row.appendChild(count);

    return row;
}

/**
 * 失敗表示の要素を生成する
 * @param {string} detailText 失敗の詳細文字列
 * @returns 失敗表示の要素
 */
function CreateFailedParagraph(detailText)
{
    const outerParagraph = document.createElement("p");
    const innerSpan = document.createElement("span");
    innerSpan.innerText = "【失敗】" + detailText;
    innerSpan.className = "bold failed";
    outerParagraph.appendChild(innerSpan);

    return outerParagraph;
}

/**
 * 「転送する」ボタンが押された時の処理
 * @param {string} formId フォームのID
 * @param {string} fileId ファイル選択フィールドのID
 * @param {string} buttonId 転送するボタンのID
 * @param {string} resultId 結果エリアのID
 */
function OnTransferButtonClick(formId, fileId, buttonId, resultId)
{
    // 結果表示をクリアする
    const resultArea = document.getElementById(resultId);
    resultArea.innerHTML = "";

    // 転送処理中にUIに触れられないようにする
    document.getElementById(fileId).disabled = true;
    document.getElementById(buttonId).disabled = true;

    // フォームからフォームデータを生成する
    const transferPanel = document.getElementById(formId);
    const formData = new FormData(transferPanel);

    // フォームデータに選択されたファイルを反映する
    const files = document.getElementById(fileId).files;
    for (var i = 0; i < files.length; ++i)
    {
        formData.append("files[" + i + "]", files[i]);
    }

    // フォームデータをファイル受け取り用のphpに送る
    const action = transferPanel.getAttribute("action");
    const method = transferPanel.getAttribute("method");
    const options = {
        method: method,
        body: formData
    }
    fetch(action, options).then((response) =>
    {
        return response.json();
    })
    .then((resultData) =>
    {
        if (resultData["isSuccess"])
        {
            const table = document.createElement("table");

            // ヘッダーの行を生成する
            const tableHeaderPart = document.createElement("thead");
            const tableHeaderRow = document.createElement("tr");
            for (var i = 0; i < TableHeaderContents.length; ++i)
            {
                const contentElement = document.createElement("th");
                contentElement.innerText = TableHeaderContents[i];

                tableHeaderRow.appendChild(contentElement);
            }
            tableHeaderPart.appendChild(tableHeaderRow);
            table.appendChild(tableHeaderPart);

            // ファイルのアップロード成否の行を生成する
            var successCount = 0;
            var failedCount = 0;
            const tableBodyPart = document.createElement("tbody");
            const results = resultData["fileResults"];
            const totalCount = resultData["totalCount"];
            for (var i = 0; i < totalCount; ++i)
            {
                const currentRow = document.createElement("tr");

                // 番号
                const currentIndex = document.createElement("td");
                currentIndex.innerText = i + 1;
                currentRow.appendChild(currentIndex);

                // ファイル名
                const result = results[i];
                const currentFileName = document.createElement("td");
                currentFileName.innerText = result["fileName"];
                currentRow.appendChild(currentFileName);

                // アップロード成否
                const currentResult = document.createElement("td");
                currentResult.innerText = "アップロードに";

                const currentResultBoldSpan = document.createElement("span");
                currentResultBoldSpan.className = "bold";

                const resultTextData = GetResultText(result);
                if (resultTextData["isSuccess"])
                {
                    ++successCount;
                }
                else
                {
                    ++failedCount;
                }
                currentResultBoldSpan.innerText = resultTextData["boldText"];
                currentResult.className = resultTextData["className"];
                currentResult.appendChild(currentResultBoldSpan);
                currentResult.append(resultTextData["afterText"]);

                currentRow.appendChild(currentResult);
                tableBodyPart.appendChild(currentRow);
            }
            table.appendChild(tableBodyPart);

            // ファイル総数、アップロード成功数、アップロード失敗数の行を生成する
            const tableFooterPart = document.createElement("tfoot");
            tableFooterPart.appendChild(CreateFooterTotalRow(totalCount));
            tableFooterPart.appendChild(
                CreateFooterSuccessRow("成功", "success", successCount));
            tableFooterPart.appendChild(
                CreateFooterSuccessRow("失敗", "failed", failedCount));
            table.appendChild(tableFooterPart);

            resultArea.appendChild(table);
        }
        else
        {
            resultArea.appendChild(
                CreateFailedParagraph(resultData["notSuccessReason"]));
        }
    })
    .catch((e) =>
    {
        resultArea.appendChild(
            CreateFailedParagraph("エラーが発生しました"));
    })
    .finally(() =>
    {
        const files = document.getElementById(fileId);
        files.value = "";
        files.disabled = false;
    });
}

/**
 * ファイル選択フィールドの準備を行う
 * @param {string} fileId ファイル選択フィールドのID
 * @param {string} buttonId 転送するボタンのID
 */
function PrepareFileField(fileId, buttonId)
{
    // ファイルが選択されている場合にのみ転送するボタンを押せるようにする
    document.getElementById(fileId).addEventListener("change", (e) =>
    {
        document.getElementById(buttonId).disabled = e.target.files.length == 0;
    })
}
ページが読み込まれた時に実行する、ファイルの選択状態が変更された時に状況に応じて転送するボタンの有効状態を変更する処理(PrepareFileField)や、転送ボタンが押された時の処理(OnTransferButtonClick)などが記述されています。
転送ボタンが押されたら、まずは一応ファイル選択フィールドと転送するボタンを弄れないように無効化します。
次に、フォームのデータからFormDataを生成します。このとき、ファイルはFormDataに含まれないらしいため、自前でFormDataのインスタンスに追加します。
さらに、そのFormDataを使用してtransfer.phpに対してfetch(Fetch API)でPOST送信します。
続いて、transfer.phpからのレスポンス(JSON形式)をもとに結果画面を構築します。
最後に、弄れなくしたファイル選択フィールドをリセット、有効化しています。
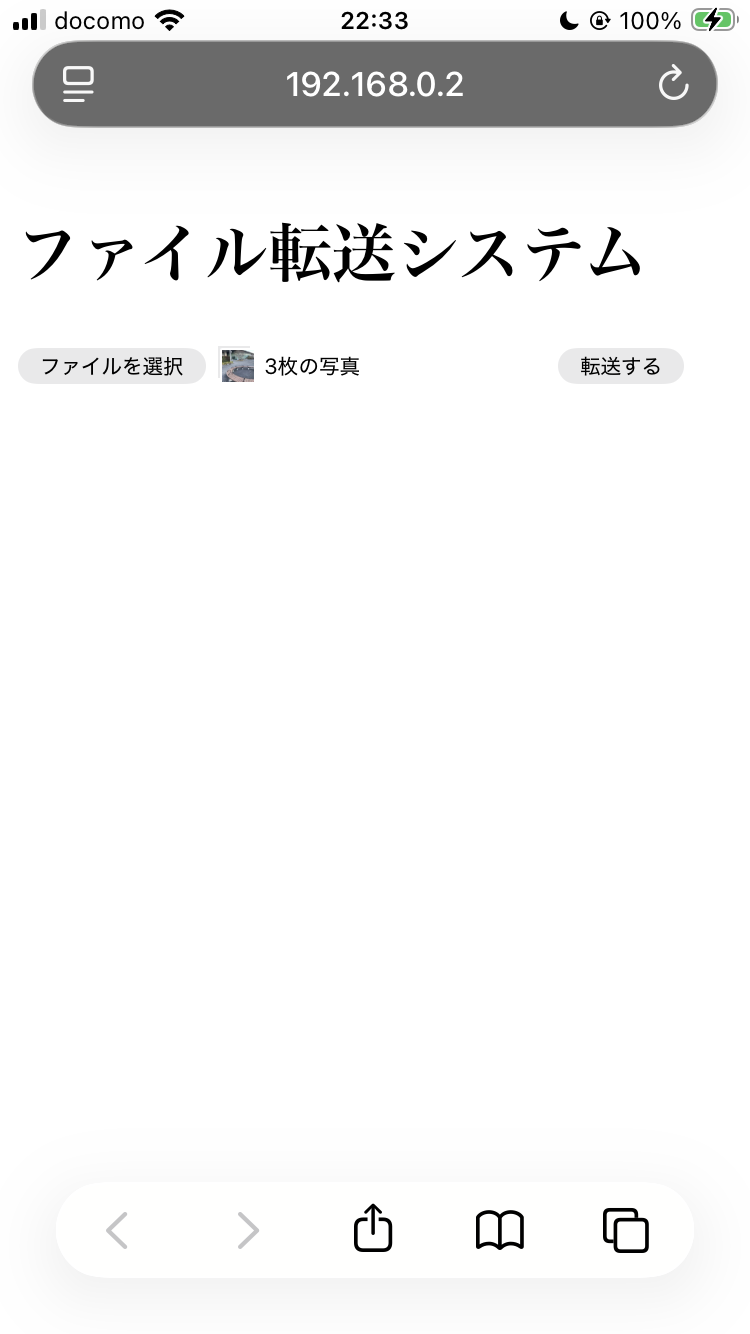
動作結果
写真選択後
写真転送後

転送された写真
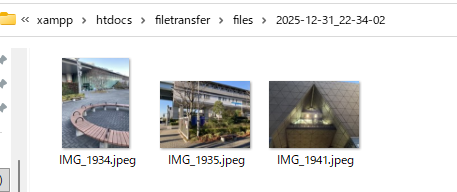
(ちなみに、写真は2025年冬コミ1日目の時の入場前と退場後に付近で撮影したものです)