概要
本記事は、Unityでオブジェクトを放物線を描くように射出するスクリプトについて記載します。
このスクリプトは標的に当たるように計算して射出します。
記載しているスクリプトは、Rigidbody.AddForce関数を使用してオブジェクトを射出します。
実装
-
下記スクリプトを作成し、射出地点のGameObjectにアタッチします。
ThrowingScript.csusing System.Collections; using System.Collections.Generic; using UnityEngine; public class ThrowingScript : MonoBehaviour { /// <summary> /// 射出するオブジェクト /// </summary> [SerializeField, Tooltip("射出するオブジェクトをここに割り当てる")] private GameObject ThrowingObject; /// <summary> /// 標的のオブジェクト /// </summary> [SerializeField, Tooltip("標的のオブジェクトをここに割り当てる")] private GameObject TargetObject; /// <summary> /// 射出角度 /// </summary> [SerializeField, Range(0F, 90F), Tooltip("射出する角度")] private float ThrowingAngle; private void Start() { Collider collider = GetComponent<Collider>(); if (collider != null) { // 干渉しないようにisTriggerをつける collider.isTrigger = true; } } private void Update() { if (Input.GetMouseButtonDown(0)) { // マウス左クリックでボールを射出する ThrowingBall(); } } /// <summary> /// ボールを射出する /// </summary> private void ThrowingBall() { if (ThrowingObject != null && TargetObject != null) { // Ballオブジェクトの生成 GameObject ball = Instantiate(ThrowingObject, this.transform.position, Quaternion.identity); // 標的の座標 Vector3 targetPosition = TargetObject.transform.position; // 射出角度 float angle = ThrowingAngle; // 射出速度を算出 Vector3 velocity = CalculateVelocity(this.transform.position, targetPosition, angle); // 射出 Rigidbody rid = ball.GetComponent<Rigidbody>(); rid.AddForce(velocity * rid.mass, ForceMode.Impulse); } else { throw new System.Exception("射出するオブジェクトまたは標的のオブジェクトが未設定です。"); } } /// <summary> /// 標的に命中する射出速度の計算 /// </summary> /// <param name="pointA">射出開始座標</param> /// <param name="pointB">標的の座標</param> /// <returns>射出速度</returns> private Vector3 CalculateVelocity(Vector3 pointA, Vector3 pointB, float angle) { // 射出角をラジアンに変換 float rad = angle * Mathf.PI / 180; // 水平方向の距離x float x = Vector2.Distance(new Vector2(pointA.x, pointA.z), new Vector2(pointB.x, pointB.z)); // 垂直方向の距離y float y = pointA.y - pointB.y; // 斜方投射の公式を初速度について解く float speed = Mathf.Sqrt(-Physics.gravity.y * Mathf.Pow(x, 2) / (2 * Mathf.Pow(Mathf.Cos(rad), 2) * (x * Mathf.Tan(rad) + y))); if (float.IsNaN(speed)) { // 条件を満たす初速を算出できなければVector3.zeroを返す return Vector3.zero; } else { return (new Vector3(pointB.x - pointA.x, x * Mathf.Tan(rad), pointB.z - pointA.z).normalized * speed); } } } -
Inspectorビューで初期設定をします。
射出するオブジェクト、標的のオブジェクト、射出角度を指定してください。
下図では射出するオブジェクトにあらかじめPrefab化したBall(Sphere)を指定しています。
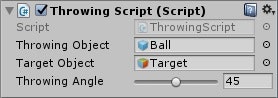
※ 射出するオブジェクトにはRigidBodyコンポーネントが必要です。
その他
-
使用する主な関数
-
スクリプトの動作確認環境
- Unity2017.2
- Visual Studio 2017