概要
今回は1つの隠れ層を入れてネットワークを構築します。前回のベースにプログラムを書いているので、もし読んでいない場合は、まずニューラルネットワークの基礎知識 - 1を読むことをお勧めします。
ネットワークを構成
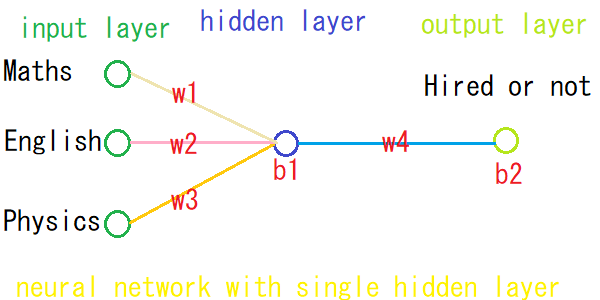
今回作成するネットワークは、入力層で3つのニューロン(ノード)を持ち、隠れ層で1つのニューロン、そして出力層でも1つのニューロンを持ちます。
Let's Code
# numpyのインポート
import numpy as np
学習データの用意
# 0:不合格、1:合格
# 合格状態のデータ
inputs = np.array([
    [0,1,1],
    [1,0,0],
    [0,1,0],
    [1,0,1]])

# 0:仕事見つからなかった、1:見つかった
# 仕事見つかった実績
outputs = np.array([
    [1],
    [1],
    [0],
    [1]])
各パラメータの初期化
weightとbias共に2セットが必要です。一つは入力層と隠れ層をつなぐため、もう一つは隠れ層と出力層をつなぐため。エポック数とlearning rateは前回と同じです。
# 入力層と隠れ層をつなぐ weightの初期化
weights_ih = np.array([
    [0.5],
    [0.5],
    [0.5]])

# 入力層と隠れ層をつなぐbiasの初期化
bias_h = np.array([[0.2]])

# 隠れ層と出力層をつなぐweightの初期化
weights_ho = np.array([[0.5]])

# 隠れ層と出力層をつなぐbiasの初期化
bias_o = np.array([[0.2]])

# learning rateの初期化
lr = 0.1

# epochの初期化
epoch = 5000
活性化関数の定義
def activate(x):
    return 1/(1+np.exp(-x))
学習実行
# start training
for _ in range(epochs):
    # feed forward
    # 隠れ層での予測
    prediction_h = activate(np.dot(inputs, weights_ih) + bias_h)

    # 出力層での予測
    prediction_o = activate(np.dot(prediction_h, weights_ho) + bias_o)

    # backpropagation
    # phase 1:出力層と隠れ層をつなぐweightとbiasの値の調整

    # △wの計算
    error = prediction_o - outputs
    sigmoid_der_prediction_o = prediction_o * (1 - prediction_o)
    der_cost_w_o = np.dot(prediction_h.T,  sigmoid_der_prediction_o * error)

    # △bの計算
    der_cost_b_o = sigmoid_der_prediction_o * error

    # Gradient Descentを使ってweightの調整
    weights_ho -= learning_rate * der_cost_w_o

    # Gradient Descentを使ってbiasの調整
    bias_o -=  learning_rate * np.sum(der_cost_b_o,axis=0,keepdims=True)

    # phase 2
    # 隠れ層と入力層をつなぐweightとbiasの値の調整

    # △wの計算
    sigmoid_der_prediction_h = prediction_h * (1 - prediction_h)
    tmp = sigmoid_der_prediction_h * sigmoid_der_prediction_o * weights_ho * error
    der_cost_w_h = np.dot(inputs.T, tmp)

    # △bの計算
    der_cost_b_h = np.sum(tmp,axis=0,keepdims=True)

    # Gradient Descentを使ってweightの調整
    weights_ih -= learning_rate * der_cost_w_h

    # Gradient Descentを使ってbiasの調整
    bias_h -=  learning_rate * der_cost_b_h

# 学習終了
print("Loss  : {:.8f}".format(error))
print("weight: ", weights_ih.T[0])
print("bias  : ", np.asscalar(bias_h))
評価
どのように学習したか評価します。
# 結果を表示するための関数
def get_prediction(data):
    pred_h = activate(np.dot(data, weights_ih) + bias_h)
    pred_o = activate(np.dot(pred_h , weights_ho) + bias_o)
    msg = "Hired" if round(np.asscalar(pred_o)) else "Not Hired"
    print(data, msg, np.asscalar(pred_o))

# 全科目合格の場合は、仕事見つかるか
get_prediction([1,1,1])

# 物理のみ不合格の場合は、仕事見つかるか
get_prediction([1,1,0])

# 全科目不合格の場合は、仕事見つかるか
get_prediction([0,0,0])
今回も、サンプルデータが少ない事とネットワークが単純すぎるから間違った答えがおおいかもしれませんが、基礎の理解という事でご許しください。
また、前回の隠れ層なしの結果と比べて、ネットワークが複雑になっていますが、その反面若干エラー(ロス)の値が少なくなっています。
Google Colab
直接Colabから実行することもできますので一度試してみてください。ちなみに、Colabのコメントはすべて英語です。
with_single_hidden_layer.ipynb
最後に
今回はニューラルネットワークの基礎を理解する目的で隠れ層を1つのみ実装しました。次回はこれらの知識を応用してかつほかのフレームワークを使ってより複雑なネットワークを作りましょう。
