はじめに
M5Goを使った小型の倒立振子を試作しました。単3✕4本の電池ケースを本体として、タイヤを取り付けたモータ、モータドライバ、M5Goを本体に貼り付けて車体としました。
使用したもの
単3電池4本
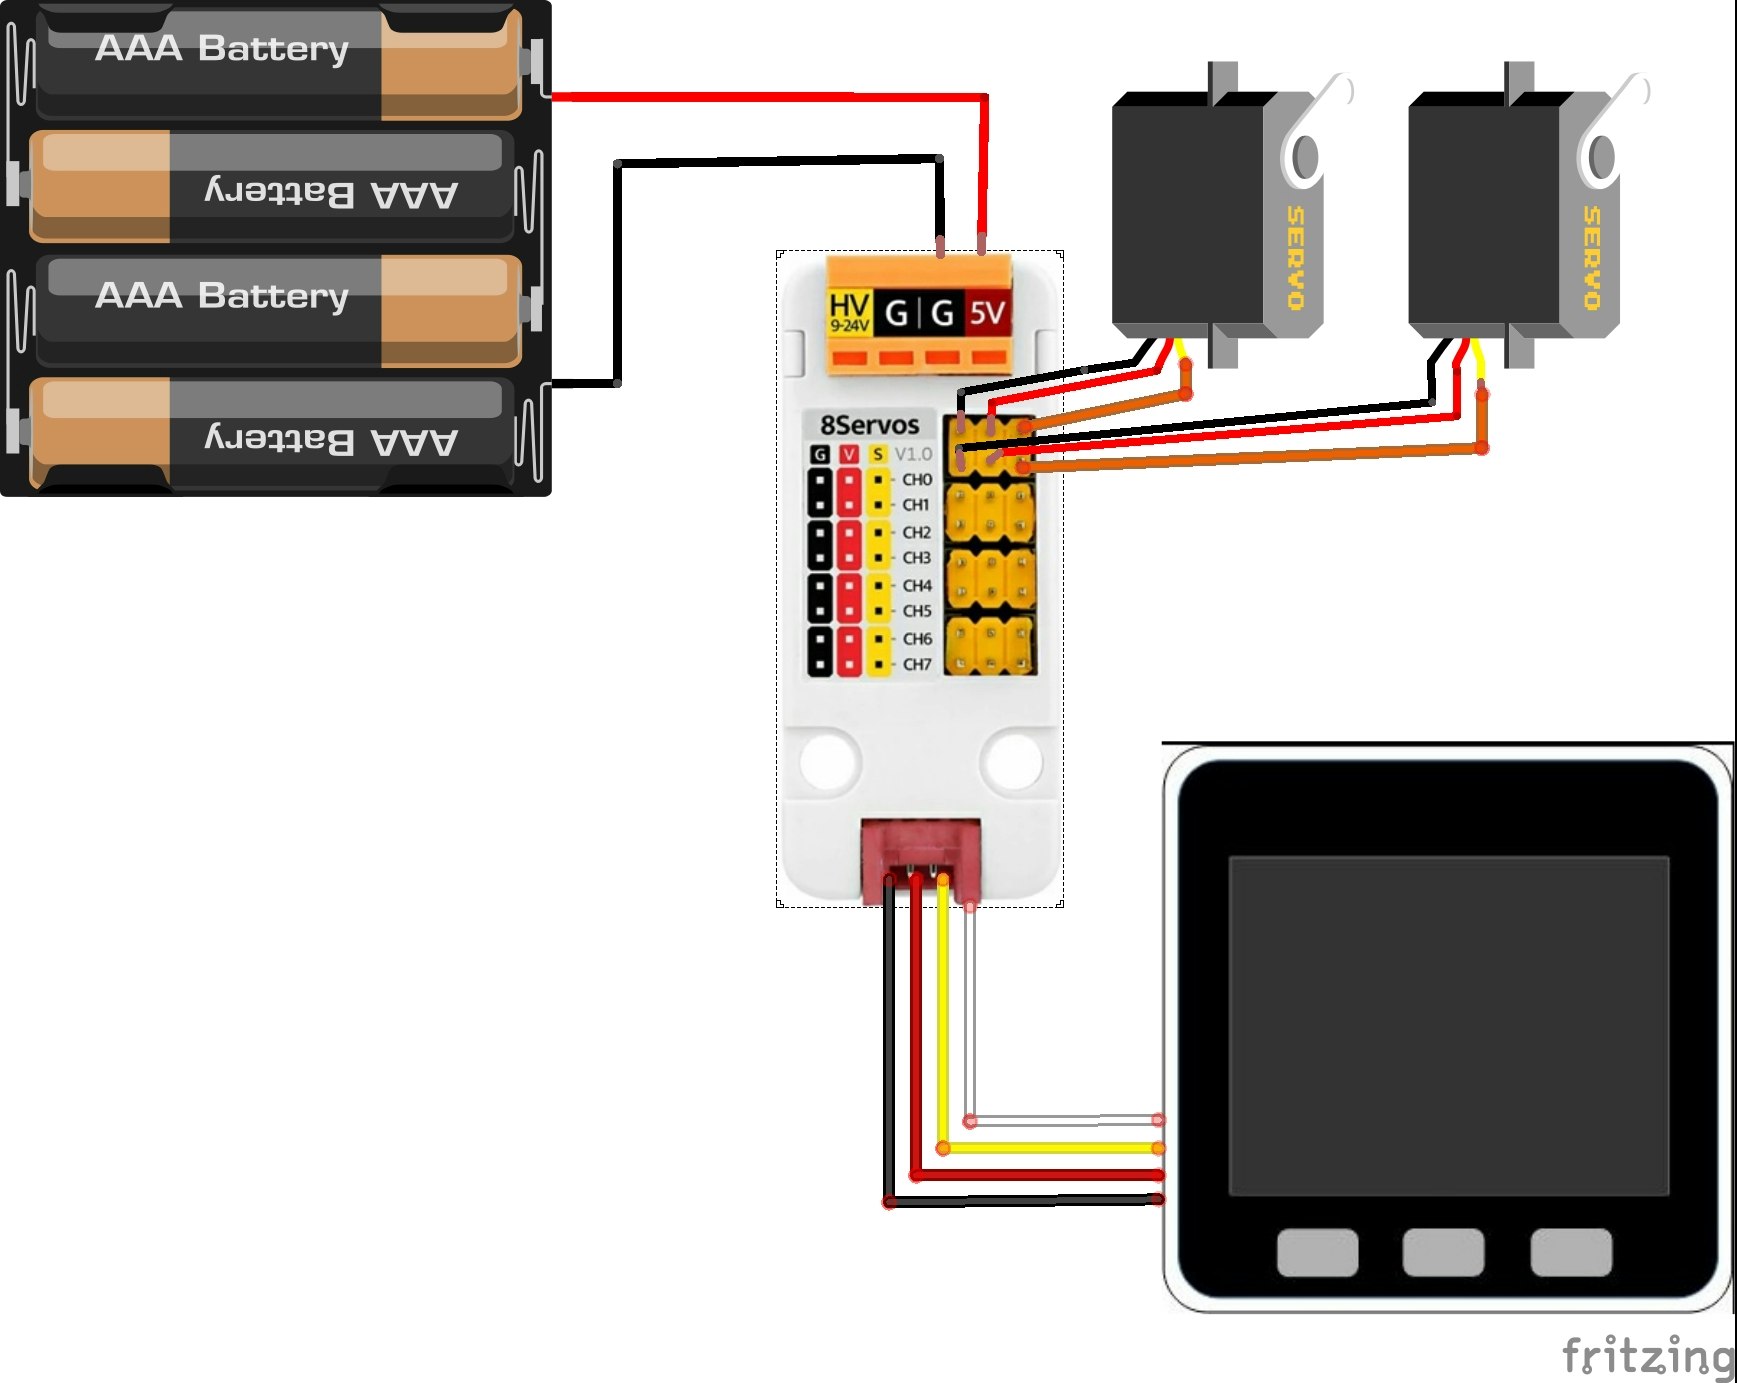
配線方法
- M5GoのPort Aと8chサーボドライバユニットをGroveケーブルで接続
- 8chサーボドライバユニットの0chと1chに、左右のタイヤを回転させる360°連続回転サーボをそれぞれ接続(360°連続回転サーボの茶色線はドライバユニットのG、赤色線はV、橙色線はSにそれぞれ接続)
- 8chサーボドライバユニットの5VとGNDに電池ボックスの+端子と-端子をそれぞれ接続
配線図は次のとおりです。モータドライバの5V端子に1.5V×4を印加していますが、モータは6Vまで印加できる仕様のため、このように配線しました。
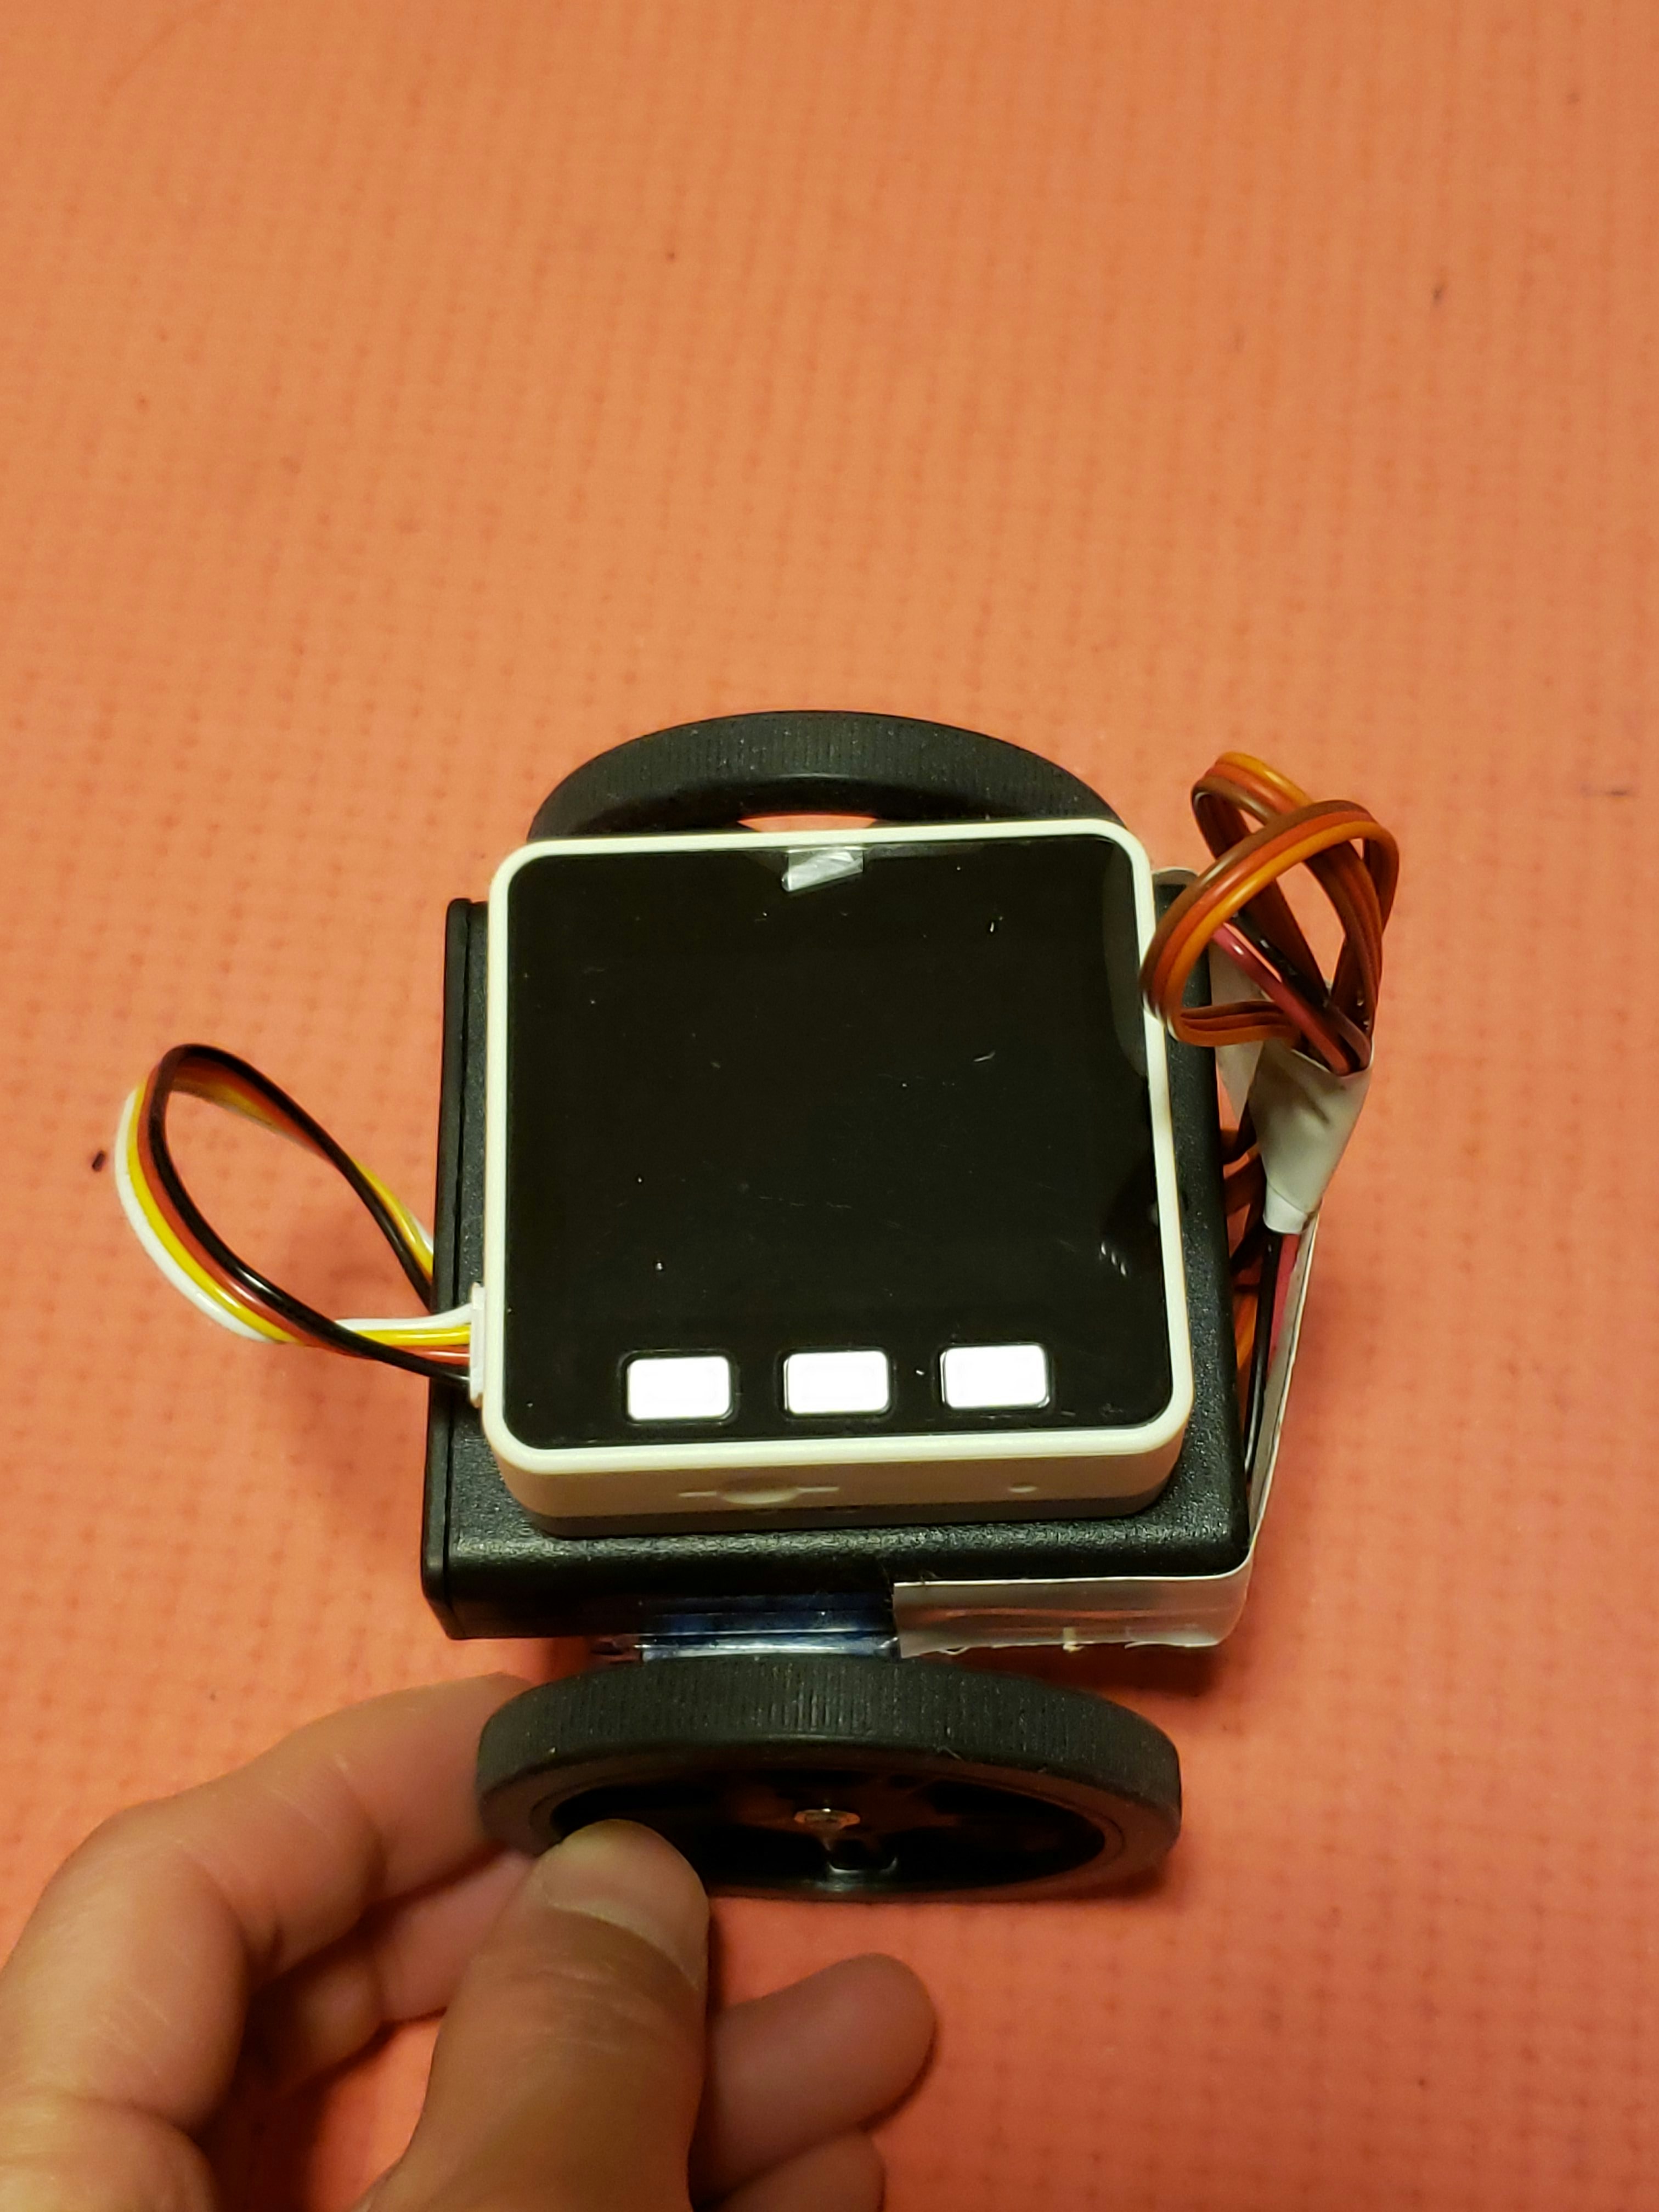
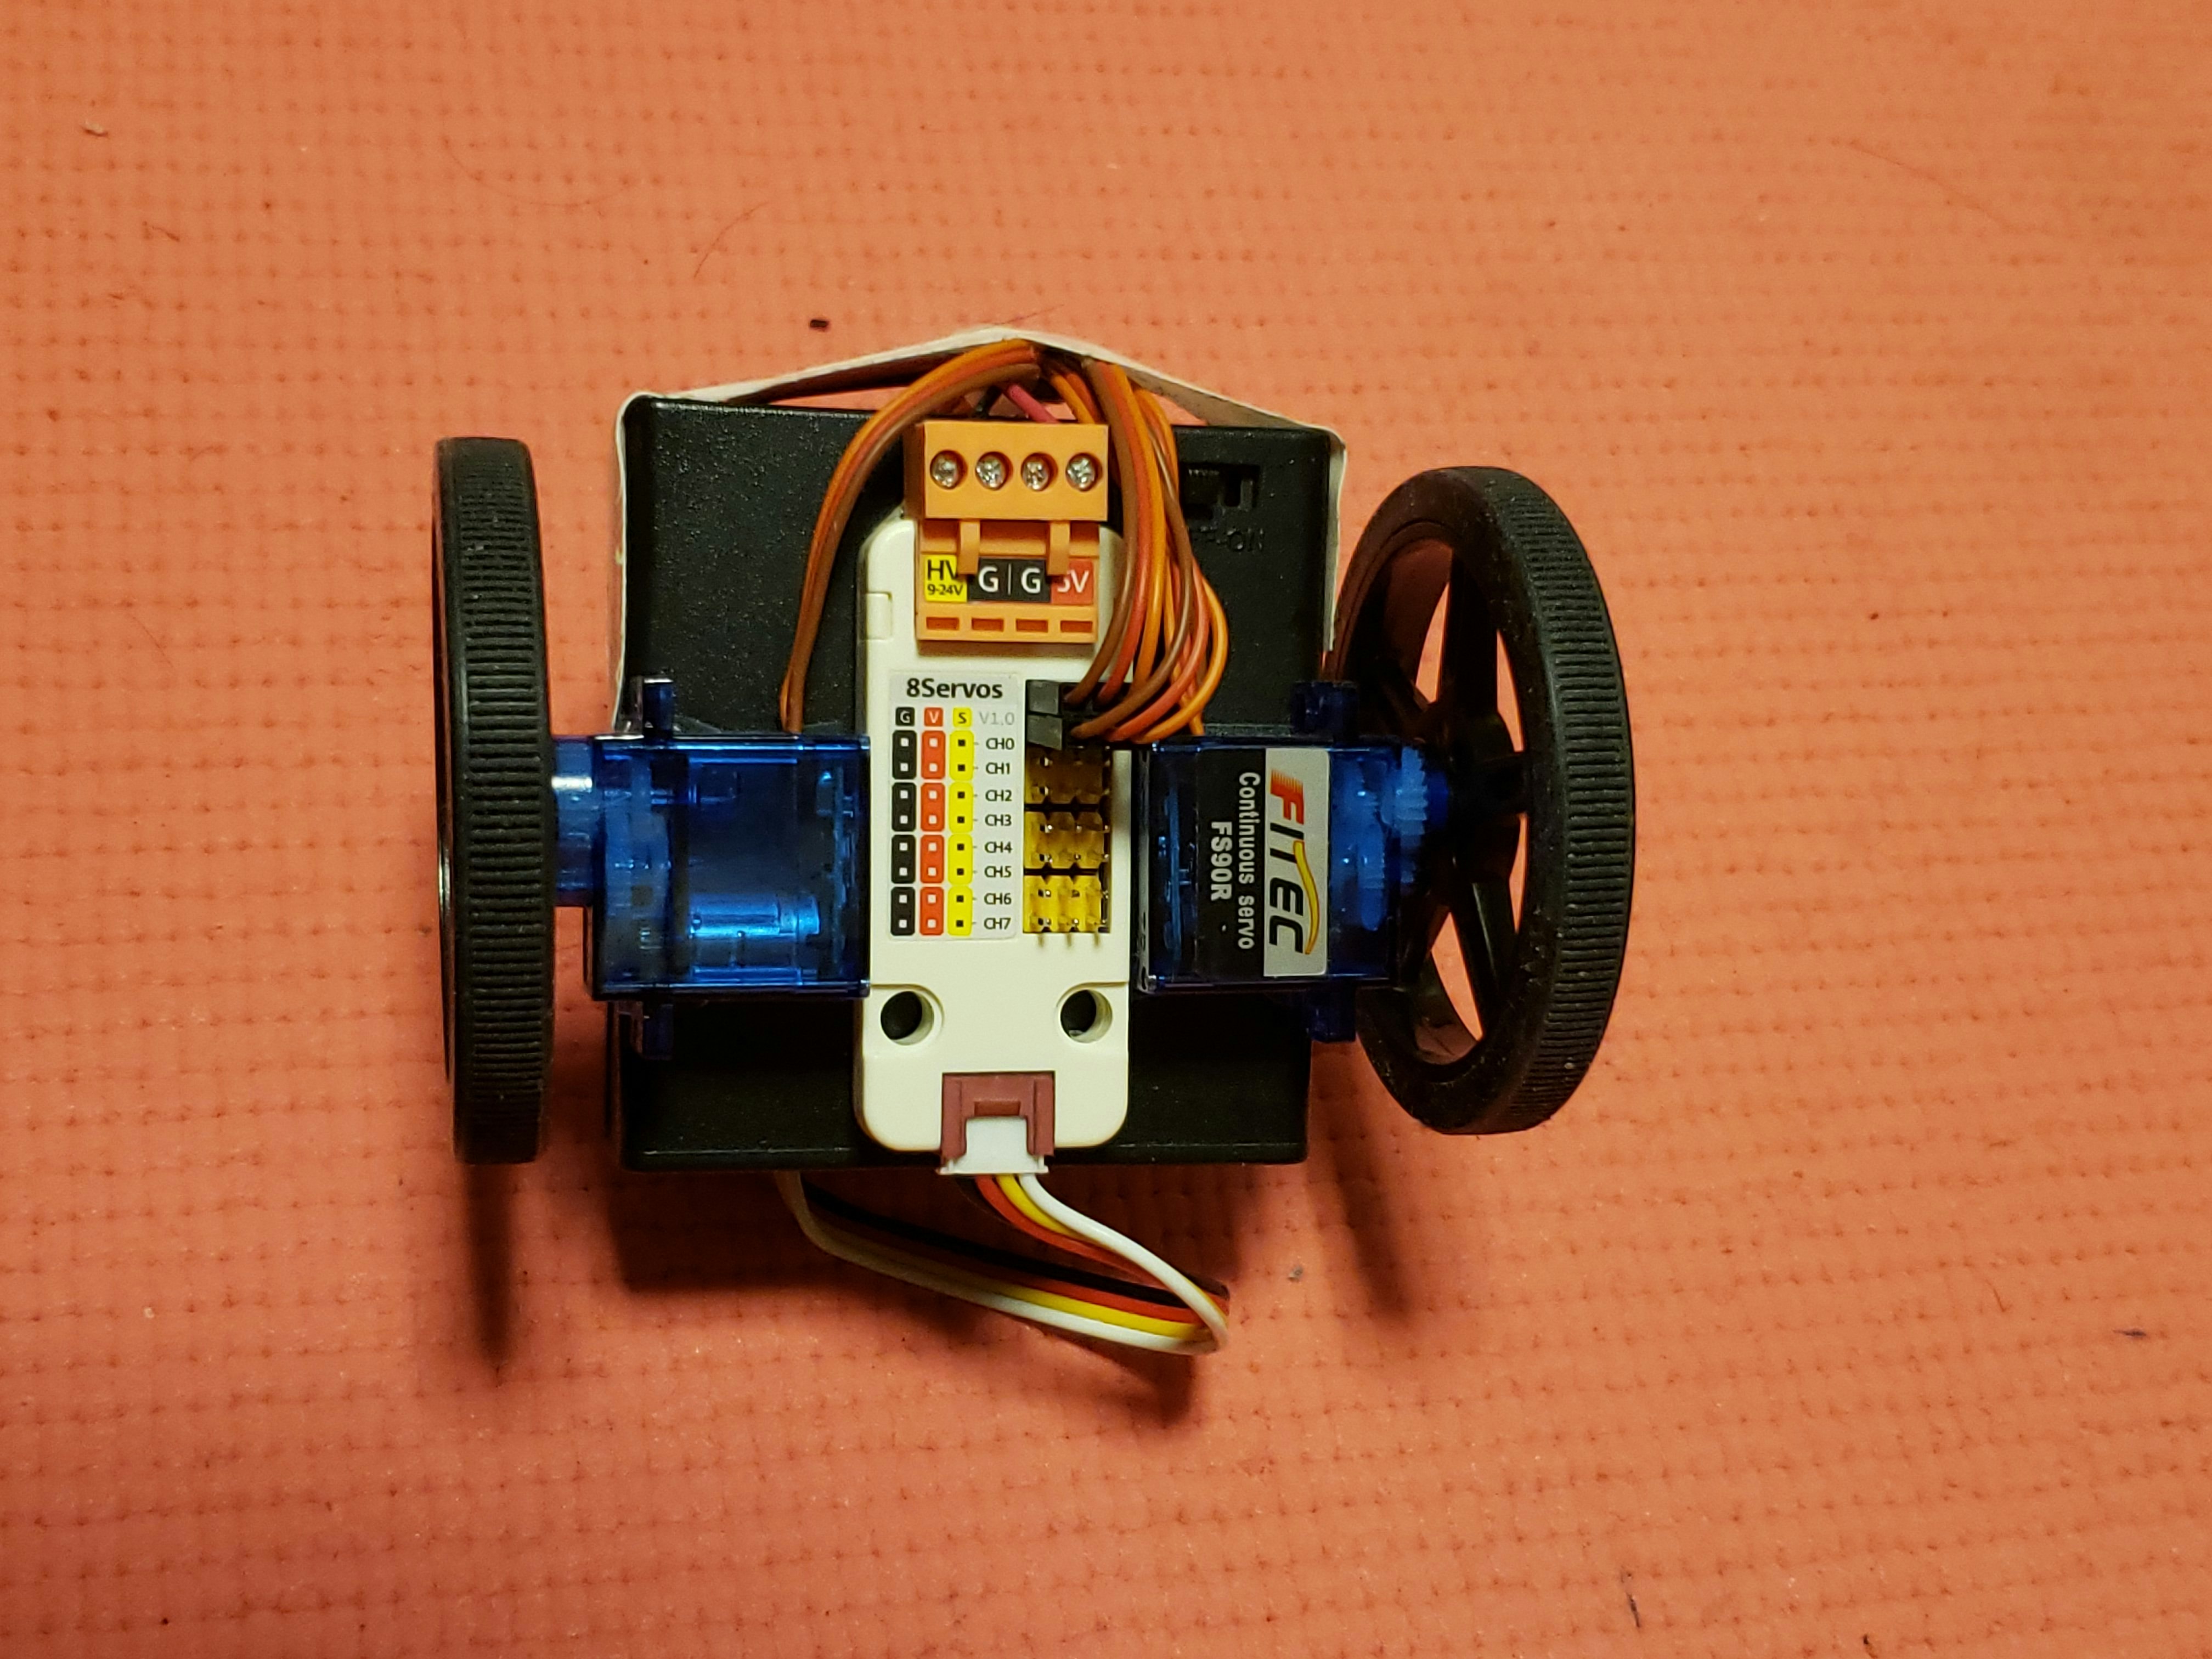
下図に配線後の状態を示します。
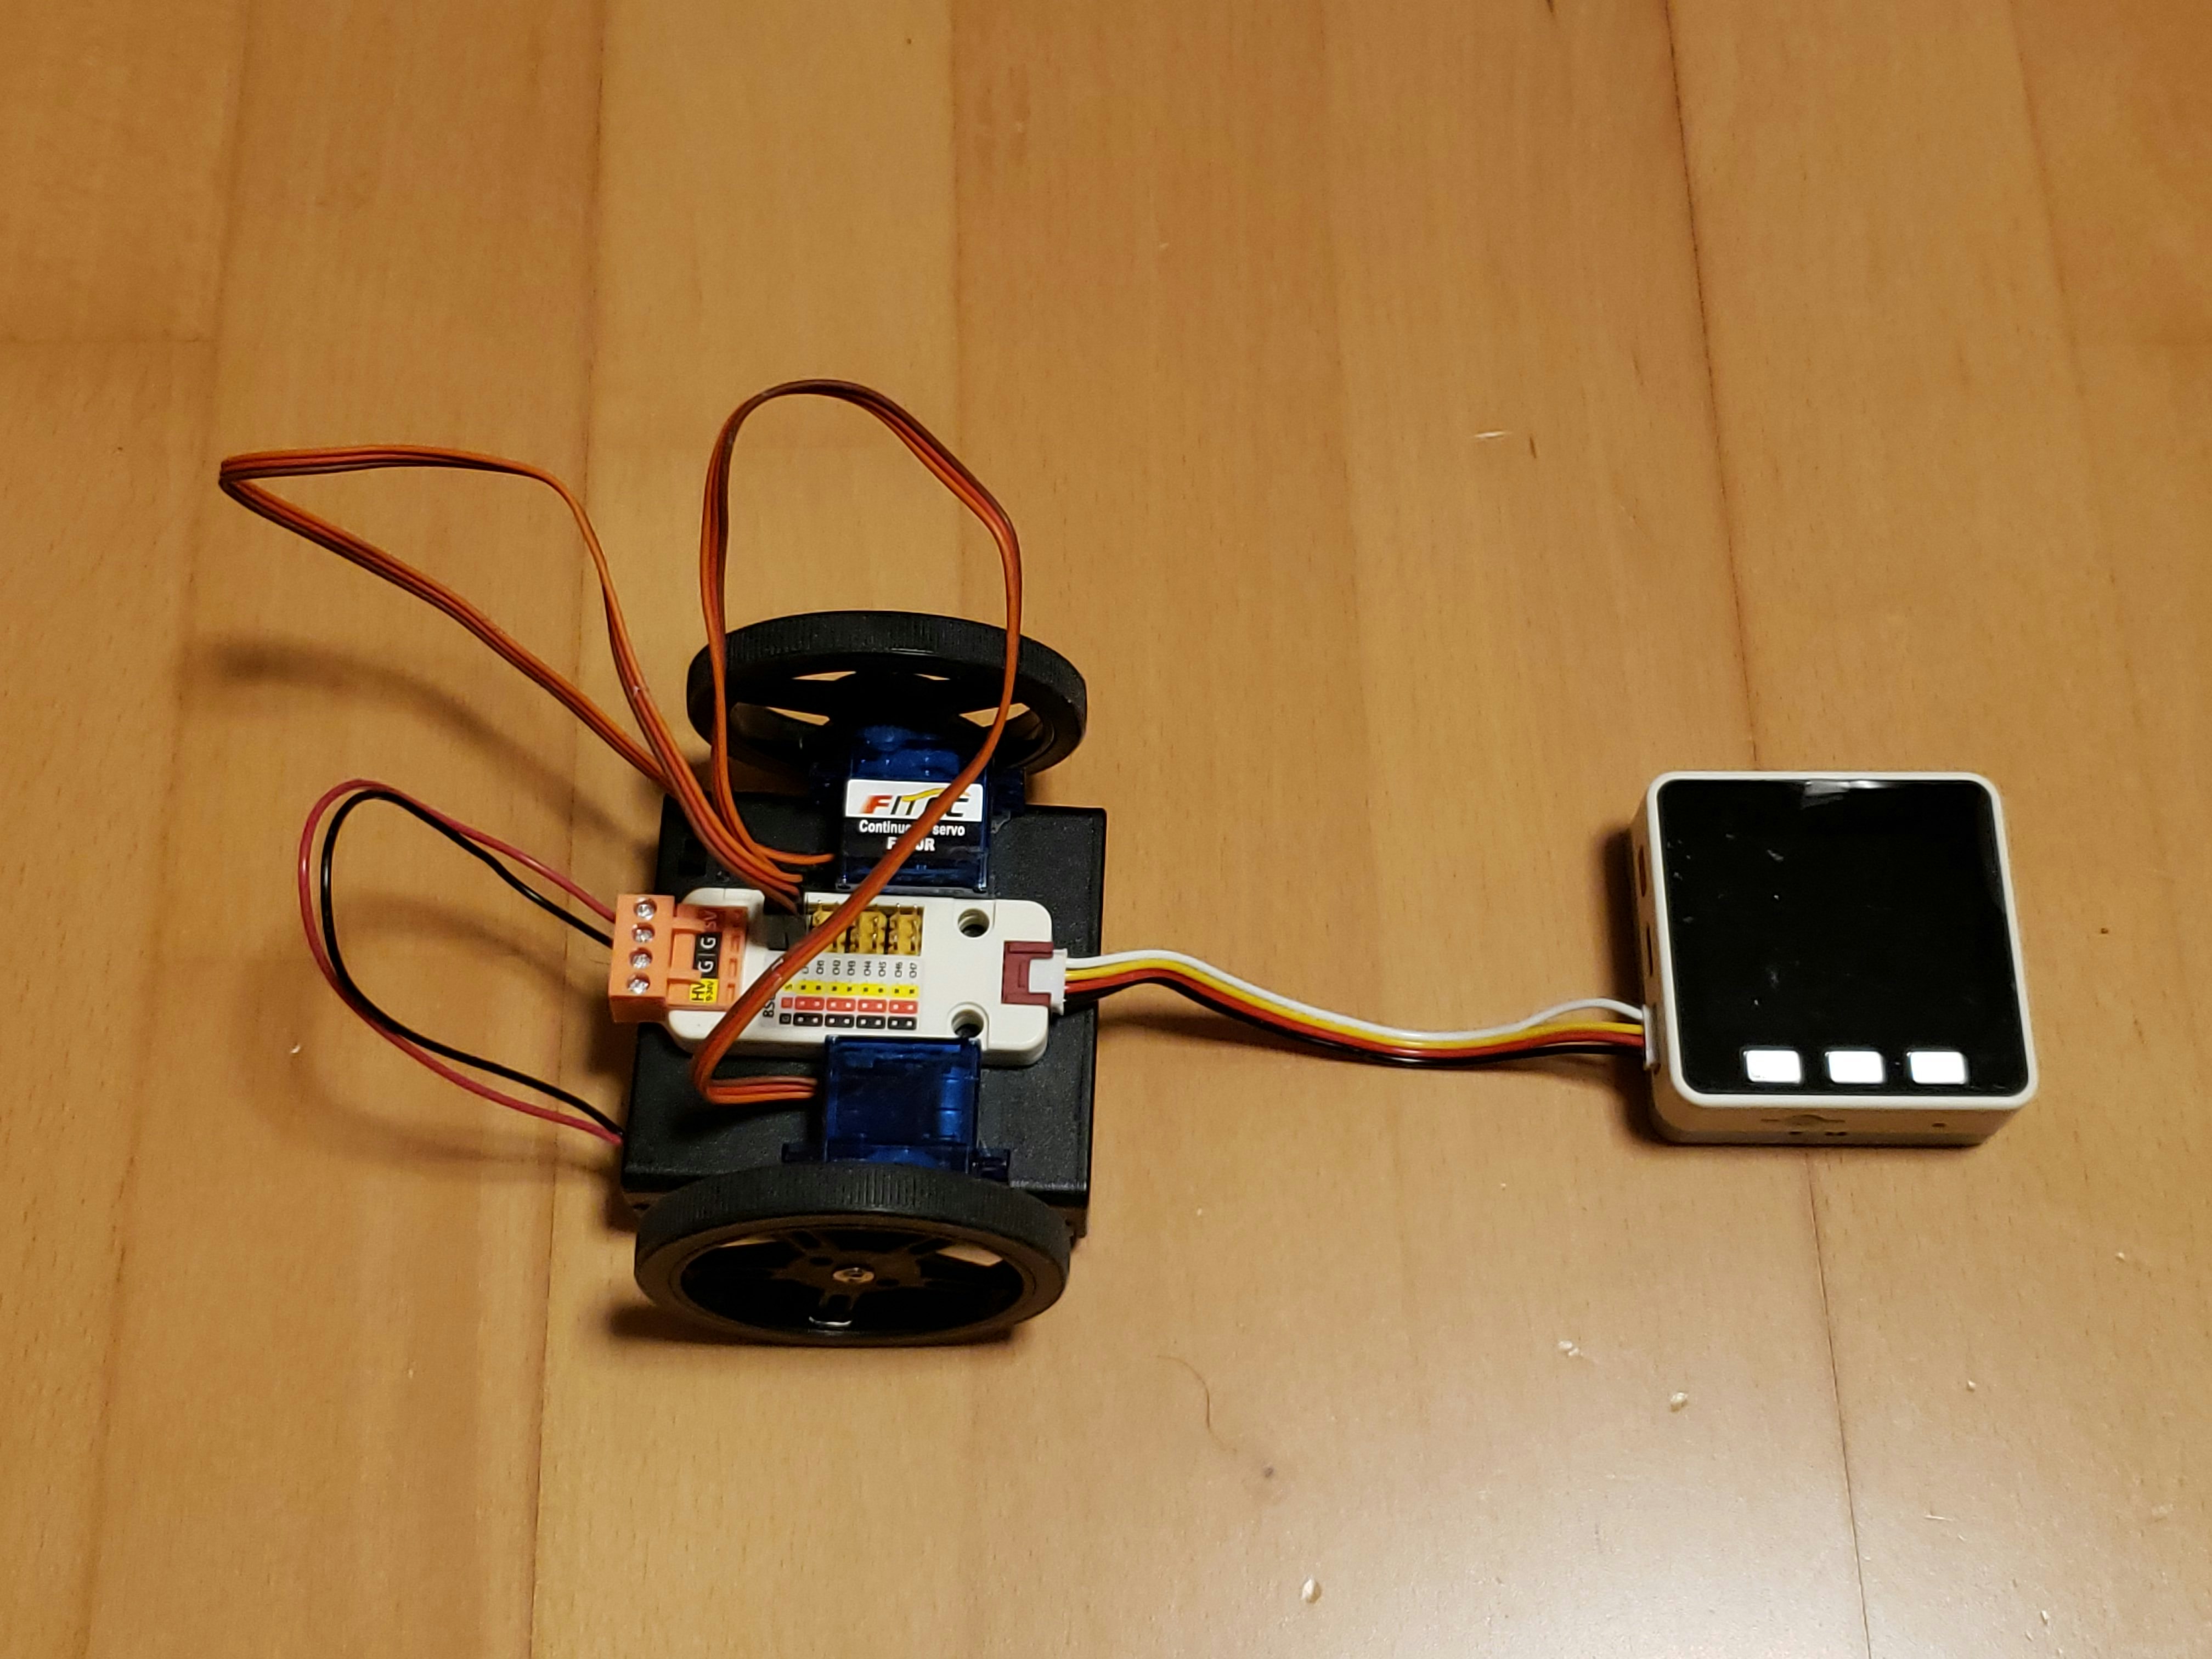
作成した倒立振子
配線をビニールテープでまとめました。
プログラム(ChatGptで作成)
Aボタンでサーボのオンオフ、Bボタンでキャリブレーションを行います。
はじめに、車体を立てた状態(バランスが取れた位置)でBボタンを押してキャリブレーションを行い、次いでAボタンを押してサーボモータを駆動させます。
なお、パソコンとM5GoをUSBケーブルで接続しているときは電池ケースのスイッチをオフにし、スケッチの書き込み中はGroveケーブルを抜いておきます。
#include <M5Unified.h>
#include <math.h>
#include "M5_UNIT_8SERVO.h"

// ===================== 8SERVOS =====================
M5_UNIT_8SERVO unit_8servo;

static const int I2C_SDA = 21;
static const int I2C_SCL = 22;

static const uint8_t CH_LEFT  = 0;
static const uint8_t CH_RIGHT = 1;

// ===================== 目標・制御 =====================
// ★変更:水平(0deg)を目標
static const float SETPOINT_DEG = 0.0f;

// ===== PIDゲイン =====
static const float KP = 4.5f;
static const float KI = 0.0f;
static const float KD = 0.03f;

static const float DEADBAND_DEG = 0.7f;

// ===== FS90R =====
static const int NEUTRAL_US_L = 1490;
static const int NEUTRAL_US_R = 1500;

static const int MIN_US = 1000;
static const int MAX_US = 2000;

static const float OUT_US_PER_DEG = 8.0f;
static const float OUT_US_PER_DPS = 8.0f;

// I項(積分)制限(アンチワインドアップ)
static const float I_TERM_LIMIT = 80.0f;

static const bool INVERT_LEFT  = false;
static const bool INVERT_RIGHT = true;

// ===================== 姿勢推定(Pitch:Y軸回り) =====================
static float pitch_deg = 0.0f;
static float pitch_offset_deg = 0.0f;
static float gy_dps = 0.0f;

static uint32_t last_ms = 0;
static bool armed = false;

// ===== I制御用 =====
static float error_i = 0.0f;

// ===================== Utility =====================
static float clampf(float v, float lo, float hi) {
  if (v < lo) return lo;
  if (v > hi) return hi;
  return v;
}

void setStop() {
  unit_8servo.setServoPulse(CH_LEFT,  NEUTRAL_US_L);
  unit_8servo.setServoPulse(CH_RIGHT, NEUTRAL_US_R);
}

// ===================== Pitch推定(Y軸回り) =====================
// Pitch(加速度由来):atan2(-ax, sqrt(ay^2+az^2))
// 水平(0deg)付近で扱いやすい定義です
void updatePitchEstimate(float dt) {
  float ax, ay, az;
  float gx, gy, gz;
  M5.Imu.getAccel(&ax, &ay, &az);
  M5.Imu.getGyro(&gx, &gy, &gz);

  // ★D項に使うのはY軸角速度
  gy_dps = gy;
  // もしDが逆に効くなら:gy_dps = -gy;

  // ★Pitch角(加速度から)
  float pitch_acc = atan2f(-ax, sqrtf(ay * ay + az * az)) * 180.0f / (float)M_PI;
  // もし角度の符号が逆なら:pitch_acc = -pitch_acc;

  // ジャイロ積分(Y軸回り)
  float pitch_gyro = pitch_deg + gy * dt;
  // もし積分方向が逆なら:pitch_gyro = pitch_deg - gy * dt;

  const float alpha = 0.98f;
  pitch_deg = alpha * pitch_gyro + (1.0f - alpha) * pitch_acc;
}

// ===================== Bボタンキャリブレーション =====================
// 「今の姿勢」を水平(0deg)としてオフセット設定
void calibrateByButton() {
  setStop();
  error_i = 0.0f;

  M5.Display.fillRect(0, 60, 320, 120, BLACK);
  M5.Display.setCursor(0, 60);
  M5.Display.println("Calibrating...");
  M5.Display.println("Hold LEVEL(0)");

  const int interval_ms = 10;
  const int warmup = 50;
  const int N = 150;
  float dt = interval_ms / 1000.0f;

  for (int i = 0; i < warmup; i++) {
    updatePitchEstimate(dt);
    delay(interval_ms);
  }

  float sum = 0.0f;
  for (int i = 0; i < N; i++) {
    updatePitchEstimate(dt);
    sum += pitch_deg;
    delay(interval_ms);
  }

  float pitch_avg = sum / N;
  pitch_offset_deg = SETPOINT_DEG - pitch_avg;

  M5.Display.fillRect(0, 60, 320, 120, BLACK);
  M5.Display.setCursor(0, 60);
  M5.Display.println("Cal DONE");
  M5.Display.printf("avg: %.2f\n", pitch_avg);
  M5.Display.printf("off: %.2f\n", pitch_offset_deg);
  delay(800);
}

// ===================== setup =====================
void setup() {
  auto cfg = M5.config();
  M5.begin(cfg);

  Serial.begin(115200);
  delay(200);

  M5.Display.clear();
  M5.Display.setTextSize(2);
  M5.Display.println("M5Core2 Inverted");
  M5.Display.println("Pitch(Y) control");
  M5.Display.println("BtnA: ARM");
  M5.Display.println("BtnB: CAL(0)");

  if (!M5.Imu.begin()) {
    while (1) delay(100);
  }

  while (!unit_8servo.begin(&Wire, I2C_SDA, I2C_SCL,
                            M5_UNIT_8SERVO_DEFAULT_ADDR)) {
    delay(100);
  }
  unit_8servo.setAllPinMode(SERVO_CTL_MODE);

  setStop();
  last_ms = millis();
}

// ===================== loop =====================
void loop() {
  M5.update();

  // ARM切替
  if (M5.BtnA.wasPressed()) {
    armed = !armed;
    error_i = 0.0f;
    if (!armed) setStop();
  }

  // Bボタン:キャリブレーション(水平=0deg)
  if (M5.BtnB.wasPressed()) {
    bool was_armed = armed;
    armed = false;
    calibrateByButton();
    armed = was_armed;
  }

  float dt = (millis() - last_ms) / 1000.0f;
  last_ms = millis();
  if (dt <= 0) dt = 0.001f;

  updatePitchEstimate(dt);

  float pitch_cal = pitch_deg + pitch_offset_deg;
  float error = SETPOINT_DEG - pitch_cal;

  if (fabsf(error) < DEADBAND_DEG) error = 0.0f;

  // ===================== PID =====================
  float up = KP * error * OUT_US_PER_DEG;

  // Iを溜める条件(おすすめ)
  const float I_ERR_LIMIT = 2.0f;   // deg(3〜5)
  const float I_GY_LIMIT  = 4.0f;   // deg/s(5〜12)

  if (armed && fabsf(error) < I_ERR_LIMIT && fabsf(gy_dps) < I_GY_LIMIT) {
    error_i += error * dt;
    error_i = clampf(error_i, -I_TERM_LIMIT, I_TERM_LIMIT);
  }

  //if (armed && fabsf(error) < 10.0f) {
  //  error_i += error * dt;
  //  error_i = clampf(error_i, -I_TERM_LIMIT, I_TERM_LIMIT);
  //}

  float ui = KI * error_i;

  // D項(-Kd*gy)
  float ud = KD * gy_dps * OUT_US_PER_DPS;

  float u_us = up + ui - ud;
  // u_us を作った直後に入れる
  const float U_DEAD_US = 12.0f;   // 8〜20くらいで調整
  if (fabsf(u_us) < U_DEAD_US) u_us = 0.0f;

  int cmdL = NEUTRAL_US_L + (INVERT_LEFT  ? -u_us : u_us);
  int cmdR = NEUTRAL_US_R + (INVERT_RIGHT ? -u_us : u_us);

  cmdL = (int)clampf(cmdL, MIN_US, MAX_US);
  cmdR = (int)clampf(cmdR, MIN_US, MAX_US);

  if (armed) {
    unit_8servo.setServoPulse(CH_LEFT,  cmdL);
    unit_8servo.setServoPulse(CH_RIGHT, cmdR);
  } else {
    setStop();
  }

  delay(10);
}
動作
ストレッチマット上ですが、プログラムのKPとKDを調整して倒立振子を自立させることができました。KPの調整だけで自立したので、調整はKDまでとしました。KIの調整は行っていません。
まとめ
簡単な組み立てられる倒立振子を紹介しました。小型化することにより、自立は容易になりますが、柔らかい床ではないフローリングで自立させるには、低重心化やモータの強力化など、さらなる工夫が必要と感じました。