これは Retty inc. Advent Calendar 2017 5日目の記事です.昨日は @shinichi-nakagawa-r の Webなエンジニアのための「Pythonデータラングリング」入門 でした.
始末
今年のはじめ,2月か3月くらいの頃のことです.Retty の Android 版に ReactNative を導入するかどうかが検討された時期がありました.プロトタイプの作成を経て導入の可否はある二人に委ねられることになりました.絶対に ReactNative 入れたいマンと絶対に ReactNative 入れたくないマンです.議論は当然のように平行線でした.双方の主張はそれぞれありましたが,だいたい View だけでなくロジックが記述できてしまう点と ReactNative で Android App らしい UI を組み立てるのが難しい点から来る,メンテナンスコスト,開発コストの増大と Web 経由で View を更新できることによるメリットの釣り合いに議論は着地していました.しかし,そこから進展することはありませんでした.
そこで私はAndroid アプリの Layout Xml をそのまま Web 経由で差し込めるようなものを制作することにしました.これであれば,両方の主張を満たし,何か素晴らしいものが出来上がると考えたのです.
イキりコードの書き過ぎで製品には採用されなかったので実験の記録として供養することにします.
View のレシピ
Layout Xml をランタイムで差し込むには,Xml を解釈するための Parser とそれをもとに View を組み立てるものが必要そうです.Xml Parser であればそのへんに転がっていそうなので View を組み立てるやつを作っても良かったのですが,今回は Android にもともと備わっている同様の機能を使いまわせそうだと考えました.Activity や Fragment に View を突っ込むときによく使うあいつのことです.LayoutInflater です.ということで LayoutInflater のソースコードを見て処理を追ってみましょう.
public View inflate(@LayoutRes int resource, @Nullable ViewGroup root, boolean attachToRoot) {
    final Resources res = getContext().getResources();
    if (DEBUG) {
        Log.d(TAG, "INFLATING from resource: \"" + res.getResourceName(resource) + "\" ("
                + Integer.toHexString(resource) + ")");
    }

    final XmlResourceParser parser = res.getLayout(resource);
    try {
        return inflate(parser, root, attachToRoot);
    } finally {
        parser.close();
    }
}

public View inflate(XmlPullParser parser, @Nullable ViewGroup root, boolean attachToRoot) {
    ... // parser をループで頭から食いながらなんかやって View を返す
}
inflate なんて名前で Parser を頭から食いながら最終的に View を返すやつをなんと呼べばいいでしょうか.View を組み立てるやつです.つまり Android は XmlPullParser を Xml Parser, LayoutInflater#inflate(XmlPullParser, ViewGroup, boolean) を View を組み立てるやつとして View のインスタンスを生成するということです.そこから Layout Xml をランタイムに差し込むには XmlPullParser のインスタンスを何らかの手段で作って inflate に食わせると良さそうだと言うことがわかります. LayoutInflater は Resources#getLayout(int) でインスタンスを入手しているので Resources のコードを読んでみましょう.
public XmlResourceParser getLayout(@LayoutRes int id) throws NotFoundException {
    return loadXmlResourceParser(id, "layout");
}

@NonNull
XmlResourceParser loadXmlResourceParser(@AnyRes int id, @NonNull String type)
        throws NotFoundException {
    final TypedValue value = obtainTempTypedValue();
    try {
        final ResourcesImpl impl = mResourcesImpl;
        impl.getValue(id, value, true);
        if (value.type == TypedValue.TYPE_STRING) {
            return impl.loadXmlResourceParser(value.string.toString(), id,
                    value.assetCookie, type);
        }
        throw new NotFoundException("Resource ID #0x" + Integer.toHexString(id)
                + " type #0x" + Integer.toHexString(value.type) + " is not valid");
    } finally {
        releaseTempTypedValue(value);
    }
}
@NonNull
XmlResourceParser loadXmlResourceParser(@NonNull String file, @AnyRes int id, int assetCookie,
        @NonNull String type)
        throws NotFoundException {
    ... // メモ化とか
    final XmlBlock block = mAssets.openXmlBlockAsset(assetCookie, file);
    ...
    return block.newParser();
    ...
}
おっと,Xml そのものっぽいクラス名です.中身を見てみましょう.
public XmlBlock(byte[] data) {
    mAssets = null;
    mNative = nativeCreate(data, 0, data.length);
    mStrings = new StringBlock(nativeGetStringBlock(mNative), false);
}
バイト列を受け取るコンストラクタがありました.Resource な Xml の Parser を作ることができるクラスのコンストラクタに渡されるバイト列とは一体どういったものでしょうか.APK に含まれるコンパイル済みの Layout Xml をバイト列として渡したら行けそうな気がしてきませんか?
Layout Xml のさばき方
前節で XmlBlock のコンストラクタにコンパイル済みの Layout Xml をバイト列として渡せばその Xml の Parser が得られるのではないかという仮説を得たので検証していきます.まず, XmlBlock のコードを読んでどんなバイト列が要求されているのか見てみましょう.
public XmlBlock(byte[] data) {
    mAssets = null;
    mNative = nativeCreate(data, 0, data.length);
    mStrings = new StringBlock(nativeGetStringBlock(mNative), false);
}

private static final native long nativeCreate(byte[] data,
                                             int offset,
                                             int size);
static jlong android_content_XmlBlock_nativeCreate(JNIEnv* env, jobject clazz,
                                               jbyteArray bArray,
                                               jint off, jint len)
{
    if (bArray == NULL) {
        jniThrowNullPointerException(env, NULL);
        return 0;
    }

    jsize bLen = env->GetArrayLength(bArray);
    if (off < 0 || off >= bLen || len < 0 || len > bLen || (off+len) > bLen) {
        jniThrowException(env, "java/lang/IndexOutOfBoundsException", NULL);
        return 0;
    }

    jbyte* b = env->GetByteArrayElements(bArray, NULL);
    ResXMLTree* osb = new ResXMLTree();
    osb->setTo(b+off, len, true);
    env->ReleaseByteArrayElements(bArray, b, 0);

    if (osb->getError() != NO_ERROR) {
        jniThrowException(env, "java/lang/IllegalArgumentException", NULL);
        return 0;
    }

    return reinterpret_cast<jlong>(osb);
}

static const JNINativeMethod gXmlBlockMethods[] = {
    /* name, signature, funcPtr */
    { "nativeCreate",               "([BII)J",
            (void*) android_content_XmlBlock_nativeCreate },
    ...
};

int register_android_content_XmlBlock(JNIEnv* env)
{
    return RegisterMethodsOrDie(env,
            "android/content/res/XmlBlock", gXmlBlockMethods, NELEM(gXmlBlockMethods));
}
nativeCreate の実体は ResXMLTree のポインタを返す native 関数でした.
status_t ResXMLTree::setTo(const void* data, size_t size, bool copyData)
{
    uninit();
    mEventCode = START_DOCUMENT;

    if (!data || !size) {
        return (mError=BAD_TYPE);
    }

    if (copyData) {
        mOwnedData = malloc(size);
        if (mOwnedData == NULL) {
            return (mError=NO_MEMORY);
        }
        memcpy(mOwnedData, data, size);
        data = mOwnedData;
    }

    mHeader = (const ResXMLTree_header*)data;
    mSize = dtohl(mHeader->header.size);
    if (dtohs(mHeader->header.headerSize) > mSize || mSize > size) {
        ALOGW("Bad XML block: header size %d or total size %d is larger than data size %d\n",
             (int)dtohs(mHeader->header.headerSize),
             (int)dtohl(mHeader->header.size), (int)size);
        mError = BAD_TYPE;
        restart();
        return mError;
    }
    mDataEnd = ((const uint8_t*)mHeader) + mSize;

    mStrings.uninit();
    mRootNode = NULL;
    mResIds = NULL;
    mNumResIds = 0;

    // First look for a couple interesting chunks: the string block
    // and first XML node.
    const ResChunk_header* chunk =
        (const ResChunk_header*)(((const uint8_t*)mHeader) + dtohs(mHeader->header.headerSize));
    const ResChunk_header* lastChunk = chunk;
    while (((const uint8_t*)chunk) < (mDataEnd-sizeof(ResChunk_header)) &&
           ((const uint8_t*)chunk) < (mDataEnd-dtohl(chunk->size))) {
        status_t err = validate_chunk(chunk, sizeof(ResChunk_header), mDataEnd, "XML");
        if (err != NO_ERROR) {
            mError = err;
            goto done;
        }
        const uint16_t type = dtohs(chunk->type);
        const size_t size = dtohl(chunk->size);
        if (kDebugXMLNoisy) {
            printf("Scanning @ %p: type=0x%x, size=0x%zx\n",
                    (void*)(((uintptr_t)chunk)-((uintptr_t)mHeader)), type, size);
        }
        if (type == RES_STRING_POOL_TYPE) {
            mStrings.setTo(chunk, size);
        } else if (type == RES_XML_RESOURCE_MAP_TYPE) {
            mResIds = (const uint32_t*)
                (((const uint8_t*)chunk)+dtohs(chunk->headerSize));
            mNumResIds = (dtohl(chunk->size)-dtohs(chunk->headerSize))/sizeof(uint32_t);
        } else if (type >= RES_XML_FIRST_CHUNK_TYPE
                   && type <= RES_XML_LAST_CHUNK_TYPE) {
            if (validateNode((const ResXMLTree_node*)chunk) != NO_ERROR) {
                mError = BAD_TYPE;
                goto done;
            }
            mCurNode = (const ResXMLTree_node*)lastChunk;
            if (nextNode() == BAD_DOCUMENT) {
                mError = BAD_TYPE;
                goto done;
            }
            mRootNode = mCurNode;
            mRootExt = mCurExt;
            mRootCode = mEventCode;
            break;
        } else {
            if (kDebugXMLNoisy) {
                printf("Skipping unknown chunk!\n");
            }
        }
        lastChunk = chunk;
        chunk = (const ResChunk_header*)
            (((const uint8_t*)chunk) + size);
    }

    if (mRootNode == NULL) {
        ALOGW("Bad XML block: no root element node found\n");
        mError = BAD_TYPE;
        goto done;
    }

    mError = mStrings.getError();

done:
    restart();
    return mError;
}
この部分に注目してみます.
    if (copyData) {
        mOwnedData = malloc(size);
        if (mOwnedData == NULL) {
            return (mError=NO_MEMORY);
        }
        memcpy(mOwnedData, data, size);
        data = mOwnedData;
    }

    mHeader = (const ResXMLTree_header*)data;
コンストラクタが受け取ったバイト列のサイズ分メモリを確保して中身を書き込んだあと,先頭へのポインタを ResXMLTree_header のポインタとして読み替えています.ループを読んでいくとだいたいこんな感じの構造になっていそうです.
[RexXMLTree_header
    [ResChunk_header
     ...]
    [ResChunk_header
    ...]
    ...
    [ResXMLTree_node
        [ResXMLTree_node
         ...]]]
また,次の定義から,渡されるバイト列は構造体をリトルエンディアンで書いたものが期待されていることがわかります.
# define DEVICE_BYTE_ORDER LITTLE_ENDIAN

# if BYTE_ORDER == DEVICE_BYTE_ORDER

# define	dtohl(x)	(x)
# define	dtohs(x)	(x)
# define	htodl(x)	(x)
# define	htods(x)	(x)

# else

# define	dtohl(x)	(android_swap_long(x))
# define	dtohs(x)	(android_swap_short(x))
# define	htodl(x)	(android_swap_long(x))
# define	htods(x)	(android_swap_short(x))

# endif
この情報をもとに実際にコンパイル済みの Layout Xml を構造体に当てはめて読んでみます.APK を unzip して hexdump あたりで眺めてみましょう.
手元の Layout ではこんな感じになりました.
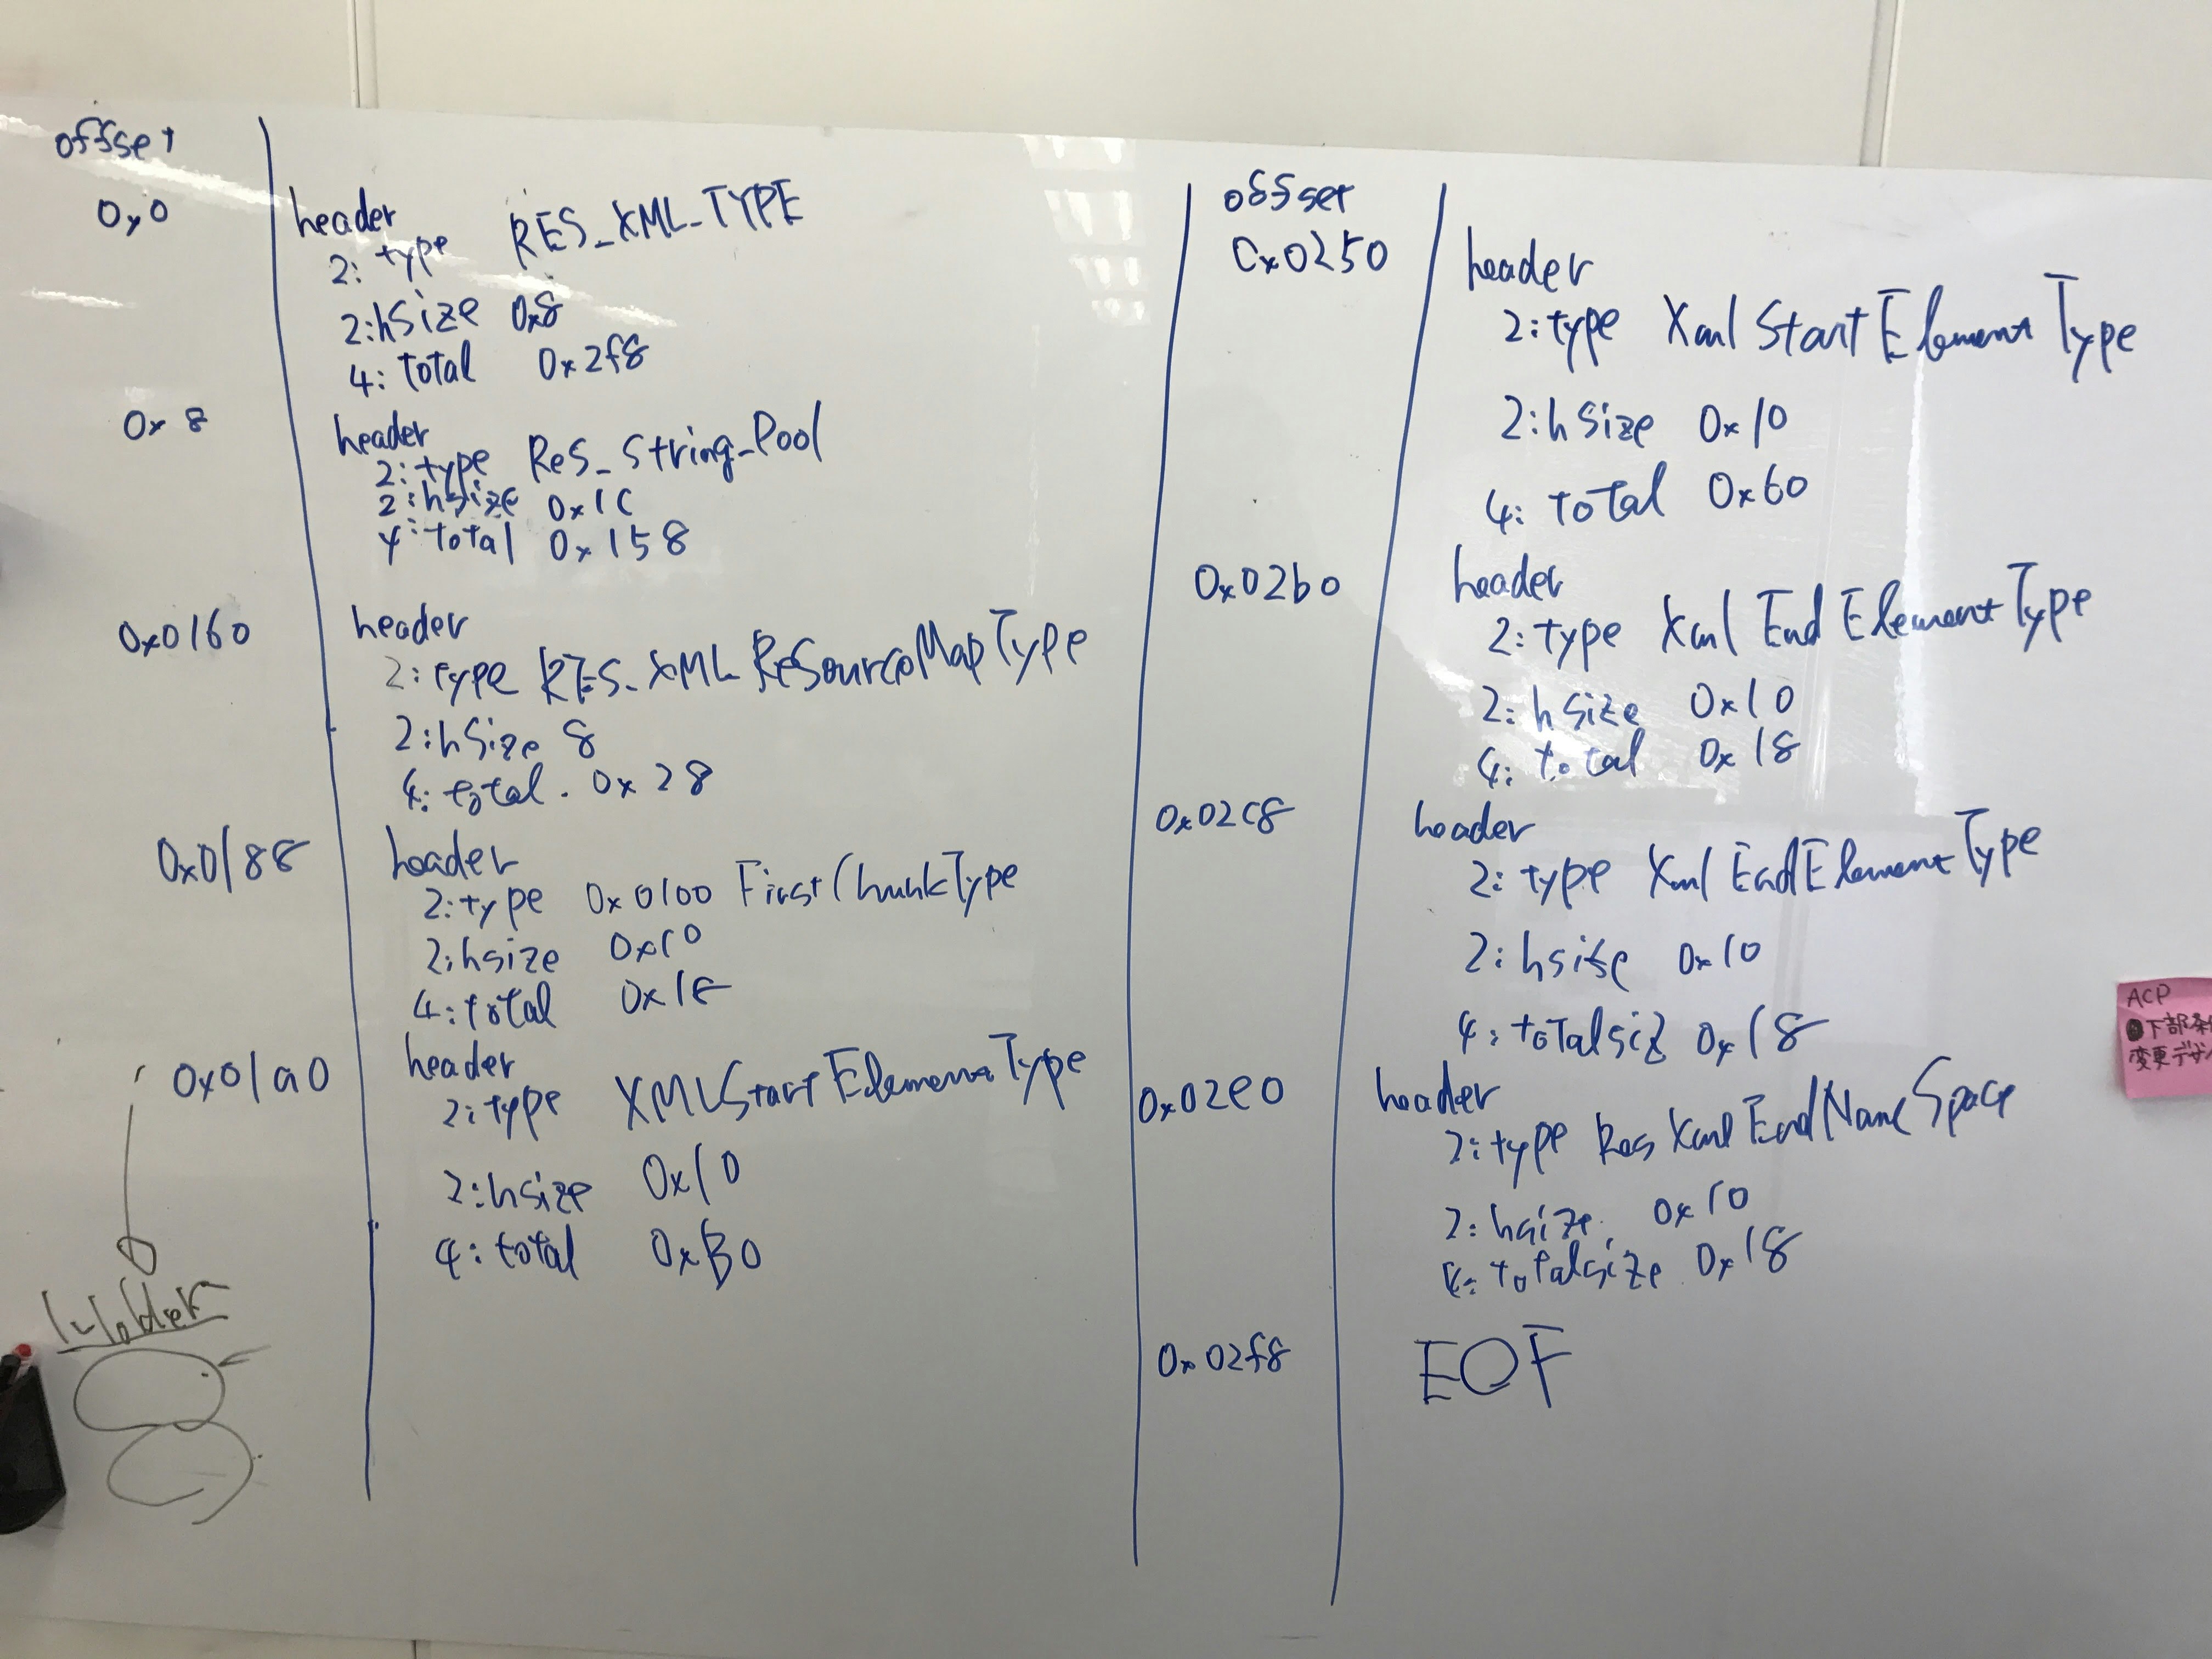
ビンゴです.最後まで解釈することができました.
毒味係は XmlBlock
XmlBlock がどんなものを食べるのかわかりました.ResXmlTree とかを順番にリトルエンディアンで表現したバイト列 a.k.a. コンパイルした Resource Xml をそのまま読み込んだやつです.そこで,ここでは適当なレイアウトを XmlBlock に食わせて実際に inflate してみます.
<?xml version="1.0" encoding="utf-8"?>
<LinearLayout xmlns:android="http://schemas.android.com/apk/res/android"
              android:layout_width="match_parent"
              android:layout_height="match_parent"
              android:background="#333"
              android:gravity="center">
    <TextView android:layout_width="match_parent"
              android:layout_height="wrap_content"
              android:textAlignment="center"
              android:text="inflate from assets"
              android:textColor="#eee"
              android:textSize="36sp"/>
</LinearLayout>
こんな感じの単純なレイアウトを作って APK から取り出します.この段階では Resource ID は利用しないようにします.取り出したファイルを別の Application の Assets に置いて実際に inflate してみます.下のような Activity を作りました.
override fun onCreate(savedInstanceState: Bundle?) {
    super.onCreate(savedInstanceState)
    val v = LayoutInflater.from(this).inflate(this.getLayoutParser("layout"), null)
    setContentView(v)
}

private fun getLayoutParser(fileName: String): XmlPullParser {
    val clazz = Class.forName("android.content.res.XmlBlock")
    val constructor = clazz.getConstructor(ByteArray::class.java)
    val bytes = this.assets.open(fileName).use { it.readBytes() }
    constructor.isAccessible = true
    return clazz.getMethod("newParser").invoke(constructor.newInstance(bytes)) as XmlPullParser
}
XmlBlock は package private なので Reflection を利用しています.
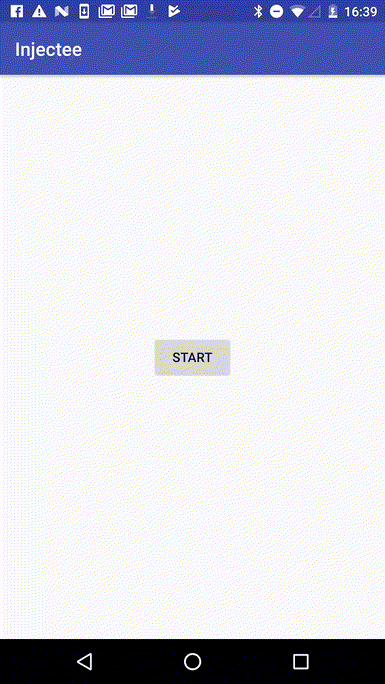
動きました!
また,native のコードがポインタを返していて,それを Java なオブジェクトが保持しているということは,Java のコードに後片付けが任されているということなので,後始末の仕方を調べます.
private int mOpenCount = 1;
public void close() {
    synchronized (this) {
        if (mOpen) {
            mOpen = false;
            decOpenCountLocked();
        }
    }
}

private void decOpenCountLocked() {
    mOpenCount--;
    if (mOpenCount == 0) {
        nativeDestroy(mNative);
        if (mAssets != null) {
            mAssets.xmlBlockGone(hashCode());
        }
    }
}

/*package*/ final class Parser implements XmlResourceParser {
    Parser(long parseState, XmlBlock block) {
        mParseState = parseState;
        mBlock = block;
        block.mOpenCount++;
    }

    public void close() {
        synchronized (mBlock) {
            if (mParseState != 0) {
                nativeDestroyParseState(mParseState);
                mParseState = 0;
                mBlock.decOpenCountLocked();
            }
        }
    }
}
上に抜粋した部分を読むと,初期値が 1 のカウントが Parser を作るたびに増えていて,Parser か XmlBlock の close を呼び出すたびにカウントが減り,カウントが 0 になるとメモリを開放するようです.これを踏まえると,Assets から Layout を inflate するコードは下のように書けます.
override fun onCreate(savedInstanceState: Bundle?) {
    super.onCreate(savedInstanceState)
    inflateWithAssets("layout")
}

private fun inflateWithAssets(fileName: String) {
    this.getParserForLayout(fileName).use {
        this.setContentView(LayoutInflater.from(this).inflate(it, null))
    }
}

private fun getParserForLayout(fileName: String): XmlResourceParser {
    val clazz = Class.forName("android.content.res.XmlBlock")
    val constructor = clazz.getConstructor(ByteArray::class.java)
    val bytes = this.assets.open(fileName).use { it.readBytes() }
    constructor.isAccessible = true
    val xmlBlock = constructor.newInstance(bytes)
    try {
        return clazz.getMethod("newParser").invoke(xmlBlock) as XmlResourceParser
    } finally {
        clazz.getMethod("close").invoke(xmlBlock)
    }
}
よりよい Layout Xml の下ごしらえ
便宜上この節では,R.id.hoge のような,コードから Resource にアクセスするのに使う数値がバインドされたシンボルを名前,32 bit の数値そのものを値と呼びます.
さて,前節でコンパイル済みの Layout Xml を Assets 配下に置いて読み込むということをしましたが,そのままだと差し込む Layout Xml では安全に Resource ID を利用することができません.なぜなら,Layout Xml に含まれる名前はコンパイル時に値に置き換えられるが,Resource ID の定義が行われている R クラスはコンパイル時に生成されるため,同じものを指す ID でもコンパイルの文脈によって値が変わる可能性があるからです.でも,せめて差し込まれる側に存在する Resource ID くらいは使いたいですよね?そこで,差し込む Layout Xml に下ごしらえをしていきましょう.
ランタイムのコンテキストで Resource ID を存在するものに置き換えるには Layout Xml における値の Offset とその名前のペアのリストがあると良さそうなので,差し込みたい Layout Xml とそれがコンパイルされたコンテキストの R クラスを入力にとって, Offset 名前 なスペース区切りを出力するプログラムを書いていきます.Java のクラスファイルを読み込めて,バイト列が操作しやすいと嬉しいので Kotlin <--> JNI <--> C++ な感じで行きます.
ちなみに Kotlin で JNI を使いたいときは extern modifier をつけた関数を定義してコンパイルして javah するだけです.
struct AttrExt {
    uint32_t nameSpaceStringRef;
    uint32_t nameStringRef;
    uint16_t attributeStartOffset;
    uint16_t attributeSize;
    uint16_t attributeCount;
    uint16_t idIndex;
    uint16_t classIndex;
    uint16_t styleIndex;
};
native のコードでは,上のように frameworks 下の ResourceTypes.h で定義されてるもののうち使うやつを実体の長さに気をつけながら移植して,XmlBlock と ResXmlTree のソースコードを読んでバイト列の読み方を確認しながら Resource ID を見つけたら Offset と名前を記録していきます.
先程差し込んだ Layout を次のように変更して実行してみます.
<?xml version="1.0" encoding="utf-8"?>
<LinearLayout xmlns:android="http://schemas.android.com/apk/res/android"
              android:layout_width="match_parent"
              android:layout_height="match_parent"
              android:background="#333"
              android:gravity="center">
    <Button android:id="@+id/messageButton"
            android:layout_width="wrap_content"
            android:layout_height="wrap_content"
            android:textAlignment="center"
            android:text="@string/button_label"
            android:textSize="36sp"/>
</LinearLayout>
% ./xmlmetadatagen ~/workspace/layout/app/build/intermediates/classes/debug/ io.github.yusaka39.layout.R ~/workspace/layout/app/build/outputs/apk/debug/res/layout/activity_main.xml
500 R.id.messageButton
560 R.string.button_label
狙い通りの出力が得られました.
盛り付け
実際に Resource ID を利用した Layout を Assets から差し込んでみます.
package io.github.yusaka39.injectee

import android.support.v7.app.AppCompatActivity
import android.os.Bundle
import android.widget.Button

class MainActivity : AppCompatActivity() {

    private val assetButton: Button by lazy {
        this.findViewById(R.id.assetButton) as Button
    }

    private val resourceButton: Button by lazy {
        this.findViewById(R.id.resourceButton) as Button
    }

    override fun onCreate(savedInstanceState: Bundle?) {
        super.onCreate(savedInstanceState)
        this.setContentView(R.layout.activity_main)

        this.assetButton.setOnClickListener {
            InjecteeActivity.start(this, true)
        }

        this.resourceButton.setOnClickListener {
            InjecteeActivity.start(this, false)
        }
    }
}
package io.github.yusaka39.injectee

import android.content.Context
import android.content.Intent
import android.support.v7.app.AppCompatActivity
import android.os.Bundle
import android.view.LayoutInflater
import android.widget.Button
import android.widget.Toast
import android.content.res.XmlResourceParser

class InjecteeActivity : AppCompatActivity() {

    private val msgButton: Button by lazy {
        this.findViewById(R.id.messageButton) as Button
    }

    private val shouldUseLayoutInAssets: Boolean by lazy {
        this.intent.getBooleanExtra(SHOULD_USE_LAYOUT_IN_ASSETS, false)
    }

    companion object {
        private const val SHOULD_USE_LAYOUT_IN_ASSETS = "shouldUseLayoutInAssets"
        fun start(from: Context, shouldUseLayoutInAssets: Boolean) {
            from.startActivity(Intent(from, InjecteeActivity::class.java).apply {
                this.putExtra(SHOULD_USE_LAYOUT_IN_ASSETS, shouldUseLayoutInAssets)
            })
        }
    }

    override fun onCreate(savedInstanceState: Bundle?) {
        super.onCreate(savedInstanceState)
        if (this.shouldUseLayoutInAssets) {
            this.inflateFromAssets()
        } else {
            this.inflateFromResource()
        }

        this.msgButton.setOnClickListener {
            Toast.makeText(this, "¯\\_(ツ)_/¯", Toast.LENGTH_LONG).show()
        }
    }

    private fun inflateFromAssets() {
        this.getLayoutParser("layout").use {
            val v = LayoutInflater.from(this).inflate(it, null)
            this.setContentView(v)
        }
    }

    private fun inflateFromResource() {
        this.setContentView(R.layout.activity_injectee)
    }

    private fun getResId(name: String): Int {
        val r = R::class.java
        val (innerClassName, idName) = name.split('.').let { it[1] to it[2] }
        return r.classes.first { it.simpleName == innerClassName }.getField(idName).get(null) as Int
    }

    private fun getLayoutBytesFromAssets(fileName: String): ByteArray =
            this.assets.open(fileName).use {
                it.readBytes().apply {
                    this.overwriteBytes(500, getResId("R.id.messageButton").toLittleEndianBytes())
                    this.overwriteBytes(560, getResId("R.string.button_label").toLittleEndianBytes())
                }
            }

    private fun getLayoutParser(fileName: String): XmlResourceParser {
        val clazz = Class.forName("android.content.res.XmlBlock")
        val constructor = clazz.getConstructor(ByteArray::class.java)
        val bytes = getLayoutBytesFromAssets(fileName)
        constructor.isAccessible = true
        val xmlBlock = constructor.newInstance(bytes)
        try {
            return clazz.getMethod("newParser").invoke(xmlBlock) as XmlResourceParser
        } finally {
            clazz.getMethod("close").invoke(xmlBlock)
        }
    }

    private fun Int.toLittleEndianBytes(): ByteArray {
        val mask = 0xff
        val bytes = ByteArray(4)
        for (i in 0..3) {
            bytes[i] = ((this ushr (i * 8)) and mask).toByte()
        }
        return bytes
    }

    private fun ByteArray.overwriteBytes(offset: Int, bytes: ByteArray) {
        for (i in 0..bytes.lastIndex) {
            this[offset + i] = bytes[i]
        }
    }
}
getLayoutBytesFromAssets で,前節で作ったプログラムの出力をもとに Layout のバイト列を書き換えています.InjecteeActivity#onCreate を読むと,View の生成以外は共通の処理を記述しているのが解ると思います.これで見た目は違うけど挙動は一緒みたいな感じになれば成功です.

成功です.これでロジックと分離された View を動的に差し込むことができるようになりました.
そして Web へ
コンパイル済みの Layout Xml と Resource ID の Offset 調べるくんの出力結果を HTTP 経由で送って同じように inflate してあげるだけです.
感想
外から見えないクラスを使っていたり,ちょくちょく Reflection してたりで製品レベルのものではないですが実験として面白いと思ってくれる人がいれば嬉しいです.