Express.jsのコードを読んでみたのでまとめることにしました。
普段の業務ではNode.jsもExpressも利用していないので、JavaScriptの基本的なコーディングやライブラリの内容なども合わせてまとめておこうと思います。
間違っている内容がありましたら編集リクエストをいただけますと幸いです。
Expressコードリーディング
対象のコード
今回コードリーディングする対象のコードです。
ただHello Worldするだけのコードになります。
const express = require('express')
const app = express()

app.get('/', (req, res) => {
    res.send('Hello World');
})

app.listen(3000);
nodeでindex.jsを起動します。
起動後curlでレスポンスを確認します。
$ node index.js
$ curl localhost:3000
Hello World
expressインスタンス生成
まずはconst app = express()の処理を追っていきます。
ここで最初に呼び出されるのは、expressライブラリのルートディレクトリ上に存在するindex.jsファイルです。
module.exports = require('./lib/express');
上記はmoduleの作成のみで、処理本体はlib/express.jsファイルです
/**
 * Expose `createApplication()`.
 */

exports = module.exports = createApplication;

/**
 * Create an express application.
 *
 * @return {Function}
 * @api public
 */

function createApplication() {
  var app = function(req, res, next) {
    app.handle(req, res, next);
  };

  mixin(app, EventEmitter.prototype, false);
  mixin(app, proto, false);

  // expose the prototype that will get set on requests
  app.request = Object.create(req, {
    app: { configurable: true, enumerable: true, writable: true, value: app }
  })

  // expose the prototype that will get set on responses
  app.response = Object.create(res, {
    app: { configurable: true, enumerable: true, writable: true, value: app }
  })

  app.init();
  return app;
}
一つずつ処理を見ていきます。
アプリケーション作成
まずはこちらになります。
  var app = function(req, res, next) {
    app.handle(req, res, next);
  };
appのfunctionを生成していますが、こちらがExpressの入り口となるアプリケーション部分です。
HTTPリクエストをされるとここが実行されます。
プレーンなNode.jsだけでここを表現すると以下のような処理になります。
const http = require('http')

var app = function(req, res, next) {
  app.handle(req, res, next);
};
app.handle = function handle(req, res, callback) {
  res.writeHead(200, {'Content-Type': 'text/plain'});
  res.end('Hello World\n');
}

http.createServer(app).listen(3000);
アプリケーションメソッドをコピーしてくる(継承する)
appはEventEmitterとprotoをコピーします。
var EventEmitter = require('events').EventEmitter;
var mixin = require('merge-descriptors');
var proto = require('./application');
var req = require('./request');
var res = require('./response');

中略

  mixin(app, EventEmitter.prototype, false);
  mixin(app, proto, false);

  // expose the prototype that will get set on requests
  app.request = Object.create(req, {
    app: { configurable: true, enumerable: true, writable: true, value: app }
  })

  // expose the prototype that will get set on responses
  app.response = Object.create(res, {
    app: { configurable: true, enumerable: true, writable: true, value: app }
  })
ここでコピーしているproto(application.js)がapplicationのメイン処理が入っている部分です。
具体的な処理は後々出てくるのでそこで説明します。
その他、EventEmitterライブラリやExpressプロジェクトのルートディレクトリにあるrequest.js、response.jsの内容もコピーしています。
アプリケーション初期設定
app.init();
ここで読みだしているのは、lib/application.js内に設定されているinitメソッドです。
この中で行なっているのは、アプリケーションをデフォルトの設定で設定しています。
例えば、HTTPヘッダーにx-powered-byを返却するなどはこの中で設定しています。
Routingの設定
次にRouting設定です。
app.get('/', (req, res) => {
    res.send('Hello World');
})
の処理です。
こちらで呼び出されるapp.getはlib/application.jsファイルの以下処理になります。
methods.forEach(function(method){
  app[method] = function(path){
    if (method === 'get' && arguments.length === 1) {
      // app.get(setting)
      return this.set(path);
    }

    this.lazyrouter();

    var route = this._router.route(path);
    route[method].apply(route, slice.call(arguments, 1));
    return this;
  };
});
HTTPメソッドに紐づくfunctionの作成
以下の処理でHTTPメソッド(GET,POST,PUT,PATCH,DELETEなど)と同一名称のメソッドをappクラスに作成します。
var methods = require('methods');

methods.forEach(function(method){
  app[method] = function(path){
    // 中略
  };
});
Routerクラスの移譲
次はthis.lazyrouter();の部分です。
ここは以下の処理になります。
var Router = require('./router');

app.lazyrouter = function lazyrouter() {
  if (!this._router) {
    this._router = new Router({
      caseSensitive: this.enabled('case sensitive routing'),
      strict: this.enabled('strict routing')
    });

    this._router.use(query(this.get('query parser fn')));
    this._router.use(middleware.init(this));
  }
};
appクラスの_routerプロパティにRouterクラスを委譲しています。
Routerクラスはlib/router/index.jsファイルを参照しています。
this._router.useはMiddlewareの設定です。
this._router.use(query(this.get('query parser fn')));の設定は、クエリストリングをObjectに変換してくれます。
this._router.use(middleware.init(this));はMiddlewareの初期設定を行います。
X-Powered-Byヘッダーを付与するのもこちらになります。
Routeクラスの取得とLayerクラスをスタックに追加
続いては以下の処理です。
var route = this._router.route(path);
こちらは先ほど作成した_routerのrouteメソッドを利用して、RouteクラスとLayerクラスを作成します。
実際の処理はこちらです。
var Route = require('./route');
var Layer = require('./layer');

/**
 * Create a new Route for the given path.
 *
 * Each route contains a separate middleware stack and VERB handlers.
 *
 * See the Route api documentation for details on adding handlers
 * and middleware to routes.
 *
 * @param {String} path
 * @return {Route}
 * @public
 */

proto.route = function route(path) {
  var route = new Route(path);

  var layer = new Layer(path, {
    sensitive: this.caseSensitive,
    strict: this.strict,
    end: true
  }, route.dispatch.bind(route));

  layer.route = route;

  this.stack.push(layer);
  return route;
};
RouteクラスとLayerクラスを生成します。
そしてLayerクラスのrouteプロパティにRouteクラスを移譲しています。
作成したLayerクラスはRouterクラスのstackに格納しています。
呼び出し元にはRouteクラスを返却しています。
RouteクラスにLayerクラスをセット
続いては以下の処理です。
route[method].apply(route, slice.call(arguments, 1));
こちらは先ほど作成したRouteクラスに新しいLayerクラス作成したうえでセットします。
実際の処理はこちらです。
methods.forEach(function(method){
  Route.prototype[method] = function(){
    var handles = flatten(slice.call(arguments));

    for (var i = 0; i < handles.length; i++) {
      var handle = handles[i];

      if (typeof handle !== 'function') {
        var type = toString.call(handle);
        var msg = 'Route.' + method + '() requires a callback function but got a ' + type
        throw new Error(msg);
      }

      debug('%s %o', method, this.path)

      var layer = Layer('/', {}, handle);
      layer.method = method;

      this.methods[method] = true;
      this.stack.push(layer);
    }

    return this;
  };
});
ここではLayerクラスを作成してかつ、指定したメソッドをLayerクラスにセットします。
そして作成したLayerクラスをRouteクラスのstackに追加しています。
httpのlisten開始
最後に以下の構文でhttpをport3000で開始します。
app.listen(3000);
実際の処理はこちらです。
app.listen = function listen() {
  var server = http.createServer(this);
  return server.listen.apply(server, arguments);
};
中身については、アプリケーション作成の部分で説明した内容と同じなので省略します。
リクエストを受け付けた時の挙動
最後にリクエストを受け付けた時の挙動についてです。
このような順番で処理されます。
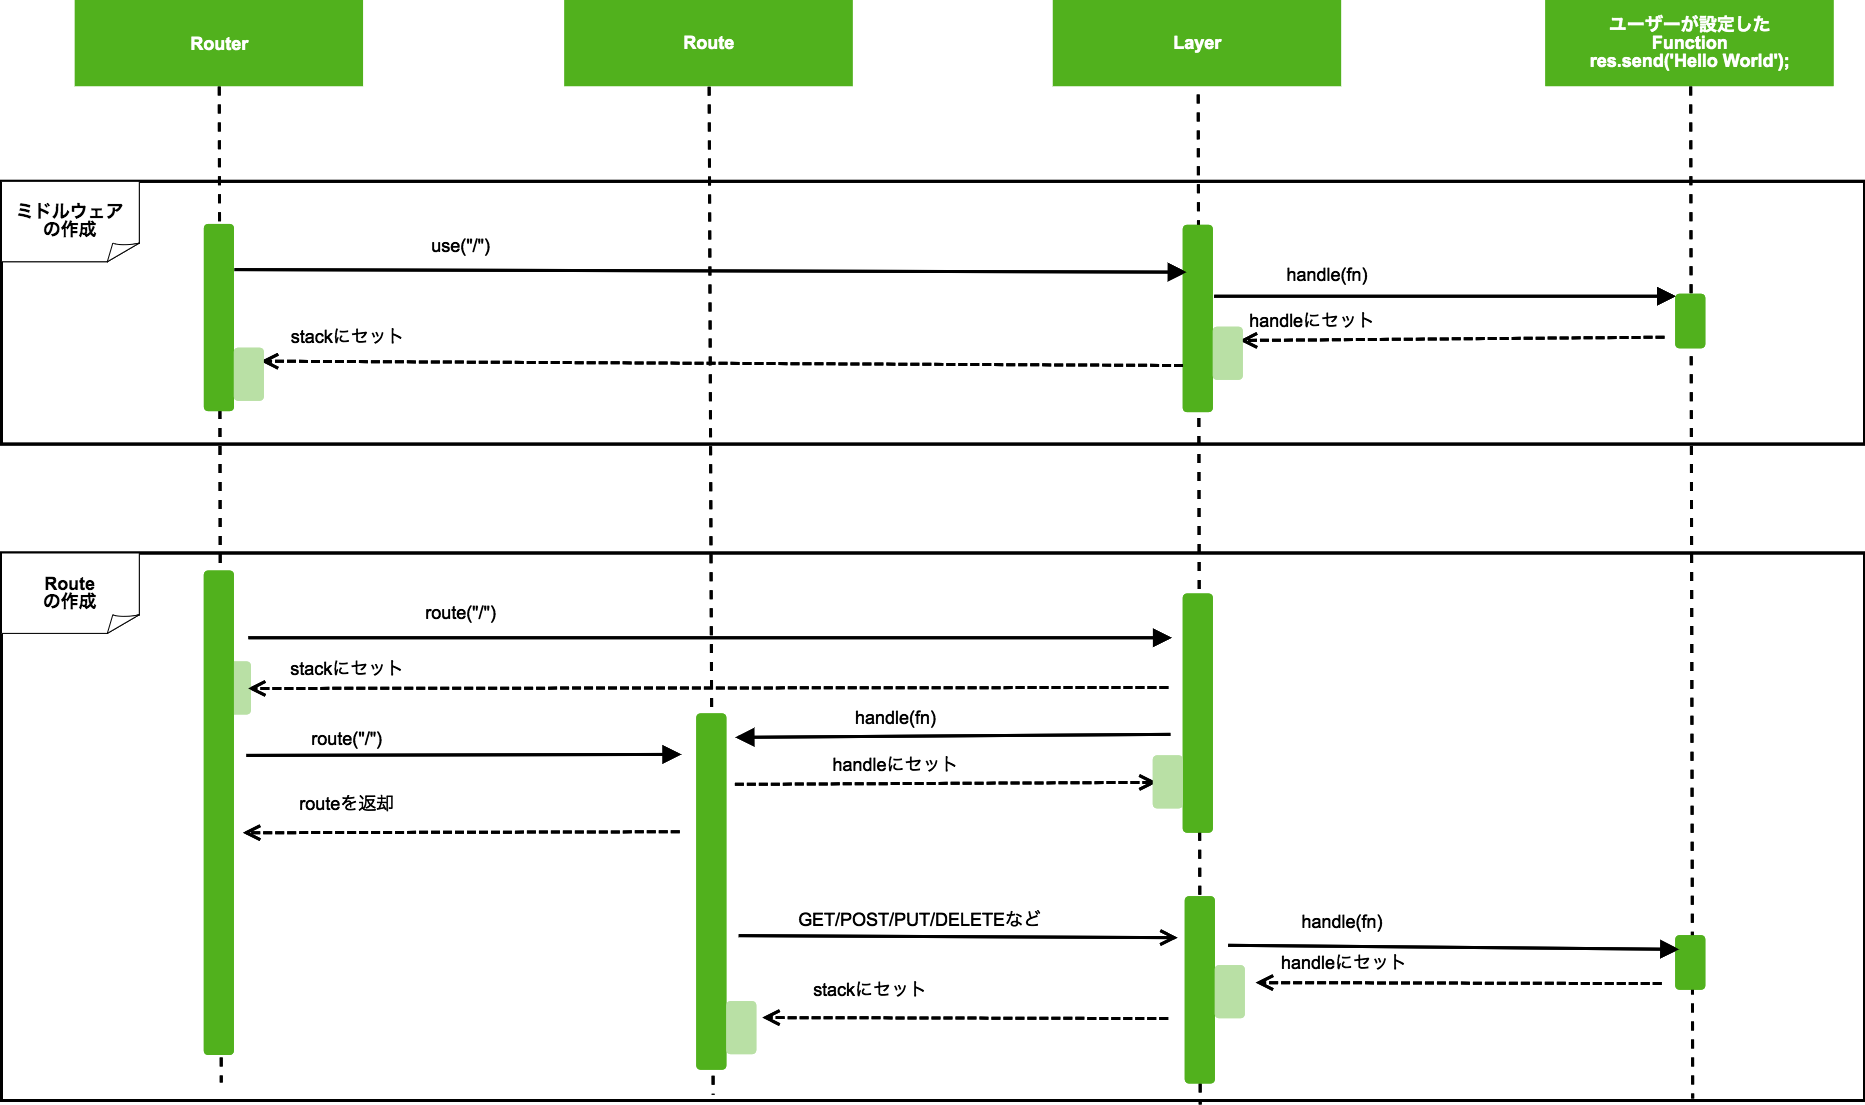
app->app.handle->router.handle->Layer.handle->Route.dispatch->Layer.hanldle->Express利用者が設定したfunction
ここでRouter、Layer、Routeクラスの関係性について図にまとめてみました。
Expressで利用しているNode.jsの構文やライブラリについて
上記まででExpressの処理の流れをざっと確認してきましたが、実際にコードリーディングするにあたり、普段見慣れないNode.jsの構文やライブラリがいつかあると思います。
そこでそれぞれの構文がどういうものなのかをまとめます。
mixin
参考:merge-descriptors
まずはmixinからです。
Expressでは、以下のように利用しています。
var app = function(req, res, next) {
    app.handle(req, res, next);
};

mixin(app, EventEmitter.prototype, false);
mixin(app, proto, false);
mixinがどういうものか見ていきます。
var mixin = require('merge-descriptors');

var app = function() {
};
var application = function() {}
application.handle = function() {
        return 'Hello mixin';
}

mixin(app, application, false);

console.log(app.handle());  // Hello mixin
このようにappクラスにapplicationクラスのメソッドを継承させています。
これがmixin(merge-descriptors)の利用方法になります。
EventEmitter
続いてはEventEmitterです。
EventEmitterを利用することでイベント駆動型の設計が可能になります。
var mixin = require('merge-descriptors');
var EventEmitter = require('events').EventEmitter;

var app = function() {};

mixin(app, EventEmitter.prototype, false);
app.init = function() {
    app.on('mount', () => {
        console.log('emit!');
    });
    console.log('init')
}
app.send = function() {
    app.emit('mount');
}
app.init();  // init
app.send();  // emit!
上記のように、on.('イベント名')で事前に処理を受け付けるタイミングを作成してemit('イベント名')を実行する際に、onの中に指定したfunctionが実行されます。
Object.create
続いてはObject.createについてです。
Expressでは以下のように利用されています。
// expose the prototype that will get set on requests
  app.request = Object.create(req, {
    app: { configurable: true, enumerable: true, writable: true, value: app }
  })
こちらもmixinと同じようにメソッドを継承します。
var app = function() {};
var req = function() {};
req.headers = function() {
    return 'req!';
}

app.request = Object.create(req);
console.log(app.request.headers()); //  req!
apply&call&bind
applyとcallとbindについてです。
Express.jsでは様々な場所でこのAPIが利用されています。
route[method].apply(route, slice.call(arguments, 1));

var args = slice.call(arguments, 1);
こちらは様々な記事で解説されているため、詳細は割愛しますが、簡単に試して見ます。
var app = function() {}
app.say = function(name, age) {
    return name + 'は' + age + '歳です。';
}

console.log(app.say('Taro', 16));  // Taroは16歳です。
console.log(app.say.apply(app, ['Taro', 16]));  // Taroは16歳です。
console.log(app.say.call(app, 'Taro', 16));  // Taroは16歳です。
var say = app.say.bind(app, 'Taro', 16);
console.log(say());
参考
他にもExpressの解説をされている方がいらっしゃいましたので紹介します。
エンジニアの教養、フレームワーク解剖学【Express編】