概要
iOSアプリ開発は、今までやったことがなかったのですが、試しにSwiftUIを使って簡単なアプリを作ってみたので、備忘録としてメモしておきます。(※ 理解度が浅いため、間違った記載がある可能性があります)
普段アジャイル的な開発をしているのですが、今回はそのときに使える様なプランニングポーカー的なアプリを作ってみました。
↓ SwiftUIの公式チュートリアルを参考にしつつ作成しましたが、中々充実していました。
https://developer.apple.com/tutorials/swiftui
前提
・ Xcode等、SwiftUIでの開発環境が整っている
完成イメージ
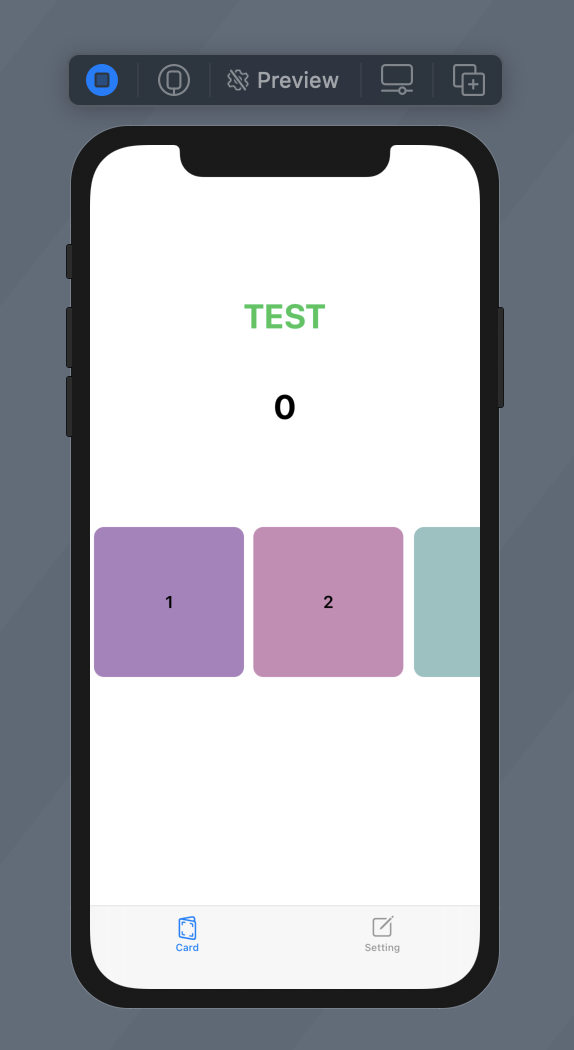
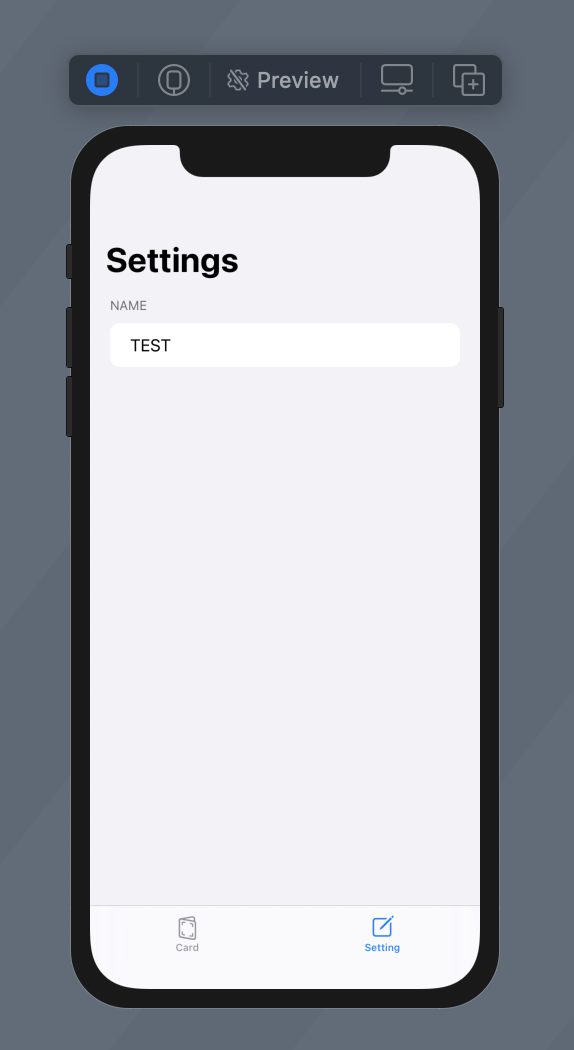
完成イメージは以下の様になります。
-
Card画面
- フィボナッチ数列のカードがスクロール表示で並んでいる
- カードを選択すると、中央部の数字がその値になり、選択したカードが分かる様になっている
- 画面上部にはSetting画面で設定した名前が表示される
-
Setting画面
- Card画面で表示する名前を入力する
実装
最終的なコードは以下になります。
ポイント①
Settingページでのユーザの入力値を、Cardページに引き渡す必要があったのですが、
struct間での値の受け渡しになるので、@EnvironmentObject を利用しています。
struct内であれば @State で値の状態を管理しています。
<参考: SwiftUIのProperty Wrappersとデータへのアクセス方法>
https://qiita.com/shiz/items/6eaf87fa79499623306a
ポイント②
Settingページでのユーザー入力値に応じて動的にCardページの値を変更させたかったので、
ObservableObject と @Published を組み合わせて動的変更を実現しています。
<参考: ObservableObject利用時のView更新タイミングを細かく制御する>
https://qiita.com/chocoyama/items/a588c3569b8dd89cd223
import SwiftUI

/*
 Card 要素用 struct
*/
struct Card: Identifiable {
    var id: String
    var color: Color
}


/*
 ユーザ入力用 class
*/
class UserInput: ObservableObject {
    @Published var name = "TEST"
}

/*
 ランダムカラー生成用
*/
extension Color {
    static var random: Color {
        return Color(
            red: .random(in: 0.5...0.9),
            green: .random(in: 0.5...0.9),
            blue: .random(in: 0.5...0.9)
        )
    }
}

/*
 フィボナッチ数列作成関数
*/
func fib() -> Array<Card>
{
    var items = [] as Array<Card>
    var f1 = 1, f2 = 1
    for _ in 0..<11 {
        items.append(Card(id: String(f1), color: Color.random ))
        (f1, f2) = (f2, f1 + f2)
    }
    items.removeFirst()
    return items
}


/*
 メニューリスト(タブ)
*/
struct Menu_List: View {
    let userInput = UserInput()
    var body: some View {
        TabView {
            CardView().environmentObject(userInput)
                .tabItem {
                    Image(systemName: "greetingcard")
                    Text("Card")
                }
            SettingView().environmentObject(userInput)
                .tabItem {
                    Image(systemName: "square.and.pencil")
                    Text("Setting")
                }
        }
    }
}

/*
 Card ページ用 struct
*/
struct CardView: View {
    @EnvironmentObject var input: UserInput
    @State var flg = true
    @State var count = "0"
    var items = fib()

    var body: some View {
        VStack {
            Text(input.name).fontWeight(.bold).offset(x: 0, y: -150).font(.largeTitle).foregroundColor(Color.green)
            Text(count).fontWeight(/*@START_MENU_TOKEN@*/.bold/*@END_MENU_TOKEN@*/).offset(x: 0, y: -100).font(.largeTitle)
            ScrollView(.horizontal, showsIndicators: false) {
                HStack(alignment: .top, spacing: 0) {
                    ForEach(self.items) { card in
                            CardsItem(card: card).onTapGesture {
                                self.count = card.id
                        }}
                }
            }
            .frame(height: 100)
        }
    }
}

/*
 Card リスト表示用 struct
*/
struct CardsItem: View {
    @State var flg = false
    let card: Card
    var body: some View {
        VStack(alignment: .leading) {
            Text(card.id)
                .font(.headline)
                .padding( 75).background(Rectangle().foregroundColor(card.color).frame(width: 150, height: 150).cornerRadius(10))
    }
}
}

/*
 Setting ページ用 struct
*/
struct SettingView: View {
    @EnvironmentObject var input: UserInput

    var body: some View {
        NavigationView {
            Form {
                Section(header: Text("Name")){
                    TextField("名前を入力してください", text: $input.name)
                }
            }
            .navigationBarTitle("Settings")
        }
    }
}

/*
 Canvas 表示用 struct
*/
struct ContentView_Previews: PreviewProvider {
    static var previews: some View {
        Menu_List()
    }
}
まとめ
SwiftUIを使って簡単なアプリ(プランニングポーカー)を作成してみました。
SwiftUIは初めてでしたが、UI構築をstruct単位で管理できたり、データの更新が自動で View に反映できたりと実装はしやすいのかなと思いました。
今後はSwiftUIもっと試していき、個人開発だけでなく商用でも使える様になったらいいなと思っています。

