ボタンを配置するとキャプションの初期値として「Button」がセットされるが、
「ハードコーディングはよくないから、@stringリソース=strings.xmlを使いなさい(意訳)」と促される。

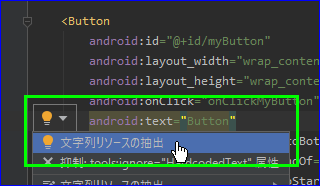
activity_main.xmlコード上で該当箇所にカーソルをあてると黄色い ![]() が表示される。
が表示される。
その黄色い ![]() をクリックして、「文字列リソースの抽出」をクリックする。
をクリックして、「文字列リソースの抽出」をクリックする。
すると「リソースの抽出」ダイアログが出るので、任意の値を記述する。
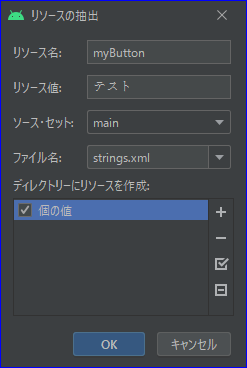
- リソース名:strings.xmlの中で、画面に配置したコントロールを識別するための文字列。サンプルではidと合わせている。
- リソース値:キャプションとして表示する文字列。
- ソース・セット:「main」「debug」「releace」から選択する。とりあえず「main」のまま。
- ファイル名:「colors.xml」「strings.xml」「styles.xml」から選択する。キャプションは文字列なので「strings.xml」のまま。
- ディレクトリーにリソースを作成:とりあえずそのまま。
「OK」をクリックするとactivity_main.xmlの ![]() 箇所が
箇所が "Button" から "@string/myButton" に変更される。
activity_main.xml
    <Button
        android:id="@+id/myButton"
        android:layout_width="wrap_content"
        android:layout_height="wrap_content"
        android:onClick="onClickMyButton"
        android:text="@string/myButton" 👈
        app:layout_constraintBottom_toBottomOf="parent"
        app:layout_constraintEnd_toEndOf="parent"
        app:layout_constraintStart_toStartOf="parent"
        app:layout_constraintTop_toTopOf="parent" />
strings.xmlは app > res > values 配下にある。
ここまでで設定した内容が ![]() 箇所に記述されている。
箇所に記述されている。
strings.xml
<resources>
    <string name="app_name">sandbox</string>
    <string name="myButton">テスト</string> 👈
</resources>
ボタンのキャプションが「テスト」になる。

以上