こんにちは、Yuiです。
最近暇になってきたので、週イチ発信を自主的に始めることにしました。
とりあえずは仕事でめちゃくちゃ忙しくなるか、飽きるか、ネタがなくなるまでは続けることにします。
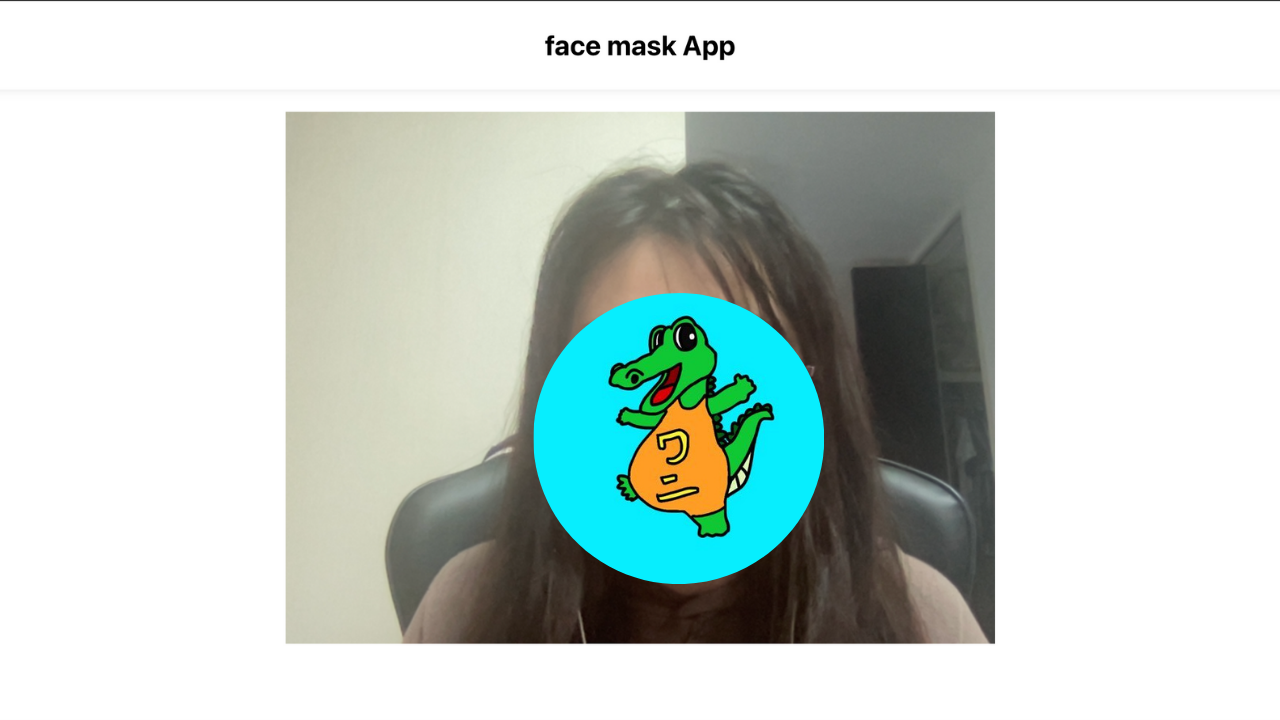
というわけで今回はwebcameraとTensorFlowを使って、画像にマスクをリアルタイムでつけるアプリを作ったのでその手順を公開します。
完成はこちら
マスクを描画するアプリを作って遊ぶなどした https://t.co/qT230RNZJQ pic.twitter.com/xwgIGj2U3d
— Yui 🌔 Yuiko Ito (@yui_active) May 23, 2021
DEMO→https://mask-app-one.vercel.app/
** 追記: エラーハンドリングが不十分なため、動作が少し不安定です。もし1〜2秒待ってマスクが表示されない場合は、リロードしてください..。随時修正していきます。
react-webcamをインストール
雛形を作ります。
$ npx create-react-app face-mask-app --template typescript
yarn add react-webcam @types/react-webcam
公式を参考に動かしてみます。
スタイルはとりあえずはベタ書きしておきます。
import { useRef } from "react";
import "./App.css";
import Webcam from "react-webcam";

const App = () => {
  const webcam = useRef<Webcam>(null);

  return (
    <div className="App">
      <header className="header">
        <div className="title">face mask App</div>
      </header>
      <Webcam
        audio={false}
        ref={webcam}
      />
    </div>
  );
}

export default App;
デザインはともかく、起動できました。
それでは次にTensorflowで顔認識をします。
良さげなモデルを見つけたので、以下を使います。
https://github.com/tensorflow/tfjs-models/tree/master/face-landmarks-detection
yarn add @tensorflow-models/face-landmarks-detection @tensorflow/tfjs-core @tensorflow/tfjs-converter @tensorflow/tfjs-backend-webgl
公式を参考に書いていきます。
// 最初にインポートが必要
import "@tensorflow/tfjs-core";
import "@tensorflow/tfjs-converter";
import "@tensorflow/tfjs-backend-webgl";
import * as faceLandmarksDetection from "@tensorflow-models/face-landmarks-detection";
import { MediaPipeFaceMesh } from "@tensorflow-models/face-landmarks-detection/dist/types";
const App = () => {
const webcam = useRef<Webcam>(null);
const canvas = useRef<HTMLCanvasElement>(null);
const runFaceDetect = async () => {
const model = await faceLandmarksDetection.load(
faceLandmarksDetection.SupportedPackages.mediapipeFacemesh
);
detect(model);
};
const detect = async (model: MediaPipeFaceMesh) => {
if (webcam.current) {
const webcamCurrent = webcam.current as any;
// ビデオのロードが完了するのを確認してから次のステップに進む
if (webcamCurrent.video.readyState === 4) {
const video = webcamCurrent.video;
const predictions = await model.estimateFaces({
input: video,
});
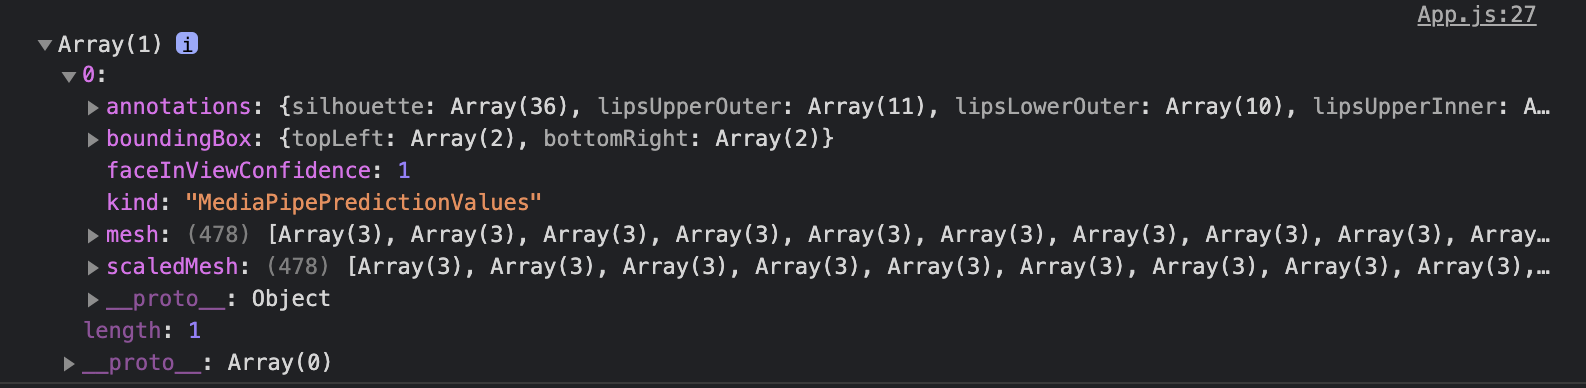
if (predictions.length) {
console.log(predictions);
}
}
};
};
useEffect(() => {
runFaceDetect();
// eslint-disable-next-line react-hooks/exhaustive-deps
}, [webcam.current?.video?.readyState])
補足
最新版では、faceLandmarksDetection.SupportedPackages.mediapipeFacemeshの部分が以下に変更になっているとの連絡を頂きました。@kurikurisan さんありがとうございます!
const model = faceLandmarksDetection.SupportedModels.MediaPipeFaceMesh;
const detectorConfig = {
  runtime: 'mediapipe', // or 'tfjs'
  solutionPath: 'https://cdn.jsdelivr.net/npm/@mediapipe/face_mesh',
}
const detector = await faceLandmarksDetection.createDetector(model, detectorConfig);
とりあえずconsole.logで顔認識ができているか確認しました。
canvasで動画に画像を重ねる
それでは次に動画に画像を重ねていきます。
canvasを使いたいので、Webcamタグの下にcanvasタグを追加します。
  const webcam = useRef<Webcam>(null);
  const canvas = useRef<HTMLCanvasElement>(null);

// 省略 //
      <Webcam
        audio={false}
        ref={webcam}
      />
      <canvas
        ref={canvas}
      />
canvasで描画するサイズをvideoと合わせたいので、
    const videoWidth = webcamCurrent.video.videoWidth;
    const videoHeight = webcamCurrent.video.videoHeight;
    canvas.current.width = videoWidth;
    canvas.current.height = videoHeight;
で、どこを描画するかですが、そこは公式のマップを見ながらめちゃくちゃ頑張って座標を確認しました。(正直この作業が一番大変だったw)
マップによると、鼻上らへんが195番目だったので、そこを支点として、canvasのbeginPath()〜closePath()を利用して書くことにします。
ちょっと描画部分のロジックが長くなってしまったので、mask.tsでファイルを切り分けます。
import { AnnotatedPrediction } from "@tensorflow-models/face-landmarks-detection/dist/mediapipe-facemesh";
import {
  Coord2D,
  Coords3D,
} from "@tensorflow-models/face-landmarks-detection/dist/mediapipe-facemesh/util";

const drawMask = (
  ctx: CanvasRenderingContext2D,
  keypoints: Coords3D,
  distance: number
) => {
  const points = [
    93,
    132,
    58,
    172,
    136,
    150,
    149,
    176,
    148,
    152,
    377,
    400,
    378,
    379,
    365,
    397,
    288,
    361,
    323,
  ];

  ctx.moveTo(keypoints[195][0], keypoints[195][1]);
  for (let i = 0; i < points.length; i++) {
    if (i < points.length / 2) {
      ctx.lineTo(
        keypoints[points[i]][0] - distance,
        keypoints[points[i]][1] + distance
      );
    } else {
      ctx.lineTo(
        keypoints[points[i]][0] + distance,
        keypoints[points[i]][1] + distance
      );
    }
  }
};

export const draw = (
  predictions: AnnotatedPrediction[],
  ctx: CanvasRenderingContext2D,
  width: number,
  height: number
) => {
  if (predictions.length > 0) {
    predictions.forEach((prediction: AnnotatedPrediction) => {
      const keypoints = prediction.scaledMesh;
      const boundingBox = prediction.boundingBox;
      const bottomRight = boundingBox.bottomRight as Coord2D;
      const topLeft = boundingBox.topLeft as Coord2D;
      // 顔のサイズを参考に、マスクを少しだけ大きくする
      const distance =
        Math.sqrt(
          Math.pow(bottomRight[0] - topLeft[0], 2) +
            Math.pow(topLeft[1] - topLeft[1], 2)
        ) * 0.02;
      ctx.clearRect(0, 0, width, height);
      ctx.fillStyle = "black";
      ctx.save();
      ctx.beginPath();
      drawMask(ctx, keypoints as Coords3D, distance);
      ctx.closePath();
      ctx.fill();
      ctx.restore();
    });
  }
};
後は上記の関数をApp.tsx内で呼び出すだけ
  const runFaceDetect = async () => {
    const model = await faceLandmarksDetection.load(
      faceLandmarksDetection.SupportedPackages.mediapipeFacemesh
    );
    detect(model);
  };

  const detect = async (model: MediaPipeFaceMesh) => {
    if (webcam.current && canvas.current) {
      const webcamCurrent = webcam.current as any;
      if (webcamCurrent.video.readyState === 4) {
        const video = webcamCurrent.video;
        const videoWidth = webcamCurrent.video.videoWidth;
        const videoHeight = webcamCurrent.video.videoHeight;
        canvas.current.width = videoWidth;
        canvas.current.height = videoHeight;
        const predictions = await model.estimateFaces({
          input: video,
        });
        const ctx = canvas.current.getContext("2d") as CanvasRenderingContext2D;
        requestAnimationFrame(() => {
          draw(predictions, ctx, videoWidth, videoHeight);
        });
        detect(model);
      }
    }
  };
制作時間
制作時間は構想からデプロイまでトータルで10時間ぐらいかかりました。
デザインもほぼないようなアプリなのに時間かけすぎた感があります。
遊びで作ってるMVPアプリなので、もっとサクサク作れるようになりたいもんですねー。
あとがき
最初face-api.jsを使おうとして、モデルの読み込みができずに5時間ぐらい溶かした挙げ句、結局face-api.jsの元になったtensorflowで作成することにしました。
issue報告にも上がっているものですが、このエラーが解消できずに、もうわけがわからなくなったのでtensorflowに逃げました。笑
分かる人教えてください..。
今回の全体のコードはこちら→https://github.com/YuikoIto/mask-app