JS7®JobSchedulerは独SOS社(Software- und Organisations-Service GmbH)によって開発されている、ジョブ管理システムです。
JOCコックピットのモニタサービスによって、ワークフロー・ジョブの実行結果をメール/Slack/JMSやZabbixなどの外部監視システムに通知することができます。
通知設定定義はXML形式となっており、XSDスキーマを使うことによって穴埋め形式で作成することができます。
XSDスキーマ(Notification_configuration_v1.0.xsd)がJOCコックピットにインストールされている必要がありますが、Dockerイメージには含まれていませんので、別途インストールする必要があります。
通知の内容には、コントローラ、エージェント情報やワークフロー・オーダ・ジョブ情報、出力メッセージ、時刻など様々な情報を変数で指定することができます。
本書では、ジョブにエラー、ワーニングが発生した場合に監視システムのZabbixへの通知を行う設定を記載します。
また、本記事は以下の記事のアップデート版となり、JobScheduler V.1系を利用する際は以下の記事をご参照ください。
https://qiita.com/Yoshitami/items/400afb3467078c06223e
https://qiita.com/Yoshitami/items/cdb90de052fb141c7a28
詳細な情報については、以下をご覧下さい。
ナレッジベース(英語) https://kb.sos-berlin.com/display/PKB/JS7
日本語紹介資料 https://www.ossl.co.jp/
フォーラム https://groups.google.com/forum/?hl=ja#!forum/jobscheduler-ja
Facebook https://www.facebook.com/Jobscheduler-Japan-%E3%83%A6%E3%83%BC%E3%82%B6%E3%83%BC%E3%82%B0%E3%83%AB%E3%83%BC%E3%83%97-594469610565511/timeline/
日本JobSchedulerユーザーグループ https://sites.google.com/site/jobschedulerja/
JIRA(英語) https://change.sos-berlin.com/secure/Dashboard.jspa
User Forum(英語) http://sourceforge.net/projects/jobscheduler/forums/forum/486122
SOS社ホームページ http://www.sos-berlin.com
1.前提条件
JS7® JobScheduler V.2.4.0以上がインストール済みであること
JS7® JobSchedulerの概要及びインストール方法については以下を参照ください
Dockerでのインストール手順 https://qiita.com/satoruf/items/360fee5293611433ed33
Windowsでのインストール手順 https://qiita.com/Yoshitami/items/6804584592956a483364
Linux/CLIでのインストール手順 https://qiita.com/satoruf/items/fa9846f4376d1a50a67e
Zabbixサーバ、Zabbixエージェントがインストール済み、基本設定ができていること
2.インストール環境
●Jobschedulerサーバ
・CentOS 7.9
・PostgreSQL 13.5
・openjdk 11
・JS7 2.4.0
・JS7インストールユーザ:scheduler
・SELinuxはDisabled、Firewalldは停止されていること
・zabbix_senderコマンドがインストールされていること
※zabbix_senderコマンドがインストールされていない場合は以下のコマンドでインストールします。
# rpm -Uvh https://repo.zabbix.com/zabbix/5.0/rhel/7/x86_64/zabbix-release-5.0-1.el7.noarch.rpm
# yum install zabbix-sender
●Zabbixサーバ
・CentOS 7.9
・MariaDB 5.5.68-1
・httpd 2.4.6-97
・Zabbix 5.0.27
・SELinuxはDisabled、Firewalldは停止されていること
●ジョブ監視設定
・通知先Zabbixホスト名:js7
・通知先Zabbixアイテム名:JobScheduler Job status monitoring
・通知先Zabbixアイテムのキー:JobError
・通知ジョブ:すべてのジョブの監視を行う
3.Zabbixの設定
(1)アイテムの作成
ZabbixのWebUIにログインし、
設定 > ホスト > js7(通知先Zabbixホスト名) > アイテム の順に移動し、以下のアイテムを作成します。
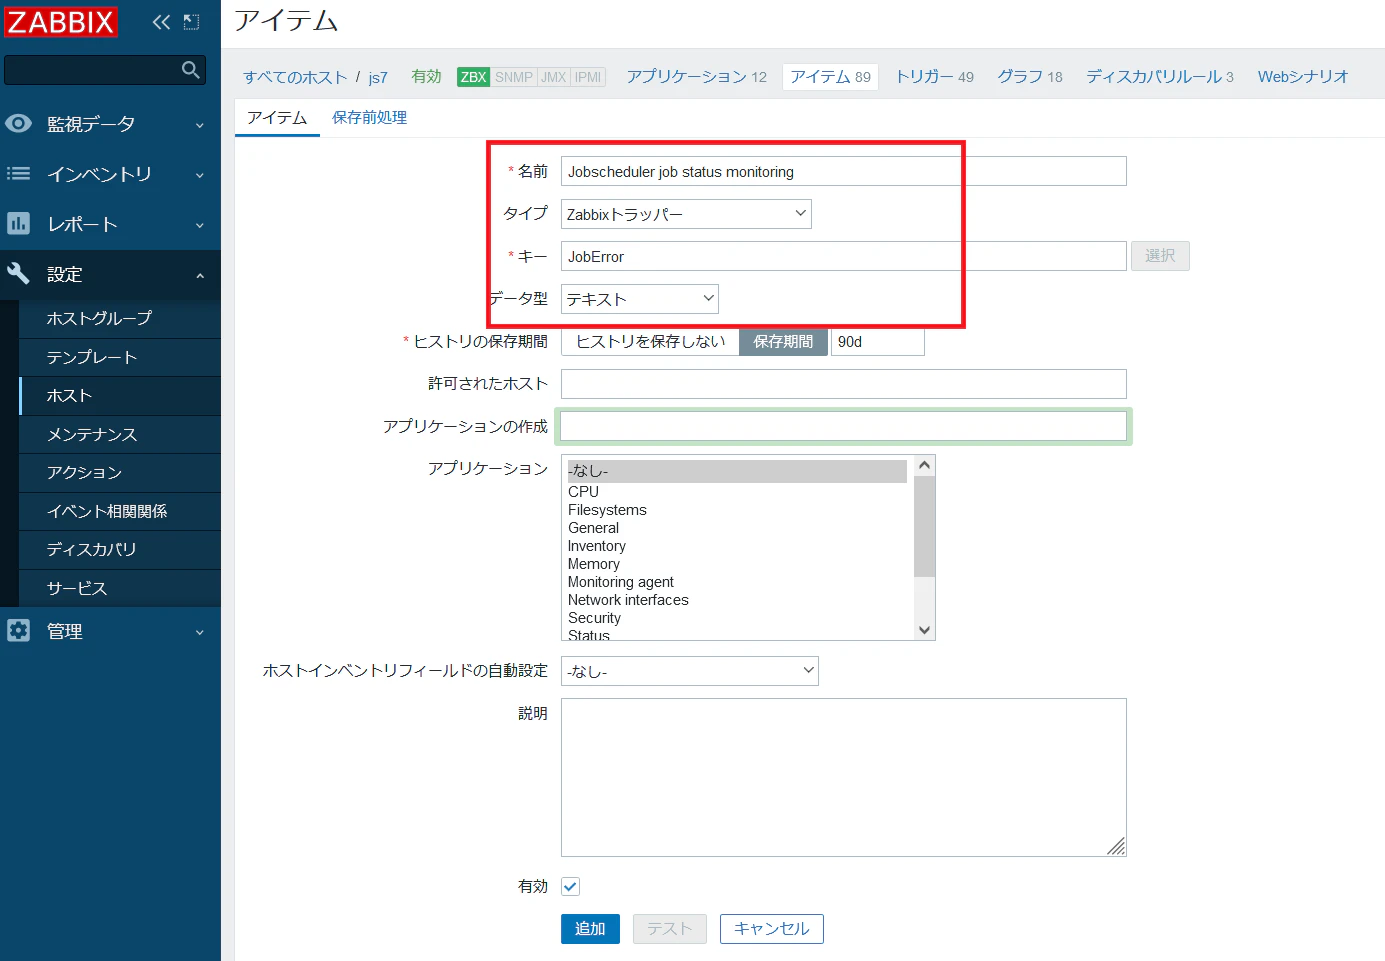
・名前:Jobscheduler job status monitoring
・タイプ:Zabbixトラッパー
・キー:JobError
・データ型:テキスト
(2)トリガーの作成
ZabbixのWebUIにログインし、
設定 > ホスト > js7(通知先Zabbixホスト名) > アイテム の順に移動し、以下のトリガーを作成します。
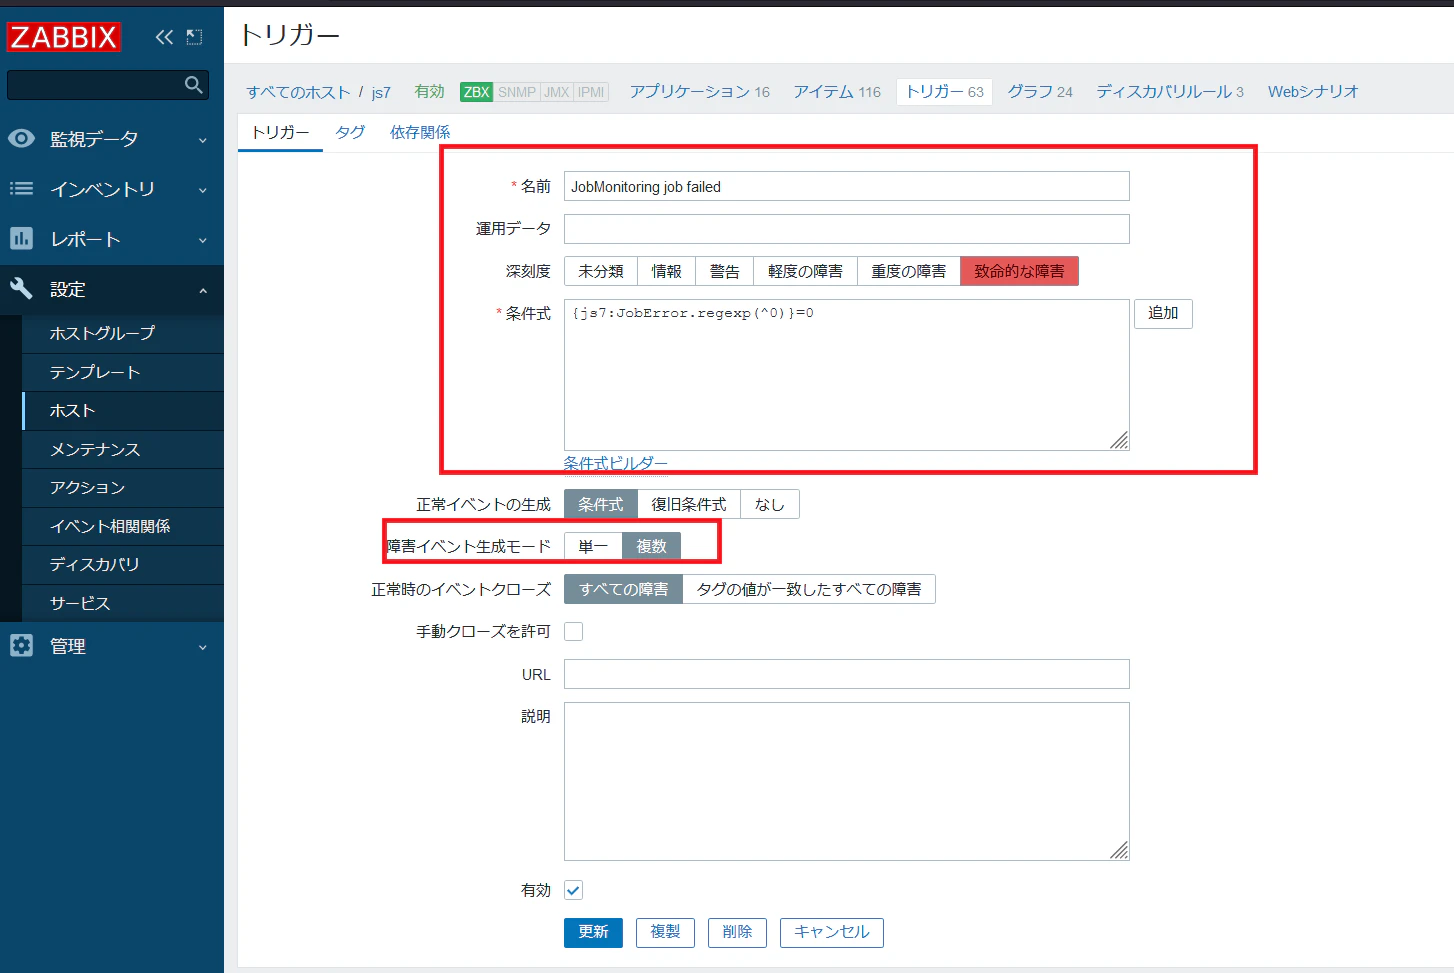
・名前:JobMonitoring job failed
・深刻度:致命的な障害
・条件式:{js7:JobError.regexp(^0)}=0
・障害イベント生成モード:複数
4.JS7通知設定
(1)ユーザ情報の設定
JOCのWebUIにrootアカウントでログインし、
http://<IPアドレス>:4446
ユーザ:root
パスワード:root
JobSchedulerメニューから、ジョブ設定 > 通知 の順で移動し、通知設定を行います。
設定の詳細は以下をご参照ください。
Fragmentsの設定
タイムゾーン設定、Zabbixサーバへ送信するメッセージを定義します。
(1)time_zoneの設定
Configurations > Fragments > MessageFragments を選択し、タイムゾーンを変更します。
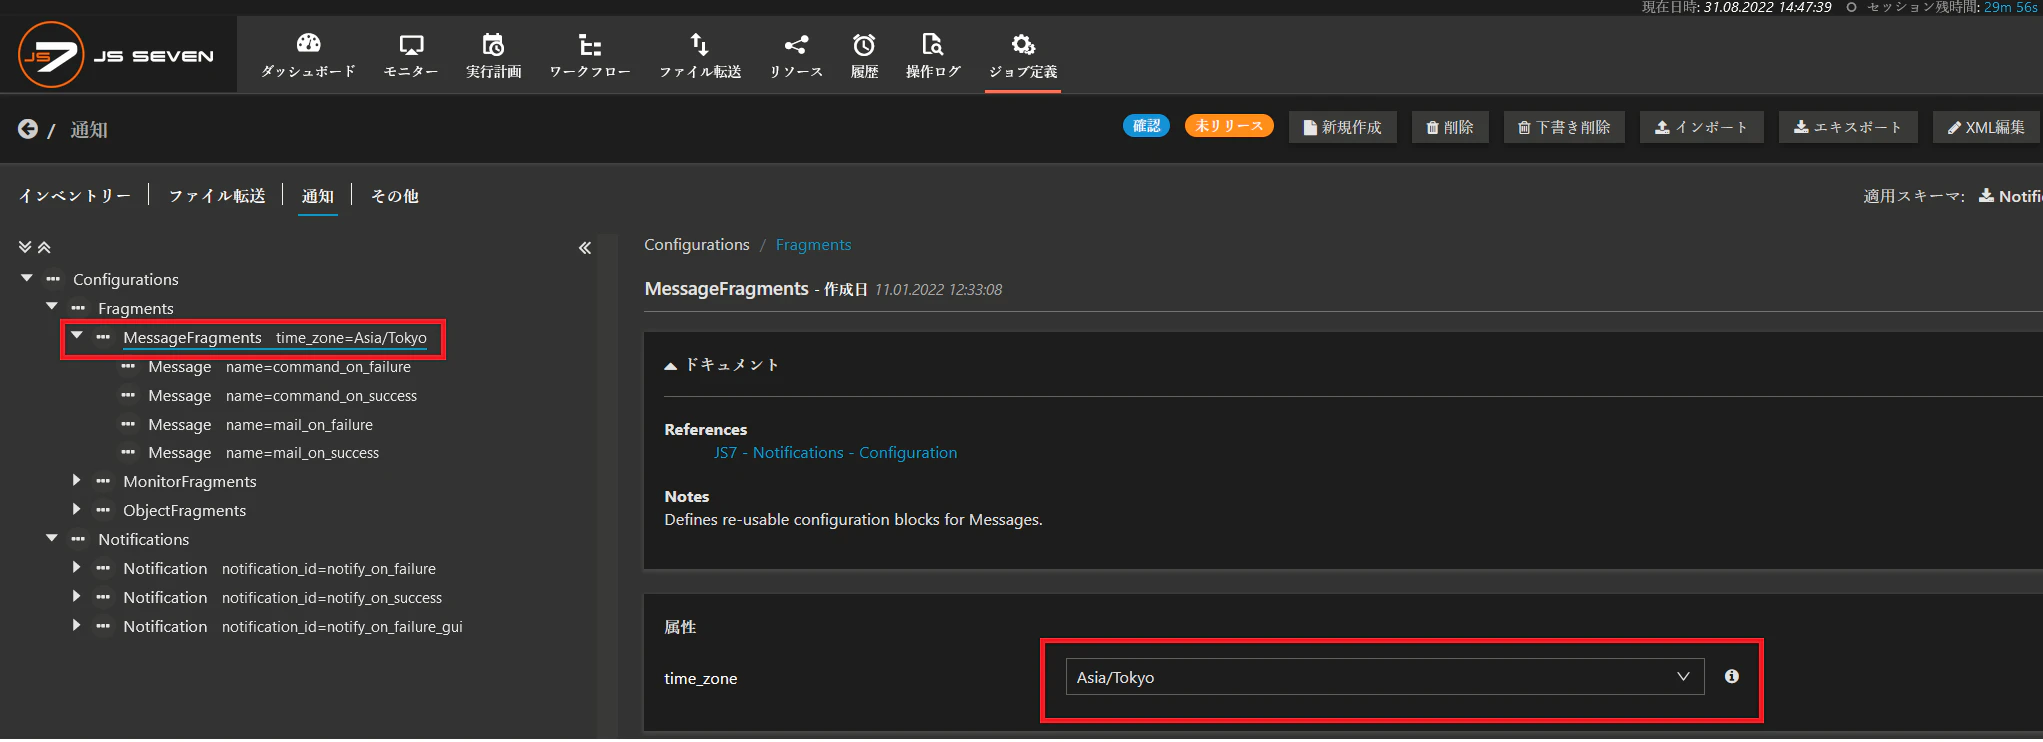
・time_zone:Asia/Tokyo
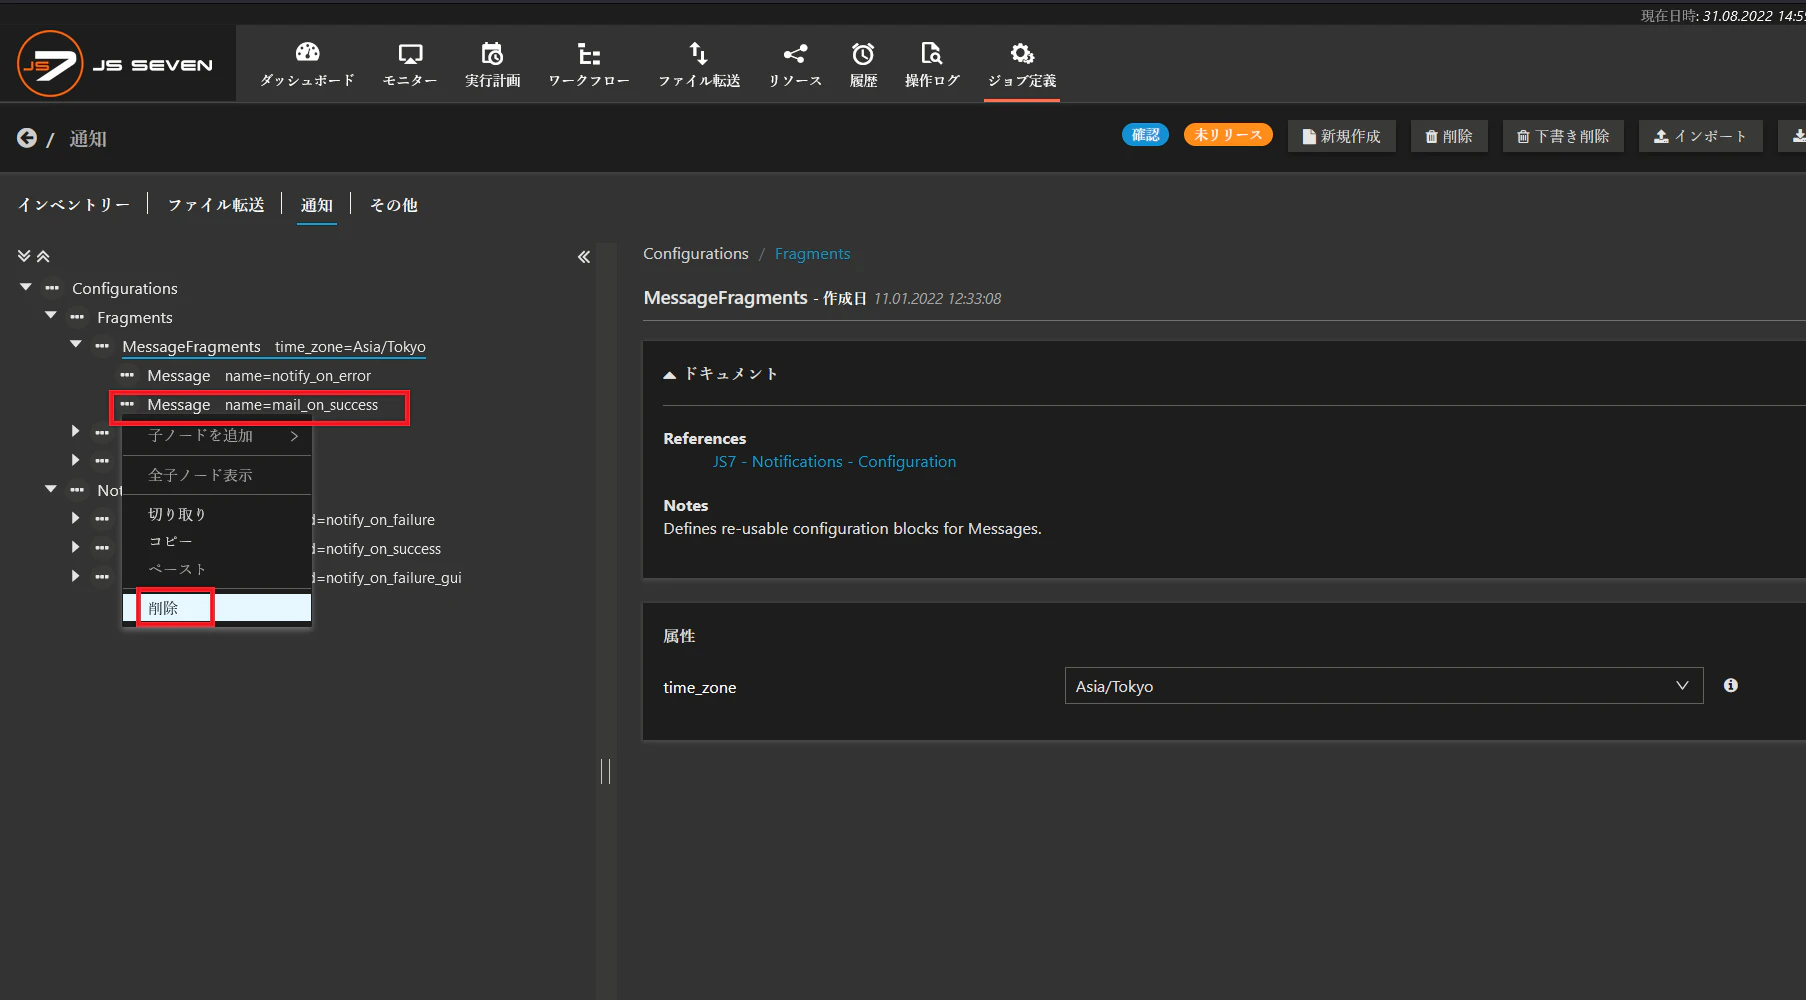
(2)Messageの設定
Configurations > Fragments > Messageを選択し、通知用のメッセージを定義します。
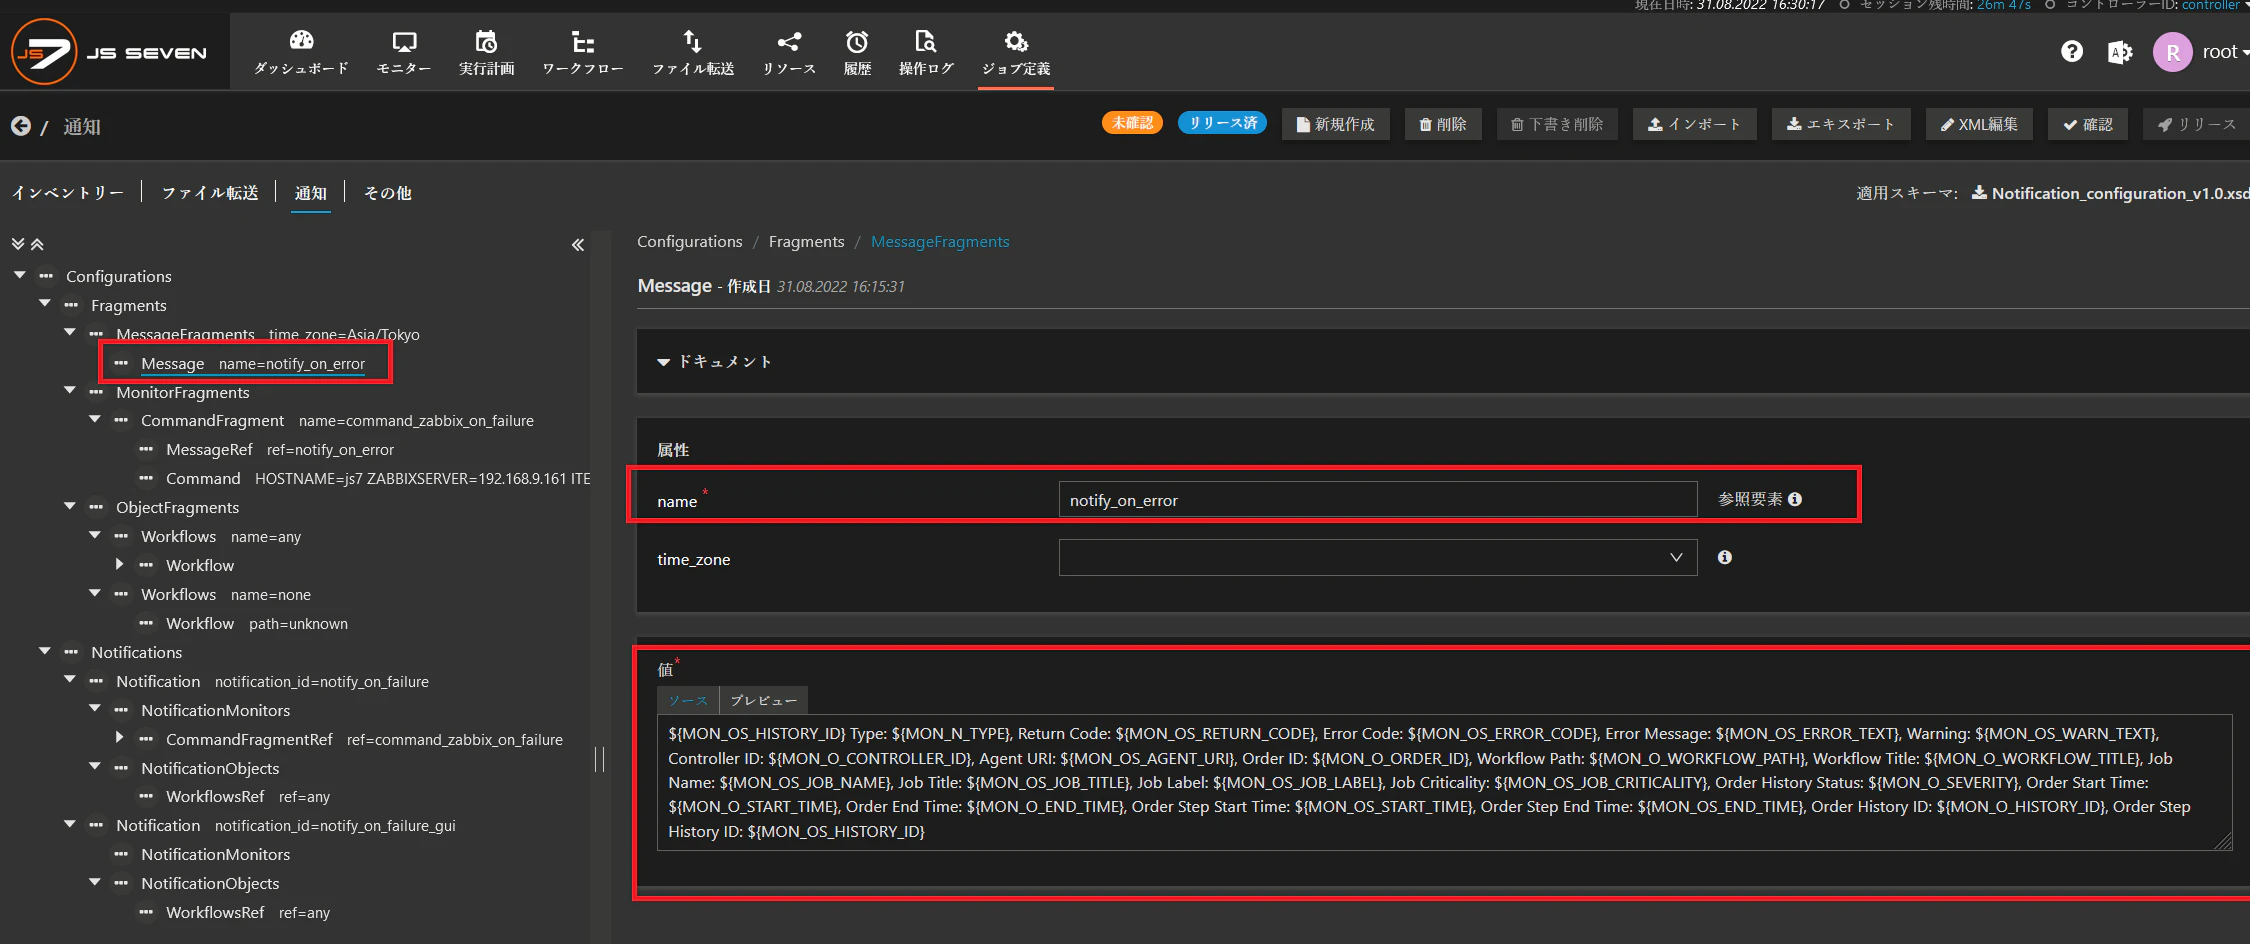
name:notify_on_error
※値の設定でZabbixサーバに送信するメッセージを変更することができます。
デフォルトの設定のみで様々なメッセージを送信しますが、さらに詳しい内容を送信したい場合は以下の変数を使用することができますので、詳細は以下をご参照ください。
また、本書では、Zabbixにエラー、ワーニング通知のみを行うため、デフォルトで設定しているMessage(command_on_success、mail_on_failure、mail_on_success)は不要のため削除します。
MonitorFragmentの設定
Zabbixサーバへ送信するコマンドの設定を行います。
詳細は以下をご参照ください。
(1)CommandMonitorFragmentの設定
Configurations > Fragments > MonitorFragments > CommandFragment を選択し、通知設定を作成します。
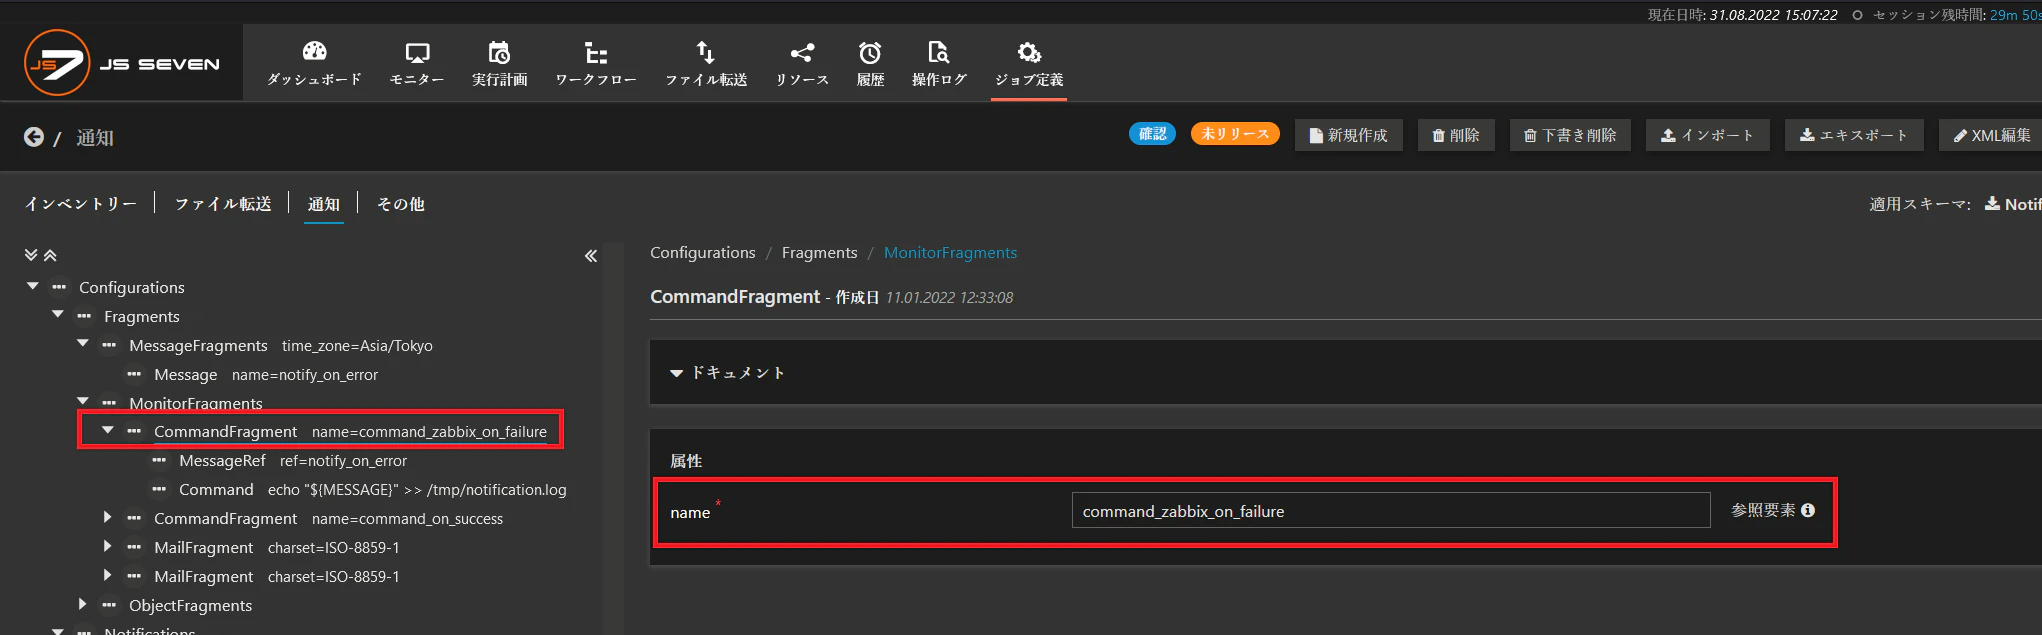
・name:command_zabbix_on_failure
(2)MessageRefの設定
Configurations > Fragments > MonitorFragments > CommandFragment > MessageRef を選択し、MessageRefで上記で作成したMessageの参照先を選択します。
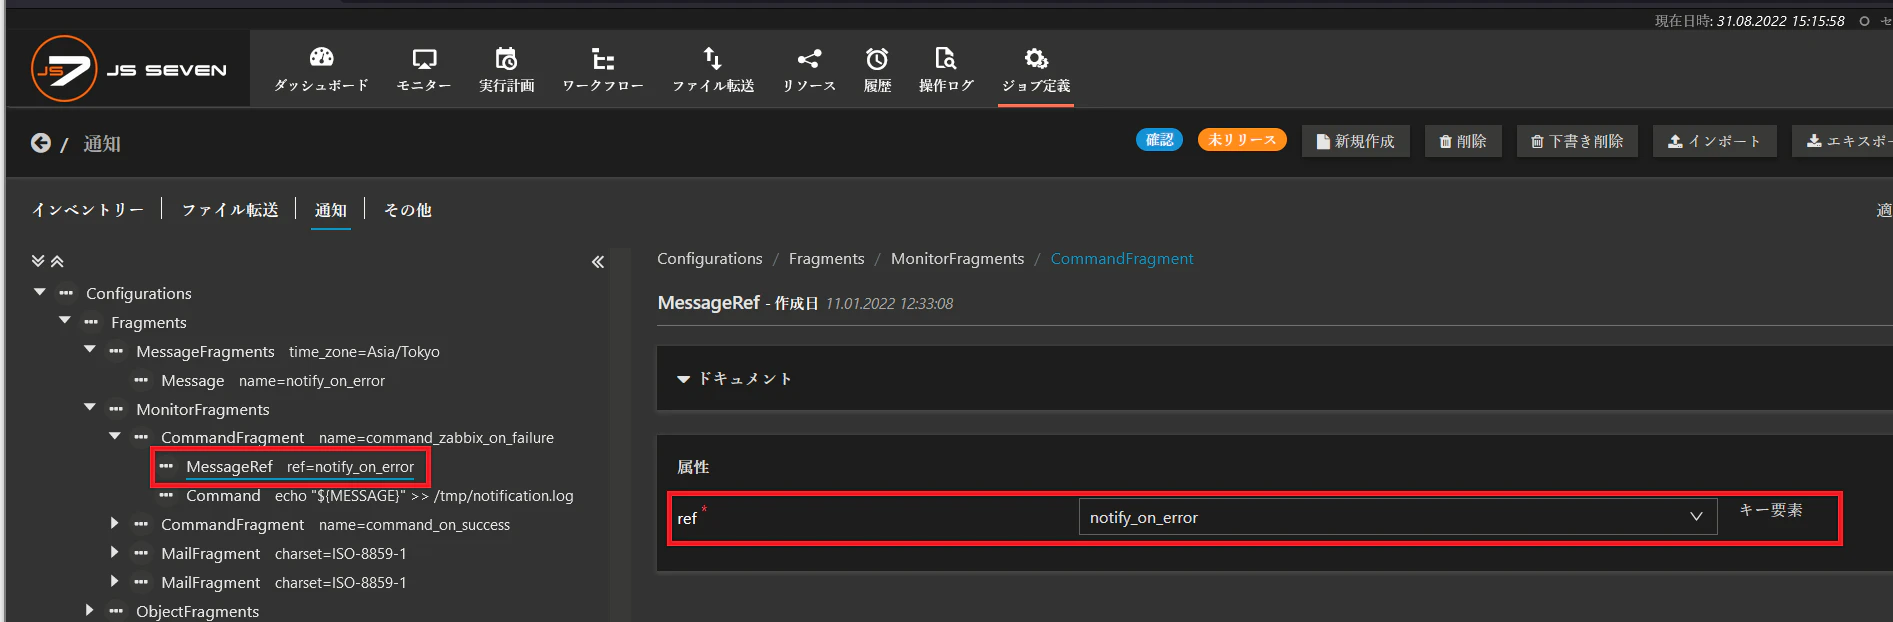
・ref:notify_on_error
(3)Commandの設定
Configurations > Fragments > MonitorFragments > CommandFragment > Command を選択し、zabbix_senderコマンドを使用して、Zabbixサーバに送信するメッセージの設定を行います。

コマンド:
zabbix_sender -z <ZabbixサーバのIPアドレス> -s <ホスト名> -k <アイテムキー> -o '${MESSAGE}'
また、デフォルトで設定しているCommandFragment(command_on_success)、MailFragmentは不要のため削除します。
Notificationsの設定
上記で作成した、Fragments要素を参照して、有効な通知を定義します。
(1)Notificationsの設定
Configurations > Notifications > Notification を選択し、notification_idを設定します。
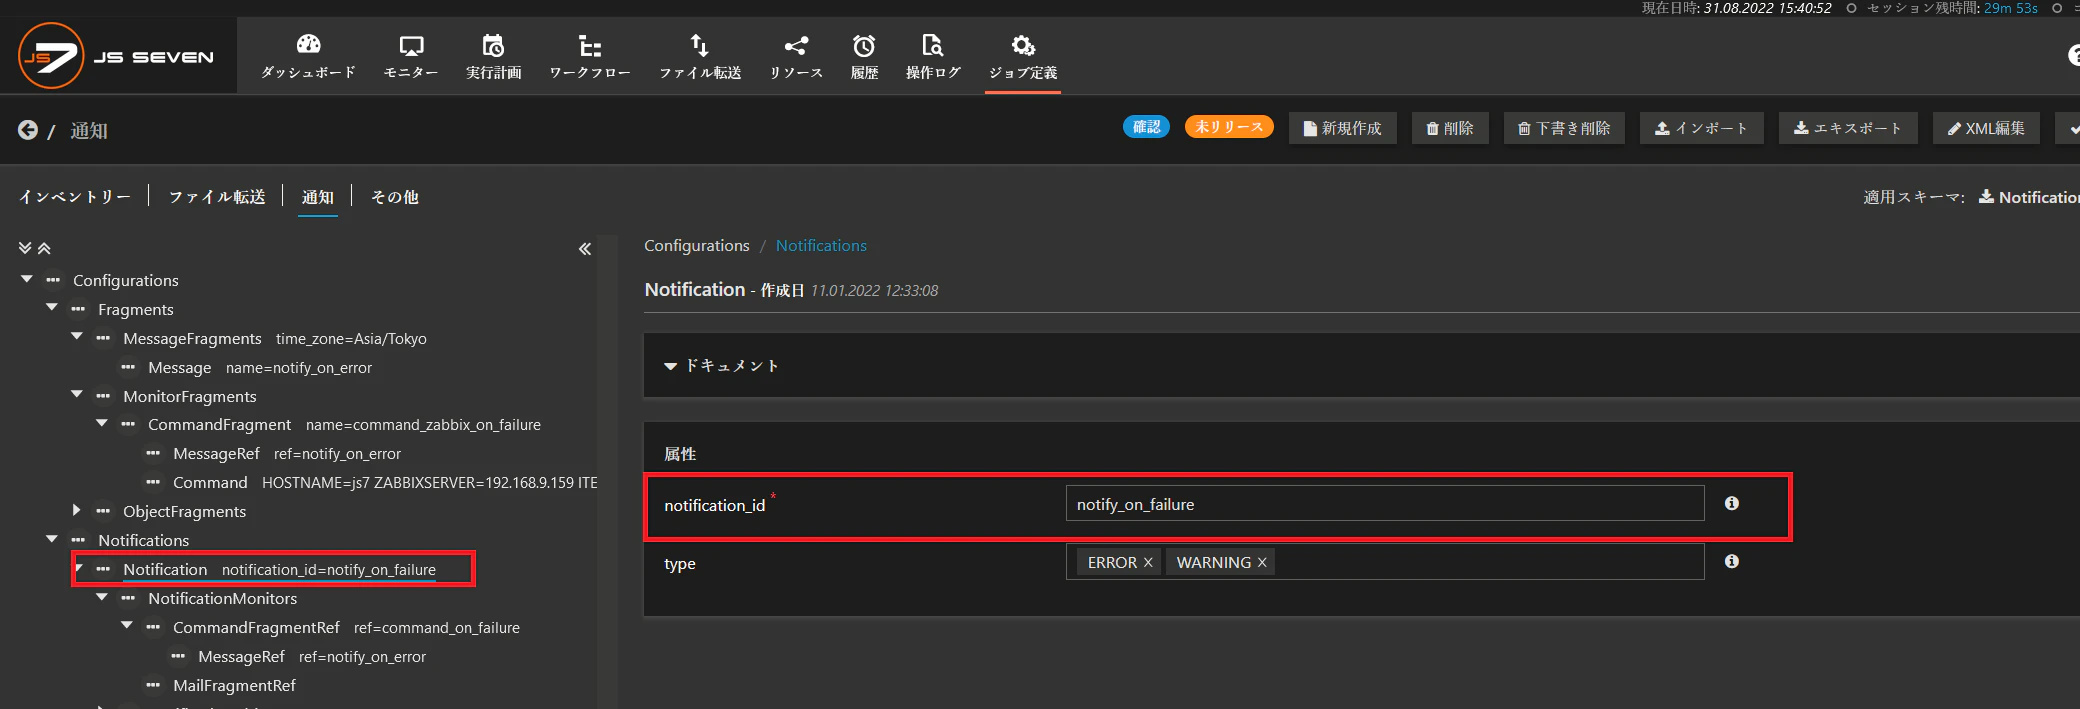
notification_id:notify_on_failure
(2)CommandFragmentRefの設定
Configurations > Notifications > Notification > NotificationMonitors を選択し、
CommandFragmentRefで、上記で作成したCommandの参照先を選択します。
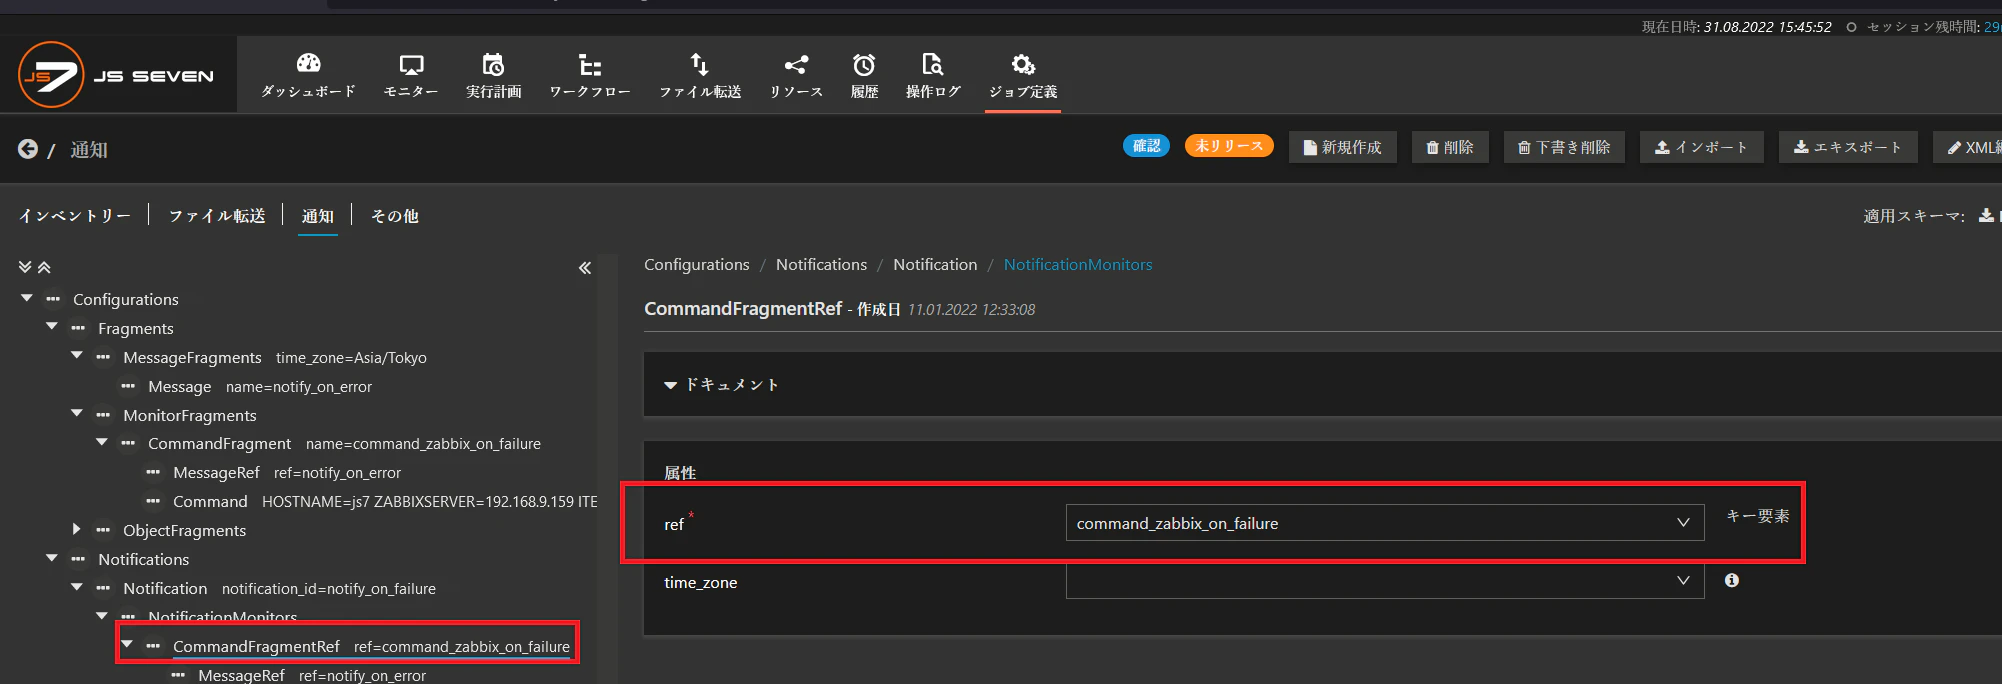
・ref:command_zabbix_on_failure
(3)WorkflowsRefの設定
Configurations > Notifications > Notification > NotificationObjects > WorkflowsRef を選択し、すべてのジョブのエラー通知を行うため、anyを選択します。
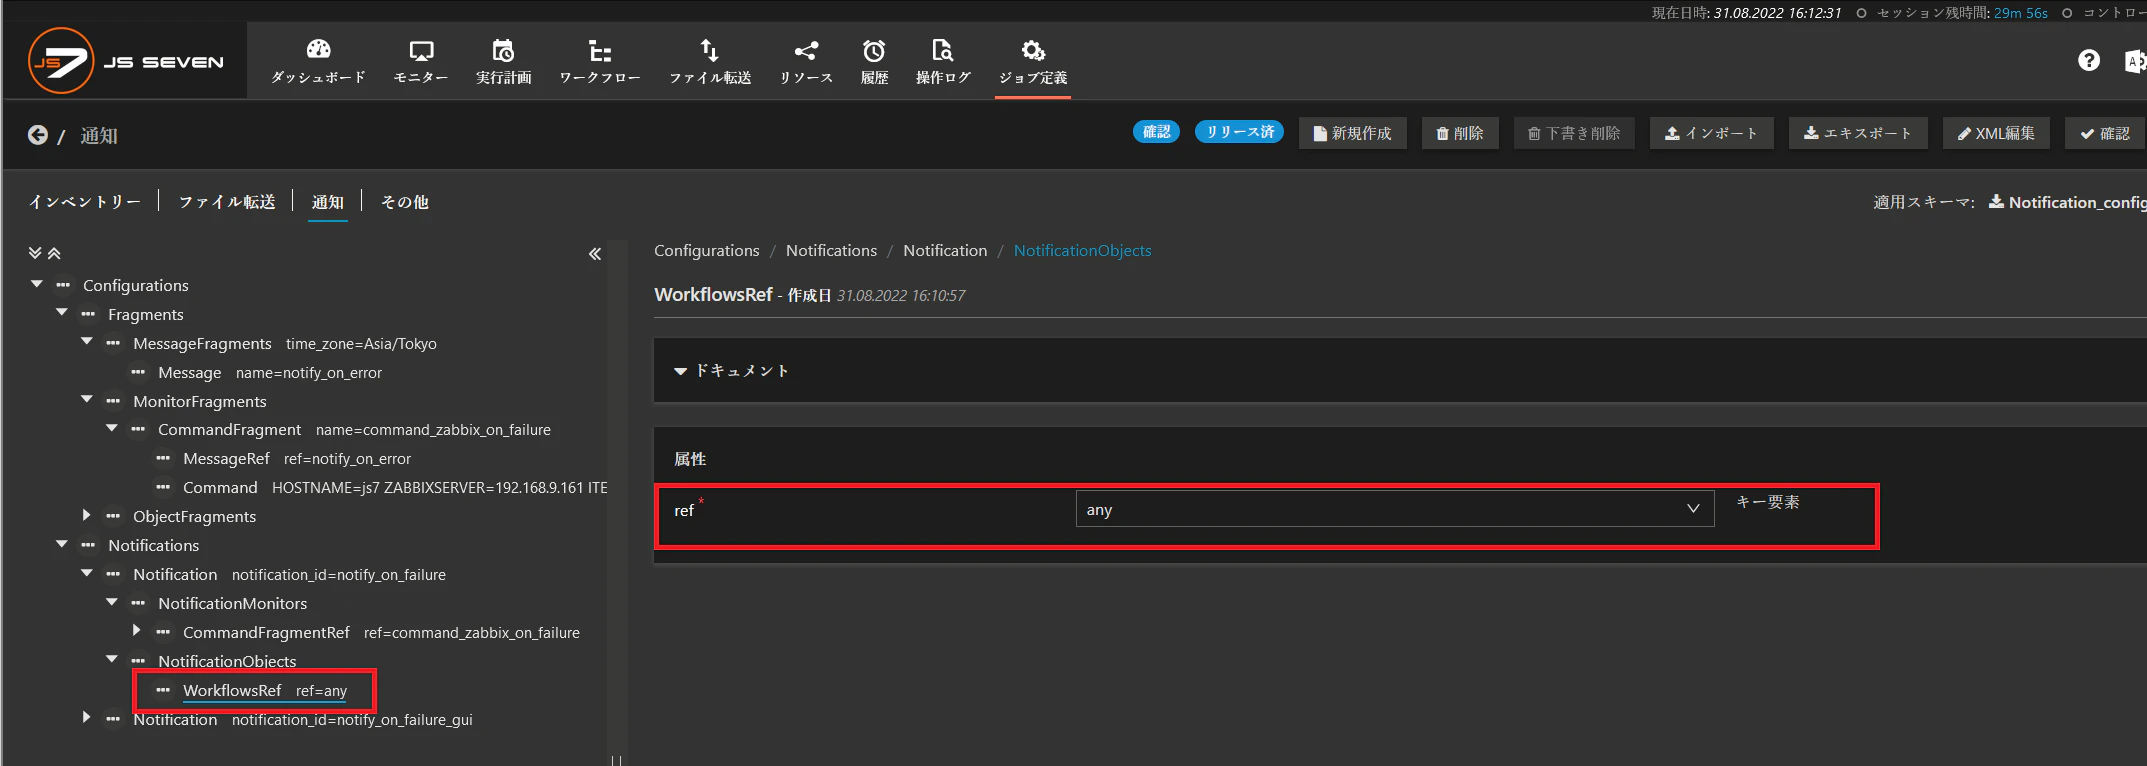
また、MailFragmentRef、Notification(notify_on_success、notify_on_failure_gui)は不要のため削除します。
設定完了後、「確認」ボタンでエラーが発生しないことを確認し、「リリース」します。
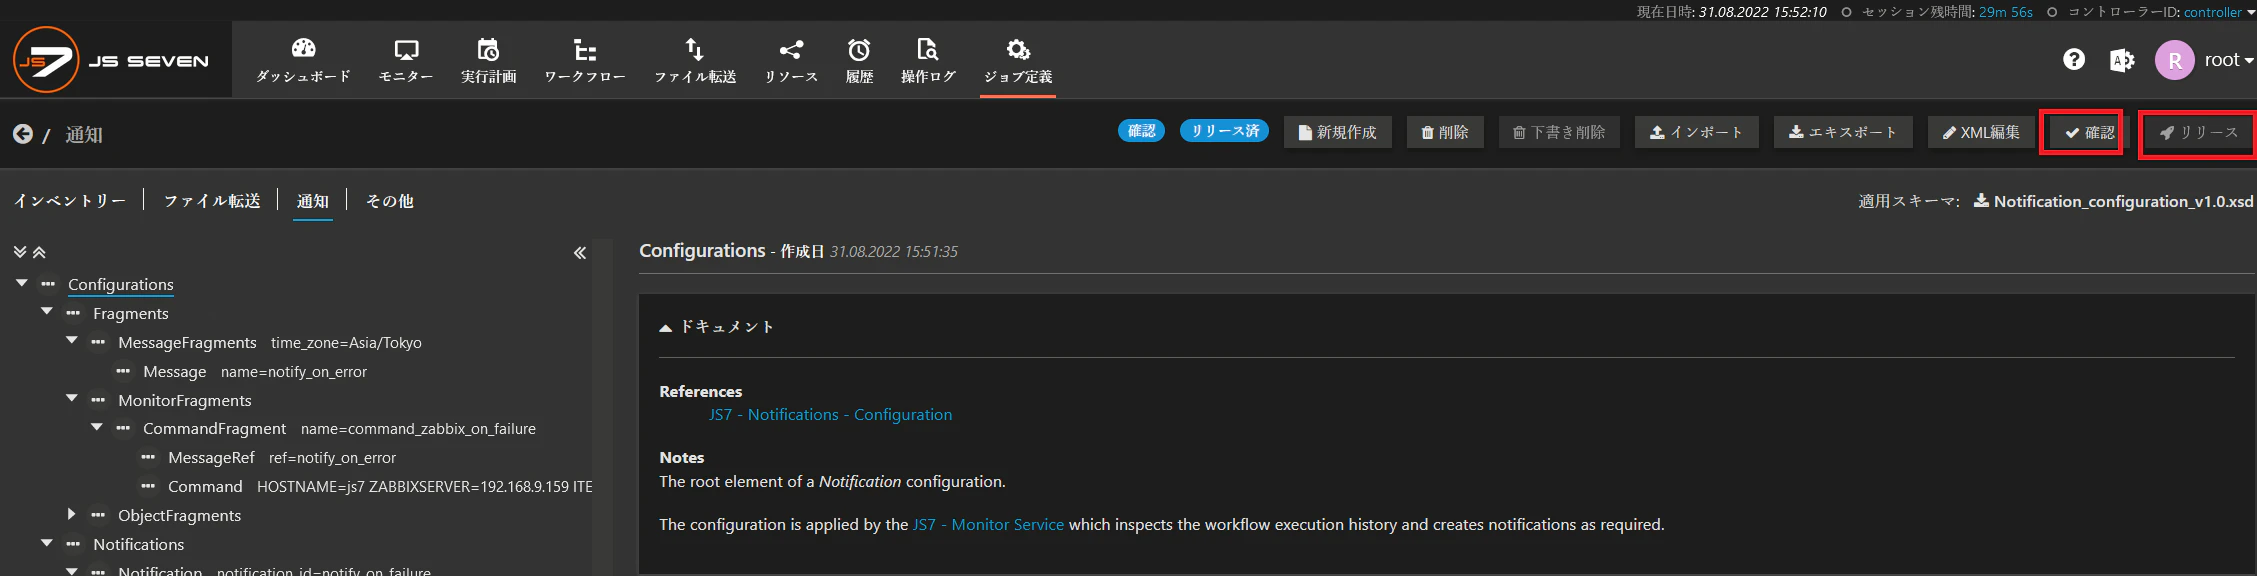
※「確認」でエラーが発生する場合は、デフォルトで設定している不要な設定等が残っている可能性があるため削除します。
また、XMLファイルを確認すると、以下の内容が表示されます。
<?xml version="1.0" encoding="UTF-8" standalone="no"?>
<Configurations>
    <Fragments>
        <MessageFragments time_zone="Asia/Tokyo">
            <Message name="notify_on_error"><![CDATA[${MON_OS_HISTORY_ID} Type: ${MON_N_TYPE}, Return Code: ${MON_OS_RETURN_CODE}, Error Code: ${MON_OS_ERROR_CODE}, Error Message: ${MON_OS_ERROR_TEXT}, Warning: ${MON_OS_WARN_TEXT}, Controller ID: ${MON_O_CONTROLLER_ID}, Agent URI: ${MON_OS_AGENT_URI}, Order ID: ${MON_O_ORDER_ID}, Workflow Path: ${MON_O_WORKFLOW_PATH}, Workflow Title: ${MON_O_WORKFLOW_TITLE}, Job Name: ${MON_OS_JOB_NAME}, Job Title: ${MON_OS_JOB_TITLE}, Job Label: ${MON_OS_JOB_LABEL}, Job Criticality: ${MON_OS_JOB_CRITICALITY}, Order History Status: ${MON_O_SEVERITY}, Order Start Time: ${MON_O_START_TIME}, Order End Time: ${MON_O_END_TIME}, Order Step Start Time: ${MON_OS_START_TIME}, Order Step End Time: ${MON_OS_END_TIME}, Order History ID: ${MON_O_HISTORY_ID}, Order Step History ID: ${MON_OS_HISTORY_ID}]]></Message>
        </MessageFragments>
        <MonitorFragments>
            <CommandFragment name="command_zabbix_on_failure">
                <MessageRef ref="notify_on_error"/>
                <Command><![CDATA[zabbix_sender -z 192.168.9.161 -s js7 -k JobError -o '${MESSAGE}']]></Command>
            </CommandFragment>
        </MonitorFragments>
        <ObjectFragments>
            <Workflows name="any">
                <Workflow>
                    <WorkflowJob criticality="ALL"/>
                </Workflow>
            </Workflows>
            <Workflows name="none">
                <Workflow path="unknown"/>
            </Workflows>
        </ObjectFragments>
    </Fragments>
    <Notifications>
        <Notification notification_id="notify_on_failure" type="ERROR WARNING">
            <NotificationMonitors>
                <CommandFragmentRef ref="command_zabbix_on_failure">
                    <MessageRef ref="notify_on_error"/>
                </CommandFragmentRef>
            </NotificationMonitors>
            <NotificationObjects>
                <WorkflowsRef ref="any"/>
            </NotificationObjects>
        </Notification>
    </Notifications>
</Configurations>
5.動作確認
Zabbixへの通知設定が完了したため、ジョブにエラーを発生させ、Zabbixへ通知されることの確認を行います。
※エラージョブは作成済みとします。
JOCのWebUIにrootアカウントでログインし、
http://<IPアドレス>:4446
ユーザ:root
パスワード:root
JobSchedulerメニューから、ワークフロー を選択し、対象のジョブのアクションにてオーダを追加します。

オーダ履歴を確認し、ステータスが「失敗」していることを確認します。
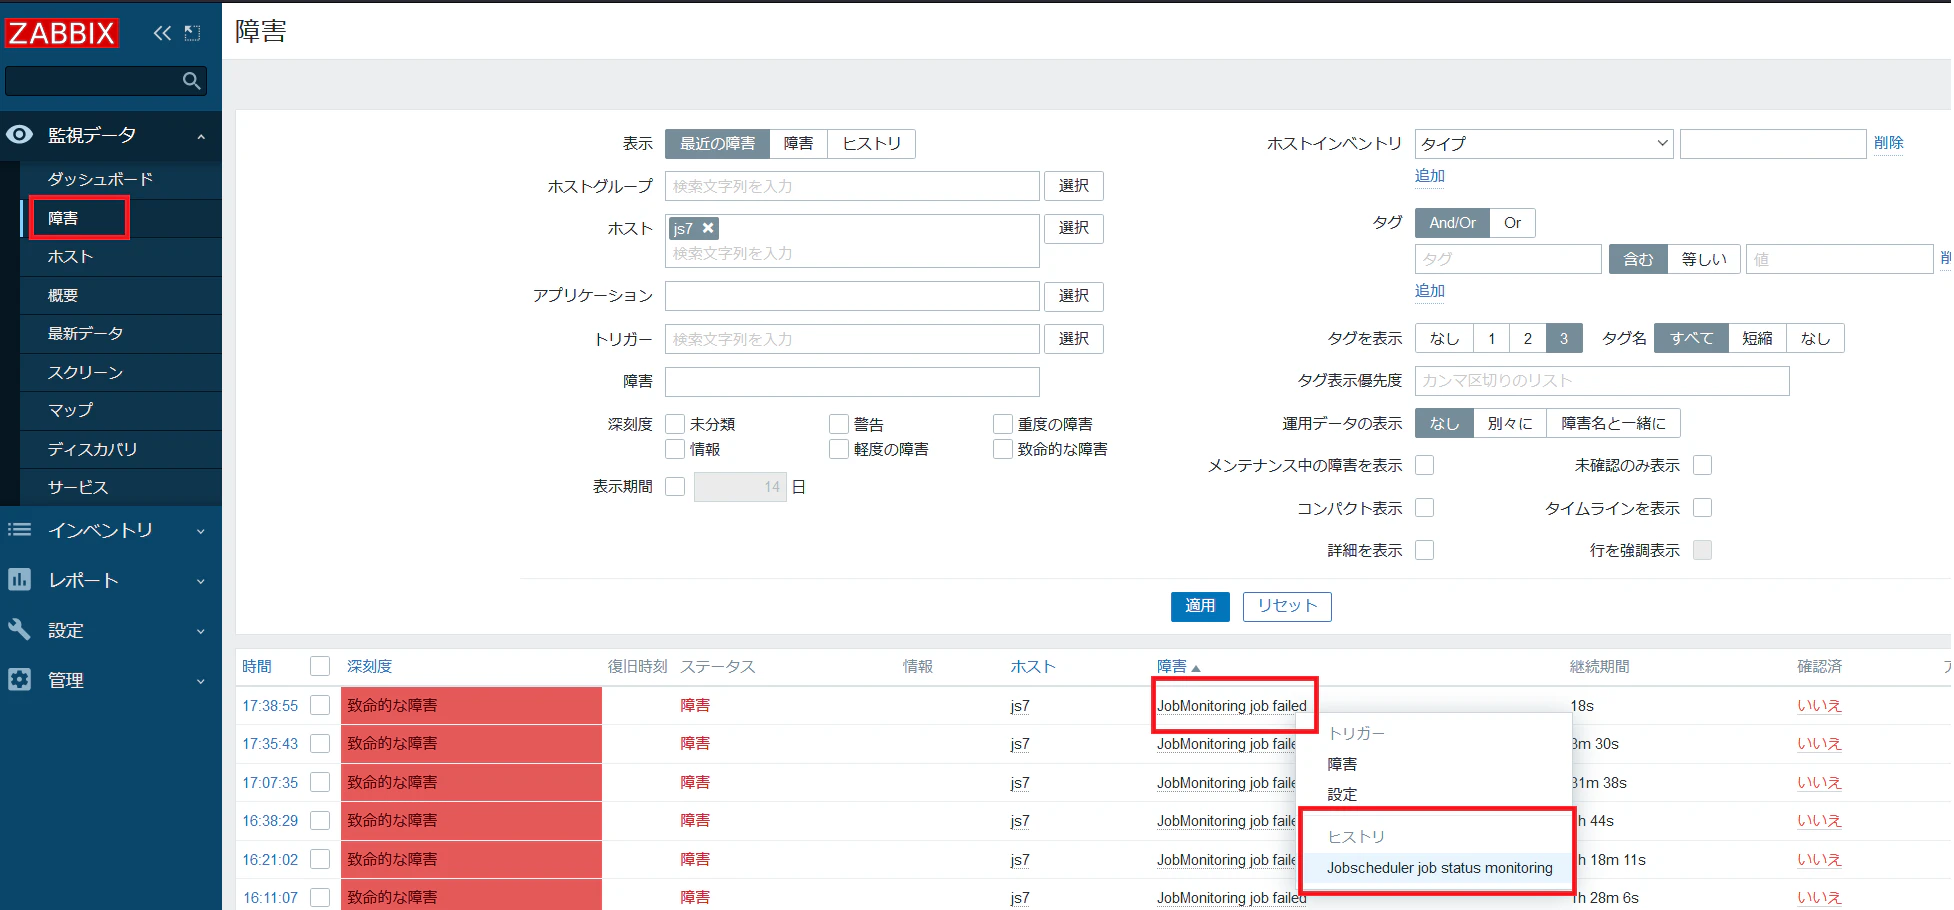
ZabbixサーバのWebUIにログインし、障害を確認し、「JobMonitoring job failed」に障害が発生していることを確認します。
「JobMonitoring job failed」のヒストリを確認すると、設定した内容のメッセージが送信されていることを確認できます。
![SnapCrab_ヒストリ [30秒ごとに更新。] — Mozilla Firefox_2022-8-31_17-39-26_No-00.png](https://qiita-user-contents.imgix.net/https%3A%2F%2Fqiita-image-store.s3.ap-northeast-1.amazonaws.com%2F0%2F66557%2F2f73d918-d0a5-af58-c1dc-5324ae38a006.png?ixlib=rb-4.0.0&auto=format&gif-q=60&q=75&s=f76c82987c465db219d17212b88c76fa)
また、js7のログを確認すると、Zabbixサーバへ通知が行われていることが確認できます。
パス:/var/log/sos-berlin.com/js7/joc
ログファイル:service-monitor.log
2022-08-31T17:38:55,291 INFO  monitor-h-8-1        c.s.j.m.m.HistoryMonitoringModel   - [monitor][history][1661935132333001-1661935132498002][UTC][08:38:52.333-08:38:52.498][0.005732s]4
2022-08-31T17:38:55,293 INFO  notification-6-1     c.s.j.m.m.NotifierModel            - [notification id=notify_on_failure][on ERROR][send to 1 monitors]MonitorCommand
2022-08-31T17:38:55,294 INFO  notification-6-1     c.s.j.m.n.n.NotifierCommand        - [1][NotifierCommand monitor=command_zabbix_on_failure,timeZone=Asia/Tokyo][execute][on ERROR][controllerId=controller,workflow=test1,orderId=#2022-08-31#T93513212816-root,job=test1,label=test1,position=0]zabbix_sender -z 192.168.9.161 -s js7 -k JobError -o '47 Type: ERROR, Return Code: 1, Error Code: , Error Message: , Warning: , Controller ID: controller, Agent URI: http://localhost:4445, Order ID: #2022-08-31#T93513212816-root, Workflow Path: /test1/test1, Workflow Title: test1, Job Name: test1, Job Title: Write log output for running log, Job Label: test1, Job Criticality: NORMAL, Order History Status: FAILED, Order Start Time: 2022-08-31T17:38:52+0900, Order End Time: , Order Step Start Time: 2022-08-31T17:38:52+0900, Order Step End Time: 2022-08-31T17:38:52+0900, Order History ID: 47, Order Step History ID: 47'
2022-08-31T17:38:55,302 INFO  notification-6-1     c.s.j.m.n.n.NotifierCommand        -     [1][NotifierCommand monitor=command_zabbix_on_failure,timeZone=Asia/Tokyo][successful][on ERROR][controllerId=controller,workflow=test1,orderId=#2022-08-31#T93513212816-root,job=test1,label=test1,position=0]zabbix_sender -z 192.168.9.161 -s js7 -k JobError -o '47 Type: ERROR, Return Code: 1, Error Code: , Error Message: , Warning: , Controller ID: controller, Agent URI: http://localhost:4445, Order ID: #2022-08-31#T93513212816-root, Workflow Path: /test1/test1, Workflow Title: test1, Job Name: test1, Job Title: Write log output for running log, Job Label: test1, Job Criticality: NORMAL, Order History Status: FAILED, Order Start Time: 2022-08-31T17:38:52+0900, Order End Time: , Order Step Start Time: 2022-08-31T17:38:52+0900, Order Step End Time: 2022-08-31T17:38:52+0900, Order History ID: 47, Order Step History ID: 47'
2022-08-31T17:39:03,305 INFO  monitor-h-8-1        c.s.j.m.m.HistoryMonitoringModel   - [monitor][history][1661935140696000-1661935140696000][UTC][08:39:00.696-08:39:00.696][0.003984s]1