参考ページ
既存のindex.htmlを「書き換える」には...?
いままでの「index.html」は、グラフ値は暫定的に固定値を出力していた。
テンプレートみたいに既存のhtmlを読み込んで、黄色の部分を書き換えてhtml再出力ができればいいのだが...
DOMとは
Javascriptでhtmlを動的に書き換える方法!
いくらでも難しく言うことはできるけど一言で言うなら、
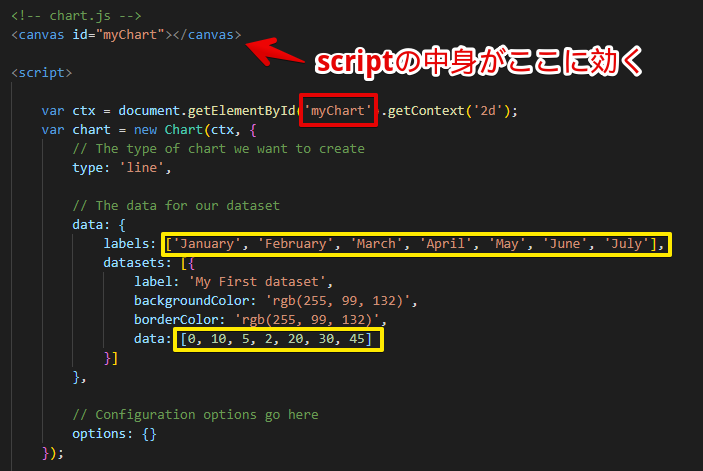
特定のIDをもつ要素を取得して書き換える がシンプルな答えだ。
かつてツイッターの記事改変が話題になったことがあったね
Twitterのツィートを書き換える方法。詳しくはリンク先とかを読んでほしいが、要はhtmlは非常に簡単に書き換えができる。その性質を利用する。
Django
今回は「basic_django_graph」というフォルダを作成する
インストール
basic_django_graph> pip install Django
プロジェクトの作成
Django は visualstudio のように「プロジェクト」とその中に複数の「アプリケーション」という単位でモノゴトを管理するようだ。プロジェクト名はとりあえず「mysite」とする。
basic_django_graph> django-admin startproject mysite
フォルダ構造は下図のようになる。「mysite」が2段仕込みになっているが、これは「mysiteという世界」に同じ名前のフォルダがあったときは、mysite配下の複数アプリケーションが使う「共通のConfigフォルダとする」という取り決めだ。ややこしいよね。 Configって名前にしたら?っていう提案 も実際にある。
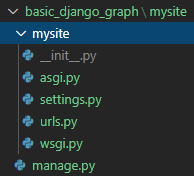
プロジェクトフォルダに移動してWebサーバーを動かす
basic_django_graph> cd mysite
basic_django_graph\mysite> python manage.py runserver

  Watching for file changes with StatReloader
  Performing system checks...

  System check identified no issues (0 silenced).

  You have 18 unapplied migration(s). Your project may not work properly until you apply the migrations for app(s):
  admin, auth, contenttypes, sessions.
  Run 'python manage.py migrate' to apply them.
  September 01, 2020 - 19:51:36
  Django version 3.1, using settings 'mysite.settings'
  Starting development server at http://127.0.0.1:8000/
  Quit the server with CTRL-BREAK.
HelloWorld!
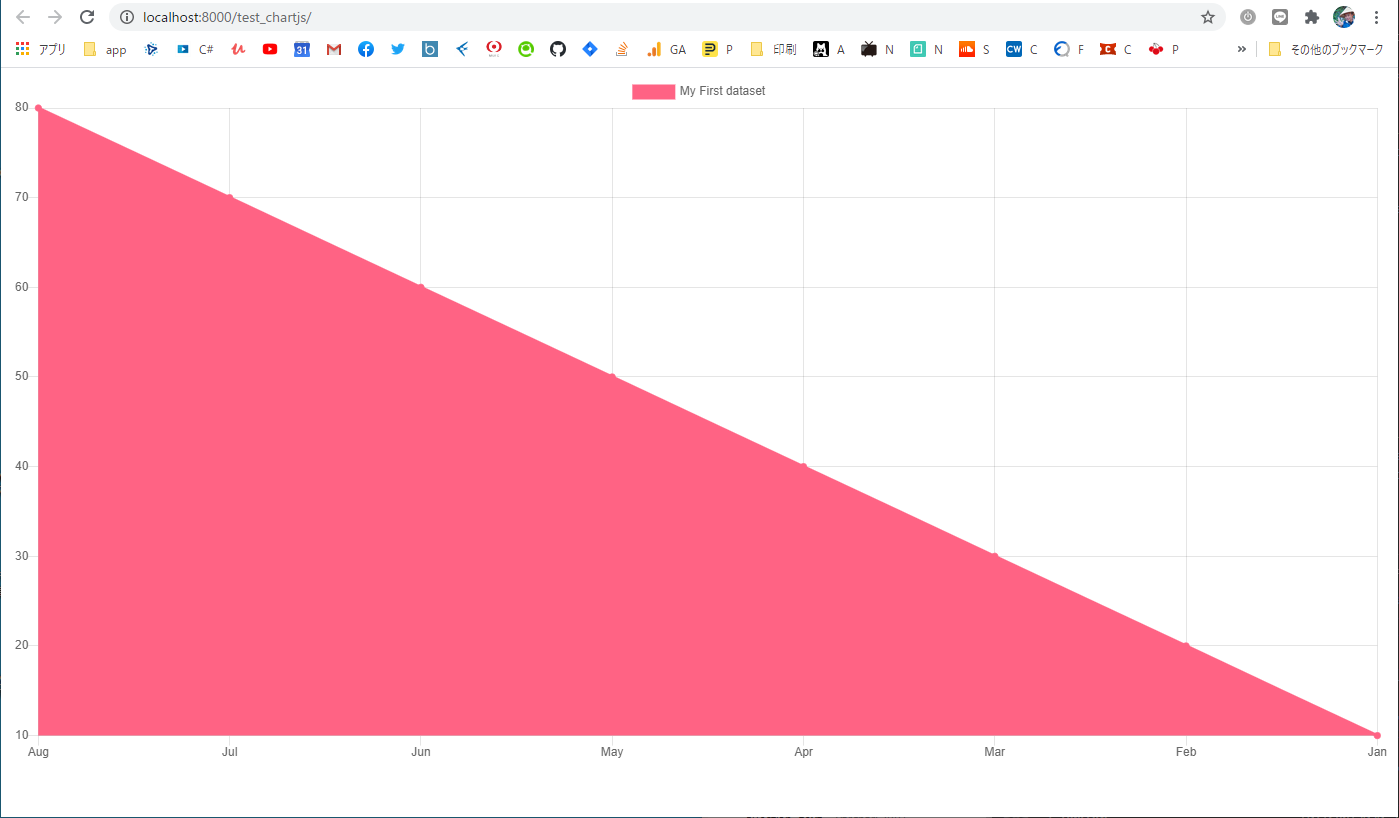
ブラウザに localhost と打ち込むと、Helloworldがきた!

startapp
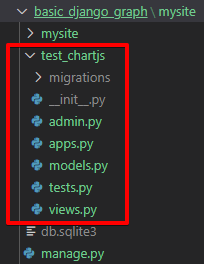
アプリケーションフォルダを作成する。名前は test_chartjs にする
basic_django_graph\mysite> python manage.py startapp test_chartjs
views.py を編集
from django.http import HttpResponse

def index(request):
    return HttpResponse("Hello, world.")
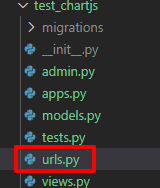
test_chartjs/urls.py を編集
URLの紐づけをロケットアニメのHelloWorldから変えるために urls.py を新規作成する(作る場所は test_chartjs フォルダ)。便宜上「子供のurls.py」と呼ぶことがある。 urls.py には s をつけろよデコ助野郎。
from django.urls import path

# STEP1: 現在のフォルダの「views.py」を import する!さっき編集したやつ!
from . import views

# STEP2: views.py には「index」という関数を作りましたね!それを呼んでます
urlpatterns = [
    path('', views.index, name='index'),
]
mysite/urls.py を編集(共通Configのほう)
NTTの配電盤みたいなイメージね。便宜上「親のurls.py」と呼ぶことがある。
(※この英語部分もよく読むと実はさっき子供のurls.pyに書いたようなことをやれって書いてあったりする)
"""mysite URL Configuration

The `urlpatterns` list routes URLs to views. For more information please see:
    https://docs.djangoproject.com/en/2.2/topics/http/urls/
Examples:
Function views
    1. Add an import:  from my_app import views
    2. Add a URL to urlpatterns:  path('', views.home, name='home')
Class-based views
    1. Add an import:  from other_app.views import Home
    2. Add a URL to urlpatterns:  path('', Home.as_view(), name='home')
Including another URLconf
    1. Import the include() function: from django.urls import include, path
    2. Add a URL to urlpatterns:  path('blog/', include('blog.urls'))
"""
from django.contrib import admin
from django.urls import include, path

urlpatterns = [
    path('test_chartjs/', include('test_chartjs.urls')),
    path('admin/', admin.site.urls),
]
HelloWorld!
Webサーバーを動かして...
basic_django_graph> cd mysite
basic_django_graph\mysite> python manage.py runserver

  Watching for file changes with StatReloader
  Performing system checks...

  System check identified no issues (0 silenced).

  You have 18 unapplied migration(s). Your project may not work properly until you apply the migrations for app(s):
  admin, auth, contenttypes, sessions.
  Run 'python manage.py migrate' to apply them.
  September 01, 2020 - 19:51:36
  Django version 3.1, using settings 'mysite.settings'
  Starting development server at http://127.0.0.1:8000/
  Quit the server with CTRL-BREAK.
ブラウザに localhost を入力(ただし、URLに /test_chartjs/ が増えてる。そう! urls.py でさっきフォルダ作ったね!)
http://localhost:8000/test_chartjs/

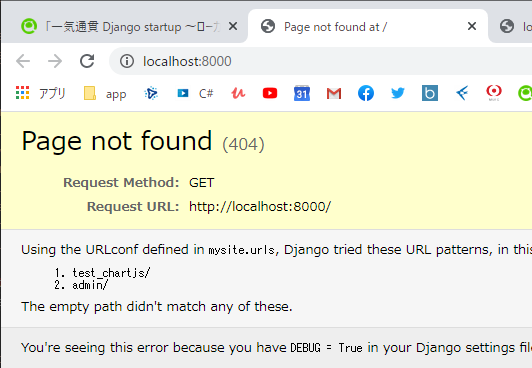
(※もう localhost だけだと 404 が出ます)
http://localhost:8000
アプリケーションとして認識させる
(このステップ忘れるべからず)
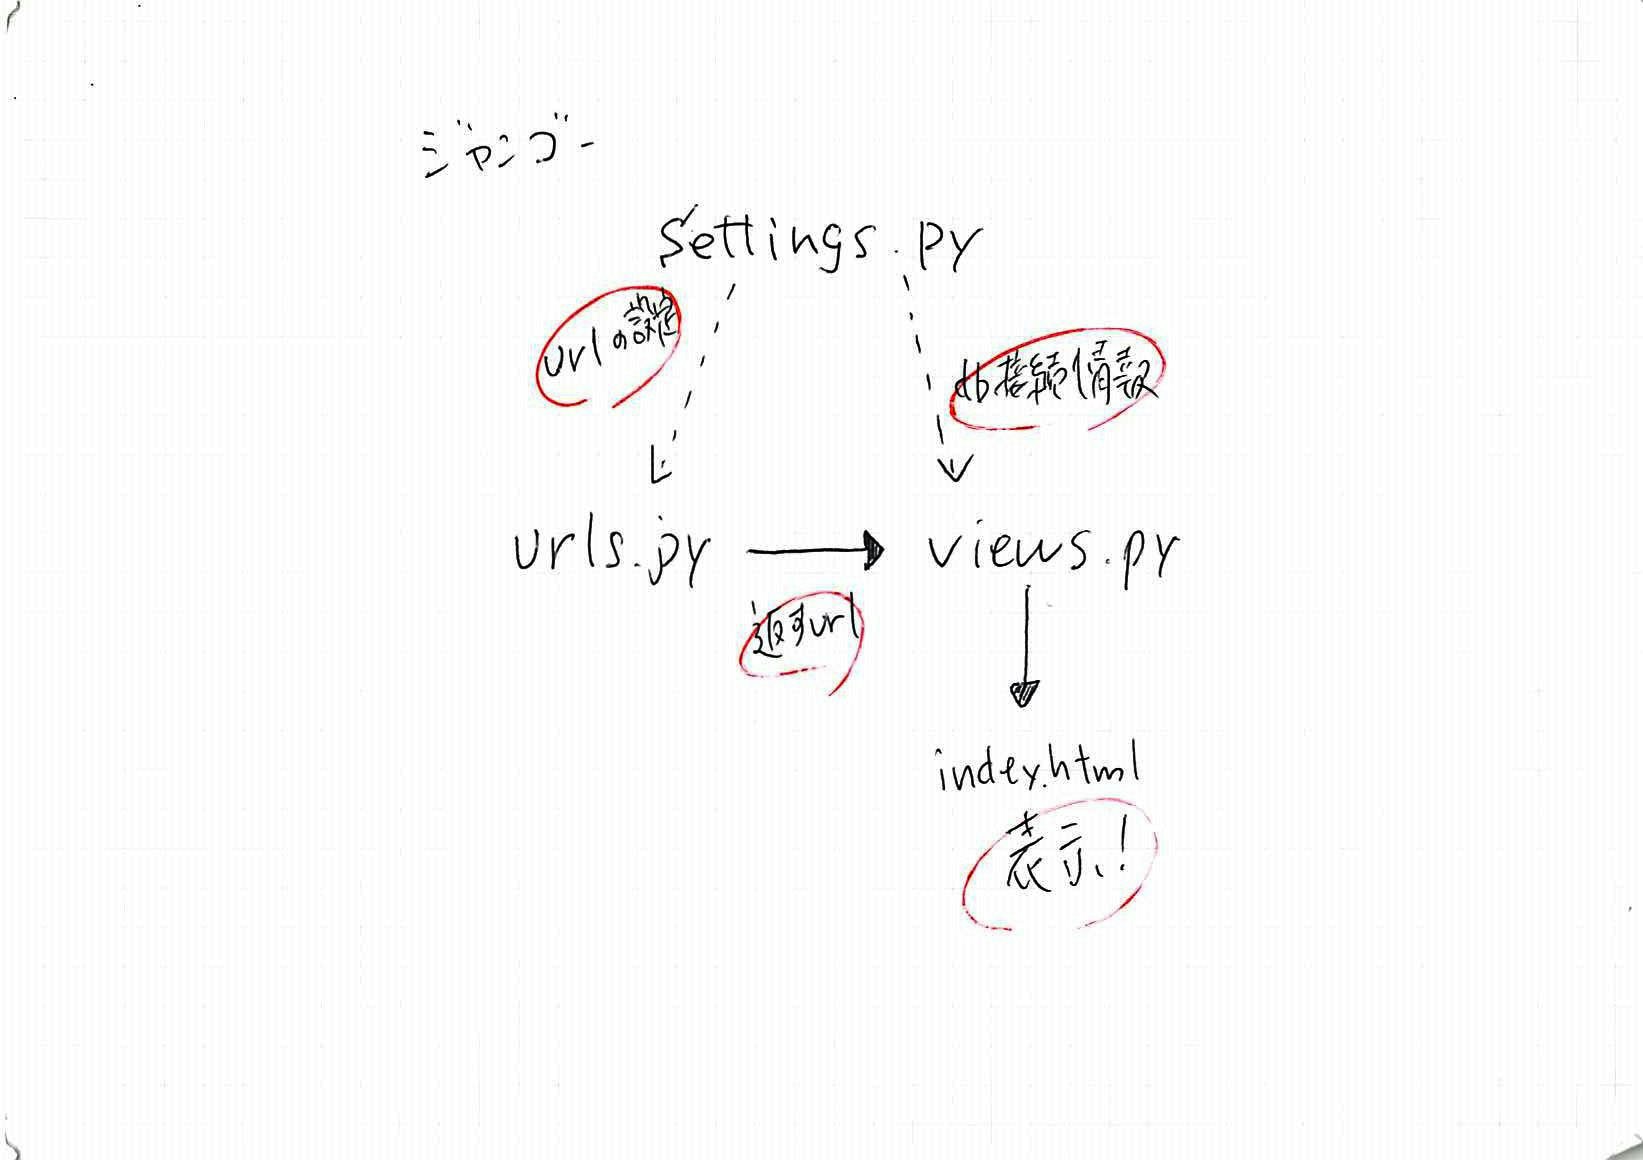
このsettingでアプリケーションとして認識させることで、index.htmlを開きにいったときの「templates/{アプリケーション名}/index.html」を自動的に識別して読みにいってくれる。
DjangoでTemplateDoesNotExistと言われたら
「各アプリケーションの配下にあるtemplatesディレクトリ」を探索するということは、アプリケーションと認識されていなければ探索されないということだ。
今回はそもそもここに原因があった。settings.pyのINSTALLED_APPSにmyappを登録するのを忘れていた。
INSTALLED_APPS に設定を追加するんだが、、え? TestChartjsConfig って文字に覚えがないって?そうなんだよ、アプリケーションフォルダ(test_chartjs)配下にある apps.py を開いてみると書いてあるんだよね。わかりにくいなぁこれ。
INSTALLED_APPS = [
    'django.contrib.admin',
    'django.contrib.auth',
    'django.contrib.contenttypes',
    'django.contrib.sessions',
    'django.contrib.messages',
    'django.contrib.staticfiles',
+    'test_chartjs.apps.TestChartjsConfig',  # 追加!
]
# 言語の設定
LANGUAGE_CODE = 'ja'
# タイムゾーンの設定
TIME_ZONE = 'Asia/Tokyo'
MySQL
インストール
・Windows10にインストーラーでMySQLをインストールする方法
ログイン
basic_django_graph\mysite> mysql -u root -p
ユーザ作成
「db」に対してFULL権限をもつ「python」ユーザを作成。
最初はSELECT権限だけ、とかにしてたんだけど、DjangoがMigrationするときにCREATEなどの権限をよこせと言ってくる。あえてひとつひとつエラーになっていくのも勉強になる。
ユーザ名とパスワード同じにしたかったけどパスワードポリシーが面倒だな...
| 項目 | 入力 |
|---|---|
| user | python |
| password | python123 |
mysql> CREATE USER 'python'@'localhost' IDENTIFIED BY 'python123';
select user, host from mysql.user;
  +---------------+-----------+
  | user          | host      |
  +---------------+-----------+
  | mysql.session | localhost |
  | mysql.sys     | localhost |
  | python        | localhost |
  | root          | localhost |
  +---------------+-----------+
データベース作成
mysql> CREATE DATABASE db DEFAULT CHARACTER SET utf8;
権限付与
show grants for 'python'@'localhost';
  GRANT USAGE ON *.* TO 'python'@'localhost'
grant CREATE, DROP, SELECT, UPDATE, INSERT, DELETE, ALTER, REFERENCES, INDEX on db.* to python@localhost;
ログアウト
mysql> exit
Django側で接続設定
# ここにはデータベースの設定が書いてあります
DATABASES = {
    'default': {
        'ENGINE': 'django.db.backends.mysql',
        'NAME': 'db',
        'USER': 'python',
        'PASSWORD': 'python123',
    }
}
mysqlclient
basic_django_graph\mysite> pip install mysqlclient
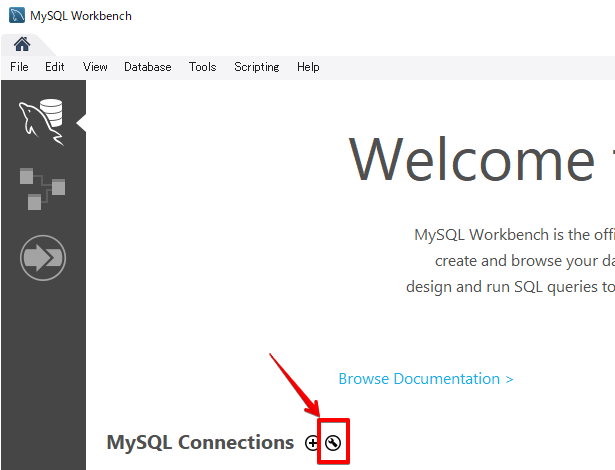
MySQLWorkbench
・前提条件
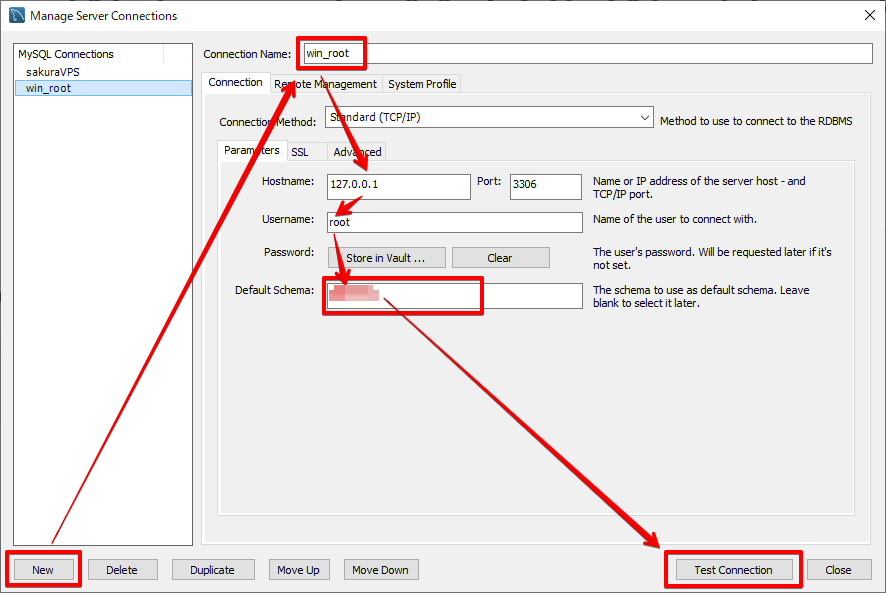
・設定項目
| 入力項目 | 入力値 |
|---|---|
| HostName | localhostのIP(初期値でOK) |
| Port | MySQLのデフォルトポートである3306番(初期値でOK) |
| UserName | root(初期値でOK) |
| Default Schema | db |
migrate
migrate コマンドは mysite/settings.py ファイルのデータベース設定に従って、アプリケーションに必要なすべてのテーブルを作成します。ここからはORM(ORマッパー)という領域になる。一言で言うと SQLServerを起動して手でSQLをいじることなくDjangoがSQLServerに神経接続されて、メソッドチェーンベースで操作できるようになる ということだ。
basic_django_graph\mysite> python manage.py migrate

  Operations to perform:
    Apply all migrations: admin, auth, contenttypes, sessions
  Running migrations:
    Applying contenttypes.0001_initial... OK
    Applying auth.0001_initial... OK
    Applying admin.0001_initial... OK
    Applying admin.0002_logentry_remove_auto_add... OK
    Applying admin.0003_logentry_add_action_flag_choices... OK
    Applying contenttypes.0002_remove_content_type_name... OK
    Applying auth.0002_alter_permission_name_max_length... OK
    Applying auth.0003_alter_user_email_max_length... OK
    Applying auth.0004_alter_user_username_opts... OK
    Applying auth.0005_alter_user_last_login_null... OK
    Applying auth.0006_require_contenttypes_0002... OK
    Applying auth.0007_alter_validators_add_error_messages... OK
    Applying auth.0008_alter_user_username_max_length... OK
    Applying auth.0009_alter_user_last_name_max_length... OK
    Applying auth.0010_alter_group_name_max_length... OK
    Applying auth.0011_update_proxy_permissions... OK
    Applying auth.0012_alter_user_first_name_max_length... OK
    Applying sessions.0001_initial... OK
モデルの作成
「モデルを作る」とはつまるところデータベースに「テーブルを作る」ということだ。models.pyに、テーブル構造を定義すると、神経接続されたMySQLのテーブル構造が「一緒に」変わる。
from django.db import models

# クラス名がテーブル名です
class DjangoTestTable(models.Model):
    # ここに定義したものがフィールド項目です
    question_text = models.CharField(max_length=200)
    pub_date = models.DateTimeField('date published')
モデルを有効にする
basic_django_graph\mysite> python manage.py makemigrations test_chartjs

    Migrations for 'test_chartjs':
      test_chartjs\migrations\0001_initial.py
        - Create model DjangoTestTable
basic_django_graph\mysite> python manage.py migrate
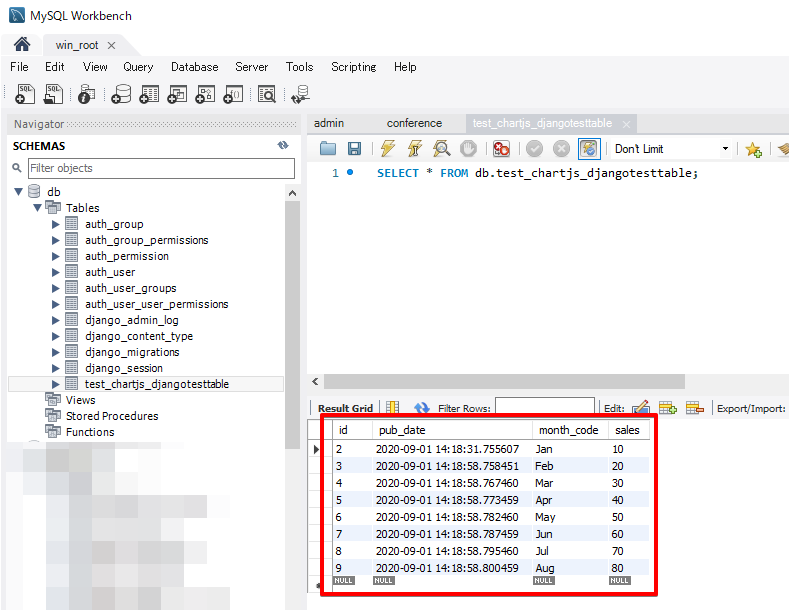
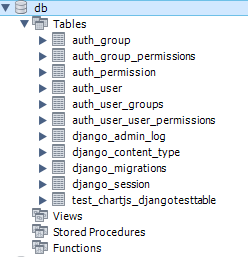
MySQLもちゃんと同期更新される
おぉ、すげーな。なんかいろいろテーブルできちゃったけど...。
auth...から始まるやつとかdjango...から始まるやつとかね
コマンドラインでSQLを実行できて、実行されるとMySQLもちゃんと更新されるところを見てみよう
basic_django_graph\mysite> python manage.py shell
Python 3.8.3 (tags/v3.8.3:6f8c832, May 13 2020, 22:37:02) [MSC v.1924 64 bit (AMD64)] on win32
Type "help", "copyright", "credits" or "license" for more information.
(InteractiveConsole)

# テーブル使用宣言
>>> from test_chartjs.models import DjangoTestTable

# 現在はなにもない
>>> DjangoTestTable.objects.all()
    <QuerySet []>

# Insertしてみる(必ず「save()」をセットにすること。まぁ意味合いはトランザクションコミットだね。)
>>> from django.utils import timezone
>>> q = DjangoTestTable(question_text="朝には四本足、昼には二本足、夕方には三本足の生き物は何か?", pub_date=timezone.now())
>>> q.save()

# 点検(1が返ってきたということはInsertできたということ)
>>> q.id
    1
>>> q.question_text
    '朝には四本足、昼には二本足、夕方には三本足の生き物は何か?'
>>> q.pub_date
    datetime.datetime(2019, 7, 14, 17, 36, 39, 381432, tzinfo=<UTC>)

# データをカラにする
>>> DjangoTestTable.objects.filter(id=1).delete()
モデルの作成 pt.2
モデル(=テーブル)を、グラフ用の構造にしてデータを入れよう
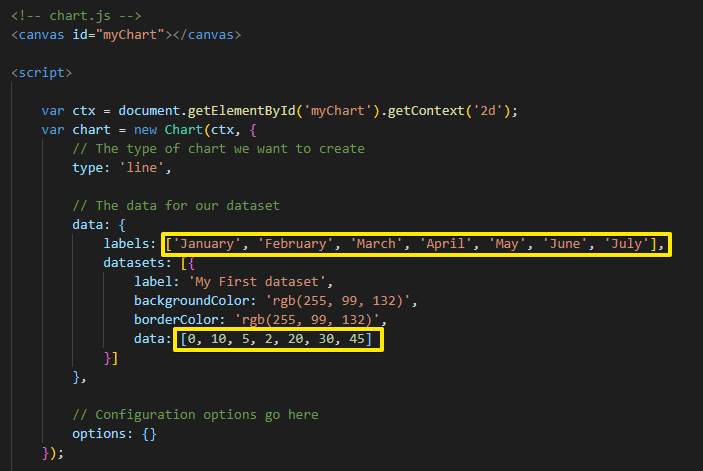
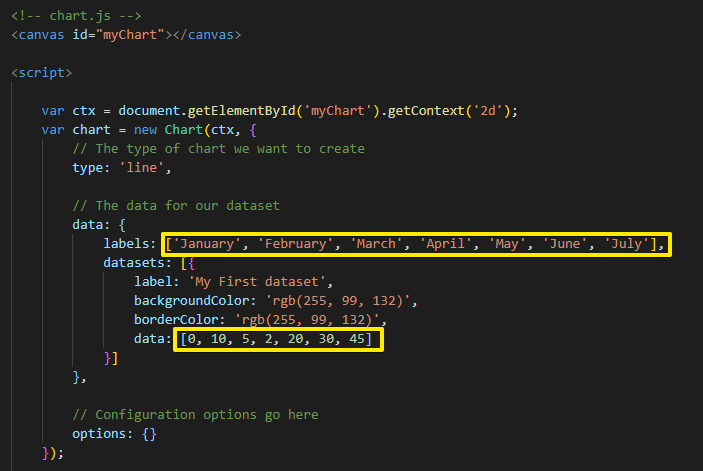
この図を覚えているか?そう、chart.jsのサンプルだ。
labelsに月が書いてあって、dataになにかの数字が書かれている。
from django.db import models

# クラス名がテーブル名です
class DjangoTestTable(models.Model):
    # ここに定義したものがフィールド項目です
    month_code = models.CharField(default='XXX', max_length=3) # Jun Feb など
    sales = models.IntegerField(default=0)
    pub_date = models.DateTimeField('date published')
basic_django_graph\mysite> python manage.py makemigrations test_chartjs
  Migrations for 'test_chartjs':
    test_chartjs\migrations\0002_auto_20200901_2315.py
      - Remove field question_text from djangotesttable
      - Add field month_code to djangotesttable
      - Add field sales to djangotesttable
basic_django_graph\mysite> python manage.py migrate
  Operations to perform:
    Apply all migrations: admin, auth, contenttypes, sessions, test_chartjs
  Running migrations:
    Applying test_chartjs.0002_auto_20200901_2315... OK
basic_django_graph\mysite> python manage.py shell
Python 3.8.3 (tags/v3.8.3:6f8c832, May 13 2020, 22:37:02) [MSC v.1924 64 bit (AMD64)] on win32
Type "help", "copyright", "credits" or "license" for more information.
(InteractiveConsole)

# テーブル使用宣言
>>> from test_chartjs.models import DjangoTestTable

# 現在はなにもない
>>> DjangoTestTable.objects.all()
    <QuerySet []>

# Insertしてみる(必ず「save()」をセットにすること。まぁ意味合いはトランザクションコミットだね。)
>>> from django.utils import timezone
>>> q = DjangoTestTable(month_code="Jan", sales=10, pub_date=timezone.now())
>>> q.save()

# 点検
>>> q.month_code
    'Jan'
>>> q.sales
    10
q = DjangoTestTable(month_code="Feb", sales=20, pub_date=timezone.now())
q.save()
q = DjangoTestTable(month_code="Mar", sales=30, pub_date=timezone.now())
q.save()
q = DjangoTestTable(month_code="Apr", sales=40, pub_date=timezone.now())
q.save()
q = DjangoTestTable(month_code="May", sales=50, pub_date=timezone.now())
q.save()
q = DjangoTestTable(month_code="Jun", sales=60, pub_date=timezone.now())
q.save()
q = DjangoTestTable(month_code="Jul", sales=70, pub_date=timezone.now())
q.save()
q = DjangoTestTable(month_code="Aug", sales=80, pub_date=timezone.now())
q.save()
MySQLも確認
テンプレート
テンプレートっていう言い方がよくわからない。そんなふうに考えていた時期が俺にもありました。テンプレートとは「ひな形」のことです。つまり、dbのデータで置換がかかる前のhtmlです。

templates ディレクトリを作成
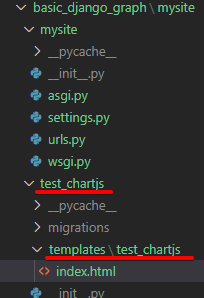
最初に、test_chartjsの中に「templates/test_chartjs」フォルダを作成してから index.html を作成する。
つまり、index.htmlは「test_chartjs/templates/test_chartjs/index.html」に作る必要がある。「templatesフォルダのなかにアプリケーション名がある」というの自体はほかのWeb言語にもあったような気がする![]()
これは文化的なもので「名前空間」という意味合いに過ぎない。
「templates」には「s」をつけろよデコ助野郎。
テンプレートを編集
変数を読み込めるようにする。まだ数字の固定値部分は変えずに body タグのてっぺんに djangoならではのループの書き方を加えただけです。混乱しちゃうからね。
<!DOCTYPE html>
<html lang="ja">
<head>
    <meta charset="UTF-8">
    <meta name="viewport" content="width=device-width, initial-scale=1.0">
    <meta http-equiv="X-UA-Compatible" content="ie=edge">
    <title>Document</title>

    <!-- chart.js -->
    <script src="https://cdn.jsdelivr.net/npm/chart.js@2.8.0"></script>

</head>
<body>

    <!-- Django to Javascript -->
    <script>
        var month_code = [];
        var sales = [];
    </script>
    {% if latest_list %}
        {% for i in latest_list %}
            <script>
                month_code.push("{{ i.month_code }}")
                sales.push("{{ i.sales }}");
            </script>
        {% endfor %}
    {% else %}
        <p>latest_listのデータがありませんでした</p>
    {% endif %}
    <script>
        document.write("JavaScriptを使って出力しています。<BR>");
        document.write(month_code.join('-')+"<BR>");
        document.write(sales.join('-'));
        document.write("<BR>JavaScriptを使って出力しました。");
    </script>

    <!-- chart.js -->
    <canvas id="myChart"></canvas>
    <script>
        var ctx = document.getElementById('myChart').getContext('2d');
        var chart = new Chart(ctx, {
            // The type of chart we want to create
            type: 'line',

            // The data for our dataset
            data: {
                labels: ['January', 'February', 'March', 'April', 'May', 'June', 'July'],
                datasets: [{
                    label: 'My First dataset',
                    backgroundColor: 'rgb(255, 99, 132)',
                    borderColor: 'rgb(255, 99, 132)',
                    data: [0, 10, 5, 2, 20, 30, 45]
                }]
            },

            // Configuration options go here
            options: {}
        });
    </script>

</body>
</html>
CSSやJSなど静的コンテンツを扱う場合
・templatesと同じ階位にstaticフォルダをつくりますstatic(黄色の四角)
・のなかに test_chartjs(オレンジの四角)
・のなかにjsやcssなど
(※フォルダは手で作る必要があります)
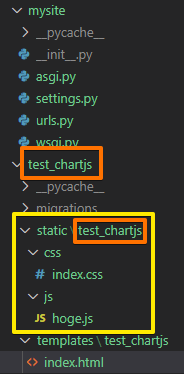
・htmlの最初に {% load static %} を忘れるな!
・javascript を読み込むときのパスは {% static 'test_chartjs/js/hoge.js' %} だ
・javascript を読み込むときのパスは {% static 'test_chartjs/css/index.css' %} だ
・このフォルダの「指定方法」と「そしてどうなる」を脳筋になるまで繰り返して感覚をつかめ!
{% load static %}
<!DOCTYPE html>
<html lang="ja">
<head>
    <!-- javascript -->
    <script src="{% static 'test_chartjs/js/hoge.js' %}"></script>
</head>
dbからデータをひったくりテンプレートへ向けて置換をかけて返却する流れを作る
"""子供のurls.pyがこの処理を呼び出します"""
from django.shortcuts import render # 追加!
from .models import DjangoTestTable # 追加!

def index(request):
    """いわばhtmlのページ単位の構成物です"""
    # 日付を降順に表示するクエリ
    ret = DjangoTestTable.objects.order_by('-pub_date')
    context = {'latest_list': ret}
    # htmlとして返却します
    return render(request, 'test_chartjs/index.html', context)
※pylint(ソースコード整え役)がdjangoの構文を「理解できてない」?

VSCode Python Djangoの問題(エラー・警告)に対応する方法
動作確認
Webサーバーを動かして...
basic_django_graph\mysite> python manage.py runserver
  Watching for file changes with StatReloader
  Performing system checks...

  System check identified no issues (0 silenced).
  September 01, 2020 - 23:49:04
  Django version 3.1, using settings 'mysite.settings'
  Starting development server at http://127.0.0.1:8000/
  Quit the server with CTRL-BREAK.
ブラウザに localhost を入力
http://localhost:8000/test_chartjs/

(メモ)Djangoがテンプレートに渡すContext(置換値)について
テンプレートシステムは、変数の属性にアクセスするためにドット検索の構文を使用します。 {{ question.question_text }} を例にすると、はじめに Django は question オブジェクトに辞書検索を行います。それに失敗したら、今度は属性として検索を行い、このケースの場合は成功します。もし属性の検索に失敗すると、リストインデックスでの検索を行います。
最終仕上げ
余計なデバッグ文言を消して、あとはjavascriptの固定値のところと置き換えるだけのはずだ!
<!DOCTYPE html>
<html lang="ja">
<head>
    <meta charset="UTF-8">
    <meta name="viewport" content="width=device-width, initial-scale=1.0">
    <meta http-equiv="X-UA-Compatible" content="ie=edge">
    <title>Document</title>

    <!-- chart.js -->
    <script src="https://cdn.jsdelivr.net/npm/chart.js@2.8.0"></script>

</head>
<body>

    <!-- Django to Javascript -->
    <script>
        var month_code = [];
        var sales = [];
    </script>
    {% if latest_list %}
        {% for i in latest_list %}
            <script>
                month_code.push("{{ i.month_code }}")
                sales.push("{{ i.sales }}");
            </script>
        {% endfor %}
    {% else %}
        <p>latest_listのデータがありませんでした</p>
    {% endif %}

    <!-- chart.js -->
    <canvas id="myChart"></canvas>
    <script>
        var ctx = document.getElementById('myChart').getContext('2d');
        var chart = new Chart(ctx, {
            // The type of chart we want to create
            type: 'line',

            // The data for our dataset
            data: {
                labels: month_code,
                datasets: [{
                    label: 'My First dataset',
                    backgroundColor: 'rgb(255, 99, 132)',
                    borderColor: 'rgb(255, 99, 132)',
                    data: sales
                }]
            },

            // Configuration options go here
            options: {}
        });
    </script>

</body>
</html>
