参考資料
入門って書いてあるのにだいぶ苦労したわ...
https://leanpub.com/symfony5-nyumon
これドル払なのに日本語だ!(衝撃)
なんでservice.ymlってなんだよって思ったら 【Symfony】サービスコンテナを実装する がわかりやすいね
サービスを必要とするオブジェクトに対して、外から渡すことにとって、疎統合な設計を実現します。
開発環境
PHP 7.4.6
PhpStorm(PhpStormが勝手にやってくれるインポートなどの部分は省略していることが多いので違うエディタでやってる人は注意)
PHP拡張を確認
intl, xsl, gd, openssl, sodium, curl, mbstring
amqp
- Download the latest stable release from here https://pecl.php.net/package/amqp for your PHP version (TS, x64);
- Unpack the archive and copy the php_amqp.dll file to your extensions directory (ex. C:\php\ext);
- Copy the rabbitmq.X.dll (ex. rabbitmq.4.dll) file to C:\Windows\System;
- Update your php.ini file and add "extension=amqp" at the end of extensions list;
- check the list
php -m
確認
次のコマンドを実行して、コンピューターに必要なすべての要件が
満たされていることを確認します。
php> symfony book:check-requirements
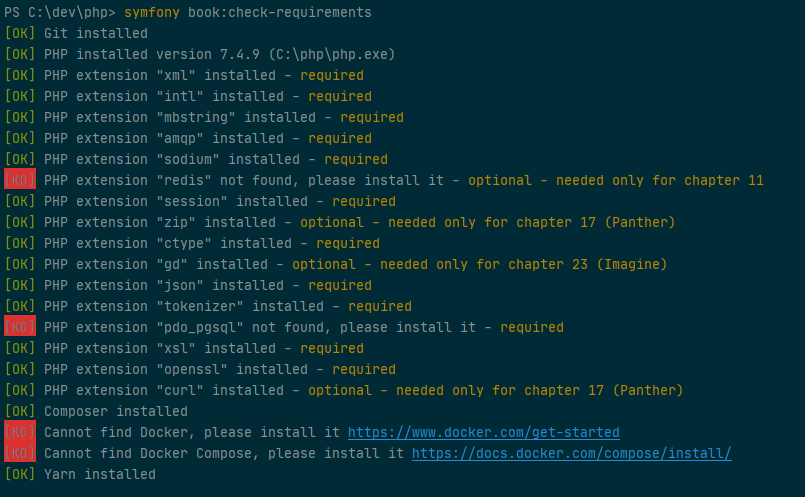
- pdo_pgsqlはPostgreSQL
- redisはNoSQL
のため無視。
ん![]()
僕はMySQL使うし、posgre![]()
![]() ってあたりでハッとしたんだけど、このコマンド。。。公式ドキュメント用にビルトインされた確認コマンドっぽいな。
ってあたりでハッとしたんだけど、このコマンド。。。公式ドキュメント用にビルトインされた確認コマンドっぽいな。
プロジェクトの作成
戒め: 日本語を含むパスにプロジェクトを作成してはならない(bin/consoleコマンドなどが通らなくなってハマる)
php> composer create-project symfony/skeleton guestbook "5.1.*"
php> cd guestbook
guestbook> composer require symfony/requirements-checker
├── bin/ よく使うCLI コマンドのconsole
├── config/ 設定
├── public/ Webルートのディレクトリ
├── src/ コードが入る場所
├── var/ キャッシュやログ
├── vendor/ Composer によって
インストールされたすべてのパッケージ
├── composer.json
├── composer.lock
└── symfony.lock
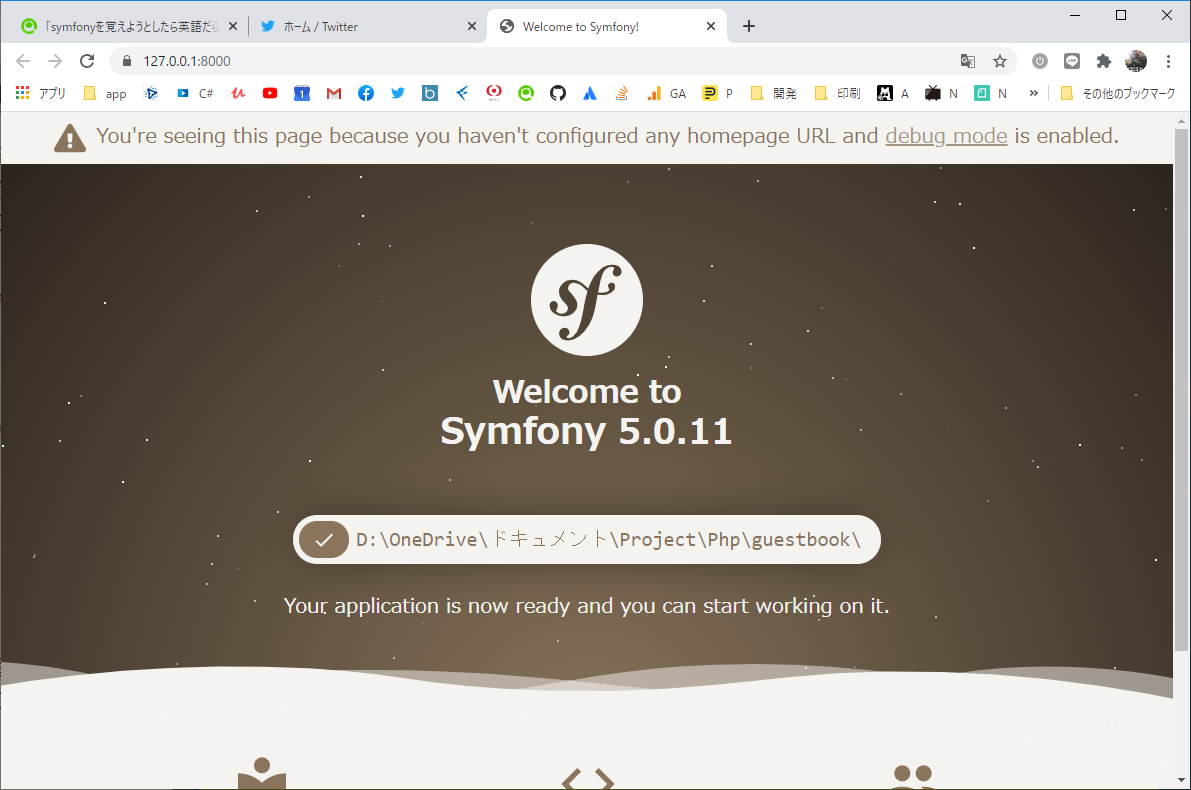
ローカルのWebサーバの起動
guestbook> php -S 127.0.0.1:8000 -t public
https://127.0.0.1:8000

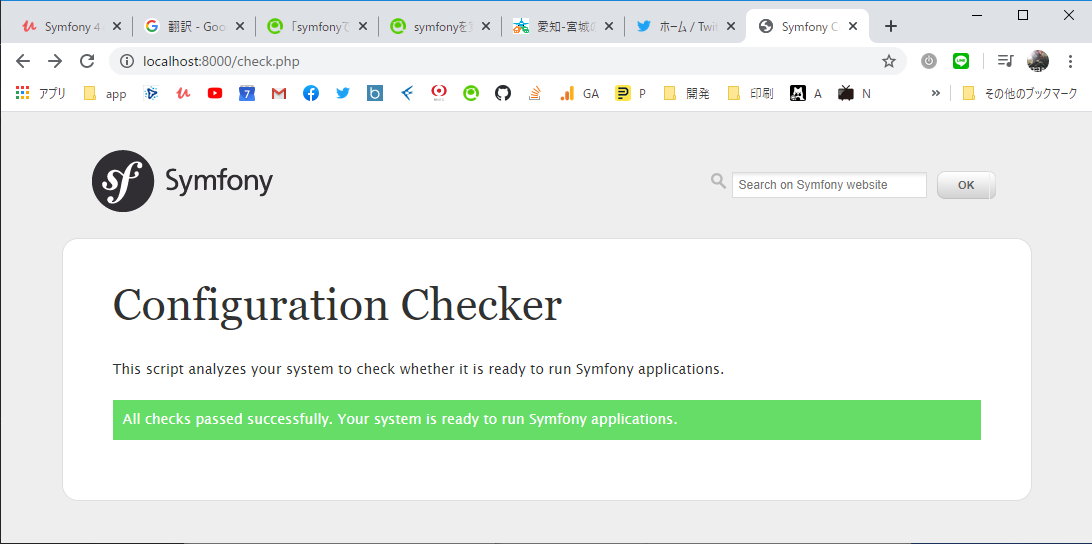
確認(checkにアクセス)
http://localhost:8000/check.php
PHP accelerato
PHP入れただけの状態でほんとの一発目にアプリを作ろうとしてcheck.phpを見てみると、
- PHP accelerator を入れろ!
- php.ini のキャッシュサイズを5M以上にしろ!
などと書いてある
https://www.php.net/manual/ja/opcache.installation.php#opcache.installation.bundled
Windows の場合は zend_extension=C:\path\to\php_opcache.dll を使います。
;opcache.enable=1
;opcache.enable_cli=0
opcache.enable=1
opcache.enable_cli=1
zend_extension=C:\php\ext\php_opcache.dll
キャッシュサイズを5M以上に
;realpath_cache_size = 4096k
realpath_cache_size = 5M
確認
guestbook> php -v
  PHP 7.4.6 (cli) (built: May 12 2020 11:38:54) ( ZTS Visual C++ 2017 x64 )
  Copyright (c) The PHP Group
  Zend Engine v3.4.0, Copyright (c) Zend Technologies
      with Zend OPcache v7.4.6, Copyright (c), by Zend Technologies
サーバーログを追う
guestbook> symfony server:log
調査系のライブラリを入れる
guestbook> composer require --dev symfony/profiler-pack
maker-bundle
make:controller などのコマンドが使えるようになります
guestbook> composer require symfony/maker-bundle --dev
annotation
guestbook> composer require doctrine/annotations
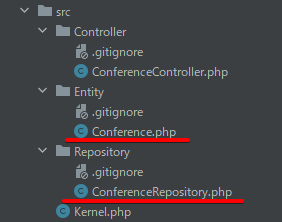
コントローラの作成
guestbook> php bin/console make:controller ConferenceController
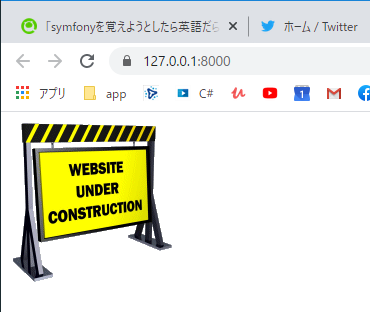
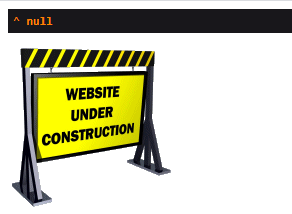
gifの配置

http://clipartmag.com/images/website-under-construction-image-6.gif
public/images/under-construction.gif に保存
コントローラの加工
<?php

namespace App\Controller;

use Symfony\Bundle\FrameworkBundle\Controller\AbstractController;
use Symfony\Component\HttpFoundation\Response;
use Symfony\Component\Routing\Annotation\Route;

class ConferenceController extends AbstractController
{
    /**
     * @Route("/", name="home")
     */
    public function index()
    {
        return new Response("<html><body><img src='/images/under-construction.gif'/> </body></html>");
    }
}
確認
guestbook> php -S 127.0.0.1:8000 -t public
https://127.0.0.1:8000
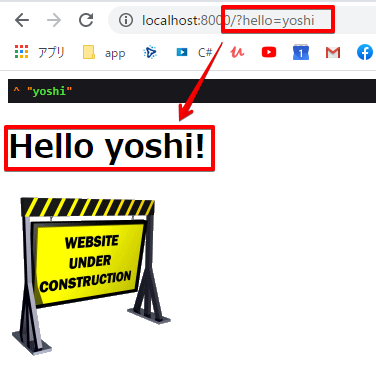
クエリー文字列が含まれていたら、挨拶
<?php

namespace App\Controller;

use Symfony\Bundle\FrameworkBundle\Controller\AbstractController;
use Symfony\Component\HttpFoundation\Request;
use Symfony\Component\HttpFoundation\Response;
use Symfony\Component\Routing\Annotation\Route;
use Symfony\Component\VarDumper\VarDumper;

class ConferenceController extends AbstractController
{
    /**
     * @Route("/", name="home")
     * @param Request $request
     * @return Response
     */
    public function index(Request $request)
    {
        $greet = '';
        VarDumper::dump($request->query->get('hello'));
        if ($name = $request->query->get('hello')) {
            $greet = sprintf('<h1>Hello %s!</h1>', htmlspecialchars($name));
        }
        return new Response("<html lang='ja'><body>$greet<img src='/images/under-construction.gif' alt='under-const'/> </body></html>");
    }
}
確認
なんでかしらんけどクエリストリングつきのリクエストのときは localhost でアクセスしないと「ページが表示できません」になるんだよな...このへんが関係してそう
Invalid request (Unsupported SSL request)
XSS
guestbook> php -S 127.0.0.1:8000 -t public
http://localhost:8000/?hello=yoshi
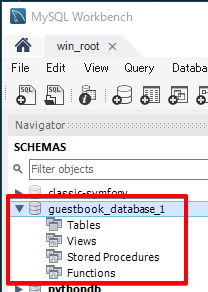
データベースをセットアップする
データベース作成
guestbook> composer require doctrine
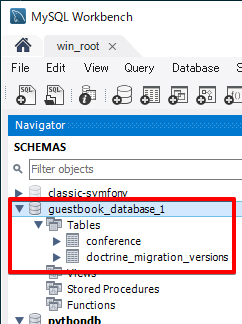
DATABASE_URL=mysql://root:rootpw@127.0.0.1:3306/guestbook_database_1
guestbook> php bin/console doctrine:database:create
エンティティ(モデル)作成
guestbook> symfony console make:entity Conference
| property name | Field type | Field length | nullable |
|---|---|---|---|
| city | string | 255 | no |
| year | string | 4 | no |
| isInternational | boolean | no |
migration
guestbook> php bin/console make:migration
guestbook> php bin/console doctrine:migrations:migrate

  Application Migrations

  (※テーブル構造いまから変えちゃっていっすか?)
  WARNING! You are about to execute a database migration that could result in schema changes and data loss. Are you sure you wish to continue? (y/n)
    > y
もうひとつエンティティを作成
guestbook> symfony console make:entity Comment
| property name | Field type | Field length | nullable |
|---|---|---|---|
| author | string | 255 | no |
| text | text | no | |
| string | 255 | no | |
| createdAt | datetime | no | |
| photoFilename | string | 255 | yes |
guestbook> php bin/console make:migration
guestbook> php bin/console doctrine:migrations:migrate
エンティティ間の関連付け
カンファレンスとコメントのエンティティは連携する必要があります。カンファンレスはn個のコメントを持ちますので、one-to-many の関連となります。Conference クラスにリレーションを追加するために、make:entity コマンドをもう一度使いましょう
guestbook> symfony console make:entity Conference
| property name | Field type | related to | add field name | allowed null | Do you want to automatically delete |
|---|---|---|---|---|---|
| comments | OneToMany | Comment | (default) | no | yes |
管理者用のバックエンドをセットアップする
easyadmin-bundleのインストール
guestbook> composer require easycorp/easyadmin-bundle
make:admin:dashboard
guestbook> php bin/console make:admin:dashboard
 Which class name do you prefer for your Dashboard controller? [DashboardController]:
 >

 Which directory do you want to generate "DashboardController" in? [src/Controller/Admin/]:
 >

 (※src/ControllerにAdminフォルダが無ぇーぞ。作って!)
 [ERROR] The given directory does not exist. Type in the path of an existing directory relative to your project root(e.g. src/Controller/Admin/)

 Which directory do you want to generate "DashboardController" in? [src/Controller/Admin/]:
 >

 [OK] Your dashboard class has been successfully generated.
(※なぜか出来上がったコントローラ guestbook/src/Controller/Admin/DashboardController.php が構文エラーを起こしている(3行目の最後にバックスラッシュ)ので修正する)
確認
guestbook> php -S 127.0.0.1:8000 -t public
http://127.0.0.1:8000/admin
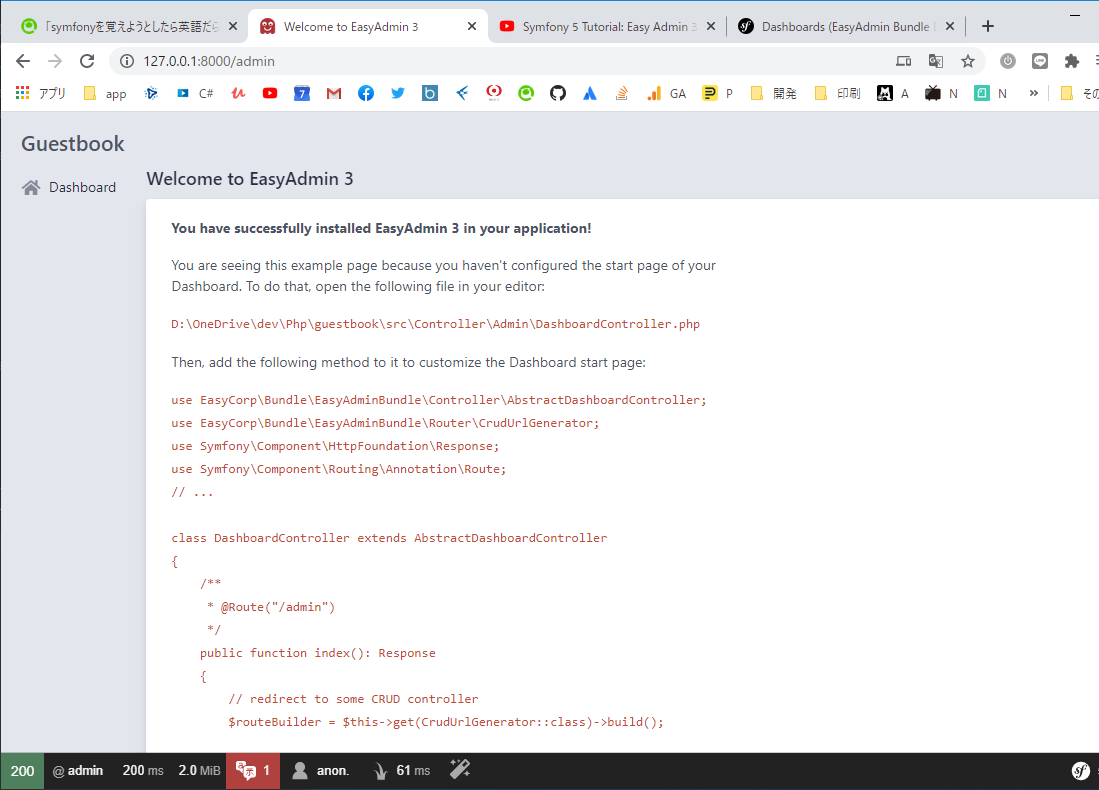
You have successfully installed EasyAdmin 3 in your application!
You are seeing this example page because you haven't configured the start page of your Dashboard. To do that, open the following file in your editor: src\Controller\Admin\DashboardController.php
コレが見えてるってことは準備が足りない。
dashboard調整
実は直前のコマンドの最後に Next steps として、こんなことが書いてある
Next steps:
Run "make:admin:crud" to generate CRUD controllers and link them from the Dashboard.
以下コマンドは「0」を選択して Comment テーブル用のCRUDを作成しますが、「1」も同じようにやってください。
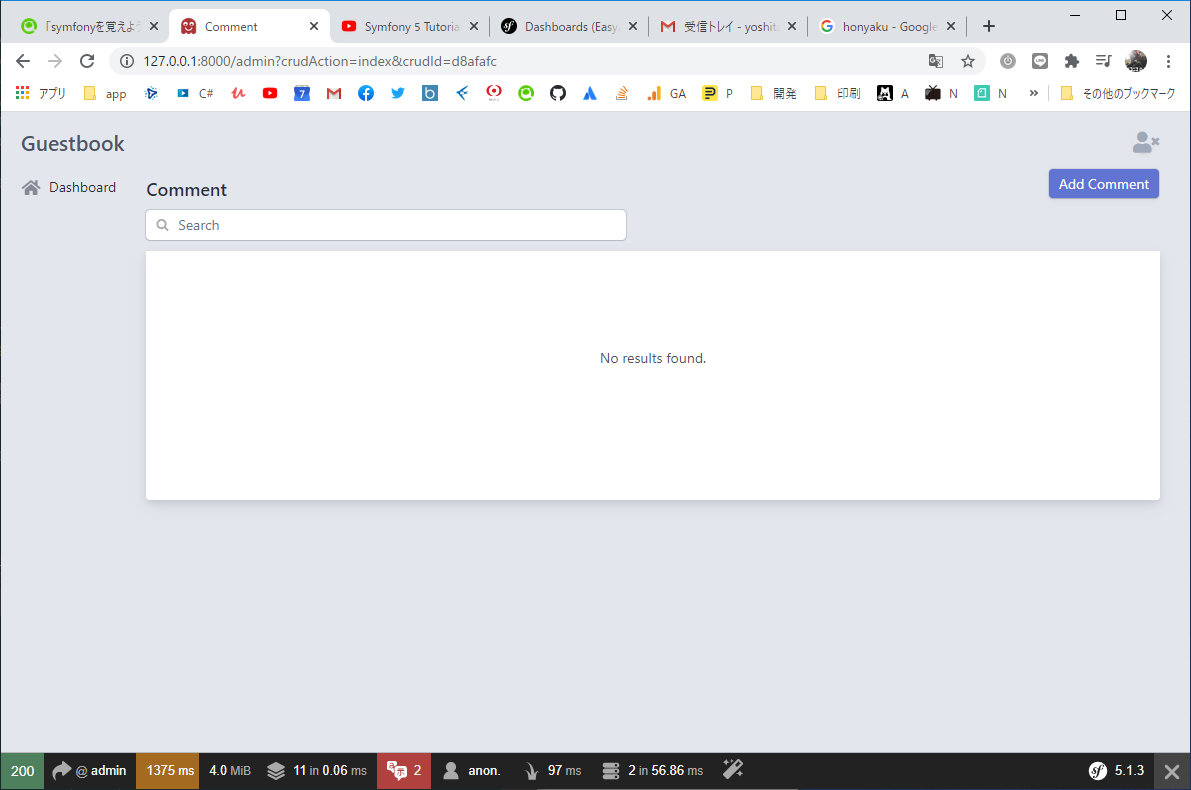
guestbook> php bin/console make:admin:crud
 Which Doctrine entity are you going to manage with this CRUD controller?:
  [0] App\Entity\Comment
  [1] App\Entity\Conference
 > 0
 Which directory do you want to generate the CRUD controller in? [src/Controller/Admin/]:
 >
 Namespace of the generated CRUD controller [App\Controller\Admin\]:
 >
 [OK] Your CRUD controller class has been successfully generated.
DashboardController調整
DashboardControllerに戻ってきて
- CrudUrlGeneratorにカーソルをあててImport
- OneOfYourCrudControllerをCommentCrudControllerに変更
    public function index(): Response
    {
        // redirect to some CRUD controller
        $routeBuilder = $this->get(CrudUrlGenerator::class)->build();

-        return $this->redirect($routeBuilder->setController(OneOfYourCrudController::class)->generateUrl());
+        return $this->redirect($routeBuilder->setController(CommentCrudController::class)->generateUrl());
    }
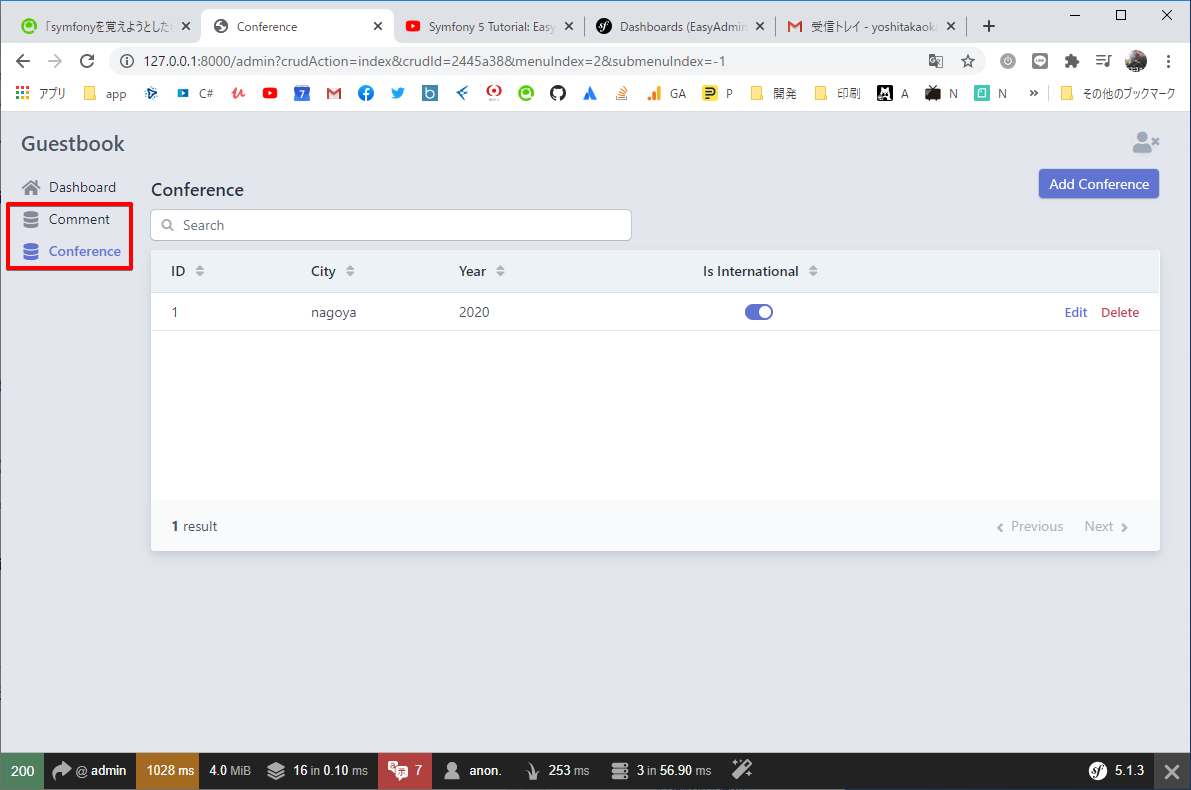
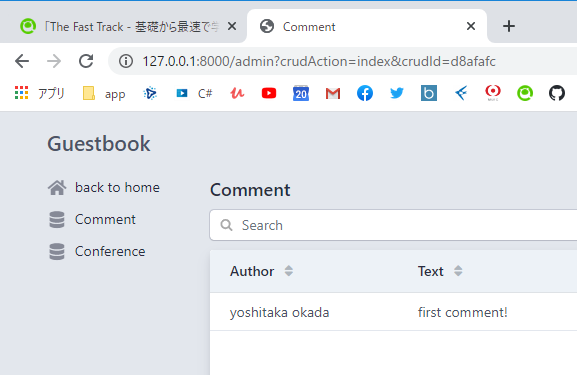
コメントテーブルの管理画面みたいなのができて、レコードの追加ができるようになっている
サイドメニューにテーブルリストを表示する
    public function configureMenuItems(): iterable
    {
        yield MenuItem::linktoDashboard('Dashboard', 'fa fa-home');
+        yield MenuItem::linkToCrud('Comment', 'fas fa-database', Comment::class);
+        yield MenuItem::linkToCrud('Conference', 'fas fa-database', Conference::class);
        // yield MenuItem::linkToCrud('The Label', 'icon class', EntityClass::class);
    }
画面からテーブルを操作できるようになった
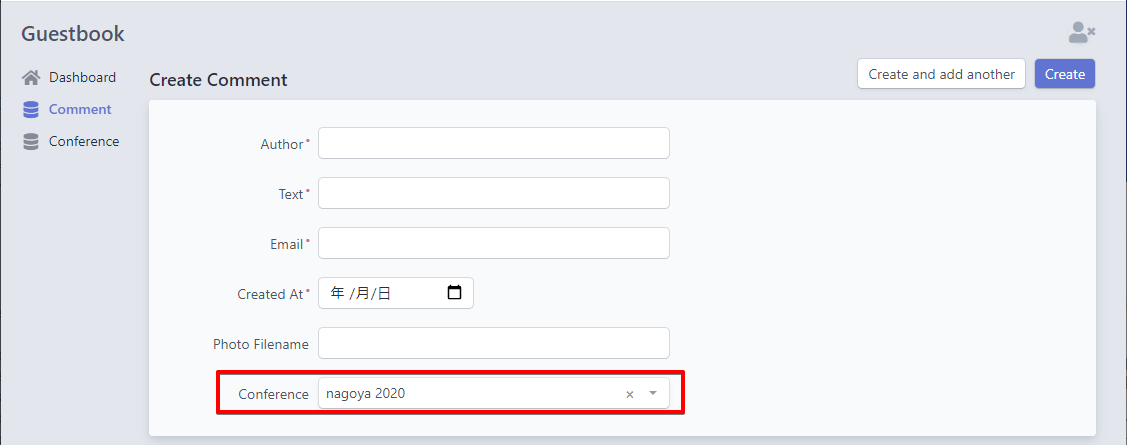
FK項目を表示する
CommentテーブルのFK項目(Commentテーブルにあるconference_id)は表示されないが、「どのカンファレンスのコメントなんだい?」を表現するために調整が必要。
<?php

namespace App\Controller\Admin;

use App\Entity\Comment;
use EasyCorp\Bundle\EasyAdminBundle\Controller\AbstractCrudController;

class CommentCrudController extends AbstractCrudController
{
    public static function getEntityFqcn(): string
    {
        return Comment::class;
    }

    /*(※初期状態のお手本コードは消していいよ)
    public function configureFields(string $pageName): iterable
    {
        return [
            IdField::new('id'),
            TextField::new('title'),
            TextEditorField::new('description'),
        ];
    }
    */

    (※Entityのfieldnameを使用する)
    public function configureFields(string $pageName): iterable
    {
        return [
            TextField::new('author'),
            TextField::new('text'),
            TextField::new('email'),
            DateField::new('createdAt'),
            TextField::new('photoFilename'),
            AssociationField::new('conference')
        ];
    }
}
確認
「クラスApp \ Entity \ ConferenceのFKオブジェクトを文字列に変換できませんでした」

Conferenceエンティティにカンファレンス名を表示する処理を追加
__toString(): PHP は「__」で始まる関数名を特殊関数として取り置きしてあります。クラスが文字列に変換される際の動作を決めることができます。たとえば echo $obj; としたときに何を表示させるかといったことです。
<?php

namespace App\Entity;

use App\Repository\ConferenceRepository;
use Doctrine\Common\Collections\ArrayCollection;
use Doctrine\Common\Collections\Collection;
use Doctrine\ORM\Mapping as ORM;

/**
 * @ORM\Entity(repositoryClass=ConferenceRepository::class)
 */
class Conference
{
    :
    :
    :
    public function __toString(): string
    {
        return $this->city.' '.$this->year;
    }
}
Commentエンティティにemailを表示する処理を追加
同じように、クラスが文字列に変換される際の動作を追加します
<?php

namespace App\Entity;

use App\Repository\CommentRepository;
use Doctrine\ORM\Mapping as ORM;

/**
 * @ORM\Entity(repositoryClass=CommentRepository::class)
 */
class Comment
{
    :
    :
    :
    public function __toString(): string
    {
        return (string) $this->getEmail();
    }
}
確認
サブスクライバーとはイベントリスナーのこと
(※あとでリファクタリングされます)
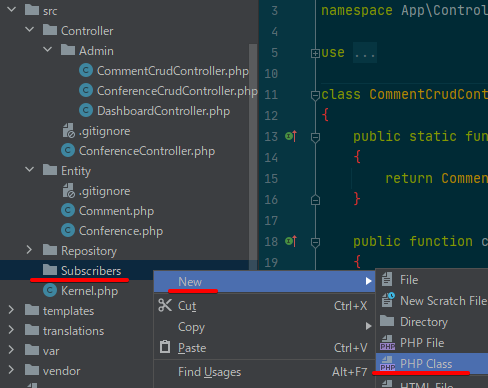
src配下に「Subscribers」という名前のディレクトリを作成し、PHPClassを新規作成
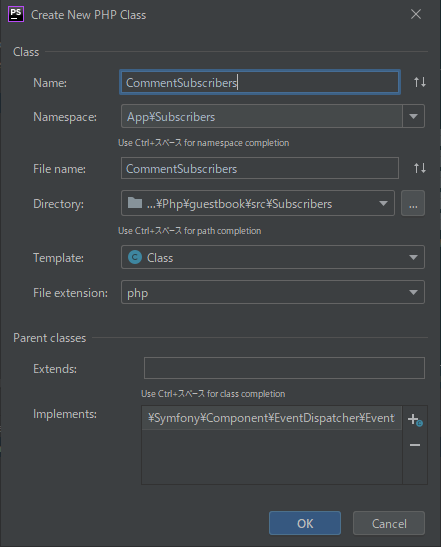
| property name | Field type |
|---|---|
| Name | CommentSubscribers |
| Namespace | App\Subscribers |
| File name | (自動) |
| Directory | (自動) |
| Template | (自動) |
| File extension | (自動) |
| Implements | Symfony...EventSubscriberInterface |
<?php


namespace App\Subscribers;


use App\Entity\Comment;
use DateTime;
use EasyCorp\Bundle\EasyAdminBundle\Event\BeforeEntityPersistedEvent;
use Symfony\Component\EventDispatcher\EventSubscriberInterface;

class CommentSubscribers implements EventSubscriberInterface
{

    /**
     * @inheritDoc
     */
    public static function getSubscribedEvents()
    {
        // TODO: Implement getSubscribedEvents() method.
        return [
            // レコード追加する直前のイベントリスナー
            BeforeEntityPersistedEvent::class => ['setCreatedAtOfComment']
        ];
    }

    /**
     * @param BeforeEntityPersistedEvent $event
     * 追加したイベントリスナーの処理の中身
     */
    public function setCreatedAtOfComment(BeforeEntityPersistedEvent $event)
    {
        $entity = $event->getEntityInstance();

        if(!($entity instanceof Comment)) {
            return;
        }

        $entity->setCreatedAt(new DateTime('NOW'));
    }
}
(※php.iniのdate.timezoneをAsia/Tokyoにしてphpstorm再起動しないと時間がおかしくなるからね)
createdAtを非表示に
サブスクライバーがレコード追加の直前にNow()してくれるので管理者がcreatedAtを入力する必要がなくなった!
<?php
    :
    :
    :
class CommentCrudController extends AbstractCrudController
{
    :
    :
    :
    public function configureFields(string $pageName): iterable
    {
        return [
            TextField::new('author'),
            TextField::new('text'),
            TextField::new('email'),
-            DateField::new('createdAt'),
            TextField::new('photoFilename'),
            AssociationField::new('conference')
        ];
    }
}
サイドメニューのリンクを変える
「Dashboard」のリンクを押すとCommentテーブルが表示されていたけど実質意味はないので、ドキュメントルートにリンクさせる(まぁdashboard用のテンプレートを表示してグラフとか追加して「ダッシュボードっぽい画面をデザインする」のが本来かもしれんけどね)
<?php
:
:
:
class DashboardController extends AbstractDashboardController
{
:
:
:
public function configureMenuItems(): iterable
{
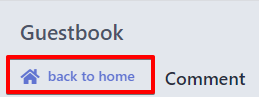
- yield MenuItem::linktoDashboard('Dashboard', 'fa fa-home');
+ yield MenuItem::linktoRoute('back to home', 'fa fa-home', 'home');
yield MenuItem::linkToCrud('Comment', 'fas fa-database', Comment::class);
yield MenuItem::linkToCrud('Conference', 'fas fa-database', Conference::class);
}
}
確認
コントローラーで Twig を使う
{% extends 'base.html.twig' %}
{% block title %}Conference Guestbook{% endblock %}
{% block body %}
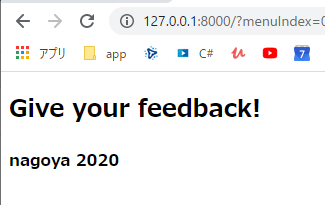
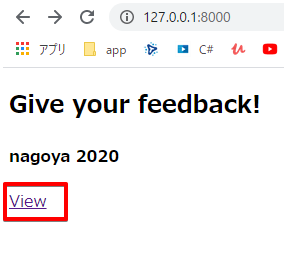
<h2>Give your feedback!</h2>
{% for conference in conferences %}
<h4>{{ conference }}</h4>
{% endfor %}
{% endblock %}
<?php

namespace App\Controller;

use App\Repository\ConferenceRepository;
use Symfony\Bundle\FrameworkBundle\Controller\AbstractController;
use Symfony\Component\HttpFoundation\Response;
use Symfony\Component\Routing\Annotation\Route;
use Twig\Environment;

class ConferenceController extends AbstractController
{
    /**
     * @Route ("/", name="home")
     * @param Environment $twig
     * @param ConferenceRepository $conferenceRepository
     * @return Response
     */
    public function index(Environment $twig, ConferenceRepository
    $conferenceRepository)
    {
        return new Response($twig->render('conference/index.html.twig', [
            'conferences' => $conferenceRepository->findAll(),
        ]));
    }
}
カンファレンスページを作成する
各カンファレンスには、コメントを一覧表示する専用のページが必要です。新しいページを作成するには、コントローラーを追加してルート定義を行い、関連付けたテンプレートを置きます。src/Controller/ConferenceController.php にshow() メソッドを追加してください
<?php
    :
    :
    :
class ConferenceController extends AbstractController
{
    :
    :
    :
    /**
     * @Route("/conference/{id}", name="conference")
     * @param Environment $twig
     * @param Conference $conference
     * @param CommentRepository $commentRepository
     */
    public function show(Environment $twig, Conference $conference,
        CommentRepository $commentRepository)
    {
        return new Response($twig->render('conference/show.html.twig', [
            'conference' => $conference,
            'comments' => $commentRepository->findBy(['conference' =>
                $conference], ['createdAt' => 'DESC']),
            ]));
    }
}
このshowメソッドには、これまでにはなかった特別な振る舞いがあります。メソッドにConference インスタンスの注入が必要です。データベースに複数あるかもしれません。Symfony ではリクエストのパスで受け取る{id} によってどのレコードを取得するのかを決めることができます( “ id“ はデータベースのconference テーブルのプライマリーキーです)。カンファレンスに関連付けられたコメントを取得するには、検索条件を第一引数に取るfindBy() メソッドを使います。最後のステップとしてファイルtemplates/conference/show.html.twigを作成します。
このテンプレートでは、Twig フィルターを呼び出すために
|記法(※Djangoで言うテンプレートタグ)を使っています。フィルターは値の変換をします。comments|lengthはコメントの数を返しcomment.createdAt|format_datetime(locale='ja')はヒューマンリーダブルな表現で日付をフォーマットします。/conference/1で最初のカンファレンスにアクセスして次のエラーを確認してください
{% extends 'base.html.twig' %}
{% block title %}Conference Guestbook - {{ conference }}{% endblock %}
{% block body %}
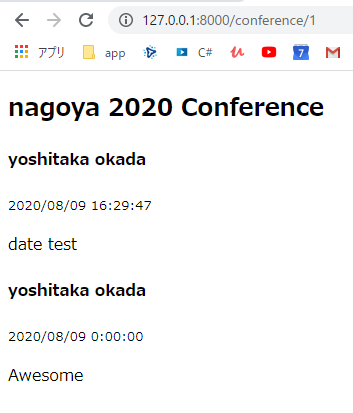
<h2>{{ conference }} Conference</h2>
{% if comments|length > 0 %}
{% for comment in comments %}
{% if comment.photofilename %}
<img src="{{ asset('uploads/photos/' ~ comment.photofilename)
}}" />
{% endif %}
<h4>{{ comment.author }}</h4>
<small>
{{ comment.createdAt|format_datetime(locale='ja') }}
</small>
<p>{{ comment.text }}</p>
{% endfor %}
{% else %}
<div>No comments have been posted yet for this conference.</div>
{% endif %}
{% endblock %}
確認
※記述が足りない??
キィィィィ!勘弁してくれ昼寝するはめになったぞ。プレーンな環境で作らなかったんか?(ハンカチを噛む)

guestbook> composer require sensio/framework-extra-bundle
確認
※記述が足りない??
キィィィィ!勘弁してくれ昼寝するはめになったぞ。プレーンな環境で作らなかったんか?(ハンカチを噛む)

format_datetime
The format_datetime filter is part of the IntlExtension which is not installed by default. Install it first:
format_datetimeフィルターは、デフォルトではインストールされないIntlExtensionの一部です。最初にインストールしてください
$ composer req twig/intl-extra
Then, use the twig/extra-bundle on Symfony projects or add the extension explicitly on the Twig environment:
次に、Symfonyプロジェクトでtwig / extra-bundleを使用するか、Twig環境で明示的に拡張機能を追加します
guestbook> symfony composer require twig/intl-extra
use Twig\Extra\Intl\IntlExtension;
>$twig = new \Twig\Environment(...);
$twig->addExtension(new IntlExtension());
<?php
    :
    :
    :
class ConferenceController extends AbstractController
{
    :
    :
    :
    public function show(Environment $twig, Conference $conference, CommentRepository $commentRepository)
    {
+        $twig->addExtension(new IntlExtension());
        return new Response($twig->render('conference/show.html.twig', [
            'conference' => $conference,
            'comments' => $commentRepository->findBy(['conference' =>
                $conference], ['createdAt' => 'DESC']),
            ]));
    }
}
確認
たかだか日付表示させるのに何時間かけさせるねん...
カンファレンスページをリンクする
{% extends 'base.html.twig' %}
{% block title %}Conference Guestbook{% endblock %}
{% block body %}
    <h2>Give your feedback!</h2>
    {% for conference in conferences %}
        <h4>{{ conference }}</h4>
+        <p><a href="{{ path('conference', { id: conference.id }) }}">View</a></p>
    {% endfor %}
{% endblock %}
確認
リンクでカンファレンス単品のページにも移動できた
コメントのページネーション
コメントリポジトリでgetCommentPaginator() メソッドを作成します。このメソッドはカンファレンスとオフセット(開始点)からコメントのPaginator を返します。テンプレートのページネーションを管理するには、Doctrine コレクションの代わりに Doctrine Paginator をTwig に渡します
DQL組み立て
全コメントの数を2で割って最初の要素を返す、みたいなSQLやな
<?php
    :
    :
    :
class CommentRepository extends ServiceEntityRepository
{
+    public const PAGINATOR_PER_PAGE = 2;
+
    public function __construct(ManagerRegistry $registry)
    {
        parent::__construct($registry, Comment::class);
    }

+    public function getCommentPaginator(Conference $conference, int $offset): Paginator
+    {
+        $query = $this->createQueryBuilder('c')
+            ->andWhere('c.conference = :conference')
+            ->setParameter('conference', $conference)
+            ->orderBy('c.createdAt', 'DESC')
+            ->setMaxResults(self::PAGINATOR_PER_PAGE)
+            ->setFirstResult($offset)
+            ->getQuery();
+
+        return new Paginator($query);
+    }
    :
    :
    :
}
コントローラの修正
コントローラーはリクエストのクエリー文字列(
$request->query) からoffset を整数として(getInt()) 取得します。デフォルトは0です。previous とnext のオフセットはDoctrine Paginator から得られる全情報から算出されます。
<?php
    :
    :
    :
class ConferenceController extends AbstractController
{
    :
    :
    :
-   public function show(Environment $twig, Conference $conference, CommentRepository $commentRepository)
+   public function show(Request $request, Environment $twig, Conference $conference, CommentRepository $commentRepository)
    {
        $twig->addExtension(new IntlExtension());

+       $offset = max(0, $request->query->getInt('offset', 0));
+       $paginator = $commentRepository->getCommentPaginator($conference, $offset);

        return new Response($twig->render('conference/show.html.twig', [
            'conference' => $conference,
-           'comments' => $commentRepository->findBy(['conference' => $conference], ['createdAt' => 'DESC']),
+           'comments' => $paginator,
+           'previous' => $offset - CommentRepository::PAGINATOR_PER_PAGE,
+           'next' => min(count($paginator), $offset + CommentRepository::PAGINATOR_PER_PAGE),
            ]));
    }
}
テンプレートの修正
最後に、テンプレートを更新して次ページ、前ページへのリンクを追加しましょう
{% extends 'base.html.twig' %}
{% block title %}Conference Guestbook - {{ conference }}{% endblock %}
{% block body %}
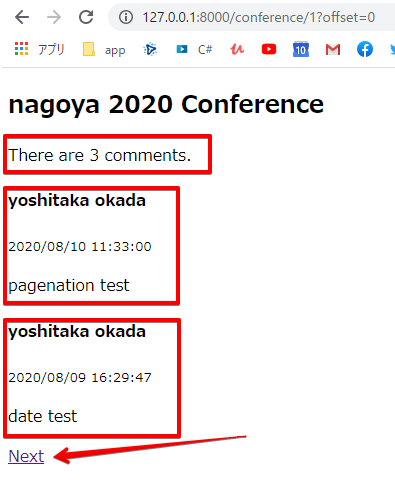
<h2>{{ conference }} Conference</h2>
{% if comments|length > 0 %}
+ <div>There are {{ comments|length }} comments.</div>
+
{% for comment in comments %}
{% if comment.photofilename %}
<img src="{{ asset('uploads/photos/' ~ comment.photofilename) }}" alt="photofilename"/>
{% endif %}
<h4>{{ comment.author }}</h4>
<small>
{{ comment.createdAt|format_datetime(locale='ja') }}
</small>
<p>{{ comment.text }}</p>
{% endfor %}
+ {% if previous >= 0 %}
+ <a href="{{ path('conference', { id: conference.id, offset: previous }) }}">Previous</a>
+ {% endif %}
+ {% if next < comments|length %}
+ <a href="{{ path('conference', { id: conference.id, offset: next }) }}">Next</a>
+ {% endif %}
{% else %}
<div>No comments have been posted yet for this conference.</div>
{% endif %}
{% endblock %}
確認
2コメントづつのページネーションが確認できました!
コントローラーをリファクタリングする
ConferenceController の両方のメソッドがTwig 環境を引数として取っていることに気がつくでしょうか。各メソッドでインジェクトするのではなく、コンストラクターインジェクションを使うようにしましょう(引数のリストが短くなり冗長性がなくなります)
コンストラクターインジェクション
コンストラクターインジェクションは DIの話でもあるしロックマンの話でもある のでそちらも参考にすること。あらかじめ初期設定で能力を自分自身のものにするために読み込んでおくってこっちゃ
<?php
    :
    :
    :
class ConferenceController extends AbstractController
{
+   private $twig;

+   public function __construct(Environment $twig)
+   {
+       $this->twig = $twig;
+   }

    /**
     * @Route ("/", name="home")
     */
-   public function index(Environment $twig, ConferenceRepository $conferenceRepository)
+   public function index(ConferenceRepository $conferenceRepository)
    {
-       return new Response($twig->render('conference/index.html.twig', [
+       return new Response($this->twig->render('conference/index.html.twig', [
            'conferences' => $conferenceRepository->findAll(),
            ]));
    }

    /**
     * @Route("/conference/{id}", name="conference")
     */
-   public function show(Request $request, Environment $twig, Conference $conference, CommentRepository $commentRepository)
+   public function show(Request $request, Conference $conference, CommentRepository $commentRepository)
    {
-       $twig->addExtension(new IntlExtension());
+       $this->twig->addExtension(new IntlExtension());

        $offset = max(0, $request->query->getInt('offset', 0));
        $paginator = $commentRepository->getCommentPaginator($conference, $offset);

-       return new Response($twig->render('conference/show.html.twig', [
+       return new Response($this->twig->render('conference/show.html.twig', [
            'conference' => $conference,
            'comments' => $paginator,
            'previous' => $offset - CommentRepository::PAGINATOR_PER_PAGE,
            'next' => min(count($paginator), $offset + CommentRepository::PAGINATOR_PER_PAGE),
            ]));
    }
}
Webサイトのヘッダーを追加する
ここで base.html.twig には conferences という変数が増えますがコントローラからは変数が引き渡されません。
<!DOCTYPE html>
<html lang="ja">
<head>
<meta charset="UTF-8">
<title>{% block title %}Welcome!{% endblock %}</title>
{% block stylesheets %}{% endblock %}
</head>
<body>
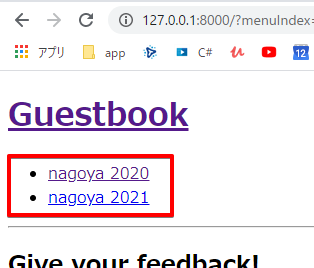
+ <header>
+ <h1><a href="{{ path('home') }}">Guestbook</a></h1>
+ <ul>
+ {% for conference in conferences %}
+ <li><a href="{{ path('conference', { id: conference.id }) }}">{{ conference }}</a></li>
+ {% endfor %}
+ </ul>
+ <hr />
+ </header>
{% block body %}{% endblock %}
{% block javascripts %}{% endblock %}
</body>
</html>
make:subscriberでサブスクライバーを実装する
conferences という変数にはここで、dbからSELECTされた値が入ります。サブスクライバーとは、vbでいうと「イベント」、JavaScriptでいうと「イベントリスナー」です。 ControllerEvent はコントローラーが呼ばれる直前に発火しますのでそのタイミングでグローバル変数に SQL の結果を仕込んでしまえばええやん。
guestbook> symfony console make:subscriber TwigEventSubscriber
  Suggested Events:
   :
   :
   :
  * kernel.controller (Symfony\Component\HttpKernel\Event\ControllerEvent)
   :
   :
   :

  What event do you want to subscribe to?:
  > kernel.controller

  created: src/EventSubscriber/TwigEventSubscriber.php
  Success!
<?php
   :
   :
   :
class TwigEventSubscriber implements EventSubscriberInterface
{
+   private $twig;
+   private $conferenceRepository;
+
+   public function __construct(Environment $twig, ConferenceRepository $conferenceRepository)
+   {
+       $this->twig = $twig;
+       $this->conferenceRepository = $conferenceRepository;
+   }

    public function onKernelController(ControllerEvent $event)
    {
-       // ...
+       $this->twig->addGlobal('conferences', $this->conferenceRepository->findAll());
    }

    public static function getSubscribedEvents()
    {
        return [
            'kernel.controller' => 'onKernelController',
        ];
    }
}
確認
※カンファレンステーブルのカンファレンスを2つに増やしてみた
最初に作ったサブスクライバーをリファクタリングします
(※最初に作ったサブスクライバー)
SubscribersフォルダとEventSubscriberフォルダ、似たようなフォルダがデキてしまったので統合します。作り終えたらSubscribersフォルダは消しちゃっていいです(Subscribers/CommentSubscribers.phpごと)
guestbook> symfony console make:subscriber CommentSubscribers
  Suggested Events:
   :
   :
   :

  What event do you want to subscribe to?:
 > EasyCorp\Bundle\EasyAdminBundle\Event\BeforeEntityPersistedEvent

 created: src/EventSubscriber/CommentSubscribersSubscriber.php
  Success!
<?php
  :
  :
class CommentSubscribersSubscriber implements EventSubscriberInterface
{
    public function onBeforeEntityPersistedEvent(BeforeEntityPersistedEvent $event)
    {
-       // ...
+       $entity = $event->getEntityInstance();
+
+       if(!($entity instanceof Comment)) {
+           return;
+       }
+
+       $entity->setCreatedAt(new DateTime('NOW'));
    }

    public static function getSubscribedEvents()
    {
        return [
            BeforeEntityPersistedEvent::class => 'onBeforeEntityPersistedEvent',
        ];
    }
}
年と都市でカンファレンスをソートする
年でカンファレンスのリストをソートすることで見やすくなるかもしれません。カンファレンスの一覧を取得してソートするカスタムメソッドを作成することもできますが、findAll() メソッドのデフォルトの実装をオーバーライドして、全ての場所でソートされた状態で取得できるようにしてみましょう
ASCとかDESCとかにして試してみましょう
<?php
   :
   :
   :
class ConferenceRepository extends ServiceEntityRepository
{
    public function __construct(ManagerRegistry $registry)
    {
        parent::__construct($registry, Conference::class);
    }

+   public function findAll()
+   {
+       return $this->findBy([], ['year' => 'ASC', 'city' => 'ASC']);
+   }
+
   :
   :
   :
}
Doctrineオブジェクトのライフサイクルを管理する
新しくコメントをした際には、自動的に現在の日時が
createdAtとしてセットされると良いですね。Doctrine は、データベースに追加されるときや更新されるときといったライフサイクルにおいてオブジェクトやプロパティを操作するいろいろな方法があります。
※あれ?そのサブスクライバ作ったぞ??![]() って思ってたけど、その作ったサブスクライバはこの教科書の表現がわからなかったときに調べたついでに作っちゃったってのがオチだったみたい。ってことはまぁ、これ設定したあとにCommentSubscribersSubscriber.phpは消してもいいでしょう。
って思ってたけど、その作ったサブスクライバはこの教科書の表現がわからなかったときに調べたついでに作っちゃったってのがオチだったみたい。ってことはまぁ、これ設定したあとにCommentSubscribersSubscriber.phpは消してもいいでしょう。
ライフサイクルコールバックを定義する
サービスの依存が必要なく、エンティティを1つしか操作しないときは、エンティティクラスにコールバック(※CRUDアクション時の自動発火)を定義すると良いでしょう。
@ORM\PrePersistは、最初にデータベースに保存されたときにトリガーとして呼ばれるイベントです(HasLifecycleCallbacks()の宣言が必要)。このイベントの際にsetCreatedAtValue()メソッドが呼ばれ、現在の日時がcreatedAtプロパティにセットされます。
<?php
   :
   :
   :
/**
 * @ORM\Entity(repositoryClass=CommentRepository::class)
+ * @ORM\HasLifecycleCallbacks()
 */
class Comment
{
   :
   :
   :
    public function setCreatedAt(DateTimeInterface $createdAt): self
    {
        $this->createdAt = $createdAt;

        return $this;
    }

+   /**
+    * @ORM\PrePersist
+    */
+   public function setCreatedAtValue()
+   {
+       $this->createdAt = new DateTime();
+   }
+
    public function getConference(): ?Conference
   :
   :
   :
}
カンファンレンスへスラッグを追加する(廃止)
(注意:スラッグのパート Entity Listener がうまくいかないのでここはトバし。ユニーク制約のところを単独で参考にするのはOK)
スラッグとはエイリアスのこと
/conference/1といったカンファレンスのURL は特に意味はありません。これはデータベースのプライマリーキーといった実装の詳細に依るものになっています。代わりに/conference/paris-2020といったURL はどうですか?こちらの方が良いですね。paris-2020はConferenceのslugと呼んでいます。Conferenceにslugプロパティを追加しましょう(255文字の長さでnot nullです)
migrationしたときに既存レコードのslugの値がNOTNULL制約のせいでmigrationが終わらないからmigrationファイルを手で書き直せ、みたいなことが書かれている(p.141)が特に起こらなかったな。。。
guestbook> php bin/console make:entity Conference
guestbook> php bin/console make:migration
guestbook> php bin/console doctrine:migrations:migrate
Conferenceエンティティにユニーク制約
各カンファレンスを探すためにスラッグを使うようにしたので、Conferenceエンティティを修正して、スラッグがデータベース上でユニークになるようにしましょう
<?php
   :
   :
   :
/**
 * @ORM\Entity(repositoryClass=ConferenceRepository::class)
+ * @UniqueEntity("slug")
 */
class Conference
{
   :
   :
   :
    /**
-     * @ORM\Column(type="string", length=255)
+     * @ORM\Column(type="string", length=255, unique=true)
     */
    private $slug;
   :
   :
   :
}
guestbook> php bin/console make:migration
guestbook> php bin/console doctrine:migrations:migrate
※ここで @UniqueEntity エラーと格闘中
/**
 * @ORM\Entity(repositoryClass=ConferenceRepository::class)
+ * @ORM\Table(uniqueConstraints={@ORM\UniqueConstraint(name="conference_unique", columns={"slug"})})
 */
class Conference
{
   :
   :
   :
guestbook> php bin/console make:migration
guestbook> php bin/console doctrine:migrations:migrate
スラッグを生成する
URL は、ASCII 文字以外を変換する必要があり、正しくスラッグを生成することは、英語圏以外の言語にとって難しいです。例えば、é をe に変換する必要があります。車輪の再発明をせずにSymfony のString コンポーネントを使いましょう。 文字列からスラッグを生成する方法が実装されています
guestbook> composer require symfony/string
Conference クラスに、カンファレンスの情報からスラッグを生成す
るcomputeSlug() メソッドを追加します
   :
   :
   :
        return $this->id;
    }

+   public function computeSlug(SluggerInterface $slugger)
+   {
+       if (!$this->slug || '-' === $this->slug) {
+           $this->slug = (string) $slugger->slug((string) $this)->lower();
+       }
+   }

    public function getCity(): ?string
    {
        return $this->city;
   :
   :
   :
computeSlug() メソッドは、現在のスラッグが何も指定していないか
-と値が渡ったときのみ動作します。-の値は、バックエンドでカンファレンスを追加するときにスラッグが必須となるので使用します。空ではないこの特別な値でアプリケーションにスラッグを自動生成させることができます。
Entity Listener
createdAtプロパティのようにslugも更新時にcomputeSlug()メソッドを呼べば自動的にセットされるようにした方が良いですね。このメソッドはSluggerInterfaceの実装に依存していますので、以前のようにprePersistイベントに追加することはできません。代わりに Doctrineエンティティのリスナーを作成しましょう
event と Entity Listener は異なり、指定されたエンティティに対してのみ呼び出されます。
同じイベント(たとえば、複数の @PrePersist )に対する複数のメソッドの実行順序は保証されません。
<?php

namespace App\EntityListener;

use App\Entity\Conference;
use Doctrine\ORM\Event\LifecycleEventArgs;
use Symfony\Component\String\Slugger\SluggerInterface;

class ConferenceEntityListener
{
    private $slugger;
    public function __construct(SluggerInterface $slugger)
    {
        $this->slugger = $slugger;
    }
    public function prePersist(Conference $conference, LifecycleEventArgs $event)
    {
        $conference->computeSlug($this->slugger);
    }
    public function preUpdate(Conference $conference, LifecycleEventArgs $event)
    {
        $conference->computeSlug($this->slugger);
    }
}
新しくカンファレンスが追加されたとき
perPersist()と、更新されたときpreUpdated()に、スラッグは更新されます。
※記述が足りない??
キィィィィ!勘弁してくれ昼寝するはめになったぞ。プレーンな環境で作らなかったんか?(ハンカチを噛む)
まぁたしかに Entity から ConferenceEntityListener への指定は必要だよね
<?php
   :
   :
   :
/**
 * @ORM\Entity(repositoryClass=ConferenceRepository::class)
 * @ORM\Table(uniqueConstraints={@ORM\UniqueConstraint(name="conference_unique", columns={"slug"})})
+ * @ORM\EntityListeners({"App\EntityListener\ConferenceEntityListener"})
 */
class Conference
{
   :
   :
   :

待てよ?これもしかしてメインルーチン(どっかのコントローラ)にこういうの置かないと行けないんじゃない?エンティティだけで完結しねーじゃねーか![]()
やめたやめた!ロールバックさ ![]()
// register a entity listener.
$listener = $container->get('xxxx_listener');
$em->getConfiguration()->getEntityListenerResolver()->register($listener);
フォームでフィードバックを受ける
カンファレンスの参加者からフィードバックをしてもらうようにしましょう。HTML フォームからコメントを投稿できるようにしましょう。
フォームタイプを生成する
Maker バンドルを使ってフォームクラスを生成します
guestbook> php bin/console make:form

  The name of the form class (e.g. VictoriousPizzaType):
  > CommentFormType

  The name of Entity or fully qualified model class name that the new form will be bound to (empty for none):
  > Comment

  created: src/Form/CommentFormType.php
  Success!
App\Form\CommentFormTypeクラスはApp\Entity\Commentエンティティのフォームを定義します。FormTypeは、モデルに紐付けられたフォームフィールドです。投稿されたデータとモデルクラスのプロパティの変換を行います。デフォルトでは、SymfonyはCommentエンティティのメタデータ(Doctrine のメタデータ)を使用して各フィールドの設定を推測します。例えばtextフィールドはデータベースで大きなカラムとして定義されているのでtextareaが使われます。
フォームを表示する
ユーザーにフォームを表示するには、コントローラーでフォームを作成し、それをテンプレートに渡しましょう。フォームタイプを直接生成してはいけません。代わりに
createForm()メソッドを使用してください。このメソッドはAbstractControllerで実装されており、フォーム作成を簡単にしています。フォームをテンプレートに渡すにはcreateView()メソッドを使い、テンプレートのためのフォーマットに変換します。
   :
   :
   :
    public function show(Request $request, Conference $conference, CommentRepository $commentRepository)
    {
+       $comment = new Comment();
+       $form = $this->createForm(CommentFormType::class, $comment);
+
        $this->twig->addExtension(new IntlExtension());

        $offset = max(0, $request->query->getInt('offset', 0));
        $paginator = $commentRepository->getCommentPaginator($conference, $offset);

        return new Response($this->twig->render('conference/show.html.twig', [
            'conference' => $conference,
            'comments' => $paginator,
            'previous' => $offset - CommentRepository::PAGINATOR_PER_PAGE,
            'next' => min(count($paginator), $offset + CommentRepository::PAGINATOR_PER_PAGE),
+           'comment_form' => $form->createView(),
            ]));
    }
   :
   :
   :
テンプレートにフォームを表示するには、Twig の関数の
formを使います。
:
:
:
{% endif %}
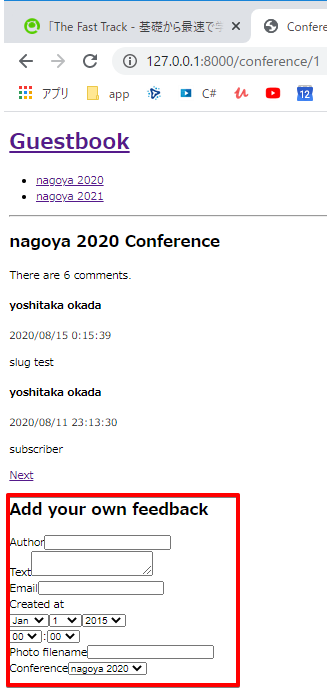
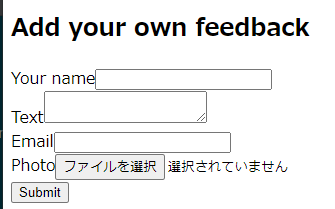
+ <h2>Add your own feedback</h2>
+ {{ form(comment_form) }}
{% endblock %}
ブラウザのカンファレンスページを再読み込みすると、フォームの各フィールドがHTML に表示されているはずです(データタイプはモデルから派生しています)。
form()関数はフォームタイプで定義された全ての情報を元にHTMLフォームを生成します。ファイルアップロードのフィールドがある際には、<form>タグにenctype=multipart/form-dataも追加します。さらに、投稿時にエラーがあった際にはエラーメッセージを表示します。デフォルトのテンプレートを上書きすれば、カスタマイズも可能ですが、このプロジェクトではまずこのままでいきましょう。
フォームタイプをカスタマイズする
フォームフィールドは、モデルから設定されていますが、フォームタイプを直接修正してデフォルトの設定をカスタマイズすることも可能です(※例えば隠し変数を持つなど)
:
:
:
class CommentFormType extends AbstractType
{
public function buildForm(FormBuilderInterface $builder, array $options)
{
$builder
- ->add('author')
+ ->add('author', null, [
'label' => 'Your name',
])
->add('text')
- ->add('email')
- ->add('createdAt')
- ->add('photoFilename')
- ->add('conference')
+ ->add('email', EmailType::class)
+ ->add('photo', FileType::class, [
+ 'required' => false,
+ 'mapped' => false,
+ 'constraints' => [
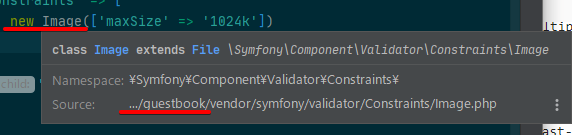
+ new Image(['maxSize' => '1024k'])
+ ],
+ ])
+ ->add('submit', SubmitType::class)
;
}
:
:
:
※記述が足りない??
キィィィィ!勘弁してくれ昼寝するはめになったぞ。プレーンな環境で作らなかったんか?(ハンカチを噛む)
guestbook> composer require symfony/validator doctrine/annotations
new Image にカーソルを当ててみて、Sourceが別のフォルダを見てたりすると、インストール漏れだったりするので、不具合探しの参考にしてくれよな!
確認
モデルをバリデートする
フォームは、コメントをした人のメールアドレスでは、
requiredとします。また、hiddenフィールドの_tokenフィールドでCSRF対策をしています。cURLなどのHTTP クライアントを使用するなどしてHTML バリデーションが効かないときは、サーバまで無効なデータが到達してしまいます。Commentデータモデルにもバリデーション制約を追加する必要があります。
class Comment
{
/**
* @ORM\Id()
* @ORM\GeneratedValue()
* @ORM\Column(type="integer")
*/
private $id;
/**
* @ORM\Column(type="string", length=255)
+ * @Assert\NotBlank
*/
private $author;
/**
* @ORM\Column(type="text")
+ * @Assert\NotBlank
*/
private $text;
/**
* @ORM\Column(type="string", length=255)
+ * @Assert\NotBlank
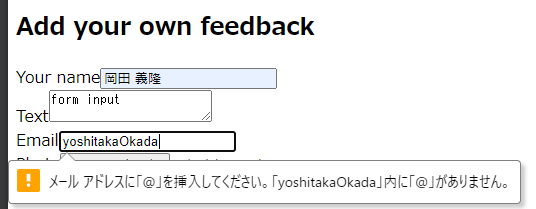
+ * @Assert\Email
*/
private $email;
フォームを処理する
これでフォームを表示する準備ができました。フォームを送信してコントローラーでデータベースに情報を永続化する処理をします。
   :
   :
   :
class ConferenceController extends AbstractController
{
    private $twig;
+   private $entityManager;

-   public function __construct(Environment $twig)
+   public function __construct(Environment $twig, EntityManagerInterface $entityManager)
    {
        $this->twig = $twig;
+       $this->entityManager = $entityManager;
    }
   :
   :
   :
    public function show(Request $request, Conference $conference, CommentRepository $commentRepository)
    {
        $comment = new Comment();
        $form = $this->createForm(CommentFormType::class, $comment);
+       $form->handleRequest($request);
+       if ($form->isSubmitted() && $form->isValid()) {
+           $comment->setConference($conference);
+           $this->entityManager->persist($comment);
+           $this->entityManager->flush();
+           return $this->redirectToRoute('conference', ['id' => $conference->getId()]);
+       }

        $this->twig->addExtension(new IntlExtension());
   :
   :
   :
確認
バリデートしてるのはブラウザなのでマイグレーションとかは必要なし
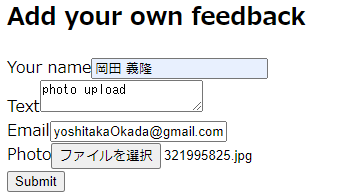
フォームを投稿すると、投稿された内容で
Commentオブジェクトが更新されます。フォームからは取り除きましたが、カンファレンスは、URLで既に決まっています。フォームのバリデーションができなかった際は、ページを表示しますが、フォームには先程投稿した内容やエラーメッセージが入っているので、ユーザーに表示することができます。フォームを試してみましょう。正しく動きデータベースに格納されるはずです(管理者バックエンドで確認してください)。しかし、まだ写真が正しく扱えていません。コントローラーで処理をしていないので正しく動きません。
ファイルをアップロードする
アップロードされた写真は、カンファレンスページで表示できるように
Webからアクセスできるローカルのディスクに保存されるべきです。public/uploads/photosディレクトリ以下にしましょう。
   :
   :
   :
-   public function show(Request $request, Conference $conference, CommentRepository $commentRepository)
+   public function show(Request $request, Conference $conference, CommentRepository $commentRepository, string $photoDir)
    {
        $comment = new Comment();
        $form = $this->createForm(CommentFormType::class, $comment);
        $form->handleRequest($request);
        if ($form->isSubmitted() && $form->isValid()) {
            $comment->setConference($conference);
+           if ($photo = $form['photo']->getData()) {
+               $filename = bin2hex(random_bytes(6)).'.'.$photo->guessExtension();
+               try {
+                   $photo->move($photoDir, $filename);
+               } catch (FileException $e) {
+                   // unable to upload the photo, give up
+               }
+               $comment->setPhotoFilename($filename);
+           }
            $this->entityManager->persist($comment);
   :
   :
   :
写真のアップロードを行うのに、ファイルにランダムな名前を付けます。そして、アップロードされたファイルを写真格納ディレクトリの最終的な場所に移動します。そして、ファイル名はコメントエンティティに格納します。
show()メソッドに、サービスではなく文字列として$photoDirが引数として追加されています。Symfony のコンテナは、サービス以外にパラメーターを格納することができます。パラメーターは、サービスを設定するためのスカラー値です。これらのパラメーターは、明示的にサービスにインジェクトもできますし、名前で紐付かせることもできます。
   :
   :
   :
services:
    # default configuration for services in *this* file
    _defaults:
        autowire: true      # Automatically injects dependencies in your services.
        autoconfigure: true # Automatically registers your services as commands, event subscribers, etc.
        bind:
            $photoDir: "%kernel.project_dir%/public/uploads/photos"
   :
   :
   :
bind の設定があると、$photoDir 引数でSymfony が値をインジェクトしてくれます。写真の代わりにPDF ファイルをアップロードしてみてください。エラーメッセージが表示されるはずです。デザインは適用していないのでかっこよくはないですが、Webサイトのデザインをする際に綺麗にします。フォームの全ての要素のスタイルを1行の設定で変更するようにします。
確認

※記述が足りない??
キィィィィ!勘弁してくれ昼寝するはめになったぞ。プレーンな環境で作らなかったんか?(ハンカチを噛む)
guestbook> composer require symfony/mime

extension=fileinfo
確認
PDFのアップロードがはじかれること

写真をアップロードできること
アップロードされた写真をGitから除外する
gitignoreに以下を追加
+ /public/uploads
管理者のバックエンドをセキュアにする
管理者のバックエンドのインターフェースは、信頼された人からのみアクセス可能であるべきです。Symfony のセキュリティコンポーネントを使用して、Web サイトをセキュアにします。Twig と同様に、セキュリティコンポーネントは既に他の依存パッケージが使用しておりインストールされていますが、明示的に
composer.jsonファイルに追加しましょう
guestbook> composer require symfony/security-bundle
Userエンティティを定義する
参加者がWebサイトに自分のアカウントを作成することはできないですが、ここでは管理者のために正しく機能する認証システムを作成しましょう。そのために、Webサイトの管理者のユーザーを一つだけ用意します。最初のステップは、
Userエンティティを定義することです。混乱を避けるためにここではAdminディレクトリを使います。Symfony のセキュリティ認証システムでAdminエンティティを使用するためには、passwordプロパティなどの要件が必要になります。make:entityではなく、専用のmake:userコマンドを使用してAdminエンティティを作成してください。
インタラクティブな質問に次のように答えてください: 管理者をDoctrine に格納したいので
(yes)、管理者のユニークな表示名を(username)、そして各ユーザーがパスワードを1つ持つことに(yes)と。生成されたクラスには、getRole(),eraseCredentials()メソッドの他にも Symfony の認証システムで必要なものが入っています。Adminユーザーにさらにプロパティを追加したければ、make:entityを使用してください。
guestbook> php bin/console make:user Admin
  Do you want to store user data in the database (via Doctrine)? (yes/no) [yes]:
  >

  Enter a property name that will be the unique "display" name for the user (e.g. email, username, uuid) [email]:
  > username

  Will this app need to hash/check user passwords? Choose No if passwords are not needed or will be checked/hashed by some other system (e.g. a single sign-on server).

  Does this app need to hash/check user passwords? (yes/no) [yes]:
  >

  created: src/Entity/Admin.php
  created: src/Repository/AdminRepository.php
  updated: src/Entity/Admin.php
  updated: config/packages/security.yaml

  Success!
EasyAdmin のように
__toString()メソッドを追加しましょう
   :
   :
   :
        return $this;
    }

+   public function __toString(): string
+   {
+       return $this->username;
+   }

    /**
     * @see UserInterface
     */
   :
   :
   :
Admin エンティティを生成するだけでなく、このコマンドは、認証システムとエンティティのワイヤリングのためのセキュリティ設定を更新します
※と書いてあるが、どうやら設定されているようだ ↓
security:
+    encoders:
+        App\Entity\Admin:
+            algorithm: auto
+
     # https://symfony.com/doc/current/security.html#where-do-users-come-fromuser-providers
     providers:
-        in_memory: { memory: null }
+        # used to reload user from session & other features (e.g. switch_user)
+        app_user_provider:
+            entity:
+                class: App\Entity\Admin
+                property: username
     firewalls:
         dev:
             pattern: ^/(_(profiler|wdt)|css|images|js)/
Symfony にパスワードをエンコードするのに一番有効なアルゴリズムを選択させましょう(これは時が経つと変更されていくものです)。マイグレーションを生成して、データベースをmigrateします
guestbook> php bin/console make:migration
guestbook> php bin/console doctrine:migrations:migrate
管理者ユーザーのパスワードを生成する
guestbook> php bin/console security:encode-password

  Symfony Password Encoder Utility
  ================================

  Type in your password to be encoded:
  >

  ------------------ ---------------------------------------------------------------------------------------------------
  Key                Value
  ------------------ ---------------------------------------------------------------------------------------------------
  Encoder used       Symfony\Component\Security\Core\Encoder\MigratingPasswordEncoder
  Encoded password   $argon2id$v=19$m=65536,t=4,p=1$J5TeTwzxmlVnzYSWpp7J7w$H0zwMauEl0yY4vfzEAOG1zqdLOtcp0ZlF+bxK6pecj4
  ------------------ ---------------------------------------------------------------------------------------------------

  ! [NOTE] Self-salting encoder used: the encoder generated its own built-in salt.

  [OK] Password encoding succeeded
管理者を作成する
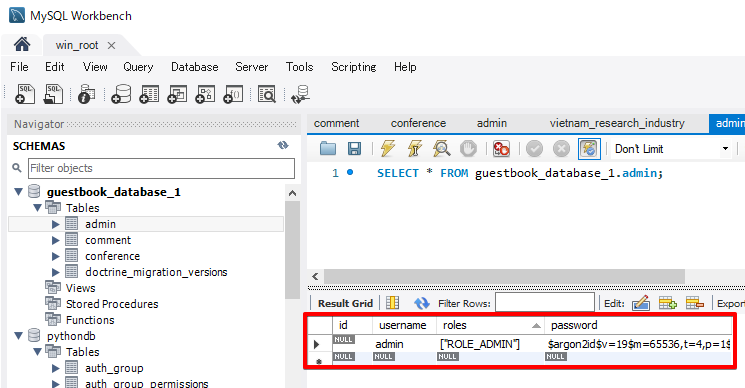
次の SQL で管理者ユーザーを追加してください。パスワードの値の
$符号は全てエスケープしましょう。
$ symfony run psql -c "INSERT INTO admin (id, username, roles, password) VALUES (nextval('admin_id_seq'), 'admin', '["ROLE_ADMIN"]', '$argon2id$v=19$m=65536,t=4,p=1$BQG+jovPcunctc30xG5PxQ$TiGbx451NK
e?![]() あれなの?パスワード作ってからSQLで登録するのか。なんか因果が逆やな
あれなの?パスワード作ってからSQLで登録するのか。なんか因果が逆やな![]()
俺(symfony)のほうだけ準備整ったよ!って?
僕は下のようにMySQLWorkbenchのUI上から値いれました。えー、これはやいとこ「メールを送り返したらユーザー登録完了」みたいなのほしいな
セキュリティ認証を設定する
管理者ユーザーができましたので、管理者のバックエンドをセキュアにすることができます。Symfony は複数の認証の方法をサポートしていますが、ここでは、昔から人気のあるフォーム認証システムを使いましょう。
make:authコマンドを実行しセキュリティ設定を更新し、ログインテンプレートを作成し、認証システムを作成しましょう
1を選択し、ログインフォーム認証システムを生成しAppAuthenticatorとし、コントローラーをSecurityControllerと命名しlogout URLを生成しましょう(yes)。このコマンドはセキュリティ設定を更新し生成されるクラスとワイヤリングします。
guestbook> php bin/console make:auth
  What style of authentication do you want? [Empty authenticator]:
    [0] Empty authenticator
    [1] Login form authenticator
  > 1

  The class name of the authenticator to create (e.g. AppCustomAuthenticator):
  > AppAuthenticator

  Choose a name for the controller class (e.g. SecurityController) [SecurityController]:
  >

  Do you want to generate a '/logout' URL? (yes/no) [yes]:
  >

  created: src/Security/AppAuthenticator.php
  updated: config/packages/security.yaml
  created: src/Controller/SecurityController.php
  created: templates/security/login.html.twig

  Success!

  Next:
  - Customize your new authenticator.
  - Finish the redirect "TODO" in the App\Security\AppAuthenticator::onAuthenticationSuccess() method.
  - Review & adapt the login template: templates/security/login.html.twig.
コマンド出力のヒントにあるように、ログインが成功した際にユーザーをリダイレクトするように
onAuthenticationSuccess()メソッドにあるルートをカスタマイズする必要があります。
   :
   :
   :
    public function onAuthenticationSuccess(Request $request, TokenInterface $token, $providerKey)
    {
        if ($targetPath = $this->getTargetPath($request->getSession(), $providerKey)) {
            return new RedirectResponse($targetPath);
        }

        // For example : return new RedirectResponse($this->urlGenerator->generate('some_route'));
-       throw new \Exception('TODO: provide a valid redirect inside '.__FILE__);
+       return new RedirectResponse($this->urlGenerator->generate('easyadmin'));
    }
   :
   :
   :
次のコマンドでルート名とパスの関連を表示することができるので、EasyAdmin ルートがeasyadmin ということがわかります。
guestbook> php bin/console debug:router
 -------------------------- -------- -------- ------ -----------------------------------
  Name                       Method   Scheme   Host   Path
 -------------------------- -------- -------- ------ -----------------------------------
  _preview_error             ANY      ANY      ANY    /_error/{code}.{_format}
  _wdt                       ANY      ANY      ANY    /_wdt/{token}
  _profiler_home             ANY      ANY      ANY    /_profiler/
  _profiler_search           ANY      ANY      ANY    /_profiler/search
  _profiler_search_bar       ANY      ANY      ANY    /_profiler/search_bar
  _profiler_phpinfo          ANY      ANY      ANY    /_profiler/phpinfo
  _profiler_search_results   ANY      ANY      ANY    /_profiler/{token}/search/results
  _profiler_open_file        ANY      ANY      ANY    /_profiler/open
  _profiler                  ANY      ANY      ANY    /_profiler/{token}
  _profiler_router           ANY      ANY      ANY    /_profiler/{token}/router
  _profiler_exception        ANY      ANY      ANY    /_profiler/{token}/exception
  _profiler_exception_css    ANY      ANY      ANY    /_profiler/{token}/exception.css
  admin                      ANY      ANY      ANY    /admin
  home                       ANY      ANY      ANY    /
  conference                 ANY      ANY      ANY    /conference/{id}
  app_login                  ANY      ANY      ANY    /login
  app_logout                 ANY      ANY      ANY    /logout
 -------------------------- -------- -------- ------ -----------------------------------
認可アクセスコントロールのルールを追加する
セキュリティシステムは2つのパートによって構成されています。認証と認可です。管理者ユーザーを作成した際に
ROLE_ADMINロールを与えています。access_controlにルールを追加してROLE_ADMINロールを持ったユーザーのみが/adminセクションにアクセスできるようにしましょう
access_control のルールは正規表現でアクセスを制限します/adminから始まるURLにアクセスされると、セキュリティシステムは、ログインしているユーザーがROLE_ADMINロールがあるかチェックします。
   :
   :
   :
    # Easy way to control access for large sections of your site
    # Note: Only the *first* access control that matches will be used
    access_control:
-       # - { path: ^/admin, roles: ROLE_ADMIN }
+         - { path: ^/admin, roles: ROLE_ADMIN }
        # - { path: ^/profile, roles: ROLE_USER }
ログインフォームで認証する
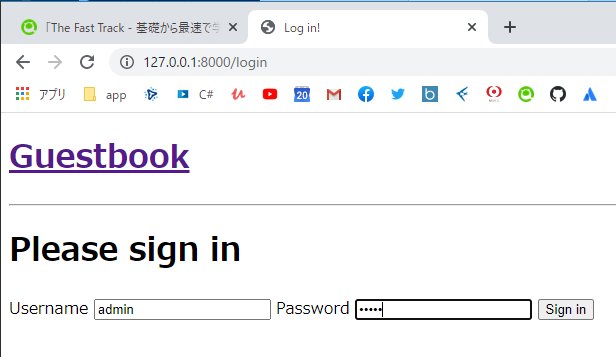
これで、管理者のバックエンドへのアクセスを試みると、ログインページにリダイレクトされ、ログインとパスワードの入力を促されるはずです。
guestbook> php -S 127.0.0.1:8000 -t public
https://127.0.0.1:8000/admin
adminと先ほどエンコードしたパスワードを使ってログインしてください。そのままSQL をコピーしていたなら、そのパスワードの値はadminです。EasyAdminは自動的にSymfonyの認証システムを検知します
毎回パスワードブレイクみたいな状態になるのよね
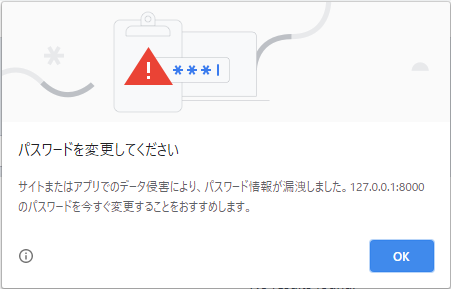
まぁでも入れたのでヨシ!
"ログアウト" リンクをクリックしてください。これで、管理者のバックエンドはセキュアな状態になります。
NOTE:
make:registration:formコマンドを使えば、より高機能な認証システムを作成することができます。
APIでスパム対策をする
ロボットやスパマーなど誰でもフィードバックを投稿すること可能な状態ですので、
CAPTCHAを追加したり、サードパーティのAPI を使用して、ロボットからの投稿から保護することを考えます。Akismetを使用することにしましょう。ここでは、アウトオブバンドにAkismetのAPIを呼ぶ方法を説明します。
Akismetに登録する
akismet.comの無料アカウントに登録し、Akismet API Keyを取得します。
ちょっと英語やしー、クレジットカード登録求められるしで怖いなー。ちょっときついからこのセクションは無視。スパムコメントはこないものと仮定しましょうw
テストをする
アプリケーションにどんどん機能を追加し始めているので、テストについて話す適切なタイミングでしょう。面白いことに、このチャプターでテストを書いている時に私はバグを見つけました。
Symfonyは、PHPUnitを使ってユニットテストをしています。インストールしておきましょう
guestbook> composer require --dev symfony/phpunit-bridge

  How to test?

   * Write test cases in the tests/ folder
   * Run php bin/phpunit
ユニットテストを書く
SpamChecker が、最初にテストを書くクラスです。ユニットテストを生成します
あぁ~ん、テストの内容が Akismet API についてか。ってことは無理やな。
コントローラーのファンクショナルテストを書く
「処理のテスト」はできなくてもブラウザのレスポンステストとかはできるはずだ。
コントローラーのテストは一般的なPHP のクラスのテストとは少し異なります。コントローラーのテストでは、HTTP リクエストのコンテキスト内で実行する必要があるからです。ファンクショナルテストで必要になる依存パッケージをインストールしてください
guestbook> composer require --dev symfony/browser-kit symfony/css-selector
Conference コントローラーのファンクショナルテストを作成してください
guestbook> php bin/console make:functional-test

  The name of the functional test class (e.g. DefaultControllerTest):
  > Controller\ConferenceControllerTest

  created: tests/Controller/ConferenceControllerTest.php

  Success!

  Next: Open your new test class and start customizing it.
  Find the documentation at https://symfony.com/doc/current/testing.html#functional-tests
<?php

namespace App\Tests\Controller;

use Symfony\Bundle\FrameworkBundle\Test\WebTestCase;

class ConferenceControllerTest extends WebTestCase
{
-   public function testSomething()
+   public function testIndex()
    {
        $client = static::createClient();
-       $crawler = $client->request('GET', '/');
+       $client->request('GET', '/');

        $this->assertResponseIsSuccessful();
-       $this->assertSelectorTextContains('h1', 'Hello World');
+       $this->assertSelectorTextContains('h2', 'Give your feedback');
    }
}
最初のテストは、ホームページが
HTTP Responseが200を返すか調べることです。$client変数は、ブラウザをシミュレートします。サーバーへのHTTP呼び出しをするのではなく、Symfonyアプリケーションを直接呼び出します。この方法を使うことの利点は次の通りです。クライアントとサーバーの間の往復をしないので処理が速くなることです。そして、各HTTPリクエストの後のサービスの状態を調べるテストが可能になることです。PHPUnitのみならず、さらにassertResponseIsSuccessfulのようなアサーションを使うことで確認作業が楽になります。Symfony によって定義されたこういったアサーションはたくさんあります。
INFO:
ルーターから生成するのではなく、/をURL として使ってきました。エンドユーザーのURL をテストとするため、故意にそうしていました。ルートパスを変更すると、テストは失敗するようになります。そして、失敗することが、サーチエンジンやWeb サイトにリンクがあった際に、古いURL を新しいURL にリダイレクトさせるようにするべきということに気づくリマンドになります。
guestbook> php bin/phpunit tests/Controller/ConferenceControllerTest.php

  PHPUnit 7.5.20 by Sebastian Bergmann and contributors.

  Testing App\Tests\Controller\ConferenceControllerTest
  .                                                                   1 / 1 (100%)

  Time: 610 ms, Memory: 10.00 MB

  OK (1 test, 3 assertions)
テストが失敗した際は、レスポンスオブジェクトを調べると良いです。
$client->getResponse()でレスポンスオブジェクトを取得しechoしてどうなっているか確認してください。
フィクスチャを定義する
コメントの一覧、ページネーション、フォーム投稿のテストをするには、データをデータベースへ投入する必要があります。そして、テスト実行の間同じデータにしておきたいです。このニーズを満たしてくれるフィクスチャの出番です。
Doctrine Fixture bundleをインストールしてください
guestbook> composer require --dev doctrine/doctrine-fixtures-bundle
インストールすると、
src/DataFixtures/ディレクトリとサンプルクラスが作成されますので、カスタマイズしてください。ここでは、カンファレンスを2つ、コメントを1つ追加します。フィクスチャをロードすると、管理者ユーザーも含め、全てのデータは削除されます。フィクスチャに管理者ユーザーも追加しておきましょう
   :
   :
   :
- use Doctrine\Common\Persistence\ObjectManager;
+ use Doctrine\Persistence\ObjectManager;
   :
   :
   :
class AppFixtures extends Fixture
{
+   private $encoderFactory;
+
+   public function __construct(EncoderFactoryInterface $encoderFactory)
+   {
+       $this->encoderFactory = $encoderFactory;
+   }

    public function load(ObjectManager $manager)
    {
        // $product = new Product();
        // $manager->persist($product);
+       $amsterdam = new Conference();
+       $amsterdam->setCity('Amsterdam');
+       $amsterdam->setYear('2019');
+       $amsterdam->setIsInternational(true);
+      $manager->persist($amsterdam);

+       $paris = new Conference();
+       $paris->setCity('Paris');
+       $paris->setYear('2020');
+       $paris->setIsInternational(false);
+       $manager->persist($paris);

+       $comment1 = new Comment();
+       $comment1->setConference($amsterdam);
+       $comment1->setAuthor('Fabien');
+       $comment1->setEmail('fabien@example.com');
+       $comment1->setText('This was a great conference.');
+       $manager->persist($comment1);

+       $admin = new Admin();
+       $admin->setRoles(['ROLE_ADMIN']);
+       $admin->setUsername('admin');
+       $admin->setPassword($this->encoderFactory->getEncoder(Admin::class)->encodePassword('admin', null));
+       $manager->persist($admin);

        $manager->flush();
    }
}
フィクスチャをロードする
フィクスチャをデータベースへロードしてください。データベースに格納されている全てのデータを削除するので、注意してください。
CAUTION:
デフォルトでは、loadコマンドはデータベースをパージし、すべてのテーブルからすべてのデータを削除します。フィクスチャのデータを追加するには、--appendオプションを追加します。
guestbook> php bin/console doctrine:fixtures:load
ファンクショナルテスト内でWebサイトをクロールする
これまで見てきたように、テストで使用するHTTP クライアントは、ブラウザをシミュレートしますので、ヘッドレスブラウザ(=CUIブラウザ)を使っているかのようにWebサイトをナビゲートすることができます。ホームページから特定のカンファレンスページをクリックするテストを新しく追加してください。
   :
   :
   :
        $this->assertResponseIsSuccessful();
        $this->assertSelectorTextContains('h2', 'Give your feedback');

    }

+   public function testConferencePage()
+   {
+       $client = static::createClient();
+       $crawler = $client->request('GET', '/');
+
+       $this->assertCount(2, $crawler->filter('h4'));
+
+       $client->clickLink('View');
+
+       $this->assertPageTitleContains('Amsterdam');
+       $this->assertResponseIsSuccessful();
+       $this->assertSelectorTextContains('h2', 'Amsterdam 2019');
+       $this->assertSelectorExists('div:contains("There are 1 comments")');
+   }
このテストで何が行われたかを説明しましょう:
• 最初のテストのようにホームページを開きます
•request()メソッドは、ページ内の要素(リンクやフォームなどCSSセレクターやXPathで探せるもの全て)を探すのに便利なCrawlerインスタンスを返します。
•CSSセレクターを使って、ホームページにカンファレンスが2つ表示されているのを確認することができます
• そして、"View" リンクをクリックします(同時に複数のリンクをクリックできないので、Symfony は最初に見つけたリンクを選択します)
• ページタイトル、レスポンス、ページの<h2>が正しいページのものであるかアサートします(ルートがマッチするかも確認することができます)
• 最後に、ページにコメントが1つあることをアサートします。div:contains()は、CSSセレクターとしては無効ですが、Symfony にはjQuery の機能から一部持ってきた便利な追加機能があります。
テキスト(すなわちView)をクリックしなくても、CSSセレクターを使ってリンクを選択することもできます
$client->click($crawler->filter('h4 + p a')->link());
新しいテストが通ることを確認してください
guestbook> php bin/phpunit tests/Controller/ConferenceControllerTest.php

  PHPUnit 7.5.20 by Sebastian Bergmann and contributors.

  Testing App\Tests\Controller\ConferenceControllerTest
  ..                                                                  2 / 2 (100%)

  Time: 15.48 seconds, Memory: 28.00 MB

  OK (2 tests, 10 assertions)
テストデータベースを使う
デフォルトでは、
phpunit.xml.distファイルでSymfony 環境をtestとして定義しており、test環境でテストは実行されます
<phpunit>
    <php>
        <server name="APP_ENV" value="test" force="true" />
    </php>
</phpunit>
テストで別のデータベースを使用するには、.env.test ファイルにあるDATABASE_URL 環境変数をオーバーライドしてください
# define your env variables for the test env here
+ DATABASE_URL=mysql://root:rootpw@127.0.0.1:3306/guestbook_database_1
KERNEL_CLASS='App\Kernel'
APP_SECRET='$ecretf0rt3st'
SYMFONY_DEPRECATIONS_HELPER=999999
PANTHER_APP_ENV=panther
test環境のデータベースにフィクスチャをロードしてください:
guestbook> php bin/console doctrine:fixtures:load --env=test
  Careful, database "guestbook_database_1" will be purged. Do you want to continue? (yes/no) [no]:
  > yes

    > purging database
    > loading App\DataFixtures\AppFixtures
このステップの残りの場所では、環境変数
DATABAE_URLは再定義しません。テストするのにdev環境と同じデータベースを使用するといくつかの利点があります。次のセクションで紹介します。
(注:.env.testも同じデータベースにしてるので結果的に同じ意味)
ファンクショナルテストでフォームを投稿する
フォームの投稿をシミュレートしてカンファレンスに写真付きのコメントを追加してみましょう。以下の必要なコードを見てください。今までに書いたものと同じように複雑ではありません
※ここにマジックナンバー注意!
本来コレは、スラッグ がうまく作れていないといけないが飛ばしているので(お手本も /conference/amsterdam-2019 みたいな指定の仕方になっているが仕方なく /conference/4 となっている。当然採番されるタイミングで数字が異なる)。さらにいうと、There are 2 comments の数字も変わる(コレに関しては次のセクションで説明)
   :
   :
   :
        $this->assertSelectorExists('div:contains("There are 1 comments")');
    }
+
+   public function testCommentSubmission()
+   {
+       $client = static::createClient();
+       $client->request('GET', '/conference/4'); // ※ここにマジックナンバー注意!
+       $client->submitForm('Submit', [
+           'comment_form[author]' => 'Fabien',
+           'comment_form[text]' => 'Some feedback from an automated functional test',
+           'comment_form[email]' => 'me@automat.ed',
+           'comment_form[photo]' => dirname(__DIR__, 2).'/public/images/under-construction.gif',
+       ]);
+       $this->assertResponseRedirects();
+       $client->followRedirect();
+       $this->assertSelectorExists('div:contains("There are 2 comments")');
+   }
}
submitForm()でフォームをサブミットするのに、ブラウザの開発ツールもしくは、Symfonyのプロファイラパネルからinput(※img??)の名前を見つけてください。工事中のイメージが再利用されているのに気づきましたか?テストをもう一度実行し、全てパスすることを確認してください。
フィクスチャをリロードする
テストをもう一度走らせると、テストは失敗します。それは、データベースにコメントが追加されたからで、コメントの数を調べるアサーションが壊れてしまっているからです。テスト実行の前にフィクスチャをリロードして、テスト実行毎にデータベースの状態をリセットする必要があります。
guestbook> php bin/console doctrine:fixtures:load
guestbook> php bin/phpunit tests/Controller/ConferenceControllerTest.php
非同期にする
フォーム投稿時にスパムの判定をするのには多少問題があります。例えば、
Akismet APIに遅延の問題があったときに、私たちのWeb サイトも遅くなってしまいます。さらに、タイムアウトされてしまったり、Akismet APIに問題があったときには、コメントを失ってしまうかもしれません。公開することなく投稿されたデータを保存して、レスポンスを早く返すことが理想とするところです。そのためにスパムのチェックとは独立して実行します。
- コメントにフラグを付ける(掲載済みの
stateは文字のpublishedが入る)
- Comment クラスにstate プロパティを追加
- データベースマイグレーション
- 既に登録されているコメント全てにデフォルトの値として
publishedを指定するようにUPDATE -
stateのデフォルトの値をsubmittedとしてセットされていることを確認 - EasyAdmin の設定を変更して管理画面でコメントの状態(state)を見ることができるようにしましょう。
- フィクスチャに
stateをセットして、テストコードを修正しましょう - コントローラーのテストでは、バリデーションをシミュレートします
- メッセンジャーを理解する
- 非同期処理が必要な際に、メッセージをメッセージバスに送ってください。このバスはキューに格納され、処理を止めることなくすぐリターンされます。コンシューマーは、継続的にバックグラウンドで動いており、キ
ューにある新しいメッセージを読み、そのメッセージに関連したロジックを実行します。コンシューマーは、Web アプリケーションと同じサーバーでも別のサーバーにあっても動作します。レスポンスがない以外は、HTTP リクエストを処理するときととても似ています。
- メッセージハンドラーをコーディングする
- メッセージはデータオブジェクトのクラスで、ロジックを持つべきではありません。シリアライズされ、キューに格納されます。“シンプルな”シリアライズ可能なデータのみを格納しましょう。
- CommentMessage クラスを作成する
- CommentMessage メッセージを処理するCommentMessageHandler クラスを作成してください
- 表示されるコメントを制限する
-
CommentRepositoryの表示ロジックを変更して、公開されていないコメントをフロントエンドへ表示しないようにしましょう
- 実際に非同期にする
- デフォルトでは、ハンドラは、同期的に処理します。非同期にするために、
config/packages/messenger.yamlの設定ファイルに、ハンドラがどのキューを使用するかを明示的に設定してください
- Docker のスタックに RabbitMQ を追加する
- Dockerサービスをリスタートする
- メッセージを取得実行する
多分コレはAjaxではない、Symfonyの内部的な非同期処理(時間の掛かりそうな処理をキューに入れてレスポンスだけ返しましょう)を経験しましょうってやつなんやな。まぁ、Ajaxでやるんで結構です!みたいな感じやな。
(省略)ワークフローを使って判定する
workflowはタスク管理みたいなやつ。参考にしたいなら本買ってみて。僕は興味がない(ぉぃ
(省略)管理者へメールを送信する
Akismet API が spam と判断したときに、管理者へメールを送信し、承認フローを設けるというものだが、Akismet APIに依存したサンプル多すぎだろ...参考にしたいなら本買ってみて。僕は興味がない(ぉぃ
パフォーマンス向上のためにキャッシュする
パフォーマンスに関する問題はよく訪れます。典型的な例だと、データベースのインデックスの欠如や、ページあたりの大量のSQL発行などです。空のデータベースでは発生しませんが、トラフィックが増えデータが増加すると、発生する可能性があります。
1時間キャッシュを保持するとかそういう事が書いてあって、んー、その手のキャッシュはクエリストリングに更新日時をつけたりして回避するので結構です、みたいな。参考にしたいなら本買ってみて。僕は興味がない(ぉぃ
Webpackでユーザーインタフェースにスタイリングする
ここまで、まだユーザーインタフェースのデザインをあまりしてきていません。プロのようにスタイルをするのに、
Webpackベースのモダンなスタックを使ってみましょう。アプリケーションとの統合をやりやすくするためにSymfony touchを追加してください。Webpack Encoreをインストールしましょう:
guestbook> composer require symfony/webpack-encore-bundle
完全な
Webpack環境は、既に作成されており、適切なデフォルトの設定でpackage.jsonとwebpack.config.jsが生成されています。Webpackを設定するのにEncoreの設定をするwebpack.config.jsを開いてください。package.jsonファイルに、毎回使う便利なコマンドが定義されています。assetsディレクトリには、css/app.cssやjs/app.jsのようなプロジェクトのアセットのメインエントリーポイントが入っています。
Sass を使用する
生の CSS を使うのではなく、 Sass を使ってみましょう
guestbook> mv assets/css/app.css assets/css/app.scss
- import '../css/app.css';
+ import '../css/app.scss';
Sass ローダーをインストールしてください
※PowerShell のスクリプトが実行できない場合の対処方法
guestbook> PowerShell -ExecutionPolicy RemoteSigned yarn add node-sass "sass-loader@^7.0.1" --dev
Webpack で Sass ローダーを有効化してください
- //.enableSassLoader()
+ .enableSassLoader()
インストールするパッケージはどうしたら分かるのでしょうか。もしパッケージインストール無しでアセットをビルドしようとすると、Encore は .scss ファイルをロードするのに必要な依存パッケージをインストールする yarn add コマンドが必要であることをエラーメッセージで表示してくれます。
Bootstrap でレバレッジする
適切なデフォルト値でレスポンシブな Webサイトをビルドするには、 Bootstrap のような CSS フレームワークが良いでしょう。Bootstrap をパッケージとしてインストールしてください:
guestbook> PowerShell -ExecutionPolicy RemoteSigned yarn add bootstrap jquery popper.js bs-custom-file-input --dev
CSSファイルで Bootstrap を require してください(ファイルをクリーンアップもしています)
- body {
-     background-color: lightgray;
- }

+ @import '~bootstrap/scss/bootstrap';
JS ファイルにも同じようにしてください
// any CSS you import will output into a single css file (app.css in this case)
import '../css/app.scss';
+ import 'bootstrap';
+ import bsCustomFileInput from 'bs-custom-file-input';
- // Need jQuery? Install it with "yarn add jquery", then uncomment to import it.
- // import $ from 'jquery';
-
- console.log('Hello Webpack Encore! Edit me in assets/js/app.js');
+ bsCustomFileInput.init();
Symfony のフォームシステムは、特別なテーマでBootstrap をネイティブでサポートしていますので、有効にしてください
twig:
    default_path: '%kernel.project_dir%/templates'
+   form_themes: ['bootstrap_4_layout.html.twig']
HTML をスタイリングする
アプリケーションをスタイリングする準備ができましたので、アーカイブをダウンロードし、プロジェクトのルートディレクトリに展開してください
zipのなかみが以下の図の感じってことは、要は素材上書きしろってことね(※上書きするとコントローラのpath指定とかが異なるけど、ひとつひとつエラーを見て修正していけるはずだ!)

guestbook> php -r "copy('https://symfony.com/uploads/assets/guestbook.zip', 'guestbook.zip');"
guestbook> Expand-Archive -Path guestbook.zip -DestinationPath . -Force
テンプレートを見ると、少し Twig にトリックがあるのに気づくと思います。
アセットをビルドする
Webpack 使用することでの主な違いは、アプリケーションがCSSや JS ファイルを直接使うことができないことです。最初に “コンパイル”してあげる必要があります。開発環境では、 encore dev コマンドでアセットをコンパイルすることができます
guestbook> symfony run yarn encore dev
JS や CSS の変更時にコマンドを毎回実行するのではなく、JS やCSSの変更を検知して、バックグラウンドで実行させましょう
guestbook> symfony run -d yarn encore dev --watch
確認
少し時間をかけて視覚的な変更を発見してみてください。ブラウザで新しいデザインを見てみてください。
guestbook> php bin/console cache:clear
guestbook> php -S 127.0.0.1:8000 -t public

画像をリサイズする(p.271)
guestbook>
guestbook>
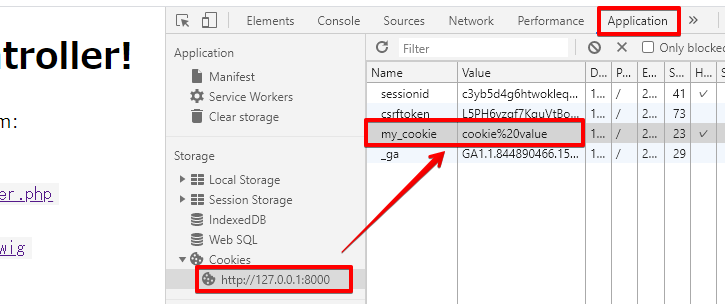
Cookie
    /**
     * @Route("/default", name="default")
     */
    public function index(GiftsService $gifts)
    {
        $users = $this->getDoctrine()->getRepository(User::class)->findAll();

        // これ!
        $cookie = new Cookie('my_cookie', 'cookie value', time() + 60); // now() + 60sec
        $res = new Response();
        $res->headers->setCookie($cookie);
        $res->send();

        return $this->render('default/index.html.twig', [
            'controller_name' => 'DefaultController',
            'users' => $users,
            'random_gift' => $gifts->gifts
        ]);
    }
確認
my-project> php -S 127.0.0.1:8000 -t public
ははぁ、なるほどね。っていうかchromeでcookieも見れたんやな...
Cookieのクリア
        $res = new Response();
        $res->headers->clearCookie('my_cookie');
        $res->send();
セッション
「セッションIDの表示アンドSTOP」のところで処理が止まっちゃう(※exit)なので、手でコメントアウトして、コメントアウト外して、ってパチパチやるとセッションに入った値とIDが確認できる
use Symfony\Component\HttpFoundation\Request;
use Symfony\Component\HttpFoundation\Session\SessionInterface;
    public function index(..., Request $request, SessionInterface $session)
    {
        // セッションIDの表示アンドSTOP
        exit($request->cookies->get('PHPSESSID'));

        // セッションに値を仕込んで表示
        $session->set('name', 'session value');
        if($session->has('name')){
            exit($session->get('name'));
        }

        // おまけ(セッション削除)
        $session->remove('name');
        // おまけ(セッション全消し)
        $session->clear();
    }
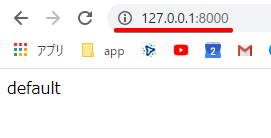
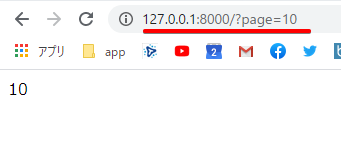
GET
    public function index(GiftsService $gifts, Request $request, SessionInterface $session)
    {
        // クエリストリングに page があれば page の数字を返しなければ 'default' を返す
        exit($request->query->get('page', 'default'));
    }
確認
my-project> php -S 127.0.0.1:8000 -t public
ははぁ、なるほどね。
おまけ
        // アップロードされたファイル foo の取得
        $request->files->get('foo');
404
カスタムエラーページ
なんかエラーページをオーバーライドしてカスタマイズできるらしいけど教材がなんか変で ボブみたいになってる から質問中。
意図的な例外の発生
public function index(GiftsService $gifts, Request $request)
{
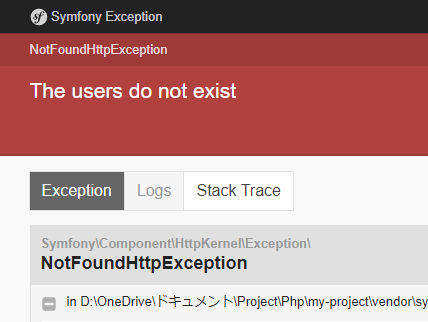
// ユーザーがいなかったら?
if(!$users){
throw $this->createNotFoundException('The users do not exist');
}
}
確認
my-project> php -S 127.0.0.1:8000 -t public
ははぁ、なるほどね(※これは意図的に if の否定を取ってエラーを起こしました)
サービスを作成する
MyService.phpを新規作成(最初はServiceというフォルダ自体がないと思います)。処理内容は、配列にランダム処理をして返却するとしましょう。
<?php
namespace App\Service;

class GiftsService {

    public $gifts = ['flowers', 'car'];

    public function __construct()
    {
        shuffle($this->gifts);
    }

}
サービスをコントローラーにバインドする
メソッドの引数で直接使う
GiftsService $gifts に注目
<?php

namespace App\Controller;

use App\Entity\User;
use App\Service\GiftsService;
use App\Service\MyService;
use Symfony\Bundle\FrameworkBundle\Controller\AbstractController;
use Symfony\Component\Routing\Annotation\Route;
use Symfony\Component\VarDumper\VarDumper;

/**
 * Class DefaultController
 *
 * @author "Yoshitaka Okada <yoshi@gmail.com>"
 */
class DefaultController extends AbstractController
{

    /**
     * @Route("/", name="default")
     * @return \Symfony\Component\HttpFoundation\Response
     */
    public function index(GiftsService $gifts)
    {

        return $this->render(
            'default/index.html.twig',
            [
                'controller_name' => 'DefaultController',
                'random_gift' => $gifts,
            ]
        );
    }
}
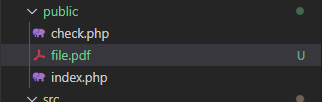
ダウンロード機能
# This file is the entry point to configure your own services.
# Files in the packages/ subdirectory configure your dependencies.

# Put parameters here that don't need to change on each machine where the app is deployed
# https://symfony.com/doc/current/best_practices/configuration.html#application-related-configuration
parameters:
    download_directory: '../public/' #追記
    /**
     * @Route("/download")
     */
    public function download()
    {
        $path = $this->getParameter('download_directory');
        return $this->file($path.'file.pdf');
    }
publicフォルダにファイルを作って
※You cannot guess the mime type as the Mime component is not installed. Try running "composer require symfony/mime".
MIME読めねぇよって言ってきたら
my-project> composer require symfony/mime
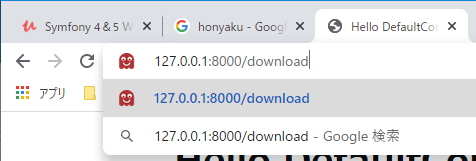
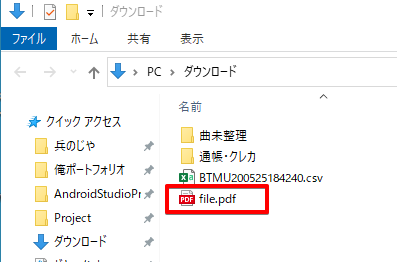
確認
my-project> php -S 127.0.0.1:8000 -t public
ははぁ、なるほどね
CRUD
    public function index(GiftsService $gifts, Request $request)
    {

        $entityManager = $this->getDoctrine()->getManager();

        // read
        $user = $this->getDoctrine()->getRepository(User::class)->findOneBy(['name'=>"yoshitaka"]);
        dump($user);

        // create
        $user = new User();
        $user->setName('yoshitaka'); // 列名のついたインテリセンスが出てくる
        $entityManager->persist($user);
        $entityManager->flush();

        // update
        $user->setName('yoshitaka2');
        $entityManager->flush();

        // delete
        $entityManager->remove($user);
        $entityManager->flush();

        // raw sql
        $conn = $entityManager->getConnection();
        $sql = 'SELECT * FROM user u WHERE u.id > :id';
        $stmt = $conn->prepare($sql);
        $stmt->execute(['id'=> 5]); // :id 置換を試すためにワザと
        dump($stmt->fetchAll());

    }
データベースマイグレーションしなおし
# delete tables in database
my-project> php bin/console doctrine:schema:drop -n -q --force --full-database

# delete migration file
my-project> rm migrations/*.php

# migration
my-project> php bin/console make:migration
my-project> php bin/console doctrine:migrations:migrate -n -q
my-project> composer require web-profiler-bundle
TEST
なんか教材が英語な上に複合的になってまとめられなくなってきたからテストのところに移ろう。テストって面倒でついついやりたくない。
インストール
my-project> composer require --dev symfony/phpunit-bridge
サービスの単体テスト
基本はこれ
my-project> php bin/console make:unit-test
  The name of the unit test class (e.g. UtilTest):
    > CalculatorTest
  created: tests/CalculatorTest.php
  Success!
<?php
namespace App\Services;

class Calculator {
    public function add($a, $b)
    {
        return $a + $b;
    }
}
<?php

namespace App\Tests;

+ use App\Services\Calculator;
use PHPUnit\Framework\TestCase;

class CalculatorTest extends TestCase
{
    public function testSomething()
    {
+        $calc = new Calculator();
+        $result = $calc->add(1, 9);
+        $this->assertEquals(10, $result);
    }
}
my-project> php ./bin/phpunit
  PHPUnit 7.5.20 by Sebastian Bergmann and contributors.
  Testing Project Test Suite
  1 / 1 (100%)
  Time: 790 ms, Memory: 2.00 MB
  OK (1 test, 1 assertion)
データプロバイダーのテスト
アノテーションでデータプロバイダーこと「provideUrls」を指定して、「provideUrls」関数を定義して、urlを複数回弾込めしてテストするってことか
<?php

namespace App\Tests;

use Symfony\Bundle\FrameworkBundle\Test\WebTestCase;

class DefaultControllerTest extends WebTestCase
{
+    /**
+     * @dataProvider provideUrls
+     */
+    public function testSomething($url)
    {
        $client = static::createClient();
+        $crawler = $client->request('GET', $url);

+        $this->assertTrue($client->getResponse()->isSuccessful());
    }

+    public function provideUrls()
+    {
+        return [['/home'], ['/login']];
+    }
}
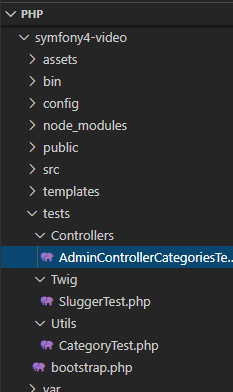
分離テスト(新)
my-project> composer require --dev symfony/test-pack
my-project> php bin/console make:functional-test AdminControllerCategoriesTest
  created: tests/AdminControllerCategoriesTest.php
  Success!
Controllersフォルダに移す(整理)
my-project> mkdir tests/Controllers
my-project> mv tests/AdminControllerCategoriesTest.php tests/Controllers/AdminControllerCategoriesTest.php
<?xml version="1.0" encoding="UTF-8"?>

<!-- https://phpunit.readthedocs.io/en/latest/configuration.html -->
<phpunit xmlns:xsi="http://www.w3.org/2001/XMLSchema-instance"
         xsi:noNamespaceSchemaLocation="bin/.phpunit/phpunit.xsd"
         backupGlobals="false"
         colors="true"
         bootstrap="tests/bootstrap.php"
>
    <php>
        <ini name="error_reporting" value="-1" />
        <server name="APP_ENV" value="test" force="true" />
        <server name="SHELL_VERBOSITY" value="-1" />
        <server name="SYMFONY_PHPUNIT_REMOVE" value="" />
        <server name="SYMFONY_PHPUNIT_VERSION" value="7.5" />
+        <server name="DATABASE_URL" value="mysql://root:pwxxxxx@127.0.0.1:3306/xxxxxdb?serverVersion=5.7" />
    </php>

    <testsuites>
        <testsuite name="Project Test Suite">
            <directory>tests</directory>
        </testsuite>
    </testsuites>

    <filter>
        <whitelist processUncoveredFilesFromWhitelist="true">
            <directory suffix=".php">src</directory>
        </whitelist>
    </filter>

    <listeners>
        <listener class="Symfony\Bridge\PhpUnit\SymfonyTestsListener" />
    </listeners>
</phpunit>
分離テスト
データベースのロールバックを毎回しながらテストする
※うまくいかないので講師に英語で問い合わせ中。データベースの削除テストとかはちゃんとしときたいやつやな...
my-project> composer require --dev symfony/test-pack
<?xml version="1.0" encoding="UTF-8"?>

<!-- https://phpunit.readthedocs.io/en/latest/configuration.html -->
<phpunit xmlns:xsi="http://www.w3.org/2001/XMLSchema-instance"
         xsi:noNamespaceSchemaLocation="bin/.phpunit/phpunit.xsd"
         backupGlobals="false"
         colors="true"
         bootstrap="tests/bootstrap.php"
>
    <php>
        <ini name="error_reporting" value="-1" />
        <server name="APP_ENV" value="test" force="true" />
        <server name="SHELL_VERBOSITY" value="-1" />
        <server name="SYMFONY_PHPUNIT_REMOVE" value="" />
        <server name="SYMFONY_PHPUNIT_VERSION" value="7.5" />

+        <env name="DATABASE_URL" value="mysql://root:xxxxx@127.0.0.1/xxxxxdb" />

    </php>

    <testsuites>
        <testsuite name="Project Test Suite">
            <directory>tests</directory>
        </testsuite>
    </testsuites>

    <filter>
        <whitelist processUncoveredFilesFromWhitelist="true">
            <directory suffix=".php">src</directory>
        </whitelist>
    </filter>

    <listeners>
        <listener class="Symfony\Bridge\PhpUnit\SymfonyTestsListener" />
    </listeners>
</phpunit>
<?php

namespace App\Tests;

use Symfony\Bundle\FrameworkBundle\Test\WebTestCase;

class DefaultControllerTest extends WebTestCase
{

    private $entityManager;
    protected function setUp()
    {
        parent::setUp();
        $this->client->static::createClient();
    }

    /**
     * @dataProvider provideUrls
     */
    public function testSomething($url)
    {
        $client = static::createClient();
        $crawler = $client->request('GET', $url);

        $this->assertTrue($client->getResponse()->isSuccessful());
    }

    public function provideUrls()
    {
        return [['/home'], ['/login']];
    }
}
モックオブジェクトのテスト
テストしたい相手の内蔵の動きと結果を指定できて(getPromotionPercentage関数を実行して20を返す)、その前提で機能だけをテストできる。人工呼吸みたいなもんやな。「俺がこいつの肺になります!」
<?php
namespace App\Services;

class PromotionCalculator {

    // Calculatorが、不特定配列を全加算するように進化した
    public function calculatePriceAfterPromotion(... $prices)
    {
        $start = 0;
        foreach($prices as $price)
        {
            $start += $price;
        }

        // ファイルの数字の分だけ割り引いて返す
        return $start - ($start * $this->getPromotionPercentage() / 100);
    }

    // ファイルの数字を読んで数字で返す
    public function getPromotionPercentage()
    {
        return (int) \file_get_contents('file.txt');
    }
}
20
<?php

namespace App\Tests;

use App\Services\Calculator;
use PHPUnit\Framework\TestCase;
use App\Services\PromotionCalculator;

class CalculatorTest extends TestCase
{
    public function testSomething()
    {
        // getPromotionPercentageというメソッドを持ったMockを定義
        $calc = $this->getMockBuilder(PromotionCalculator::class)
        ->setMethods(['getPromotionPercentage'])
        ->getMock();

        // メソッドを実行し、20を返すものとする、というモックの振る舞いを定義
        $calc->expects($this->any())
        ->method('getPromotionPercentage')
        ->willReturn(20);

        // 10 - (10*20%) = 8
        $result = $calc->calculatePriceAfterPromotion(1, 9);
        $this->assertEquals(8, $result);

        // 80 - (80*20%) = 64
        $result = $calc->calculatePriceAfterPromotion(10, 20, 50);
        $this->assertEquals(64, $result);

    }
}
my-project> php ./bin/phpunit tests/CalculatorTest.php
  PHPUnit 7.5.20 by Sebastian Bergmann and contributors.
  Testing App\Tests\CalculatorTest
  1 / 1 (100%)
  Time: 159 ms, Memory: 2.00 MB
  OK (1 test, 1 assertion)
カバレッジレポート
カバレッジとは?
カバレッジ(網羅率)とは、ソフトウェアテストにおいて、全体のうちどのくらいまでテストを実施したのかを割合で表したものです。
カバレッジを計測することにより、テストのヌケ・モレを防ぐことができます。
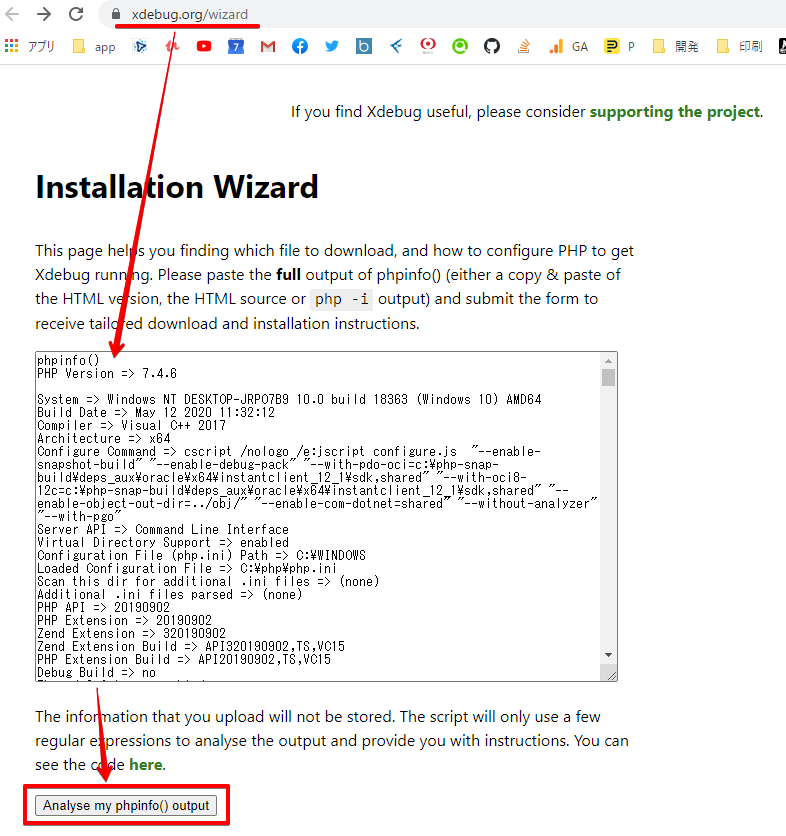
参考:PHPをWindows 10上のVisual Studio Codeを使って「Webサーバなしで」デバッグする方法
C:\Users\yoshi> php.exe -i
長い出力結果が出てくるので、Xdebugのページに貼り付けるとダウンロードリンクが出てくる
https://xdebug.org/wizard
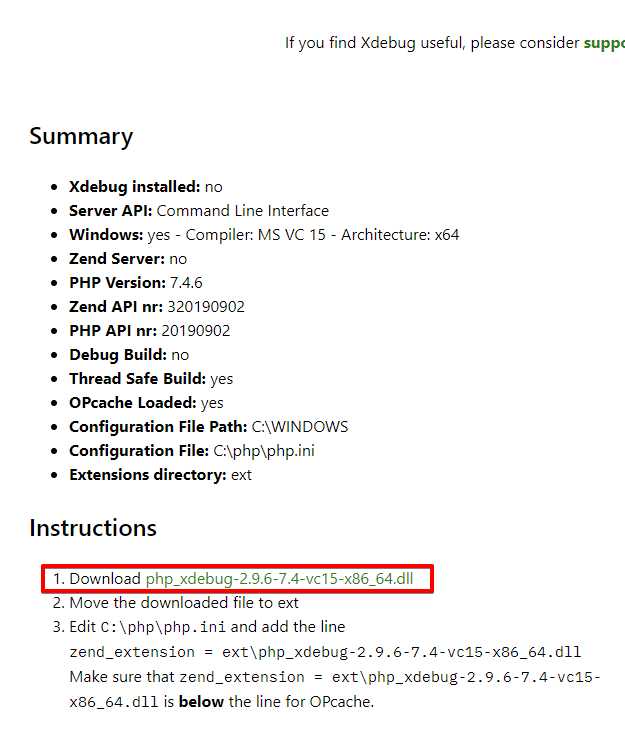
php.iniファイルの最後に以下の内容を追記する。
[XDebug]
xdebug.remote_enable = 1
xdebug.remote_autostart = 1
xdebug.remote_connect_back = 1
xdebug.remote_port = 9000
zend_extension = C:\php\ext\php_xdebug-2.9.6-7.4-vc15-x86_64.dll
my-project> php ./bin/phpunit --coverage-text
  PHPUnit 7.5.20 by Sebastian Bergmann and contributors.
  Error:         No code coverage driver is available
  Testing Project Test Suite
  2 / 2 (100%)
  Time: 935 ms, Memory: 8.00 MB
  OK (2 tests, 3 assertions)