はじめに
現場が VirtualBox と Vagrant を使っていた
参考
VirtualBoxとVagrantでCentOS8の仮想環境を導入(Windows10)
インストール
特に悩むところはなかった
VirtualBox をインストールする方法
Vagrantのインストール手順書(Windows 10, CentOS 7.2, Vagrant 1.9.5, VirtualBox 5.1.22)
https://www.virtualbox.org/
https://www.vagrantup.com/
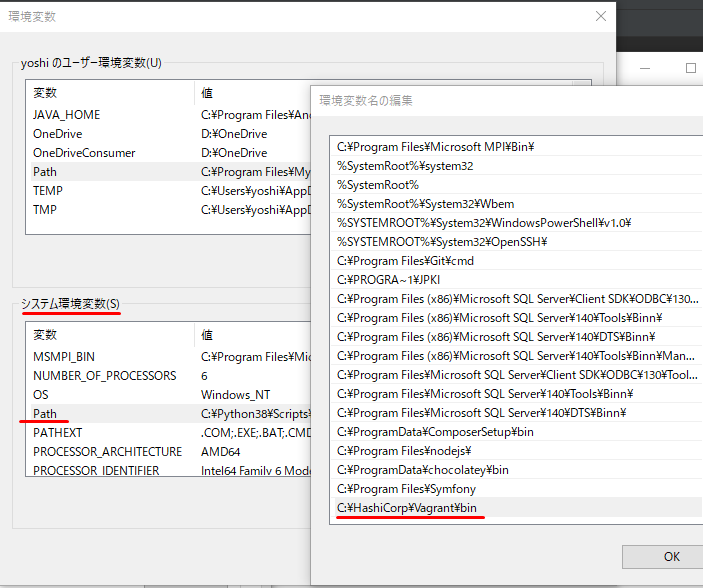
環境変数をチェックして
# なにもないことを確認
dev\Portfolio> vagrant box list
  There are no installed boxes! Use `vagrant box add` to add some.

# init
dev\Portfolio> vagrant init
  A `Vagrantfile` has been placed in this directory. You are now
  ready to `vagrant up` your first virtual environment! Please read
  the comments in the Vagrantfile as well as documentation on
  `vagrantup.com` for more information on using Vagrant.
Vagrantfile
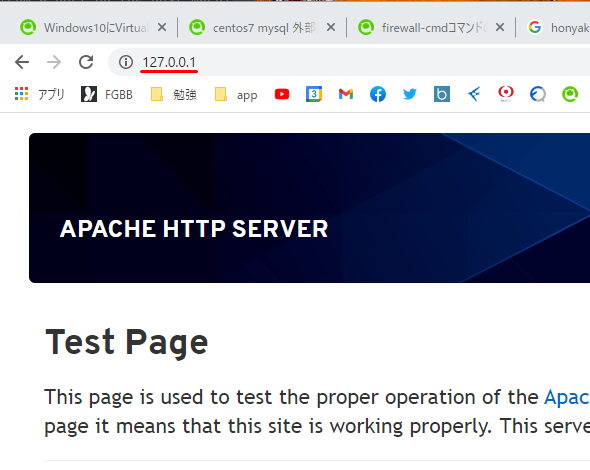
forwarded_port は、hostの80番からのアクセスをguestの80番に通すという設定にしてます。のちのステップでapacheを設定してますが、Listenは80。ということはデフォルトのコメントアウトを解いただけの状態にした場合はブラウザに localhost:8080 と入力することで apacheには80で通る ってことなのね。Vagrantから見た場合はguestの80番をhostの80番に通す(=フォワードする)という表現になるようだ
==> default: Forwarding ports...
default: 80 (guest) => 80 (host) (adapter 1)
default: 22 (guest) => 2222 (host) (adapter 1)
# -*- mode: ruby -*-
# vi: set ft=ruby :

# All Vagrant configuration is done below. The "2" in Vagrant.configure
# configures the configuration version (we support older styles for
# backwards compatibility). Please don't change it unless you know what
# you're doing.
Vagrant.configure("2") do |config|
  # The most common configuration options are documented and commented below.
  # For a complete reference, please see the online documentation at
  # https://docs.vagrantup.com.

  # Every Vagrant development environment requires a box. You can search for
  # boxes at https://vagrantcloud.com/search.
- config.vm.box = "base"
+ config.vm.box = "generic/centos8"

  # Disable automatic box update checking. If you disable this, then
  # boxes will only be checked for updates when the user runs
  # `vagrant box outdated`. This is not recommended.
  # config.vm.box_check_update = false

  # Create a forwarded port mapping which allows access to a specific port
  # within the machine from a port on the host machine. In the example below,
  # accessing "localhost:8080" will access port 80 on the guest machine.
  # NOTE: This will enable public access to the opened port
  # config.vm.network "forwarded_port", guest: 80, host: 8080

  # Create a forwarded port mapping which allows access to a specific port
  # within the machine from a port on the host machine and only allow access
  # via 127.0.0.1 to disable public access
- # config.vm.network "forwarded_port", guest: 80, host: 8080, host_ip: "127.0.0.1"
+ config.vm.network "forwarded_port", guest: 80, host: 80, host_ip: "127.0.0.1"

  # Create a private network, which allows host-only access to the machine
  # using a specific IP.
  # config.vm.network "private_network", ip: "192.168.33.10"

  # Create a public network, which generally matched to bridged network.
  # Bridged networks make the machine appear as another physical device on
  # your network.
  # config.vm.network "public_network"

  # Share an additional folder to the guest VM. The first argument is
  # the path on the host to the actual folder. The second argument is
  # the path on the guest to mount the folder. And the optional third
  # argument is a set of non-required options.
  # config.vm.synced_folder "../data", "/vagrant_data"

  # Provider-specific configuration so you can fine-tune various
  # backing providers for Vagrant. These expose provider-specific options.
  # Example for VirtualBox:
  #
  # config.vm.provider "virtualbox" do |vb|
  #   # Display the VirtualBox GUI when booting the machine
  #   vb.gui = true
  #
  #   # Customize the amount of memory on the VM:
  #   vb.memory = "1024"
  # end
  #
  # View the documentation for the provider you are using for more
  # information on available options.

  # Enable provisioning with a shell script. Additional provisioners such as
  # Ansible, Chef, Docker, Puppet and Salt are also available. Please see the
  # documentation for more information about their specific syntax and use.
  # config.vm.provision "shell", inline: <<-SHELL
  #   apt-get update
  #   apt-get install -y apache2
  # SHELL
end
vagrant up
dev/server> vagrant up
※vagrant up時にdefault: SSH auth method: private keyから進まない
結論: PowerShellで管理者として以下のコマンド実行 Hyper-Vをoff にする
PowerShell> bcdedit /set hypervisorlaunchtype off
その後PC再起動
PowerShell> bcdedit
hypervisorlaunchtype が Off を確認
vagrant ssh
dev/server> vagrant ssh
rootになる
[vagrant@centos8 ~]$ su -
  Password:
  su: Authentication failure
[vagrant@centos8 ~]$ sudo su
[root@centos8 vagrant]#
dnf update
wsgiがインストールできないとか言われる原因はたいがいここ
# dnf update
日本語ロケール
# dnf -y install langpacks-ja
# localectl set-locale LANG=ja_JP.UTF-8
# source /etc/locale.conf
# echo $LANG
  ja_JP.UTF-8
# date
  2021年  3月  5日 金曜日 10:45:14 UTC
タイムゾーン
# timedatectl set-timezone Asia/Tokyo
  Failed to set time zone: Failed to update /etc/localtime
※タイムゾーンが設定できないの?
やっぱりSELinuxかよ...![]()
RHEL8でタイムゾーンを変更しようとしたら "Failed to set time zone: Failed to update /etc/localtime" エラーが出て変更できない
# getenforce
  Enforcing
# vi /etc/selinux/config
  ---
  SELINUX=enforcing
    → SELINUX=permissive
  ---
# reboot
dev/server> vagrant ssh
$ sudo su
# getenforce
  Permissive

# timedatectl set-timezone Asia/Tokyo
# date
  2021年  3月  5日 金曜日 19:50:45 JST
Pythonコマンドに変更
python3 → python
# python3 --version
  Python 3.6.8

(※2を選んで)
# alternatives --config python
  There are 2 programs which provide 'python'.
    Selection    Command
  -----------------------------------------------
  *+ 1           /usr/libexec/no-python
     2           /usr/bin/python3
  Enter to keep the current selection[+], or type selection number: 2

# python --version
  Python 3.6.8
pipコマンドに変更
(※pipがないねん)
# pip --version
  bash: pip: command not found
# which pip
  /usr/bin/which: no pip in (/sbin:/bin:/usr/sbin:/usr/bin)

(※pip3ならあんねん)
# which pip3
  /bin/pip3

(※alias変更)
# ln -s /usr/bin/pip3 /usr/bin/pip

(※pipで出てくる)
# pip --version
  pip 9.0.3 from /usr/lib/python3.6/site-packages (python 3.6)
Apache(Webサーバ)
インストール
# dnf -y install httpd httpd-devel gcc
httpd.conf
:set number
10(G)
# vi /etc/httpd/conf/httpd.conf

# 45行目(VagrantからのPort80を許可する):
Listen 80
# 98行目:コメント解除しサーバー名指定
ServerName 127.0.0.1:80
# 147行目:変更 (Indexes を削除)
Options FollowSymLinks
# 154行目:変更
AllowOverride All
# 167行目:必要に応じて追記 (ディレクトリ名のみでアクセスできるファイル名 index.php など)
DirectoryIndex index.html
# 319行目:確認(UTF-8になってると思うけどなってなかったら変更)
AddDefaultCharset UTF-8

# 最終行に追記
# サーバーの応答ヘッダ
ServerTokens Prod
# キープアライブオン
KeepAlive On
# systemctl enable --now httpd
  Created symlink /etc/systemd/system/multi-user.target.wants/httpd.service → /usr/lib/sy
stemd/system/httpd.service.
Django3
インストール
# pip install django
# pip freeze
  Django==3.1.7
MySQL8
インストール
(rootじゃないと入れられないみたい)
# dnf module -y install mysql:8.0
# vi /etc/my.cnf.d/mysql-server.cnf
character-set-server=utf8
[client]
default-character-set=utf8
[mysql]
default-character-set=utf8
[mysqldump]
default-character-set=utf8
# systemctl enable --now mysqld
# mysql_secure_installation

# パスワード品質チェックを有効にするか否か
Press y|Y for Yes, any other key for No: y

# パスワード品質チェックを有効にした場合は強度を選択
Please enter 0 = LOW, 1 = MEDIUM and 2 = STRONG: 0

# MySQL root パスワードを設定
New password:
Re-enter new password:

# 入力したパスワードで良いかの確認
Do you wish to continue with the password provided?(Press y|Y for Yes, any other key for No) : y

# 匿名ユーザーを削除するか否か
Remove anonymous users? (Press y|Y for Yes, any other key for No) : y

# root ユーザーのリモートログインを無効とするか否か
Disallow root login remotely? (Press y|Y for Yes, any other key for No) : y

# テストデータベースを削除するか否か
Remove test database and access to it? (Press y|Y for Yes, any other key for No) : y

# 特権情報をリロードするか否か
Reload privilege tables now? (Press y|Y for Yes, any other key for No) : y

All done!
ファイアウォールは面倒なので無効化する
現場でもオレオレ証明書を作ってファイアウォールをパスしてたので、無効化しても同じこと(これ有効にしたままだとマジでアドレスアクセステストで沼にハマるからね)
# systemctl stop firewalld
# systemctl disable firewalld
アドレスアクセステスト

やりなおすとき
dev\Portfolio> vagrant box list
  generic/centos8 (virtualbox, 3.2.6)
dev\Portfolio> vagrant box remove generic/centos8
  Removing box 'generic/centos8' (v3.2.6) with provider 'virtualbox'...
dev\Portfolio> vagrant box list
  There are no installed boxes! Use `vagrant box add` to add some.
ローカルディスクのDjangoプロジェクトを連携
(下の英文のgoogle翻訳)追加のフォルダーをゲストVMと共有します。最初の引数は、ホスト上の実際のフォルダーへのパスです。 2番目の引数は、フォルダーをマウントするゲストのパスです。また、オプションの3番目の引数は、不要なオプションのセットです。
  # Share an additional folder to the guest VM. The first argument is
  # the path on the host to the actual folder. The second argument is
  # the path on the guest to mount the folder. And the optional third
  # argument is a set of non-required options.
- # config.vm.synced_folder "../data", "/vagrant_data"
+ config.vm.synced_folder ".", "/var/www/html/Portfolio"
dev\Portfolio> vagrant reload
dev\Portfolio> vagrant ssh
$ sudo su
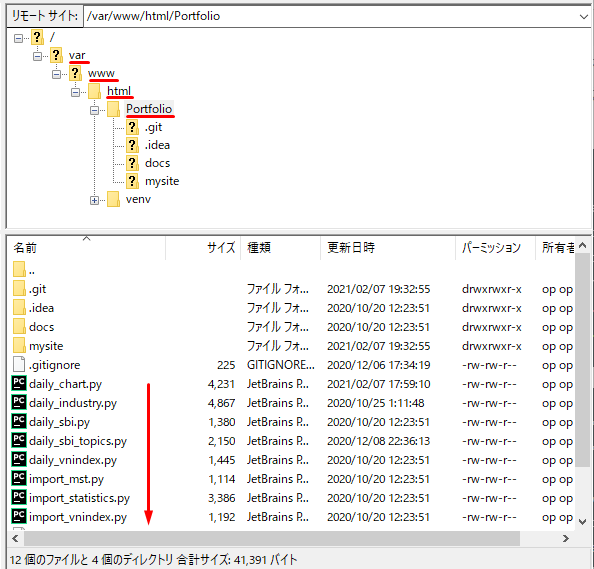
# ls /var/www/html/Portfolio
daily_chart_cp.py daily_industry.py daily_sbi_topics.py docs import import_statistics.py mysite result.log test_daily_sbi_topics.py venv
daily_chart.py daily_sbi.py daily_vnindex.py favicon import_mst.py import_vnindex.py README.md step_log.sql Vagrantfile
lsのリストがさくらのVPSのファイル構成と一致した!
MySQL Workbench
Vagrant内にしかないデータベースを外から覗く
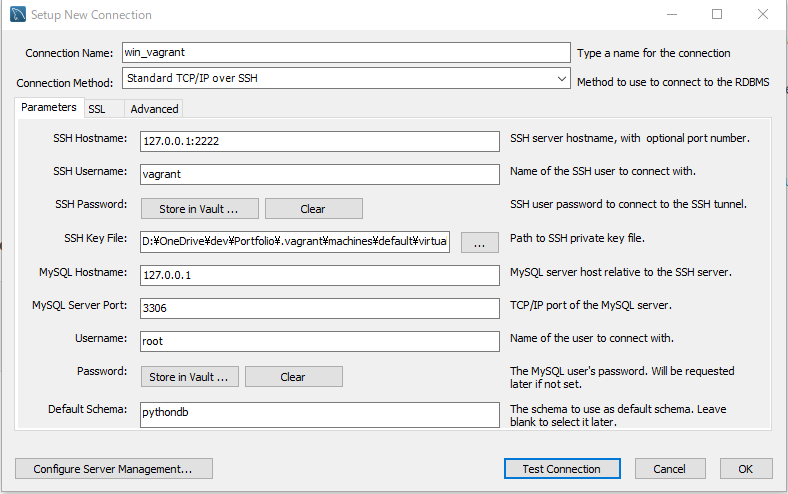
dev\Portfolio> vagrant ssh-config
  Host default
    HostName 127.0.0.1
    User vagrant
    Port 2222
    UserKnownHostsFile /dev/null
    StrictHostKeyChecking no
    PasswordAuthentication no
    IdentityFile D:/OneDrive/dev/Portfolio/.vagrant/machines/default/virtualbox/private_key
    IdentitiesOnly yes
    LogLevel FATAL