Azure OpenAI や OpenAI の SDK や OpenTelemetry 関連のライブラリは、更新が頻繁なため、実装や画面表示などが現時点と異なっている可能性があります。
正しい情報の確認については、都度公式ドキュメントや各SDK、ライブラリのページをご参照ください。
本記事について
本記事では、Azure OpenAI Service にアクセスし、履歴などのデータを Azure Cosmos DB に記録するような Python ベースの Web アプリケーションや Web API を Azure の APM である Application Insights を使ってどのように監視できるかを見ていきます。
Python アプリケーションの Application Insights の基本的な利用方法については、下記記事をご参照ください。
本稿では、上記記事の内容を踏まえたうえで、azure.monitor.opentelemetry や opentelemetry.instrumentation.openai のライブラリを利用するとどのようにデータが取得でき、Application Insights での分析を行えるかを確認します。
サンプルアプリケーション
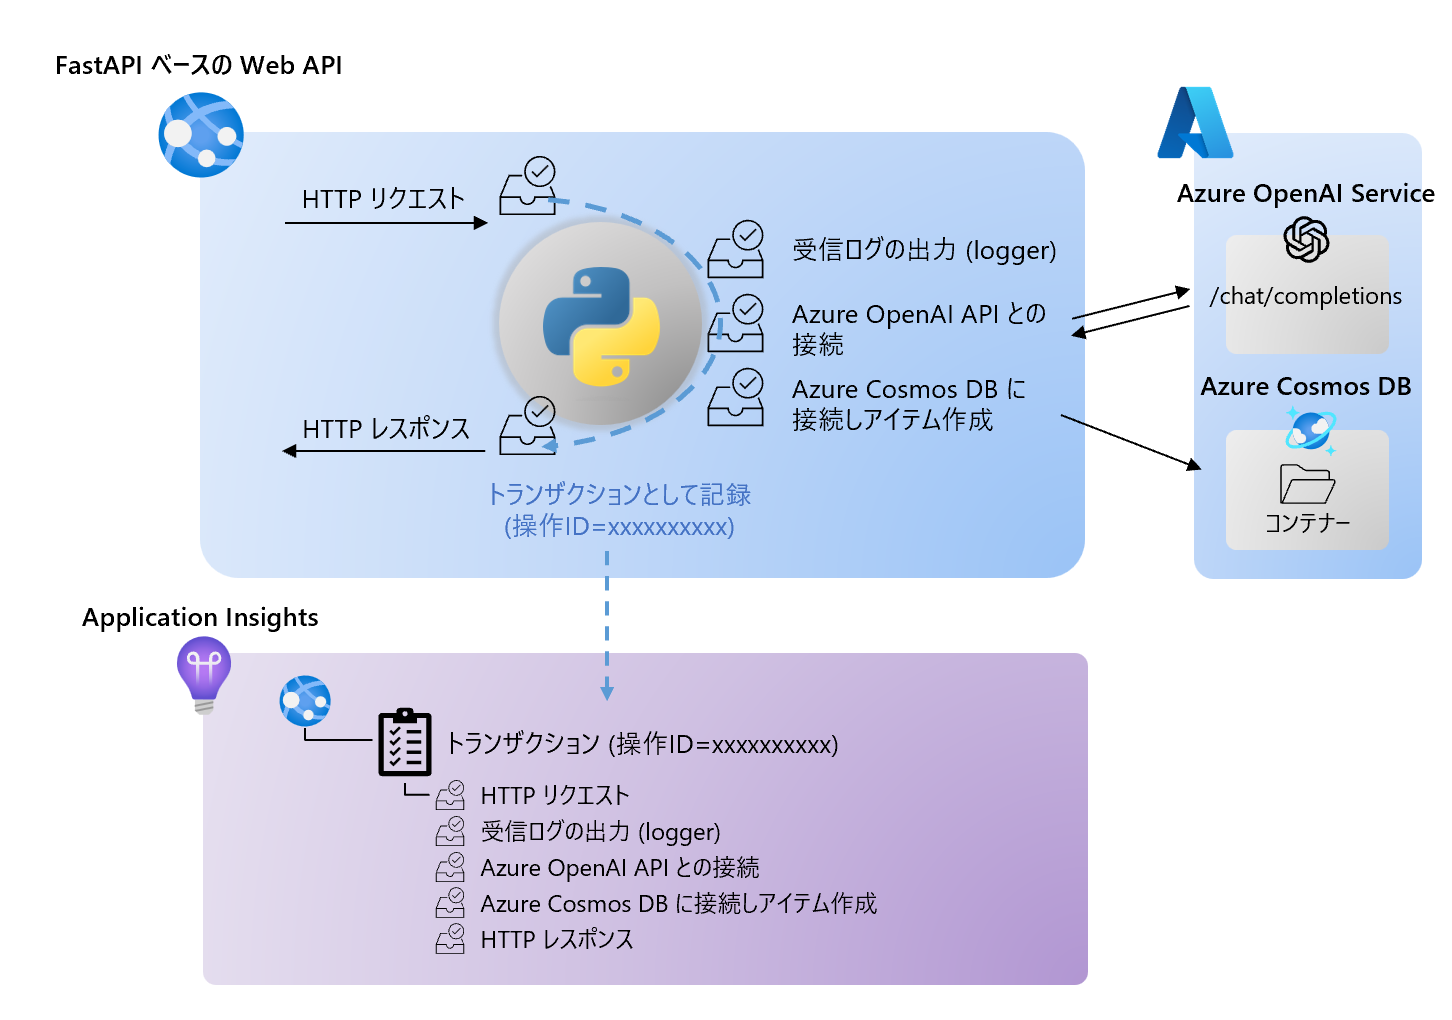
シンプルなサンプルとして、FastAPI で動く、message を HTTP Post で受け取ると、その値を Azure OpenAI の Chat Completion に渡し、結果を Cosmos DB に記録するという Web API で動作を見ていきます。
そして、そのトレースやログを Application Insights に収集し、分析したいという内容です。実現したいことの簡単な概略図は下記になります。
下記のフォルダーを準備し、環境を用意します。なお、本記事の内容を私の手元では、VS Code の devcontainer 上でローカル実行しています。
<project_root>/
 | - __init__.py
 | - aoai.py
 | - cosmosdb.py
 | - env.sh
 | - main.py
 | - models.py
 | - requirements.txt
 | - test.http
当サンプルで pip install -r requirements.txt でインストールするモジュールは下記になります。
fastapi
uvicorn
azure-monitor-opentelemetry
opentelemetry-instrumentation-fastapi
opentelemetry-instrumentation-openai
azure-cosmos
openai
また、OpenTelemetry 用として事前に環境変数を下記のように設定しておきます。(source env.sh)
#!/bin/bash
export OTEL_RESOURCE_ATTRIBUTES="service.instance.id=FastAPI-AOAI-Instance1"
export OTEL_SERVICE_NAME="FastAPI-AOAI"
main.py のコード以外は、本記事の一番最後に参考までに貼っておきます。main.py のコードは下記として、今回の検証では実行します。
Application Insights と OpenTelemetry の設定は、おおむね前記事 と同じです。ただし、今回は FastAPI を利用しているため、FastAPI 用のインストルメンター (FastAPIInstrumentor.instrument_app(app)) を使っています。
また、2024年3月時点の OpenAI Python SDK のバージョンである 1.14.0 では OpenAI へのアクセスについては、OpenTelemetry の OpenAIInstrumentor を利用できるため、その有効化も行っています。
from fastapi import FastAPI
from azure.monitor.opentelemetry import configure_azure_monitor
from opentelemetry import trace
from opentelemetry.instrumentation.fastapi import FastAPIInstrumentor
from opentelemetry.instrumentation.openai import OpenAIInstrumentor
import logging

from models import ChatMessage, ChatAnswer
import cosmosdb
import aoai

app = FastAPI()

# OpenTelemetry の設定
configure_azure_monitor(
    connection_string="<Application Insights の接続文字列>",
)
tracer = trace.get_tracer(__name__)
FastAPIInstrumentor.instrument_app(app)
OpenAIInstrumentor().instrument()

# loggerの初期化
logger = logging.getLogger(__name__)
logger.setLevel(logging.INFO)
# logger.addHandler(logging.StreamHandler())

@app.post("/chat/")
async def create_chat_message(chat_message: ChatMessage):
    logger.info(f"create_chat_message function was called with message received: {chat_message.message}")
    with tracer.start_as_current_span("call_chat_completion") as call_chat_completion_span:
        answer = aoai.call_chat_completion(chat_message)
        logger.info(f"Chat answer sent by call_chat_completion method: {answer}")
    cosmosdb.create_cosmos_item_message_and_answer(chat_message.message, answer)
    return {"answer": answer}
このアプリケーションを実行します。
uvicorn main:app
そして、VS Code から下記のtest.http ファイルと Rest Client 拡張機能を使ってテストしてみます。
POST http://127.0.0.1:8000/chat/ HTTP/1.1
content-type: application/json

{
    "message": "こんにちは"
}
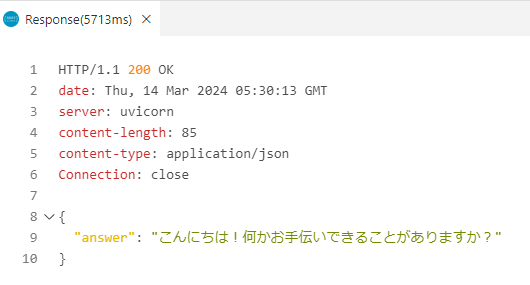
そしてローカルでは、下記のようにレスポンスを確認できました。
Application Insights での監視結果
ここから、Application Insights で実際の情報の出方を確認します。データ格納や出力の方式や使用については、前記事をご確認ください。
アプリケーションマップ
アプリケーションマップでは、FastAPI-AOAI というアプリケーションノード (クラウドロール) から OpenAI (Azure OpenAI Service) と Cosmos DB へアクセスのあることが分かります。
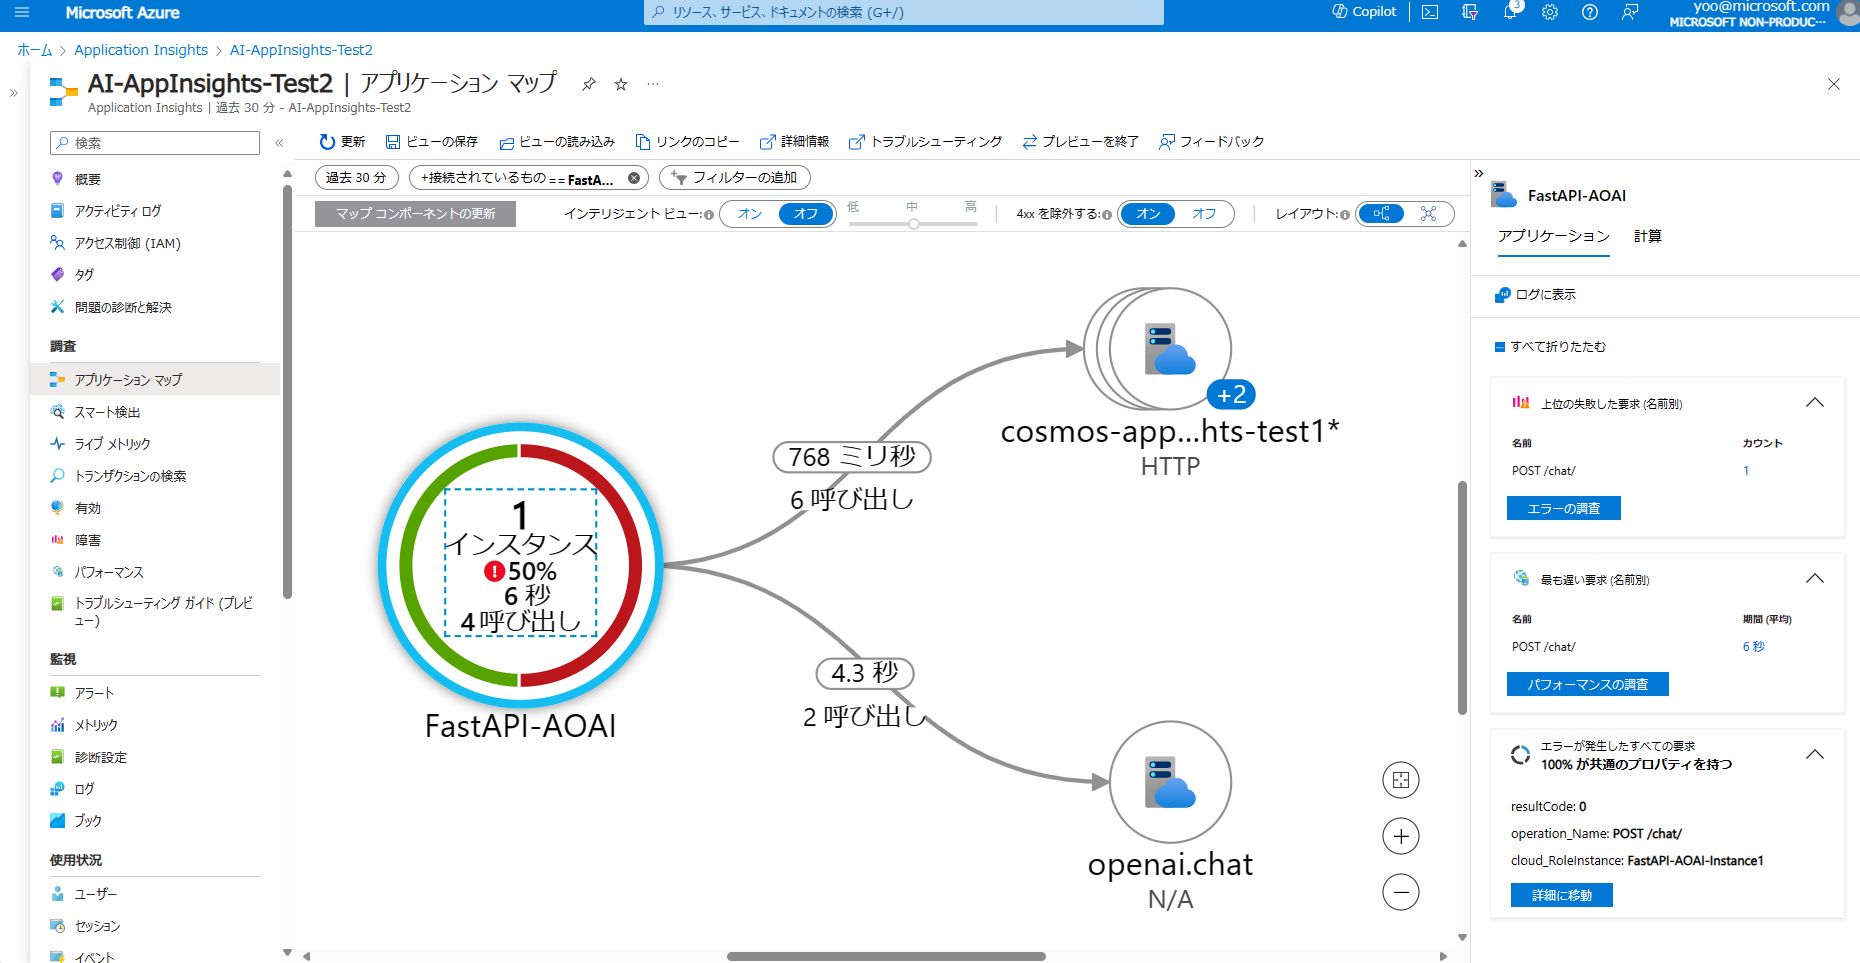
また、ここを入り口にパフォーマンスやエラー、ログなどを詳細に見ていくこともできます。
パフォーマンスとトランザクション
次に、パフォーマンスとトランザクションを見てみたいと思います。
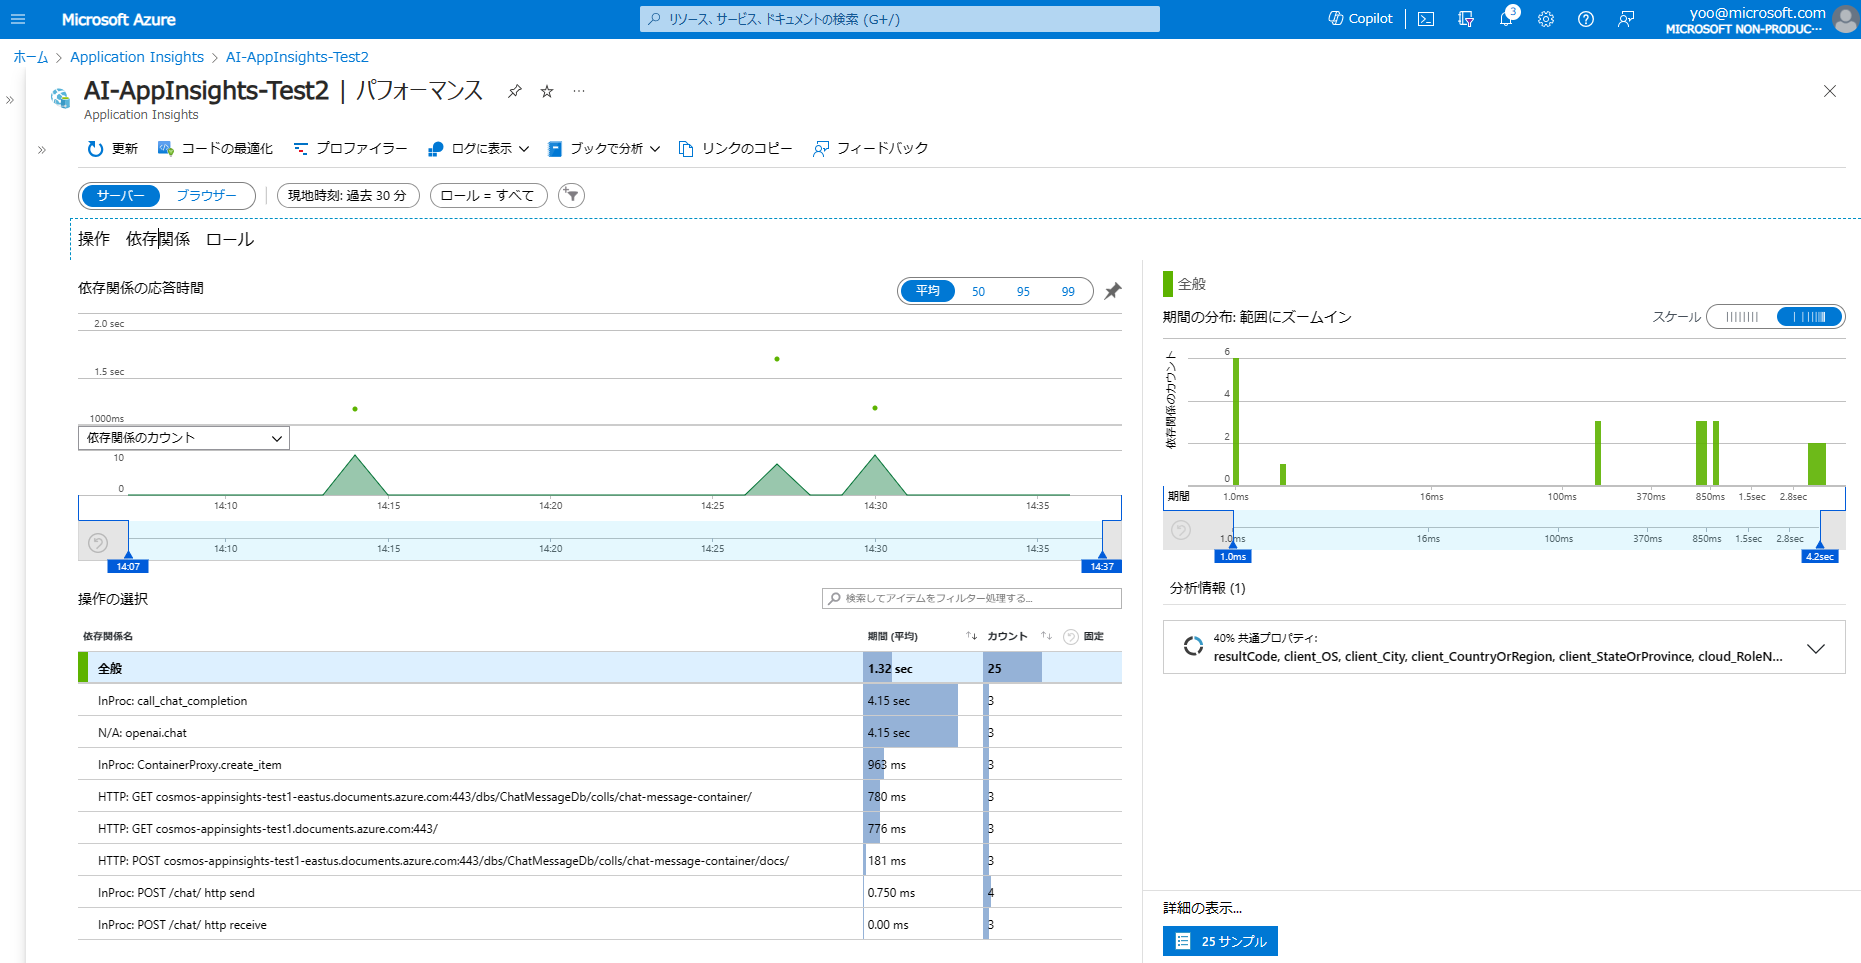
パフォーマンスページを開き、サーバーの操作タブを開くと、各 API Call に対して、どれくらい応答時間がかかっているかが簡単に見て取れます。
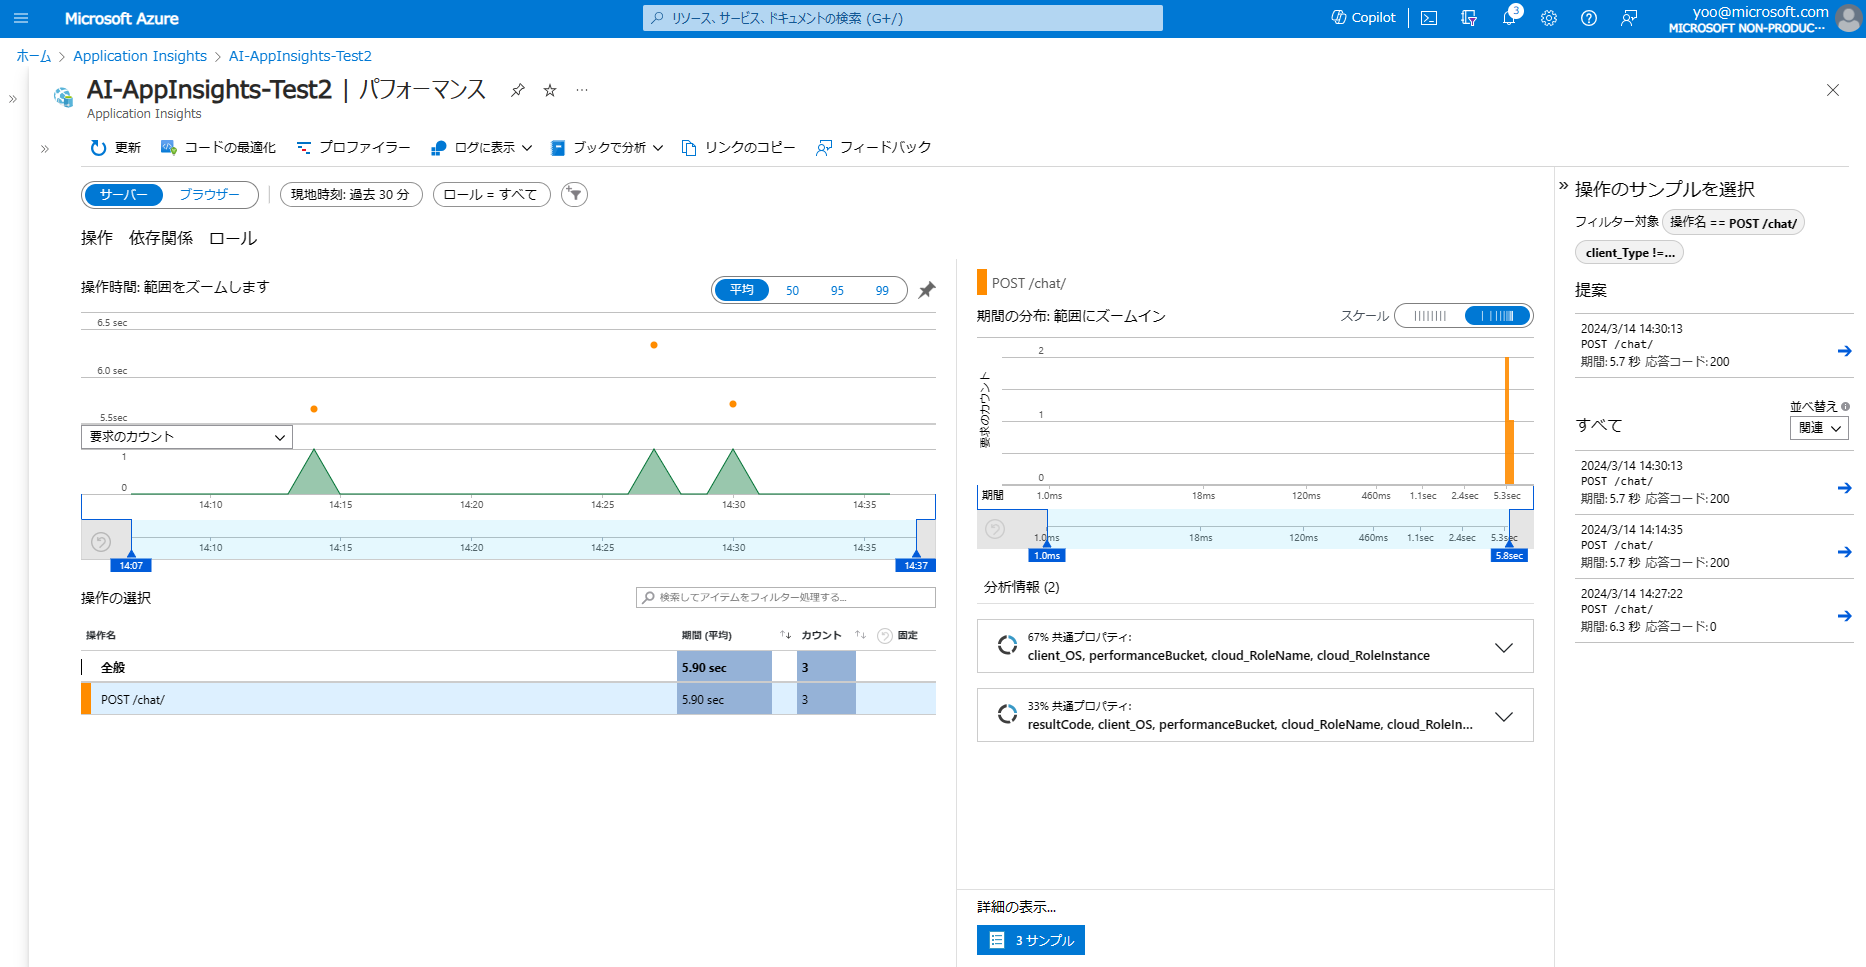
また、依存関係タブをクリックすると、各依存関係ごとのパフォーマンスも確認できます。今回の例だと、Azure OpenAI へのアクセスに大半の時間がかかっていることがすぐにわかります。
そして個別のサンプルを開き、エンドツーエンドのトランザクションの詳細には、個別のトランザクションごとのデータを確認できます。
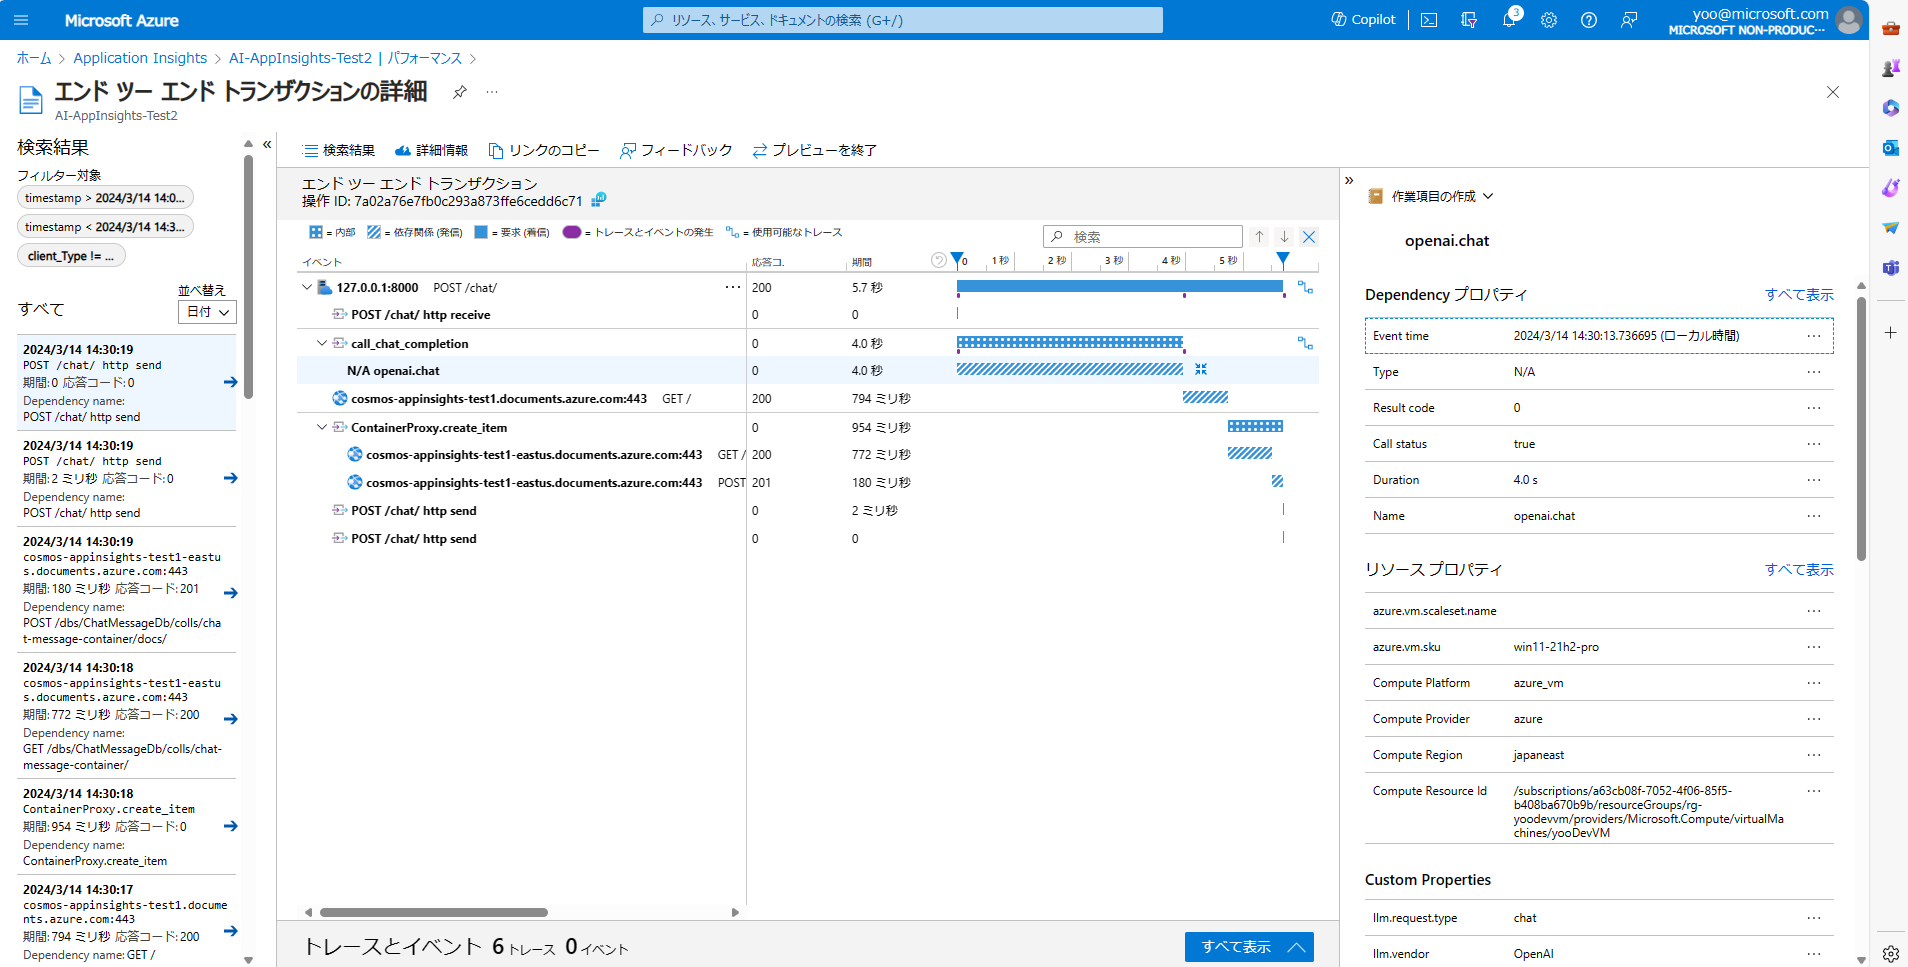
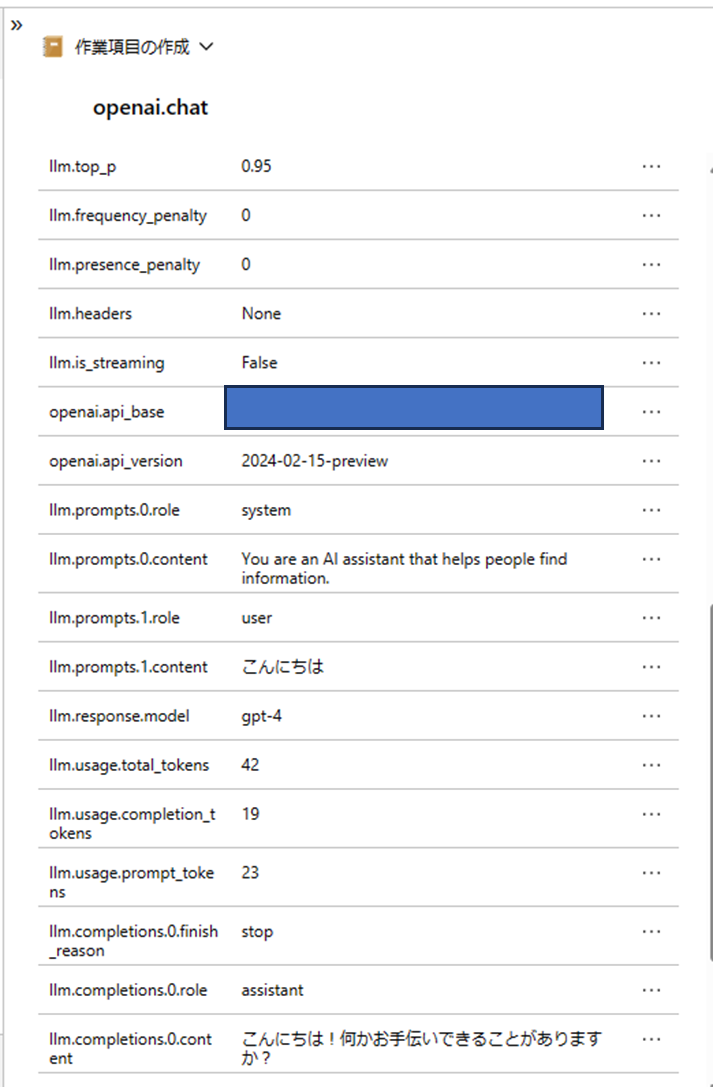
特に、OpenAIInstrumentor().instrument() のおかげで、OpenAI との接続についてはかなり詳細なデータが取れていることが分かります。
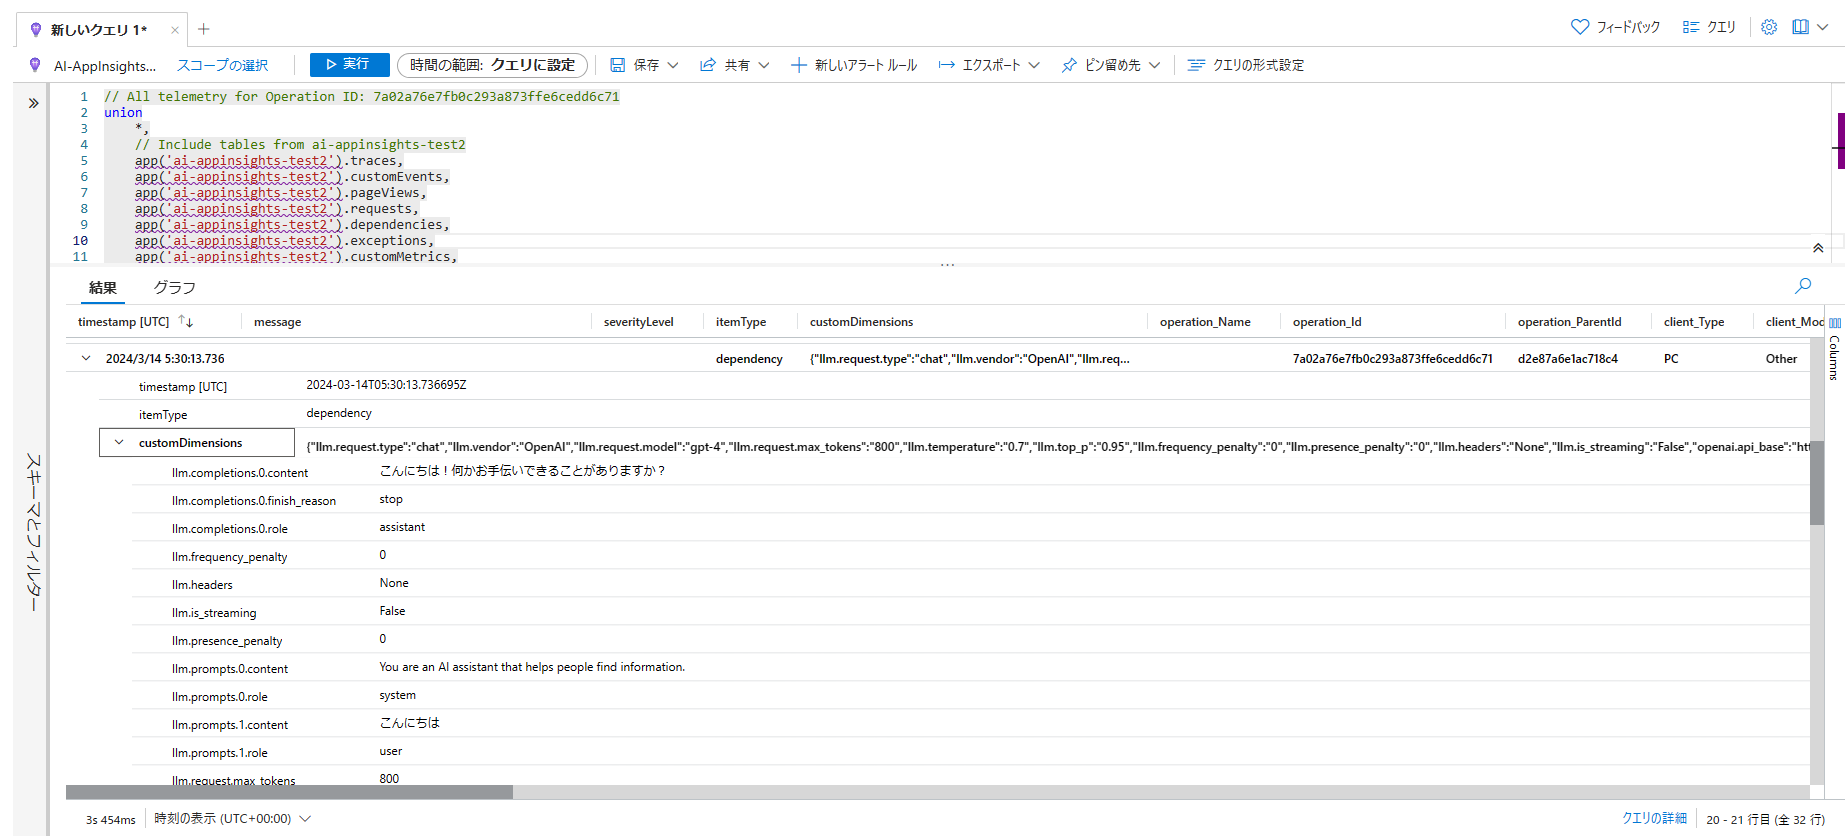
こちらのデータは、ログの dependencies テーブルに元データが格納されています。
ログ
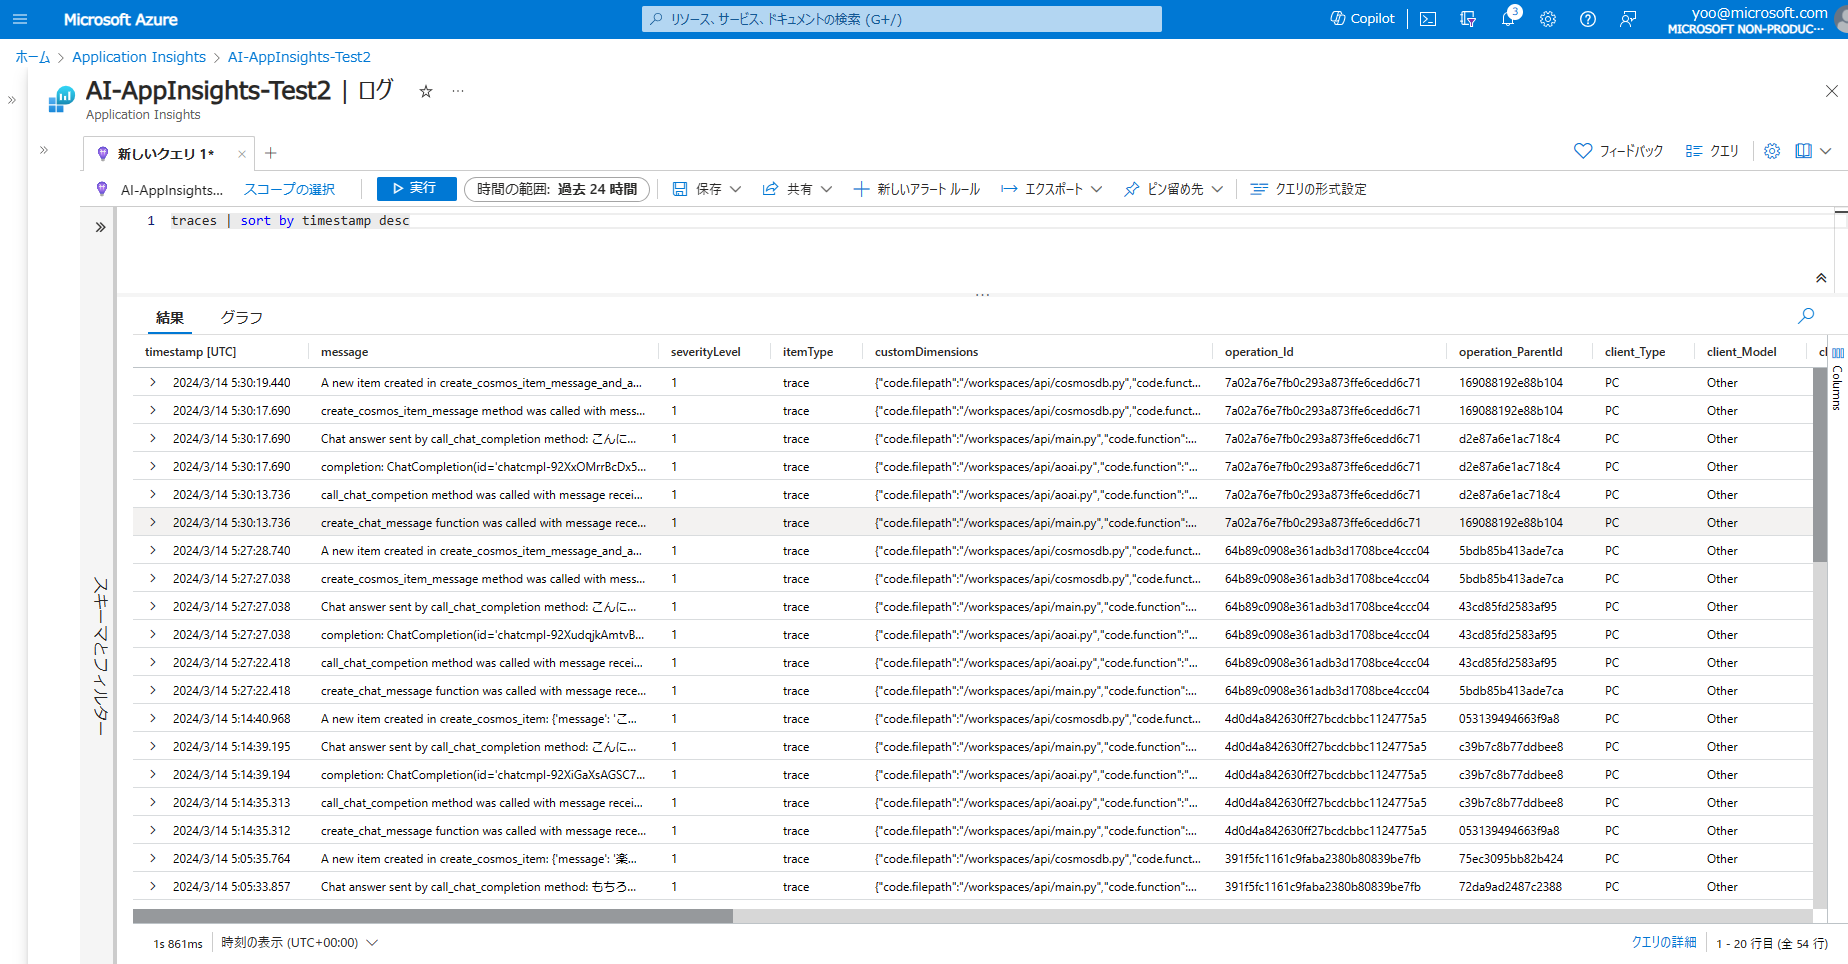
最後にログの検索を見ていきます。Application Insights の OpenTelemetry Distro の Python 版では、有効化すると logger で記録したログを自動的に traces テーブルに格納してくれます。
そのため、Kusto クエリで簡単にデータの検索が可能になります。
traces | sort by timestamp desc
最後に
*本稿は、個人の見解に基づいた内容であり、所属する会社の公式見解ではありません。また、いかなる保証を与えるものでもありません。正式な情報は、各製品の販売元にご確認ください。
サンプルコードの補足
下記にそれぞれ利用するコードを記載します。
from openai import AzureOpenAI
from models import ChatMessage
import logging

logger = logging.getLogger(__name__)
logger.setLevel(logging.INFO)
# logger.addHandler(logging.StreamHandler())

client = AzureOpenAI(
  azure_endpoint = "<AOAI のエンドポイント>",
  api_key="<AOAI の API キー>",
  api_version="2024-02-15-preview"
)

def call_chat_completion(chat_message: ChatMessage):
    logger.info(f"call_chat_competion method was called with message received: {chat_message.message}")

    message_text = [{"role":"system","content":"You are an AI assistant that helps people find information."},{"role":"user","content":chat_message.message}]

    completion = client.chat.completions.create(
    model="gpt-4", # model = "deployment_name"
    messages = message_text,
    temperature=0.7,
    max_tokens=800,
    top_p=0.95,
    frequency_penalty=0,
    presence_penalty=0,
    stop=None
    )
    logger.info(f"completion: {completion}")
    return completion.choices[0].message.content
from azure.cosmos import CosmosClient
from models import ChatMessage
import datetime
import logging

logger = logging.getLogger(__name__)
logger.setLevel(logging.INFO)
# logger.addHandler(logging.StreamHandler())

connectionString ="<Cosmos DB の接続文字列>"
dbName="ChatMessageDb"
containerName="chat-message-container"

def create_cosmos_item_message_and_answer(message: str, answer: str):
    logger.info(f"create_cosmos_item_message method was called with message: {message} and answer: {answer}")
    client = CosmosClient.from_connection_string(connectionString)
    database = client.get_database_client(dbName)
    container = database.get_container_client(containerName)
    time_utc = str(datetime.datetime.utcnow())
    body = {
        "message": message,
        "answer": answer,
        "timestamp": time_utc
    }
    container.create_item(body=body, enable_automatic_id_generation=True)
    logger.info(f"A new item created in create_cosmos_item_message_and_answer: {body}")
from pydantic import BaseModel

class ChatMessage(BaseModel):
    message: str