はじめに
この記事では、ブログアプリの実装を通して、Express から MySQL に接続し、CRUD処理を行う手順について学んでいきます。
前提情報
開発環境は以下の通りです。
- Windows11
- VSCode
- Talend API Tester
- TypeScript 5.0.4
- Node.js 18.14.0
- Express 4.18.2
- MySQL 8.0.3
また、事前にExpressでRoutingの実装とWindowsへのMySQLのインストールし、blogsテーブルを作成しておきます。
それぞれ手順は以下の記事に記載があります。
Express からMySQL に接続
まず、ExpressからMySQLに接続します。
mysqlモジュールのインストール
Expressからデータベースを操作するためにmysql2モジュールをインストールします。
yarn add mysql2
yarn add --dev @types/mysql
データベース接続情報の定義
mysql2モジュールを読み込み、テータベースの接続情報を定義します。
import mysql from "mysql2";

const connection = mysql.createConnection({
  host: "localhost",
  user: "root",
  password: "[rootユーザーのパスワード]",
  database: "blog_app",
});
データベースへの接続確認
先ほど定義したテータベースの接続情報を利用してデータベースへの接続を確認するコードを追加します。
connection.connect((error) => {
  if (error) {
    console.error("Error connecting to MySQL: ", error);
    return;
  }

  console.log("Success connecting to MySQL");
});
ローカルサーバー起動してMySQLへの接続が成功すると、接続が成功したログが表示されます。

ブログの CRUD
次はExpressからMySQLを操作して、ブログのCRUD機能が実現できるようにします。
CRUD機能は、query() メソッドを利用して以下のように実装します。
connection.query(
  [SQL],
  (error, results) => {
    [SQL実行後の処理]
  }
);
ブログをデータベースに保存する
上記の形式に沿って、データベースへの保存処理を実装します。
const query = "INSERT INTO blogs (title, body) VALUES (?, ?)";
connection.query(
  query,
  [`${req.body.title}`, `${req.body.body}`],
  (error, results) => {
    if (error) {
      console.error("Error insert values:", error);
      res.status(500).json(error);
      return;
    }
    res.status(201).json({ message: "Blog created successfully" });
  }
);
こちらの保存処理を Create のルーティング処理に追加します。
また、保存処理の前にデータベースへの接続処理も追加します。
const connectToDatabase = () => {
  connection.connect((error) => {
    if (error) {
      console.error("Error connecting to MySQL: ", error);
      return;
    }

    console.log("Success connecting to MySQL");
  });
};

// Create a new blog
app.post("/blogs", (req: Request, res: Response) => {
  connectToDatabase();

  const query = "INSERT INTO blogs (title, body) VALUES (?, ?)";
  connection.query(
    query,
    [`${req.body.title}`, `${req.body.body}`],
    (error, results) => {
      if (error) {
        console.error("Error insert values:", error);
        res.status(500).json(error);
        return;
      }
      res.status(201).json({ message: "Blog created successfully" });
    }
  );
});
動作確認をします。Talend API Tester でブログのタイトルと本文を追加します。
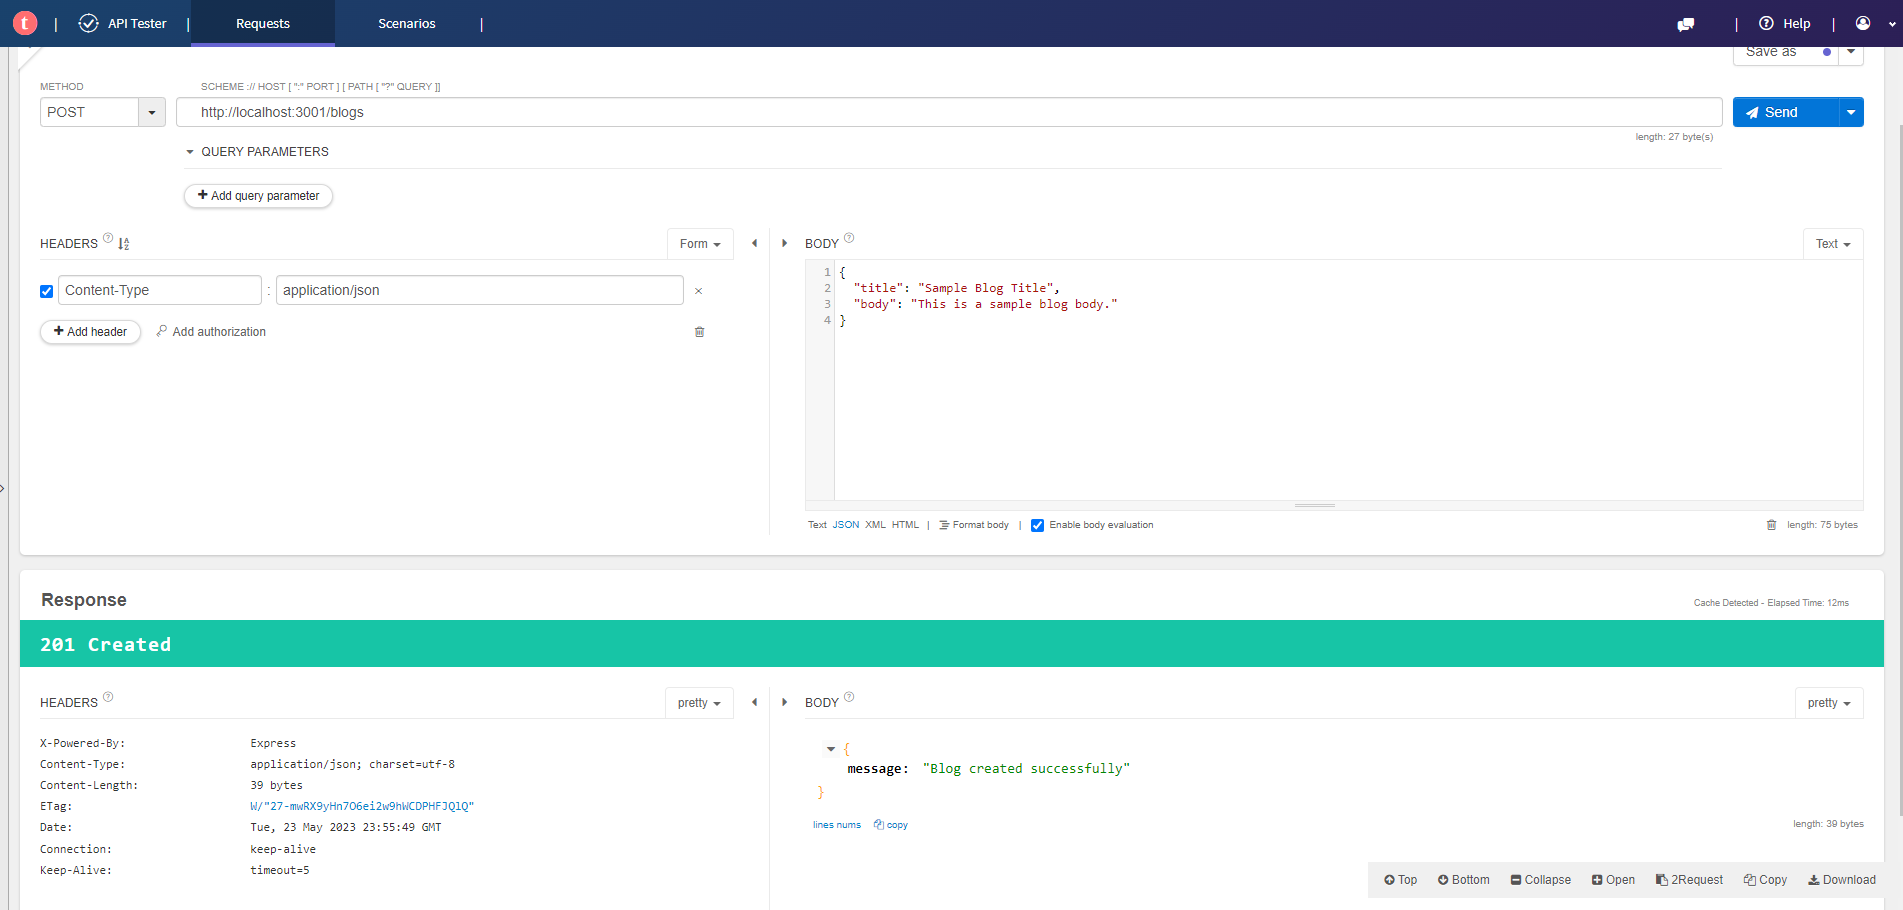
データベースに先ほどのタイトルと本文が保存されているか確認します。
select * from blogs;
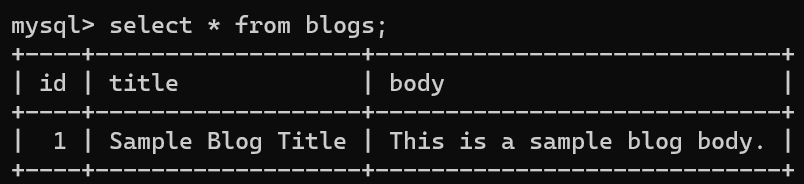
保存されていることが確認できました。
データベースからブログ一覧を取得する
ブログ一覧を取得するルーティングにデータベースからブログ一覧を取得する処理を追加します。
// Get all blogs
app.get("/blogs", (req: Request, res: Response) => {
  const query = "SELECT * FROM blogs";
  connection.query(query, (error, results) => {
    if (error) {
      console.error("Error select values:", error);
      res.status(500).json(error);
      return;
    }
    res.status(200).json(results);
  });
});
動作確認をします。

ブログ一覧を取得できることを確認できました。
ブログを更新する
まず、ブログを更新するルーティングに更新対象のIDが含まれているか確認する処理を追加します。
データベースからブログ一覧を取得し、その中に更新対象のIDが含まれているか確認します。
含まれていない場合、404を返します。
// Update a blog
app.put("/blogs/:id", (req: Request, res: Response) => {
  const id = req.params.id;
  const { title, body } = req.body;

  const checkQuery = "SELECT * FROM blogs WHERE id = ?";
  connection.query(checkQuery, [id], (error, results) => {
    if (error) {
      console.error("Error checking ID existence:", error);
      res.status(500).json(error);
      return;
    }

    const isExists = Array.isArray(results) && results.length > 0;
    if (!isExists) {
      console.log("Blog ID not found");
      res.status(404).json({ message: "Blog ID not found" });
      return;
    }
  });
});
含まれている場合、更新処理を行います。
// Update a blog
app.put("/blogs/:id", (req: Request, res: Response) => {
  const id = req.params.id;
  const { title, body } = req.body;

  const checkQuery = "SELECT * FROM blogs WHERE id = ?";
  connection.query(checkQuery, [id], (error, results) => {
    if (error) {
      console.error("Error checking ID existence:", error);
      res.status(500).json(error);
      return;
    }

    const isExists = Array.isArray(results) && results.length > 0;
    if (!isExists) {
      console.log("Blog ID not found");
      res.status(404).json({ message: "Blog ID not found" });
      return;
    }

    const updateQuery = "UPDATE blogs SET title = ?, body = ? WHERE id = ?";
    connection.query(updateQuery, [title, body, id], (error, results) => {
      if (error) {
        console.error("Error update values:", error);
        res.status(500).json(error);
        return;
      }

      res.status(200).json({ message: "Blog updated successfully" });
    });
  });
});
動作確認をします。
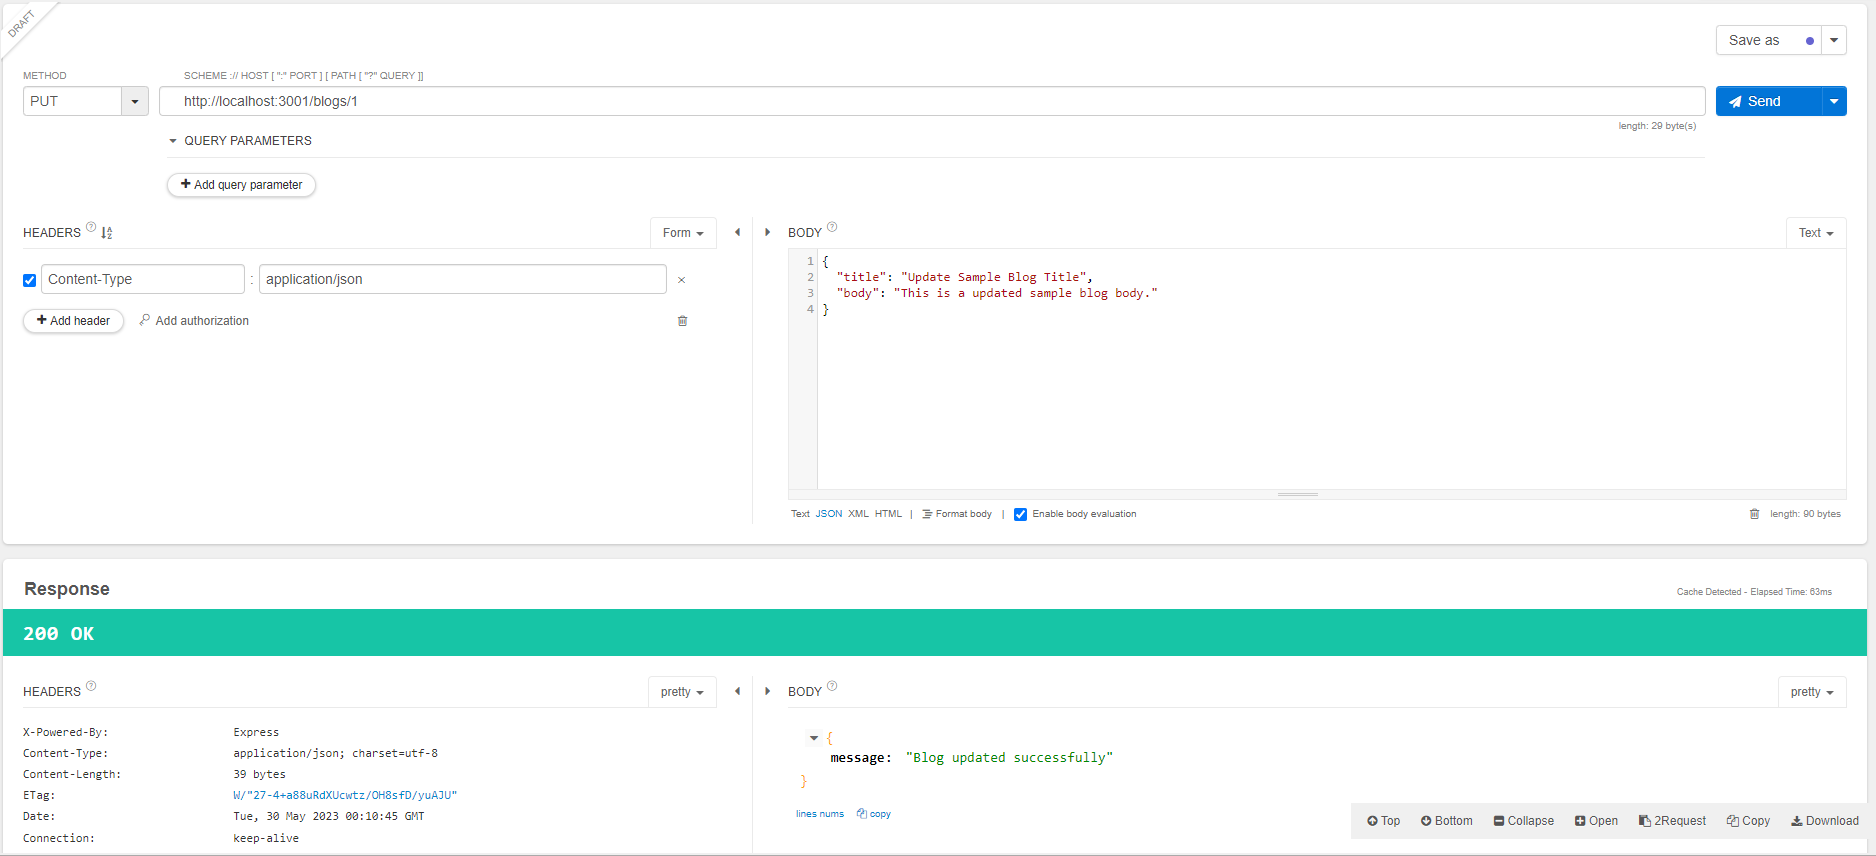
更新されていることを確認できました。
ブログを削除する
まず、更新処理と同じように削除対象のIDが含まれているか確認する処理を追加します。
含まれていない場合、404を返し、含まれている場合、削除処理を行います。
// Delete a blog
app.delete("/blogs/:id", (req: Request, res: Response) => {
  const id = req.params.id;

  const checkQuery = "SELECT * FROM blogs WHERE id = ?";
  connection.query(checkQuery, [id], (error, results) => {
    if (error) {
      console.error("Error checking ID existence:", error);
      res.status(500).json(error);
      return;
    }

    const isExists = Array.isArray(results) && results.length > 0;
    if (!isExists) {
      console.log("Blog ID not found");
      res.status(404).json({ message: "Blog ID not found" });
      return;
    }

    const deleteQuery = "DELETE FROM blogs WHERE id = ?";
    connection.query(deleteQuery, [id], (error, results) => {
      if (error) {
        console.error("Error update values:", error);
        res.status(500).json(error);
        return;
      }

      res.status(200).json({ message: "Blog deleted successfully" });
    });
  });
});
動作確認をします。
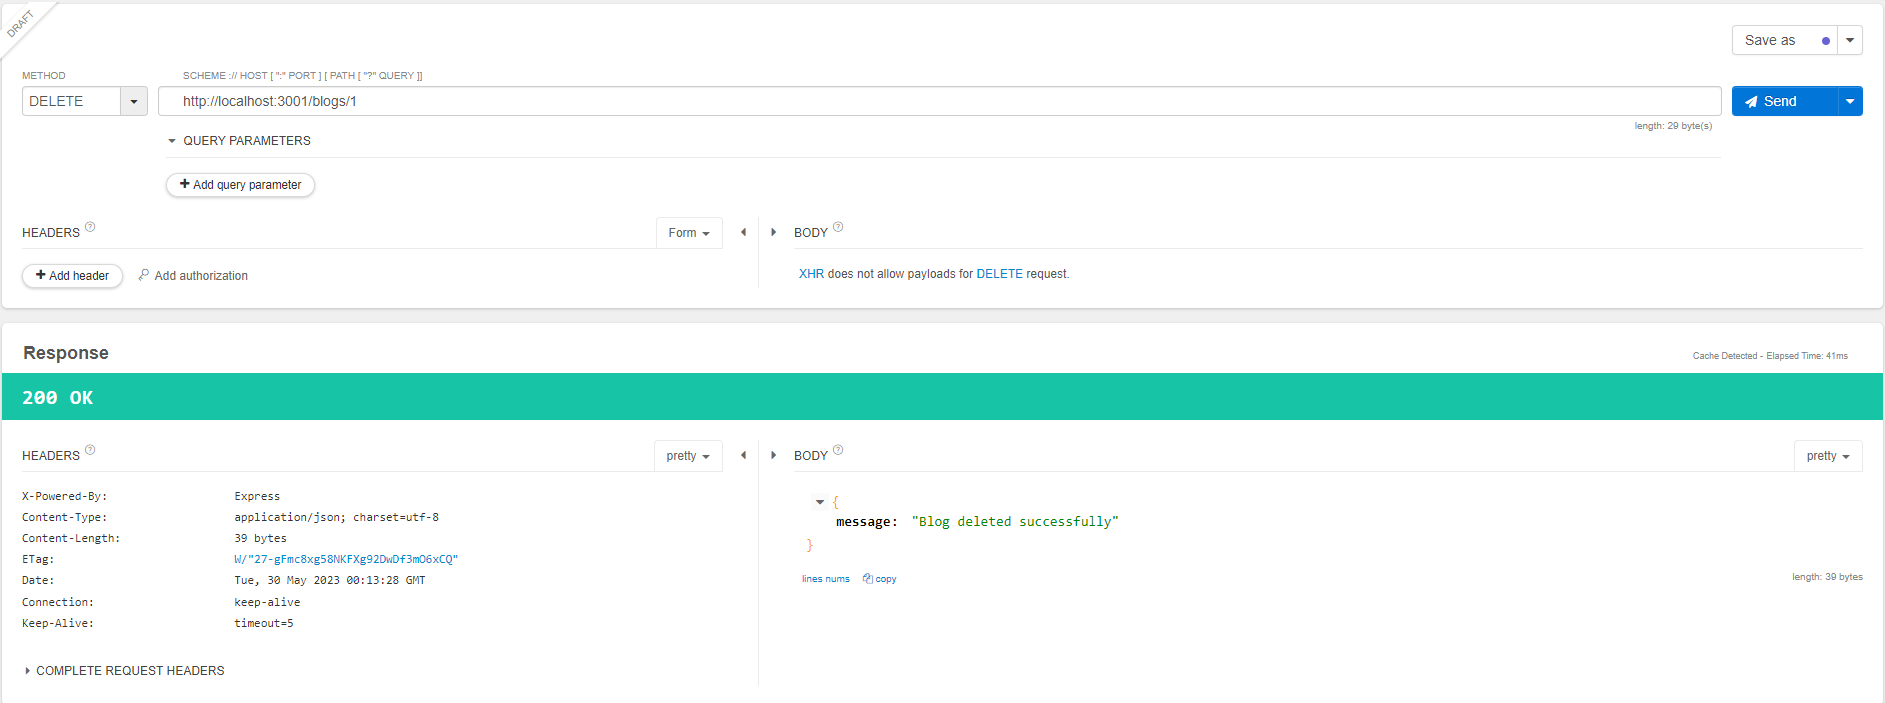
削除されているこを確認できました。
最後に
この記事では、ブログアプリの実装を通して、Express から MySQL に接続し、CRUD処理を行う手順について学びました。今後は別の技術を使って同じ実装をしたり、もう少し複雑な処理を実装してみようと思います。