はじめに
ディープラーニングの学習がてらKerasのLSTMサンプルコードで遊んでみようと思ったのですが、
内容を読み解くのに意外と苦労したので、内容をまとめたものが皆さんの参考になればと残しておきます。
対象読者
ディープラーニング初心者向けです。
以下の方を対象としています。
- Pythonは分かる
- ディープラーニングは詳しくない
- LSTMネットワークの概要 は読んだ
詳しい方は突っ込み所があればコメント欄で教えてください。
サンプルコードについて
URL
こちらのサンプルコードです。
https://github.com/keras-team/keras/blob/master/examples/lstm_text_generation.py
(追記)
リファクタリングしたものを用意しました。
こちらのコードを読んだほうが分かりやすい・・・はず。
https://github.com/YankeeDeltaBravo225/lstm_text_generation_comment/blob/master/lstm_text_generation_refactored.py
概要
文字列を与えられると、次の文字が何になるかを予測し、m回続けてそれっぽい文字列を生成します。
これにLSTMの中でも一番ベーシックなSingle LSTMと言うモデルを用います。
例えば、"this is the piano made by a German meister" という文字があるとします。
これを8文字で区切るとすると以下のようになります。
- 入力:"this is ", 結果:"t"
- 入力:"his is t",結果: "h"
- 入力:"is is th",結果: "e"
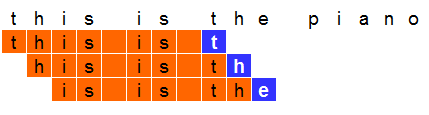
入力データをこの8文字、教師データを次の文字として学習させることで、
ネットワークは"this is " と来たら次の文字は"t"だと予測できるようになります。
もう少し細かく言うと、学習・予測させるのは文章の次に続く文字そのものではなく出現率です。
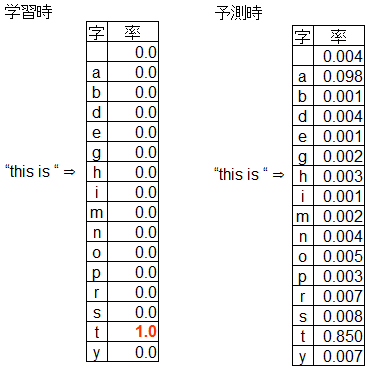
予測の際は、これを元に乱数で次の文字を決めます。
上記の例で行くと、"this is"ときた場合、85%で"t"が、9.8%で"a"が出現します。
これでどうやって文字列を生成するかですが、"this is a" と来たら、
学習時の8文字に合わせるため左端の"t"を削って"his is a"とし、
同じように次の文字を予測します。
以上延々と繰り返して行くことで、それっぽい文字列を生成します。
コードの解説
コメント付きのコードを用意したので、これを元に説明して行きます。
https://github.com/YankeeDeltaBravo225/lstm_text_generation_comment/blob/master/lstm_text_generation_Ja_comments.py
コードは大別して以下の5つの部分から成ります。
- テキストのダウンロード・読み込み
- 各々の字のdict作成
- 学習用データに整形
- モデル作成・フィッティング
- 文章生成
1. テキストのダウンロード・読み込み
ここは特に説明は要らないと思います。
テキストファイルをダウンロードして読み込み、大文字を小文字に置換しているだけです。
# ニーチェの文集をダウンロードする
# path : ダウンロードした先のパス
path = get_file('nietzsche.txt', origin='https://s3.amazonaws.com/text-datasets/nietzsche.txt')

# text : 入力ファイル
with io.open(path, encoding='utf-8') as f:
    text = f.read().lower()
print('corpus length:', len(text))
ちなみに、僕は以下のように引数で指定したローカルファイルから読み込むようにしていました。
# text : 入力ファイル
with io.open(sys.argv[1], encoding='utf-8') as f:
    text = f.read().replace('\n', '')
2. 各々の字のdict作成
文字はそのままだと扱いづらいので、index番号で扱います。
名前がちょっと分かりづらいですが、 char_indices は
字からcharsのインデックス番号を引くだけのdict。
indices_char は逆にcharsのインデックス番号から
字を引くためのリストです。
# chars : 重複を排除した「字」のリスト
chars = sorted(list(set(text)))
print('total chars:', len(chars))

# char_indices : 「字」を上記charsのindex番号に変換するdict
char_indices = dict((c, i) for i, c in enumerate(chars))

# indices_char : 上記と逆にindex番号を「字」に変換するdict
indices_char = dict((i, c) for i, c in enumerate(chars))
3. 学習用データに整形
先ほどの例で上げたとおり、特定の長さで区切った文章と次の文章のセットを作成します。
これまでは説明の都合上、8文字区切りとしていましたがコードでは40文字区切りとしています。
この40文字1セットの文字列を1つのシーケンスとして学習にかけます。
# cut the text in semi-redundant sequences of maxlen characters
# maxlen : いくつの「字」を1つの「文」とするか
maxlen = 40

# step : 開始位置のスキップ数
step = 3

# sentences  : 「文」のリスト
sentences = []

# next_chars : 各「文」について、その次の「文」の最初の「字」
next_chars = []

for i in range(0, len(text) - maxlen, step):
    # 単純に長さで区切った部分文字列を一つの文という扱いで抽出
    sentences.append(text[i: i + maxlen])

    # 次の文の最初の文字を保存
    next_chars.append(text[i + maxlen])

# 上記の「文」の数をそのままLSTMのsequence数として用いる
print('nb sequences:', len(sentences))

print('Vectorization...')

# x : np.bool型 3次元配列 [文の数, 文の最大長, 字の種類] ⇒ 文中の各位置に各indexの文字が出現するか
x = np.zeros((len(sentences), maxlen, len(chars)), dtype=np.bool)

# y : np.bool型 2次元配列 [文の数, 字の種類]              ⇒ 次の文の開始文字のindex
y = np.zeros((len(sentences), len(chars)), dtype=np.bool)

# vector化は各「文」について実施
for i, sentence in enumerate(sentences):
    for t, char in enumerate(sentence):
        x[i, t, char_indices[char]] = 1
    y[i, char_indices[next_chars[i]]] = 1
x, yがどんな形になるか分かりづらいので、1になる箇所をプロットしてみました。
-
x : 現在のシーケンス(sentence)
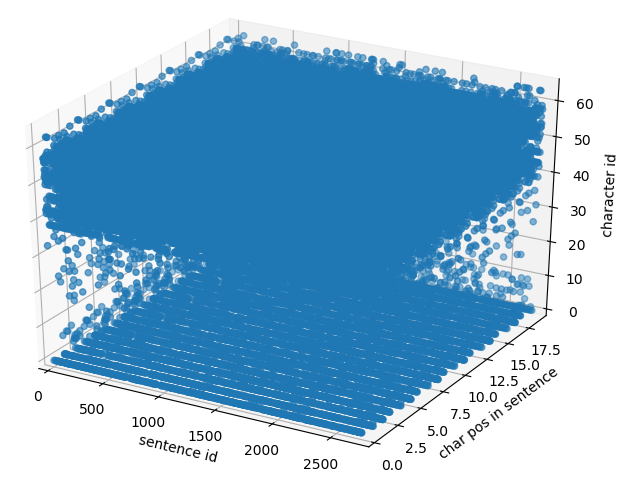
-
y : 現在のシーケンス(sentence)の次に来る文字
y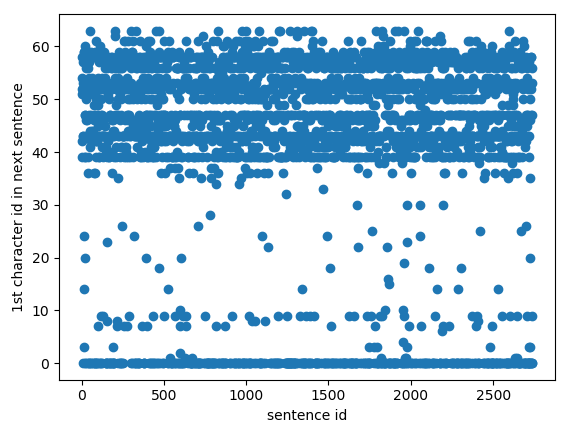
なお、プロットに使用したコードは以下の通りです。
# import文
import matplotlib.pyplot as plt
from mpl_toolkits.mplot3d import Axes3D

# 本文(3D)
# Plot three dimension bool vector
def plot_bool_vector_3d(vector, labels):
    # こちらは3Dでプロットするためのコード
    # http://ct-innovation01.hateblo.jp/entry/matplotlib05 で詳しく説明
    coordinates = [pos for pos, valid in np.ndenumerate(vector) if valid]

    xs, ys, zs = [], [], []
    for coordinate in coordinates:
        x, y, z = coordinate
        xs.append(x)
        ys.append(y)
        zs.append(z)

    # pyplotの使い方の話になるので、こちらのリファレンスも見ると良いかも
    # https://matplotlib.org/api/pyplot_summary.html
    ax = plt.figure().add_subplot(111, projection='3d')
    ax.scatter(xs, ys, zs)

    ax.set_xlabel(labels[0])
    ax.set_ylabel(labels[1])
    ax.set_zlabel(labels[2])

    plt.show()

# 本文(2D)
# Plot two dimension bool vector
def plot_bool_vector_2d(vector, labels):
    coordinates = [pos for pos, valid in np.ndenumerate(vector) if valid]

    xs, ys = [], []
    for coordinate in coordinates:
        x, y = coordinate
        xs.append(x)
        ys.append(y)

    ax = plt.figure().add_subplot(111)
    ax.scatter(xs, ys)

    ax.set_xlabel(labels[0])
    ax.set_ylabel(labels[1])

    plt.show()

# 使い方
plot_bool_vector_3d(x, ('sentence id', 'char pos in sentence', 'character id'))
plot_bool_vector_2d(y, ('sentence id', '1st character id in next sentence'))
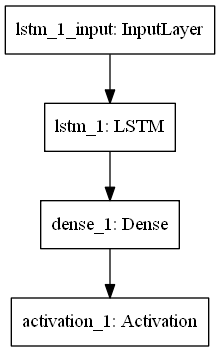
4. モデル作成・フィッティング
Kerasにある既製品のLSTMを使用します。
# build the model: a single LSTM
print('Build model...')
model = Sequential()
model.add(LSTM(128, input_shape=(maxlen, len(chars))))
model.add(Dense(len(chars)))
model.add(Activation('softmax'))

# 勾配法にRMSpropを用いる
# 以下参照
# https://qiita.com/tokkuman/items/1944c00415d129ca0ee9

optimizer = RMSprop(lr=0.01)
model.compile(loss='categorical_crossentropy', optimizer=optimizer)
これにフィッティングをかける訳ですが、各エポックの終了時に
その時点のモデルを使ったテキスト生成処理が呼ばれるようにCallbackを設定します。
# 各epoch終了時のcallbackとして、上記のon_epoch_endを呼ぶ
# 参照
# https://keras.io/ja/callbacks/#lambdacallback
print_callback = LambdaCallback(on_epoch_end=on_epoch_end)

# フィッティング実施、各epoch完了時に先述の on_epoch_end が呼ばれる
model.fit(x, y,
          batch_size=128,
          epochs=60,
          callbacks=[print_callback])
5. 文章生成
長いので、on_epoch_end と、そこから呼ばれる sample の二つの関数それぞれについて
解説して行きます。
on_epoch_end
このモデルの特性上、はじめに maxlen (=40) 文字の文章が必要になりますが、
元の入力テキストからランダムに選択し、それを変数 sentence に格納します。
この文字列は元の入力テキストから選ぶ必要はないのですが、学習時に使用した
文字種のみで構成されていないといけません。
また、diversityと言う言葉が出てきますが、sampleの方で詳しく説明します。
def on_epoch_end(epoch, logs):
    # Function invoked at end of each epoch. Prints generated text.
    print()
    print('----- Generating text after Epoch: %d' % epoch)

    # モデルは40文字の「文」からその次の「字」を予測するものであるため、
    # その元となる40文字の「文」を入力テキストからランダムに選ぶ
    start_index = random.randint(0, len(text) - maxlen - 1)

    # diversityとは多様性を意味する言葉
    # この値が低いとモデルの予測で出現率が高いとされた「字」がそのまま選ばれ、
    # 高ければそうでない「字」が選ばれる確率が高まる
    for diversity in [0.2, 0.5, 1.0, 1.2]:
        print('----- diversity:', diversity)

        generated = ''

        # 元にする「文」を選択
        sentence = text[start_index: start_index + maxlen]
        generated += sentence
        print('----- Generating with seed: "' + sentence + '"')
        sys.stdout.write(generated)
sentence の次に来る文字を予測し、その結果を sentence の末尾に加えると共に先頭文字を削ります。
これを延々繰り返すことで、それっぽい文字列を生成します。
        # 上記のランダムで選ばれた「文」に続く400個の「字」をモデルから予測し出力する
        for i in range(400):

            # 現在の「文」の中のどの位置に何の「字」があるかのテーブルを
            # フィッティング時に入力したxベクトルと同じフォーマットで生成
            # 最初の次元は「文」のIDなので0固定
            x_pred = np.zeros((1, maxlen, len(chars)))
            for t, char in enumerate(sentence):
                x_pred[0, t, char_indices[char]] = 1.

            # 現在の「文」に続く「字」を予測する
            preds = model.predict(x_pred, verbose=0)[0]
            next_index = sample(preds, diversity)
            next_char = indices_char[next_index]

            # 予測して得られた「字」を生成し、「文」に追加
            generated += next_char

            # モデル入力する「文」から最初の文字を削り、予測結果の「字」を追加
            # 例:sentence 「これはドイツ製」
            #     next_char 「の」
            #     ↓
            #     sentence 「れはドイツ製の」
            sentence = sentence[1:] + next_char

            sys.stdout.write(next_char)
            sys.stdout.flush()
        print()
sample
予測結果を元にして、文字を選びます。
# 各「字」の出現確率の配列(ndarray型)から、出力する文字を選ぶ
# 単純に一番確率の高いものを選ぶのではなく、出現率に従いランダムに選ぶ
#
# predsはモデルからの出力であり、多項分布の形になっているため、
# その総和は必ず 1.0 となる
#
#  preds       : モデルからの出力結果、float32型の多項分布が入ったndarray
#  temperature : 多様度、この値が高いほど preds 中の出現率が低いものが選ばれやすくなる
def sample(preds, temperature=1.0):
    # helper function to sample an index from a probability array

    # 64bit float型に変換
    preds = np.asarray(preds).astype('float64')

    # 確率の低く出た「字」が抽選で選ばれやすくなるようにゲタをはかせるため、
    # 自然対数を取った上、引数の値で割る
    # 参照
    # https://docs.scipy.org/doc/numpy-1.14.0/reference/generated/numpy.log.html
    preds = np.log(preds) / temperature

    # 上記で確率の自然対数を取ったため、その逆変換である自然指数関数をとる
    # 参照
    # https://docs.scipy.org/doc/numpy-1.14.0/reference/generated/numpy.exp.html
    exp_preds = np.exp(preds)

    # 多項分布の形に合わせるため、総和が1となるように全値を総和で割る
    preds = exp_preds / np.sum(exp_preds)

    # 多項分布に基づいた抽選を行う
    # 参照
    # https://docs.scipy.org/doc/numpy/reference/generated/numpy.random.multinomial.html
    probas = np.random.multinomial(1, preds, 1)
    return np.argmax(probas)
on_epoch_end でdiversityという名前だった変数はここでは temperatureとなっています。
この数字は1の場合、予測結果そのままの確率で次の文字を選びますが、
大きい場合、出現率の低い文字にゲタを履かせます。
下の対数グラフの青線は予測結果そのまま、赤線はdiversity=1.2の時のものです。
出現率下位の文字が選ばれやすくなり、より様々な文章が生成されるようになります。
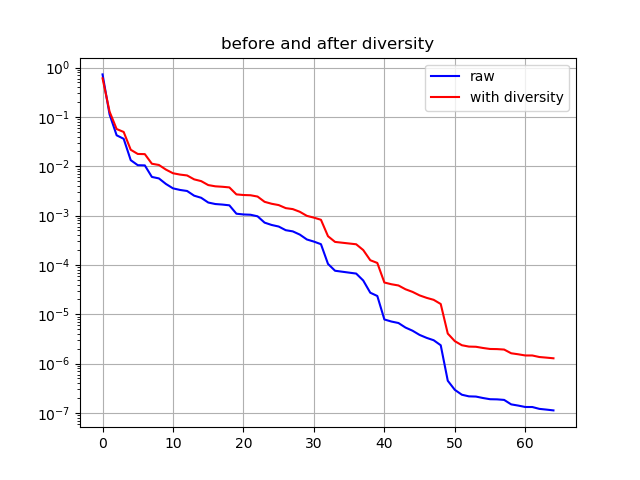
plotに使用したコードはこちら。
# import文
import matplotlib.pyplot as plt

# 本体
def visualize_preds(preds_comb_list, title):
    ax = plt.figure().add_subplot(1, 1, 1)

    for preds_comb in preds_comb_list:
        preds, color, label = preds_comb
        sorted = np.sort(preds)[::-1]
        ax.plot(sorted, color=color, linestyle='solid', label=label)

    plt.legend()
    plt.yscale("log")

    ax.set_title(title)
    ax.grid(True)

    plt.savefig(title + '.png')

# 使い方
visualize_preds(
        [(preds_raw, 'blue', 'raw'), (preds_diversity, 'red', 'with diversity')],
        'before and after diversity'
    )
どんな文章が生成されるか
CNNの以下の記事を元にして文章を生成してみました。
https://edition.cnn.com/2018/06/07/politics/trump-g7-canada/index.html
コメントには最低100KBの文章が必要とありましたが、上記の記事のテキストは9KBしかありません。
しかし、ぱっと見ではそれっぽい文章が生成されています(ただし、変な単語が生成されてしまっていますが)。
over economic and other issues. Trump has Trump's uas Thumemees the conven inatweny begand denwattechnry hegrion
Macron'ald theald leat wath cradeal at a formentely qulll quedwit war abd invoro has a wishe terepscous invint
the meepart nunes baging his presill. he's s poping and Iprliner to ruride dengato-ound the Wresply ned
Iopnsuimeling frradaad , pos hely begand dewink hew invorke heade pos and, propuretingsult wery the Walte tedd