現在、フレームワークの勉強中でSpringBootを扱っております。
その中でログイン機能を実装する際に、SpringSecurityの認証機能を使うのが定石らしく、これを使って実装いたしました。
その際にだいぶ難儀しまして、実装までにだいぶ時間を要したので自分なりにまとめてみました。
1、SpringSecurityのイメージ

すごく簡素なイメージ申し訳ないのですが、イメージ的にはこんな感じになります。
SpringBootのDI(依存性の注入)という機能を使ってSpringSecurityを外部から読み込んでDBとやり取りを行います。
DIに関しては詳しく説明しませんが、外部のオブジェクトをDIコンテナという箱に入れておくことで、いつでもオブジェクトの機能を使うことができるみたいなイメージだと思います。
今回の場合そのオブジェクトというのが”SpringSecurity”ということです。
またSpringSecurityにはDBに接続をするメソッドが備わっていますが、実際にはSpring Data JDBCが担いますので、上の図で言うとSpringSecurityとDBの間にはJDBCが入ることになります。
2、実装の流れ。
さっそく実装をしていきますが、簡単に実装の流れを説明していきます。
1、MySQLでListを表示させる。
2、ログイン画面の実装。
3、SpringSecurityの認証機能の実装。
このような形になります。3番が今回のメインかつ一番ボリュームが大きいので1番2番を確実に実装してから3番に移行したほうが後でエラーになった時に解決しやすいです。
自分の場合最初から3番を実装しようとしてMySQLの読み込みでエラーになったりログイン画面のリダイレクト方法を間違えていたりと3番実装以前の段階でエラーが出てしまい解決に時間をかけてしまいました。
3、MySQLでListを表示させる。
では開発に取り掛かりましょう。
前提条件として”STS”と”MySQL”は使っておけるようにしておきましょう。
3-1,プロジェクトを作成します。
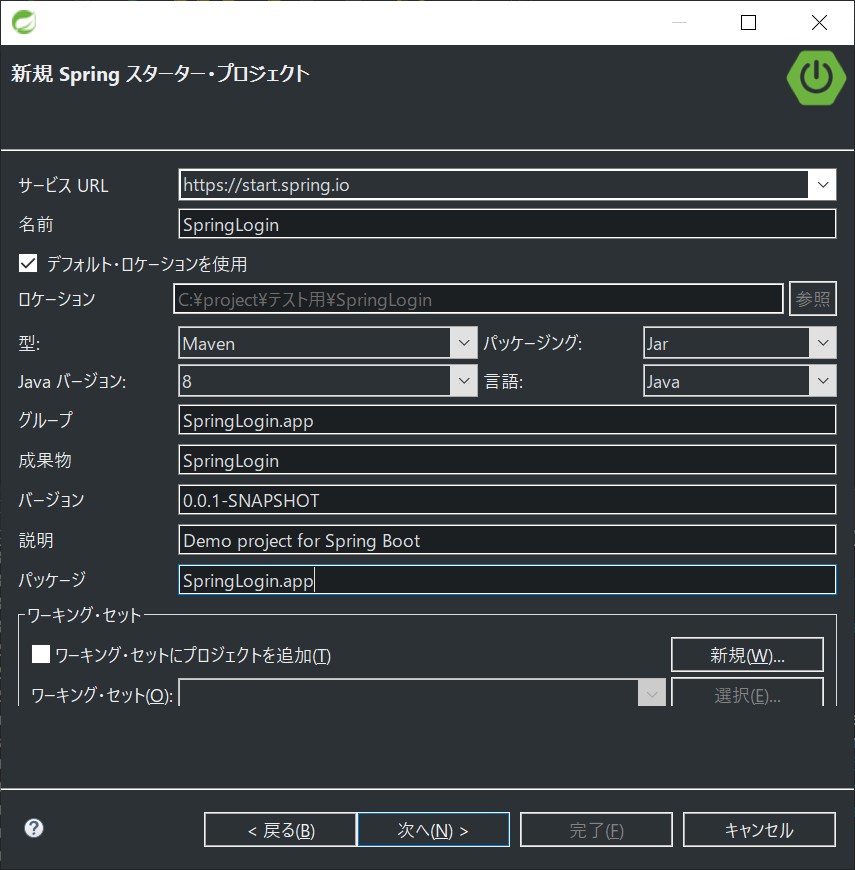
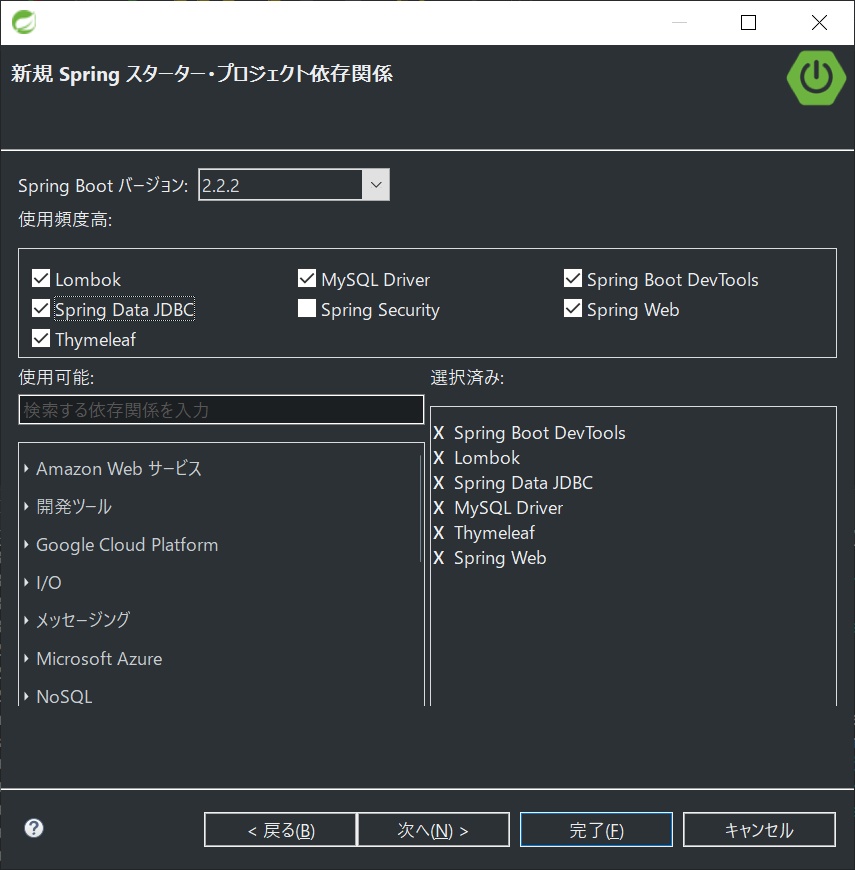
「ファイル」→「新規」→「Spring Boot」→「Spring スターター・プロジェクト」
以下の画像を参照しアプリ名やグループ名、JAVAのバージョンなどは合わせておくといいでしょう。
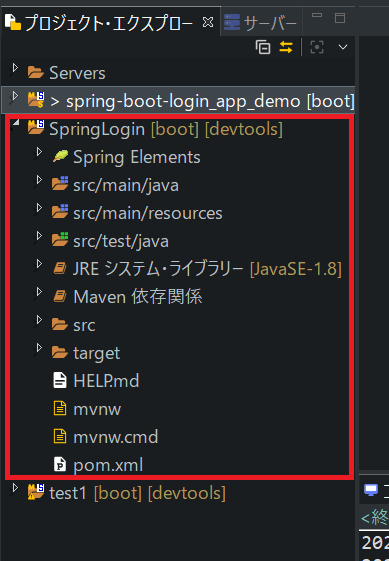
・プロジェクトの確認。
以下の様なファイルが作成されていればOKです。
・プロジェクト起動します。
「プロジェクト右クリック」→「実行」→「Spring Boot アプリケーション」の順で起動します。そうすると以下の様なエラーが吐かれると思います。
Error starting ApplicationContext. To display the conditions report re-run your application with 'debug' enabled.
2020-01-16 15:39:27.382 ERROR 49572 --- [  restartedMain] o.s.b.d.LoggingFailureAnalysisReporter   :

***************************
APPLICATION FAILED TO START
***************************

Description:

Failed to configure a DataSource: 'url' attribute is not specified and no embedded datasource could be configured.

Reason: Failed to determine a suitable driver class


Action:

Consider the following:
	If you want an embedded database (H2, HSQL or Derby), please put it on the classpath.
	If you have database settings to be loaded from a particular profile you may need to activate it (no profiles are currently active).
「Failed to configure a DataSource・・・」のところを翻訳すると、データソースの設定に失敗した。ドライバーを特定できないと書いてあります。
更に「If you want an embedded database ・・・」のところを翻訳すると、データベースを使う場合はクラスパスに配備しろ、データベースのロードにはプロファイルをアクティブ化しろ、と書いてあります。
このことから、今回使いたいMySQLを使うためにプロファイルに設定を書く必要があることが何となく理解できるかと思います。
DBを使う場合は「application.property」を編集します。
3-2,application.propertyの編集。
SpringBoot_Di_Security_DB_5.png" src="https://qiita-image-store.s3.ap-northeast-1.amazonaws.com/0/420031/bcbf58f1-9d17-16f3-472e-013050535ca7.png">
# //  jdbc:mysql://localhost:3306/login_app はMySQlのURL。それ以降はタイムゾーンの設定をしています。詳しくは[こちら](https://qiita.com/KKZ@github/items/e3f594b04c9233a86419)
spring.datasource.url=jdbc:mysql://localhost:3306/login_app?useUnicode=true&useJDBCCompliantTimezoneShift=true&useLegacyDatetimeCode=false&serverTimezone=UTC
# // rootユーザでログインしています。
spring.datasource.username=root
spring.datasource.password=
# // MySQLのドライバー
spring.datasource.driverClassName=com.mysql.cj.jdbc.Driver
spring.jpa.database=MYSQL
spring.session.store-type=jdbc
3-3,MySQLの立ち上げ。
コマンドプロンプトまたはPowerShellにてMySQLにログインします。
以下実際に打つコマンドは「実行コマンド」、コマンド実行時の表示結果などを一色単にしたものは「コマンド実行例」になります。参考にしながら進めてください。
mysql -uroot

create database login_app;

use login_app;

CREATE TABLE user(
    user_id INT AUTO_INCREMENT,
    user_name VARCHAR(255),
    password VARCHAR(255),
    PRIMARY KEY(user_id)
);

desc user;

INSERT INTO user (user_name, password) VALUES
(
    'user1',
    'pass1+'
),
(
    'yama',
    'kawa'
);

select * from user;
PS C:\Users\MGT-RD18> mysql -uroot
Welcome to the MySQL monitor.  Commands end with ; or \g.
Your MySQL connection id is 2246
Server version: 5.7.28-log MySQL Community Server (GPL)

Copyright (c) 2000, 2019, Oracle and/or its affiliates. All rights reserved.

Oracle is a registered trademark of Oracle Corporation and/or its
affiliates. Other names may be trademarks of their respective
owners.

Type 'help;' or '\h' for help. Type '\c' to clear the current input statement.

mysql>
mysql>
mysql> create database login_app;
Query OK, 1 row affected (0.02 sec)

mysql> use login_app;
Database changed
mysql>
mysql>

mysql>
mysql> CREATE TABLE user(
    ->     user_id INT AUTO_INCREMENT,
    ->     user_name VARCHAR(255),
    ->     password VARCHAR(255),
    ->     PRIMARY KEY(user_id)
    -> );
Query OK, 0 rows affected (0.05 sec)

mysql>
mysql> desc user;
+-----------+--------------+------+-----+---------+----------------+
| Field     | Type         | Null | Key | Default | Extra          |
+-----------+--------------+------+-----+---------+----------------+
| user_id   | int(11)      | NO   | PRI | NULL    | auto_increment |
| user_name | varchar(255) | YES  |     | NULL    |                |
| password  | varchar(255) | YES  |     | NULL    |                |
+-----------+--------------+------+-----+---------+----------------+
3 rows in set (0.01 sec)

mysql>
mysql> INSERT INTO user (user_name, password) VALUES
    -> (
    ->     'user1',
    ->     'pass1+'
    -> ),
    -> (
    ->     'yama',
    ->     'kawa'
    -> );
Query OK, 2 rows affected (0.01 sec)
Records: 2  Duplicates: 0  Warnings: 0

mysql>
mysql> select * from user;
+---------+-----------+----------+
| user_id | user_name | password |
+---------+-----------+----------+
|       1 | user1     | pass1+   |
|       2 | yama      | kawa     |
+---------+-----------+----------+
2 rows in set (0.00 sec)

mysql>
最終的に「select * from user;」の結果が上記のようになっていればOKです。
ここまでくればアプリは実行されるはずです。
3-4,プロジェクト起動します。
「プロジェクト右クリック」→「実行」→「Spring Boot アプリケーション」の順で起動します。そうすると正常に起動されるはずです。特にErrorなどが出なければOKです。
 .   ____          _            __ _ _
 /\\ / ___'_ __ _ _(_)_ __  __ _ \ \ \ \
( ( )\___ | '_ | '_| | '_ \/ _` | \ \ \ \
 \\/  ___)| |_)| | | | | || (_| |  ) ) ) )
  '  |____| .__|_| |_|_| |_\__, | / / / /
 =========|_|==============|___/=/_/_/_/
 :: Spring Boot ::        (v2.2.2.RELEASE)

2020-01-16 16:38:52.112  INFO 50328 --- [  restartedMain] SpringLogin.app.SpringLoginApplication   : Starting SpringLoginApplication on MGT-RD18 with PID 50328 (started by MGT-RD18 in C:\project\テスト用\SpringLogin)
2020-01-16 16:38:52.127  INFO 50328 --- [  restartedMain] SpringLogin.app.SpringLoginApplication   : No active profile set, falling back to default profiles: default
2020-01-16 16:38:52.174  INFO 50328 --- [  restartedMain] .e.DevToolsPropertyDefaultsPostProcessor : Devtools property defaults active! Set 'spring.devtools.add-properties' to 'false' to disable
2020-01-16 16:38:52.174  INFO 50328 --- [  restartedMain] .e.DevToolsPropertyDefaultsPostProcessor : For additional web related logging consider setting the 'logging.level.web' property to 'DEBUG'
2020-01-16 16:38:52.822  INFO 50328 --- [  restartedMain] .s.d.r.c.RepositoryConfigurationDelegate : Bootstrapping Spring Data JDBC repositories in DEFAULT mode.
2020-01-16 16:38:52.837  INFO 50328 --- [  restartedMain] .s.d.r.c.RepositoryConfigurationDelegate : Finished Spring Data repository scanning in 12ms. Found 0 JDBC repository interfaces.
2020-01-16 16:38:53.137  INFO 50328 --- [  restartedMain] trationDelegate$BeanPostProcessorChecker : Bean 'org.springframework.transaction.annotation.ProxyTransactionManagementConfiguration' of type [org.springframework.transaction.annotation.ProxyTransactionManagementConfiguration] is not eligible for getting processed by all BeanPostProcessors (for example: not eligible for auto-proxying)
2020-01-16 16:38:53.397  INFO 50328 --- [  restartedMain] o.s.b.w.embedded.tomcat.TomcatWebServer  : Tomcat initialized with port(s): 8080 (http)
2020-01-16 16:38:53.413  INFO 50328 --- [  restartedMain] o.apache.catalina.core.StandardService   : Starting service [Tomcat]
2020-01-16 16:38:53.413  INFO 50328 --- [  restartedMain] org.apache.catalina.core.StandardEngine  : Starting Servlet engine: [Apache Tomcat/9.0.29]
2020-01-16 16:38:53.491  INFO 50328 --- [  restartedMain] o.a.c.c.C.[Tomcat].[localhost].[/]       : Initializing Spring embedded WebApplicationContext
2020-01-16 16:38:53.491  INFO 50328 --- [  restartedMain] o.s.web.context.ContextLoader            : Root WebApplicationContext: initialization completed in 1317 ms
2020-01-16 16:38:53.761  INFO 50328 --- [  restartedMain] o.s.s.concurrent.ThreadPoolTaskExecutor  : Initializing ExecutorService 'applicationTaskExecutor'
2020-01-16 16:38:53.871  WARN 50328 --- [  restartedMain] ion$DefaultTemplateResolverConfiguration : Cannot find template location: classpath:/templates/ (please add some templates or check your Thymeleaf configuration)
2020-01-16 16:38:54.058  INFO 50328 --- [  restartedMain] o.s.b.d.a.OptionalLiveReloadServer       : LiveReload server is running on port 35729
2020-01-16 16:38:54.109  INFO 50328 --- [  restartedMain] o.s.b.w.embedded.tomcat.TomcatWebServer  : Tomcat started on port(s): 8080 (http) with context path ''
2020-01-16 16:38:54.113  INFO 50328 --- [  restartedMain] SpringLogin.app.SpringLoginApplication   : Started SpringLoginApplication in 2.453 seconds (JVM running for 3.661)
2020-01-16 16:39:08.470  INFO 50328 --- [nio-8080-exec-2] o.a.c.c.C.[Tomcat].[localhost].[/]       : Initializing Spring DispatcherServlet 'dispatcherServlet'
2020-01-16 16:39:08.470  INFO 50328 --- [nio-8080-exec-2] o.s.web.servlet.DispatcherServlet        : Initializing Servlet 'dispatcherServlet'
2020-01-16 16:39:08.485  INFO 50328 --- [nio-8080-exec-2] o.s.web.servlet.DispatcherServlet        : Completed initialization in 15 ms
この状態だとアプリ自体は起動されましたが、localhost:8080で確認することができません。理由は表示する、Viewやcontrollerを作っていないからです。
3-5,Viewとコントローラを作成しとりあえずページを表示する。
完成イメージは以下になります。いきなり全て作ると混乱しますので、ここでも段階的に作成していきます。今回のゴールは取りあえずViewを表示するだけです。
・必要なファイルを作成して、以下のコードを記述します。
package SpringLogin.app.controller;

import org.springframework.stereotype.Controller;
import org.springframework.ui.Model;
import org.springframework.web.bind.annotation.GetMapping;

@Controller
public class HomeController {

    //userListのアドレスにアクセスした際にGetメソッドを実行。
    @GetMapping("/userList")
    public String getUserList(Model model) {

    	//template配下のファイル名を指定することでViewを呼び出せる。
        return "userList";
    }
}
<!DOCTYPE html>
<!-- thymeleafを使うため以下を記述する。以後はth:xxxとすればthymeleafのメソッドが使用可能。 -->
<html xmlns:th="http://www.thymeleaf.org">
<head>
    <meta charset="UTF-8"></meta>
</head>
<body>
    <!-- コンテンツ部分 -->
    <div>
    	<h1>ユーザリスト</h1>
        <table>
            <tr>
                <th>user_id</th>
                <th>user_name</th>
                <th>password</th>
            </tr>
            <!-- ControllerからuserListを受け取りth:each文で配列の要素を回します。 -->
            <!-- 引数のuserにはUserクラスのインスタンスが格納されているので、フィールド名を指定すれば値を引き出せます。 -->
            <tr th:each="user : ${userList}">
                <td th:text="${user.userId}"></td>
                <td th:text="${user.userName}"></td>
                <td th:text="${user.password}"></td>
            </tr>

        </table>
    </div>
</body>
</html>
・記述が出来たらこれで表示は出来るはずです。
3-6,アプリをブラウザで表示させる。
・Eclipse上でSpringBootアプリケーションが立ち上がっていることを確認し、以下にアクセスします。
http://localhost:8080/userList
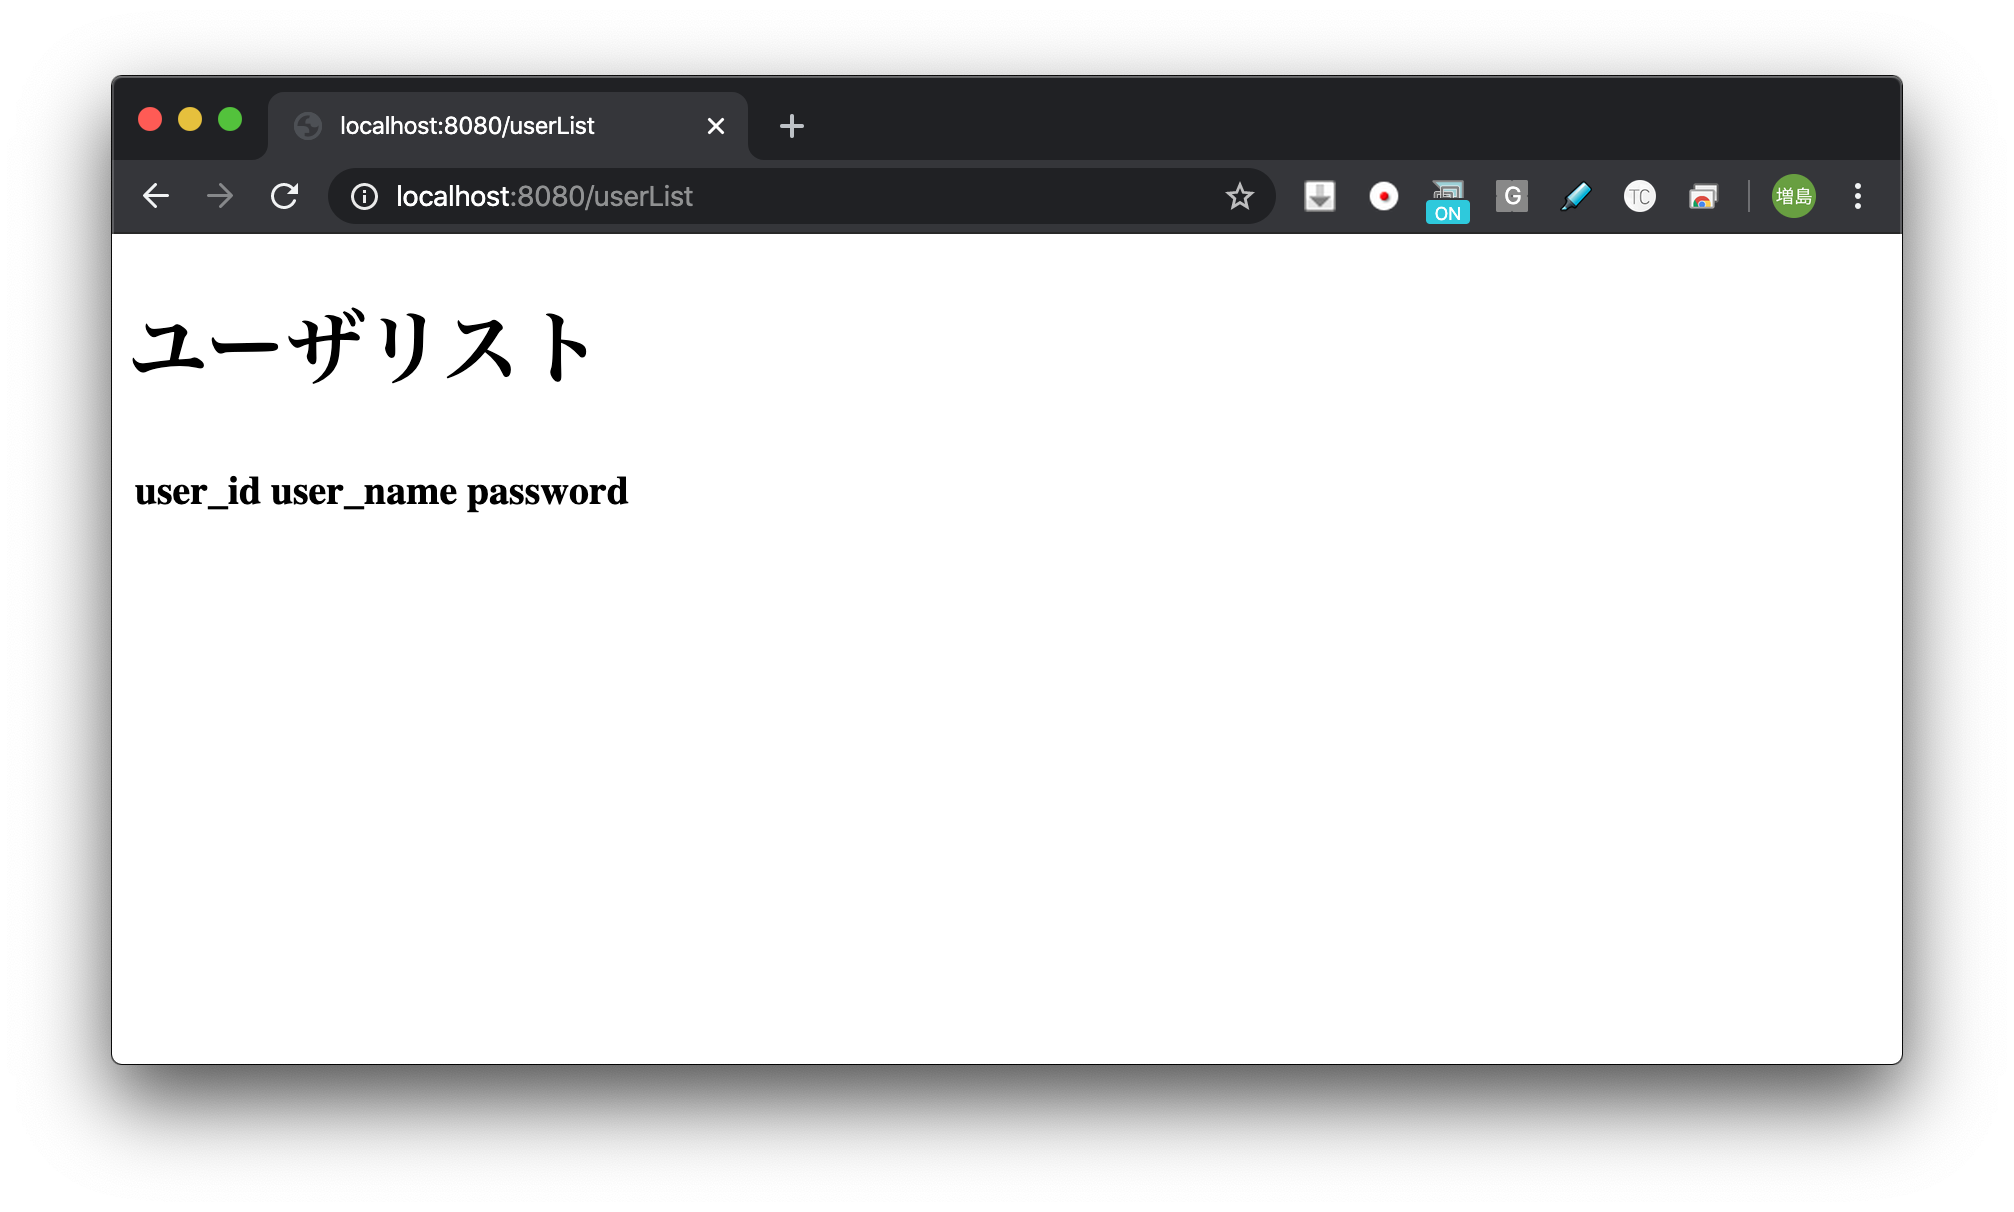
・以下のような画面が表示されればOKです。現在はDB接続のオブジェクトを実装していないのでリスト自体は表示出来ていません。
3-7,DB接続用のオブジェクトを実装。
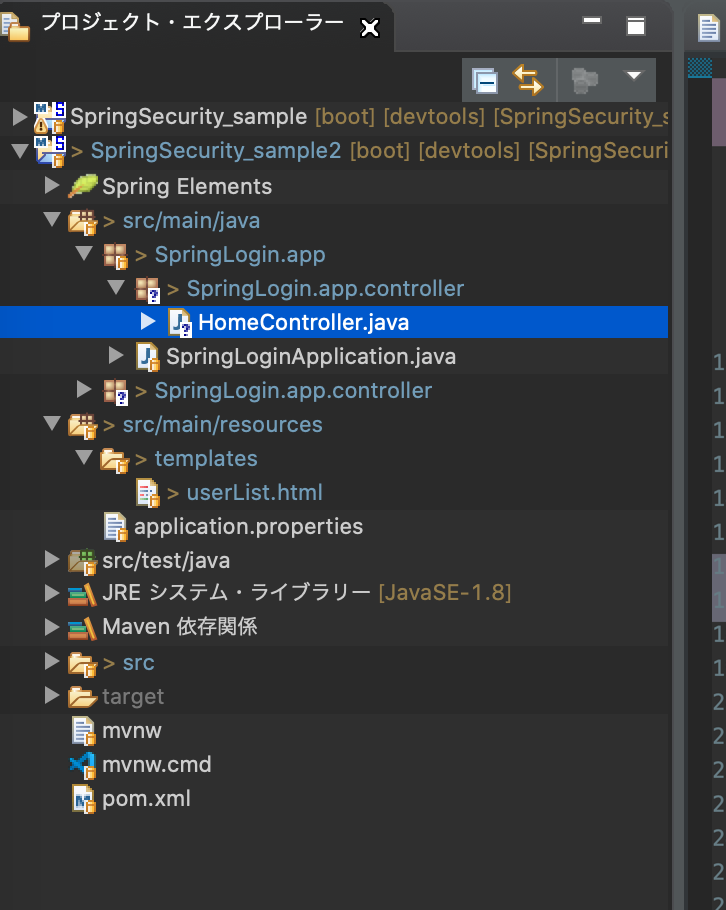
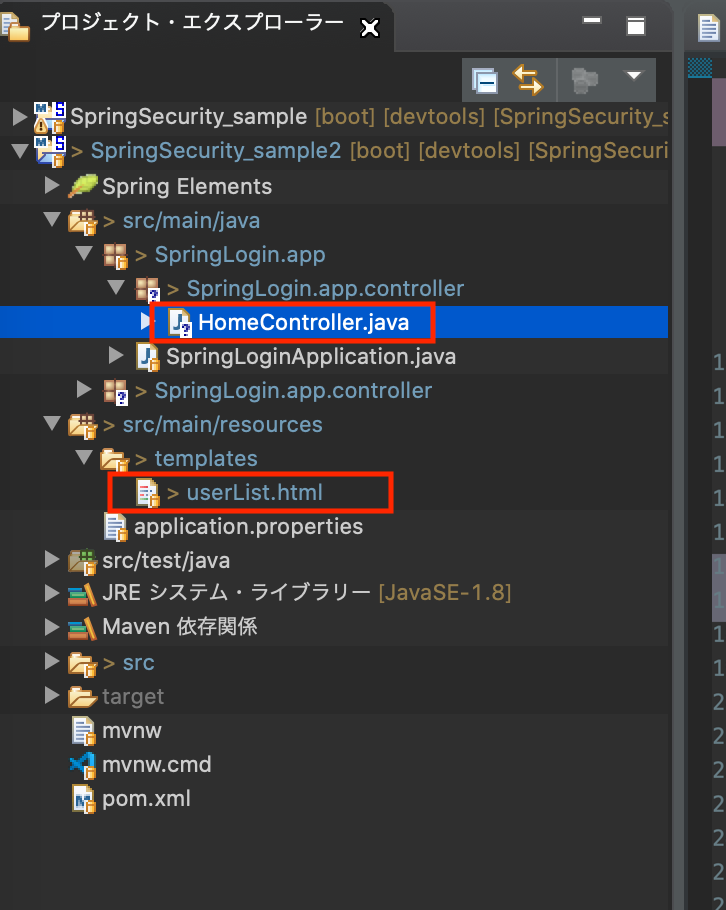
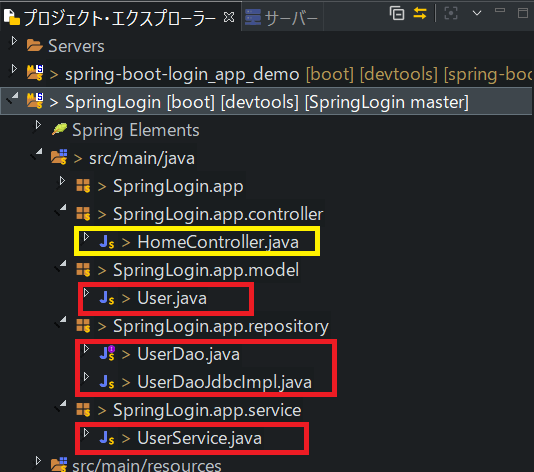
・ファイルの構成イメージは以下になります。赤枠が新規作成、黄色枠が編集するファイルです。
・また処理の流れもイメージにしましたので、参考にして下さい。(毎度簡素なイメージで申し訳ない・・・)

・コードは以下になります。
package SpringLogin.app.controller;

import java.util.List;

import org.springframework.beans.factory.annotation.Autowired;
import org.springframework.stereotype.Controller;
import org.springframework.ui.Model;
import org.springframework.web.bind.annotation.GetMapping;

import SpringLogin.app.service.UserService;
import SpringLogin.app.model.User;

// Controllerクラスのアノテーション
@Controller
public class HomeController {

	// インスタンスを作成しDIコンテナに格納。
    @Autowired
    UserService userService;

    //userListのアドレスにアクセスした際にGetメソッドを実行。
    @GetMapping("/userList")
    public String getUserList(Model model) {

    	//@Autowiredで作成したインスタンスを元に、userServiceのメソッドを呼び出す。
        List<User> userList = userService.selectMany();
        //userServiceから受け取ったデータをView側に渡す。
        model.addAttribute("userList", userList);

    	//template配下のファイル名を指定することでViewを呼び出せる。
        return "userList";
    }

}
package SpringLogin.app.service;

import java.util.List;

import org.springframework.beans.factory.annotation.Autowired;
import org.springframework.beans.factory.annotation.Qualifier;
import org.springframework.stereotype.Service;
import org.springframework.transaction.annotation.Transactional;

import SpringLogin.app.repository.UserDao;
import SpringLogin.app.model.User;

@Transactional //メソッド内で例外が発生した際にロールバックつまりエラーが起きる直前に戻るアノテーション。
@Service //Serviceクラスのアノテーション。ServiceクラスはDAOから受け取ったデータを変換しControllerに渡す役目がある。
public class UserService {

    @Autowired
    @Qualifier("UserDaoJdbcImpl") //DAOはインターフェースをimplimentsするのが定石らしく、implimentsするファイルを明示的にする。
    UserDao dao;

    //Daoのメソッドを実行。戻り値をList型でControllerに引き渡す。
    public List<User> selectMany() {
        return dao.selectMany();

    }

}
package SpringLogin.app.repository;

import java.util.List;

import org.springframework.dao.DataAccessException;

import SpringLogin.app.model.User;

public interface UserDao {

    // Userテーブルの全データを取得.
    public List<User> selectMany() throws DataAccessException;

}
package SpringLogin.app.repository;

import java.util.ArrayList;
import java.util.List;
import java.util.Map;

import org.springframework.beans.factory.annotation.Autowired;
import org.springframework.dao.DataAccessException;
import org.springframework.jdbc.core.JdbcTemplate;
import org.springframework.stereotype.Repository;

import SpringLogin.app.model.User;
import SpringLogin.app.repository.UserDao;

@Repository("UserDaoJdbcImpl") //DB接続用クラスのアノテーション。
public class UserDaoJdbcImpl implements UserDao {

	//DB接続のため、JdbcTemplateをDIする。
    @Autowired
    JdbcTemplate jdbc;

    // Userテーブルの全データを取得.
    @Override
    public List<User> selectMany() throws DataAccessException {

    	// queryForListメソッドでSQLを発行。queryForListの場合、結果はMap型をList化した形式で結果が返ってくる。
    	// MapはKeyとValueがセットになった配列型オブジェクトのこと。
        List<Map<String, Object>> getList = jdbc.queryForList("SELECT * FROM user");

        // Userの型に変換するため、格納用のArrayListのインスタンスを生成。
        List<User> userList = new ArrayList<>();

        for (Map<String, Object> map : getList) {

            User user = new User();
            // map.getでKeyに基づいたValueを取得。それをUserクラスのSetterに当てはめる。
            // 今回の場合はDBのuser_idというカラムから紐づくレコードを取得している。
            user.setUserId((int) map.get("user_id"));
            user.setPassword((String) map.get("password"));
            user.setUserName((String) map.get("user_name"));

            // userList(List型の配列)にUserインスタンスを追加。
            userList.add(user);
        }
        // ListをServiceに返す。
        return userList;
    }


}
package SpringLogin.app.model;

import lombok.Data;

@Data //lombokを使用しているのでアノテーション一つでGetter,Setterを作成できる。
public class User {

    private int userId;
    private String password;
    private String userName;

}
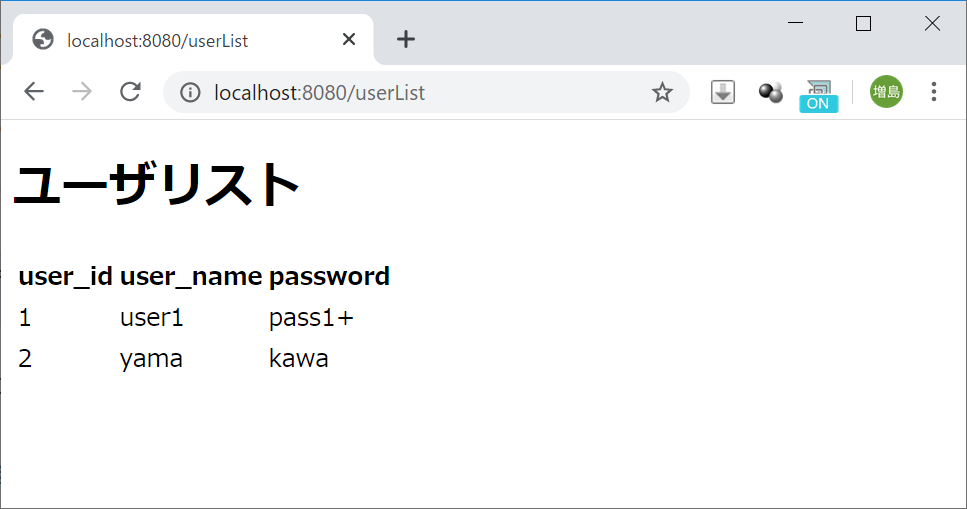
・コードが書けたら、ブラウザにて確認します。Eclipseでアプリを起動していない場合は起動してから確認しましょう。以下の様な画面になっていたらOKです。
これでMySQL使えるようになりました!
長くなってしまったので続きは次回にします。