前回の続きです。
※ここからたくさんのファイルを作成していきます。失敗した際に、途中で後戻りが出来なくなる可能性が高いので、ここまでプロジェクト情報をコピーまたはGithubなどに挙げておくといいでしょう。
私はこれをせず何度もプロジェクト作成してかなりの時間を要しました。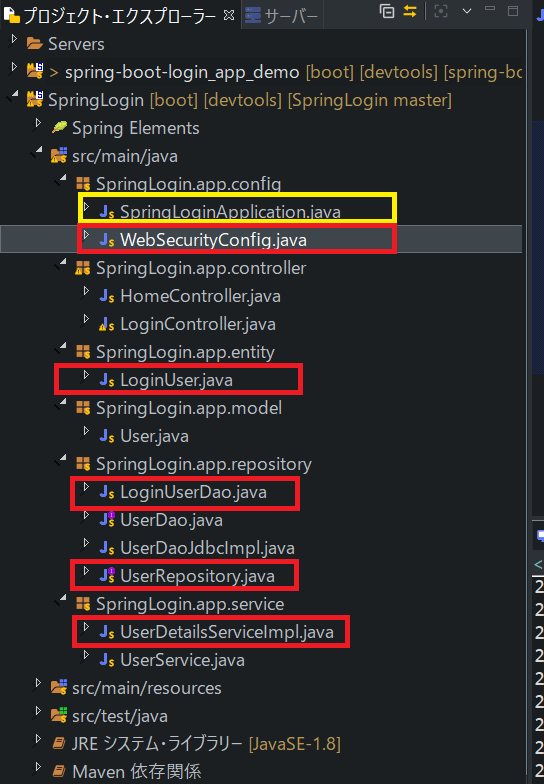
5、SpringSecurityの認証機能の実装。
・ここからがメインディッシュになります。
前回までの実装がうまく行ってないとエラー対応が面倒なので、ここまでを完璧に実装しておきましょう。
5-1,POMを編集。
・まずSpringSecurityを導入するためMavenの依存関係を記載してある、pom.xmlを書き換えます。またDBから受け取ったデータを格納するエンティティクラスを使用するためjavax.persistenceも導入します。
<!-- SpringSecurity -->
<dependency>
	<groupId>org.springframework.boot</groupId>
	<artifactId>spring-boot-starter-security</artifactId>
</dependency>
<!-- Thyemeleaf拡張(セキュリティ) -->
<dependency>
	<groupId>org.thymeleaf.extras</groupId>
	<artifactId>thymeleaf-extras-springsecurity5</artifactId>
</dependency>
<!-- https://mvnrepository.com/artifact/javax.persistence/javax.persistence-api -->
<!-- Entityのアノテーションを使うため -->
<dependency>
    <groupId>javax.persistence</groupId>
    <artifactId>javax.persistence-api</artifactId>
    <version>2.2</version>
</dependency>
<!-- JpaRepository-->
<dependency>
	<groupId>org.springframework.boot</groupId>
	<artifactId>spring-boot-starter-data-jpa</artifactId>
</dependency>
・**コードを書いただけだと反映されません。**Mavenプロジェクト更新する必要があります。
「プロジェクト右クリック」→「Maven」→「プロジェクトの更新」でMavenファイルに更新をかけます。選択したファイルが正しければ「OK」で更新をかけましょう。
・アプリを実行した際にコンソール上にエラーが出なければOKです。
5-2,認証機能を実装する。
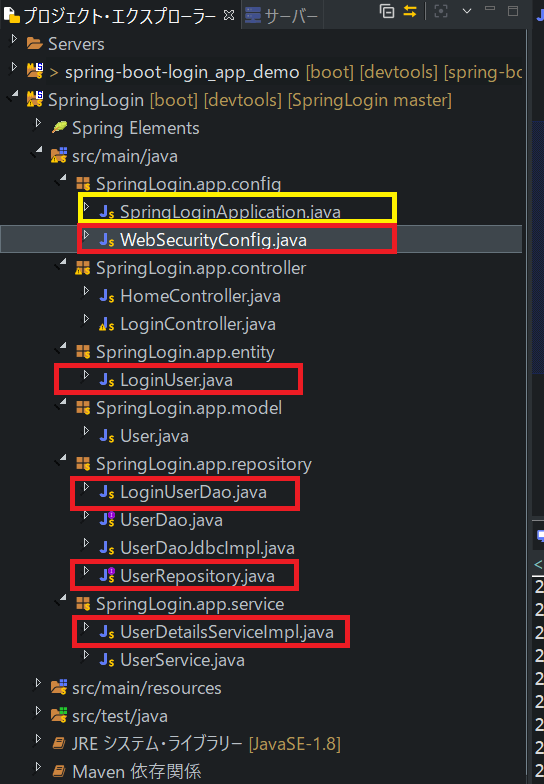
・最後です。最後にして、たくさんのファイルを作成していきます。ファイル構成イメージは以下になります。赤枠が新規作成、黄色枠が編集するファイルです。
・また処理の流れもイメージにしましたので、参考にして下さい。(非常に見づらくて申し訳ない・・・)
・コードを載せます。コメントをたくさん書いていますが、正直全てを理解するのが難しく間違っている可能性もあります。各自で調べて理解を深めて頂くと幸いです。
package SpringLogin.app.config;

import org.springframework.beans.factory.annotation.Autowired;
import org.springframework.context.annotation.Bean;
import org.springframework.context.annotation.Configuration;
import org.springframework.security.config.annotation.authentication.builders.AuthenticationManagerBuilder;
import org.springframework.security.config.annotation.web.builders.HttpSecurity;
import org.springframework.security.config.annotation.web.builders.WebSecurity;
import org.springframework.security.config.annotation.web.configuration.EnableWebSecurity;
import org.springframework.security.config.annotation.web.configuration.WebSecurityConfigurerAdapter;
import org.springframework.security.crypto.bcrypt.BCryptPasswordEncoder;

import SpringLogin.app.service.UserDetailsServiceImpl;

/**
 * SpringSecurityを利用するための設定クラス
 * ログイン処理でのパラメータ、画面遷移や認証処理でのデータアクセス先を設定する
 * @author aoi
 *
 */
@Configuration
@EnableWebSecurity
public class WebSecurityConfig extends WebSecurityConfigurerAdapter {

	// UserDetailsServiceImplのメソッドを使えるようインスタンス化しておきます。
	@Autowired
	private UserDetailsServiceImpl userDetailsService;

	//フォームの値と比較するDBから取得したパスワードは暗号化されているのでフォームの値も暗号化するために利用
	@Bean
	public BCryptPasswordEncoder passwordEncoder() {
		BCryptPasswordEncoder bCryptPasswordEncoder = new BCryptPasswordEncoder();
		return bCryptPasswordEncoder;
	}

	/**
	 * 認可設定を無視するリクエストを設定
	 * 静的リソース(image,javascript,css)を認可処理の対象から除外する
	 */
	@Override
    public void configure(WebSecurity web) throws Exception {
        web.ignoring().antMatchers(
                            "/images/**",
                            "/css/**",
                            "/javascript/**"
                            );
    }

	/**
	 * 認証・認可の情報を設定する
	 * 画面遷移のURL・パラメータを取得するname属性の値を設定
	 * SpringSecurityのconfigureメソッドをオーバーライドしています。
	 */
	@Override
	protected void configure(HttpSecurity http) throws Exception {
		http
		    .authorizeRequests()
		        .anyRequest().authenticated()
		        .and()
		    .formLogin()
		        .loginPage("/login") //ログインページはコントローラを経由しないのでViewNameとの紐付けが必要
		        .loginProcessingUrl("/login") //フォームのSubmitURL、このURLへリクエストが送られると認証処理が実行される
		        .usernameParameter("username") //リクエストパラメータのname属性を明示
		        .passwordParameter("password")
		        .defaultSuccessUrl("/userList", true) //認証が成功した際に遷移するURL
		        .failureUrl("/login?error") //認証が失敗した際に遷移するURL
		        .permitAll() //どのユーザでも接続できる。
		        .and()
		    .logout()
		        .logoutUrl("/logout")
		        .logoutSuccessUrl("/login?logout")
		        .permitAll();
	}

	/**
	 * 認証時に利用するデータソースを定義する設定メソッド
	 * ここではDBから取得したユーザ情報をuserDetailsServiceへセットすることで認証時の比較情報としている
	 * @param auth
	 * @throws Exception
	 * AuthenticationManagerBuilderは認証系の機能を有している。
	 * userDetailsServiceもその一つでフォームに入力されたユーザが使用可能か判断します。
	 * https://docs.spring.io/spring-security/site/docs/4.0.x/apidocs/org/springframework/security/config/annotation/authentication/builders/AuthenticationManagerBuilder.html
	 */
	@Autowired
	public void configure(AuthenticationManagerBuilder auth) throws Exception{
		auth.userDetailsService(userDetailsService).passwordEncoder(passwordEncoder());
		/*
		 * インメモリの場合は以下を使います。
		auth
		    .inMemoryAuthentication()
		        .withUser("user").password("{noop}password").roles("USER");
		*/
	}

}
package SpringLogin.app.service;

import java.util.ArrayList;
import java.util.List;

import org.springframework.beans.factory.annotation.Autowired;
import org.springframework.security.core.GrantedAuthority;
import org.springframework.security.core.authority.SimpleGrantedAuthority;
import org.springframework.security.core.userdetails.User;
import org.springframework.security.core.userdetails.UserDetails;
import org.springframework.security.core.userdetails.UserDetailsService;
import org.springframework.security.core.userdetails.UsernameNotFoundException;
import org.springframework.security.crypto.bcrypt.BCryptPasswordEncoder;
import org.springframework.stereotype.Service;

import SpringLogin.app.repository.LoginUserDao;
import SpringLogin.app.entity.LoginUser;

/**
 * Spring Securityのユーザ検索用のサービスの実装クラス
 * DataSourceの引数として指定することで認証にDBを利用できるようになる
 * @author aoi
 *
 */
@Service
public class UserDetailsServiceImpl implements UserDetailsService{

	//DBからユーザ情報を検索するメソッドを実装したクラス
	@Autowired
	private LoginUserDao userDao;

	/**
	 * UserDetailsServiceインタフェースの実装メソッド
	 * フォームから取得したユーザ名でDBを検索し、合致するものが存在したとき、
	 * パスワード、権限情報と共にUserDetailsオブジェクトを生成
	 * コンフィグクラスで上入力値とDBから取得したパスワードと比較し、ログイン判定を行う
	 */
	@Override
	public UserDetails loadUserByUsername(String userName) throws UsernameNotFoundException {

		LoginUser user = userDao.findUser(userName);

		if (user == null) {
			throw new UsernameNotFoundException("User" + userName + "was not found in the database");
		}
		//権限のリスト
		//AdminやUserなどが存在するが、今回は利用しないのでUSERのみを仮で設定
		//権限を利用する場合は、DB上で権限テーブル、ユーザ権限テーブルを作成し管理が必要

		List<GrantedAuthority> grantList = new ArrayList<GrantedAuthority>();
		GrantedAuthority authority = new SimpleGrantedAuthority("USER");

		grantList.add(authority);

		//rawDataのパスワードは渡すことができないので、暗号化
		BCryptPasswordEncoder encoder = new BCryptPasswordEncoder();

        //UserDetailsはインタフェースなのでUserクラスのコンストラクタで生成したユーザオブジェクトをキャスト
		UserDetails userDetails = (UserDetails)new User(user.getUserName(), encoder.encode(user.getPassword()),grantList);

		return userDetails;
	}

}
package SpringLogin.app.repository;

import javax.persistence.EntityManager;

import org.springframework.beans.factory.annotation.Autowired;
import org.springframework.stereotype.Repository;

import SpringLogin.app.entity.LoginUser;

/**
 * DBへのアクセスメソッドを呼び出すDao
 * @author aoi
 *
 */
@Repository
public class LoginUserDao {

	/**
	 * エンティティを管理するオブジェクト。
	 * 以下のメソッドでエンティティクラスであるLoginUserにキャストして戻り値を返すので必要なオブジェクト。
	 */
	@Autowired
	EntityManager em;

	/**
	 * フォームの入力値から該当するユーザを検索 合致するものが無い場合Nullが返される
	 * @param userName
	 * @return 一致するユーザが存在するとき:UserEntity、存在しないとき:Null
	 */
	public LoginUser findUser(String userName) {

		String query = "";
		query += "SELECT * ";
		query += "FROM user ";
		query += "WHERE user_name = :userName "; //setParameterで引数の値を代入できるようにNamedParameterを利用

		//EntityManagerで取得された結果はオブジェクトとなるので、LoginUser型へキャストが必要となる
		return (LoginUser)em.createNativeQuery(query, LoginUser.class).setParameter("userName", userName).getSingleResult();
	}

}
package SpringLogin.app.entity;

import javax.persistence.Column;
import javax.persistence.Entity;
import javax.persistence.Id;
import javax.persistence.Table;

/**
 * ログインユーザのユーザ名、パスワードを格納するためのEntity
 * @author aoi
 *
 */
@Entity
@Table(name = "user")
public class LoginUser {

	@Column(name = "user_id")
	@Id
	private Long userId;

	@Column(name = "user_name")
	private String userName;

	@Column(name = "password")
	private String password;

	public String getUserName() {
		return userName;
	}

	public void setUserName(String userName) {
		this.userName = userName;
	}

	public String getPassword() {
		return password;
	}

	public void setPassword(String password) {
		this.password = password;
	}

}
package SpringLogin.app.repository;

import org.springframework.data.jpa.repository.JpaRepository;
import org.springframework.stereotype.Repository;

import SpringLogin.app.entity.LoginUser;

/*
 * Spring Frameworkのデータ検索を行うための仕組み。
 * DIに登録しておくことでデータ検索が可能になる。引数には<エンティティクラス, IDタイプとなる>
 * https://www.tuyano.com/index3?id=12626003
 */
@Repository
public interface UserRepository extends JpaRepository<LoginUser, Integer>{

}
package SpringLogin.app.config;

import org.springframework.boot.SpringApplication;
import org.springframework.boot.autoconfigure.SpringBootApplication;
import org.springframework.boot.autoconfigure.domain.EntityScan;
import org.springframework.context.annotation.ComponentScan;
import org.springframework.data.jpa.repository.config.EnableJpaRepositories;

@SpringBootApplication //Spring Bootアプリケーションであることを示す
@ComponentScan("SpringLogin.app") //BeanとしてDIに登録する。パッケージとして指定することができる。
@EntityScan("SpringLogin.app.entity") //上記同様BeanとしてDIに登録。
@EnableJpaRepositories("SpringLogin.app.repository") //JpaRepositoryをONにするためのもの。指定されたパッケージ内を検索し、@Repositoryを付けたクラスをBeanとして登録。
public class SpringLoginApplication {

	public static void main(String[] args) {
		SpringApplication.run(SpringLoginApplication.class, args);
	}

}
・お疲れ様です。だいぶ長いコードになりましたがあともう一踏ん張りです!では、ここまでコードが書けたら、ブラウザで確認しましょう。
5-3,動作確認。
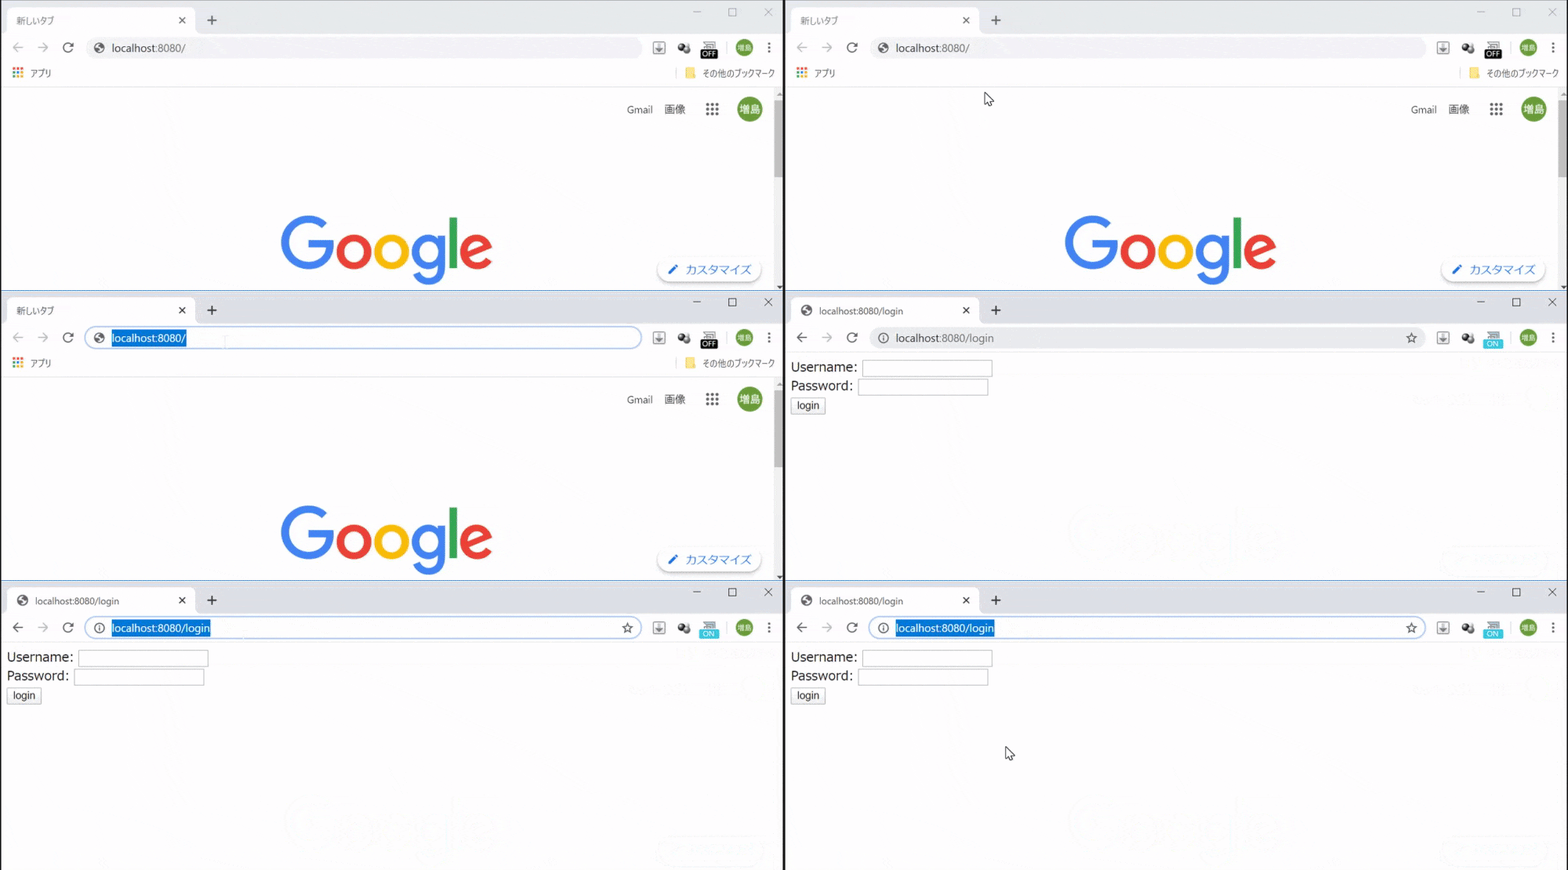
まずここにアクセスします→http://localhost:8080/
するとURLが/loginの画面に遷移します。
これはSpringSecurityのが適用されている証拠で、WebSecurityConfig.javaのauthorizeRequestsメソッド内にはloginしていない状態でもアクセスできるURLを指定します。ですが今回は何も指定がないので、未ログイン状態ではログインページ以外アクセスが出来ません。なのでlocalhost:8080/にアクセスした際に/loginにリダイレクトされます。
・上のイメージの様に動いていたらOKです。
・次に認証機能を確認します。
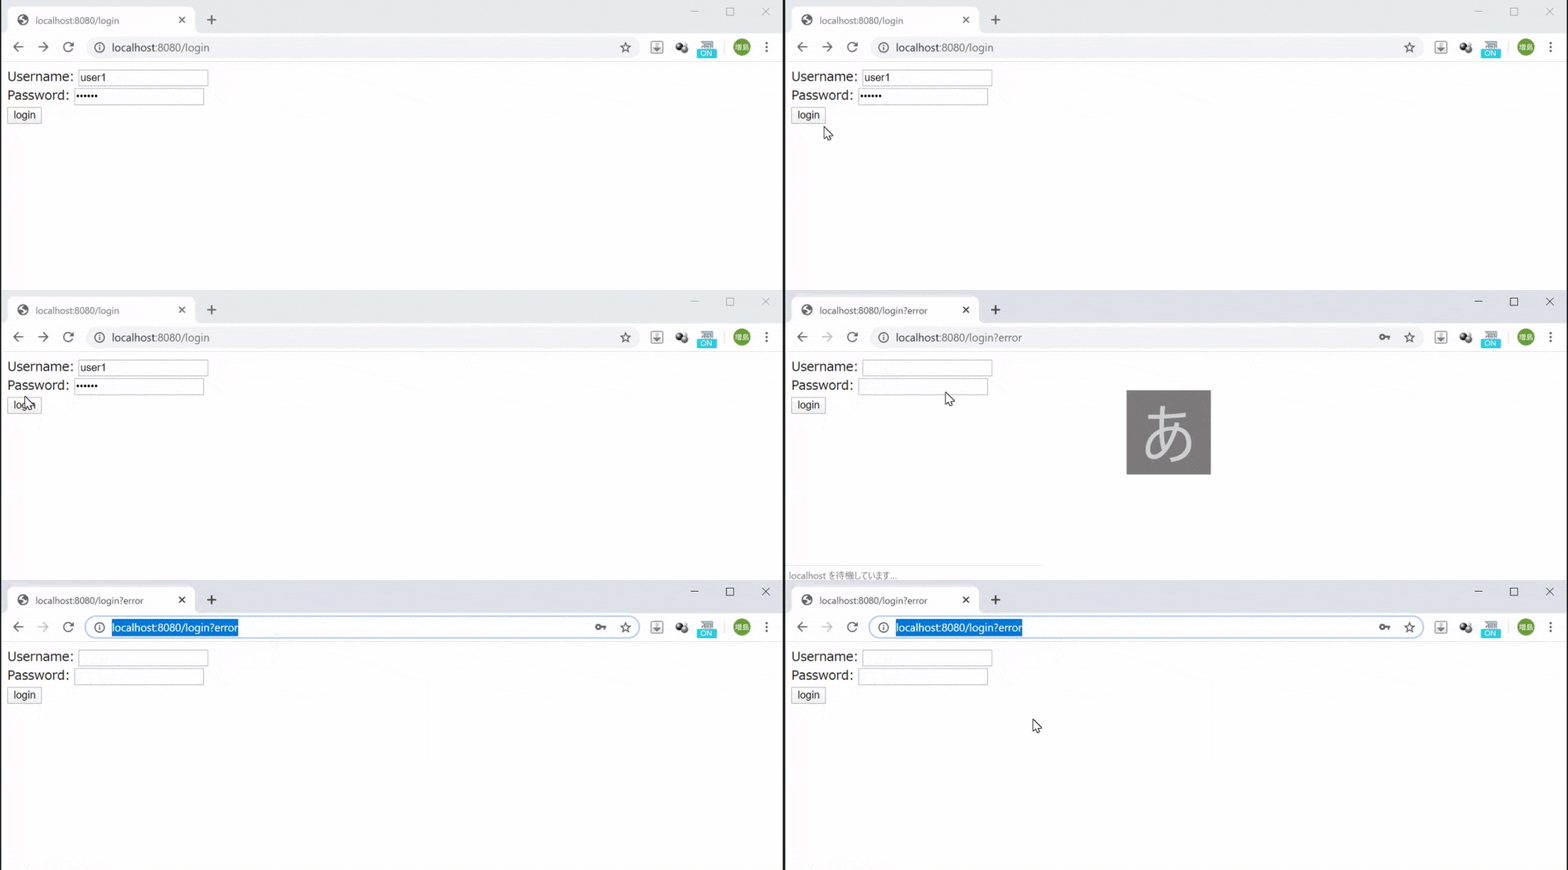
まず間違ったパスとユーザでログインします。
そうするとログインできない&"/login?error"にリダイレクトされます。
これはWebSecurityConfig.jav内のfailureUrl()に影響されています。
・上のイメージの様に動いていたらOKです。
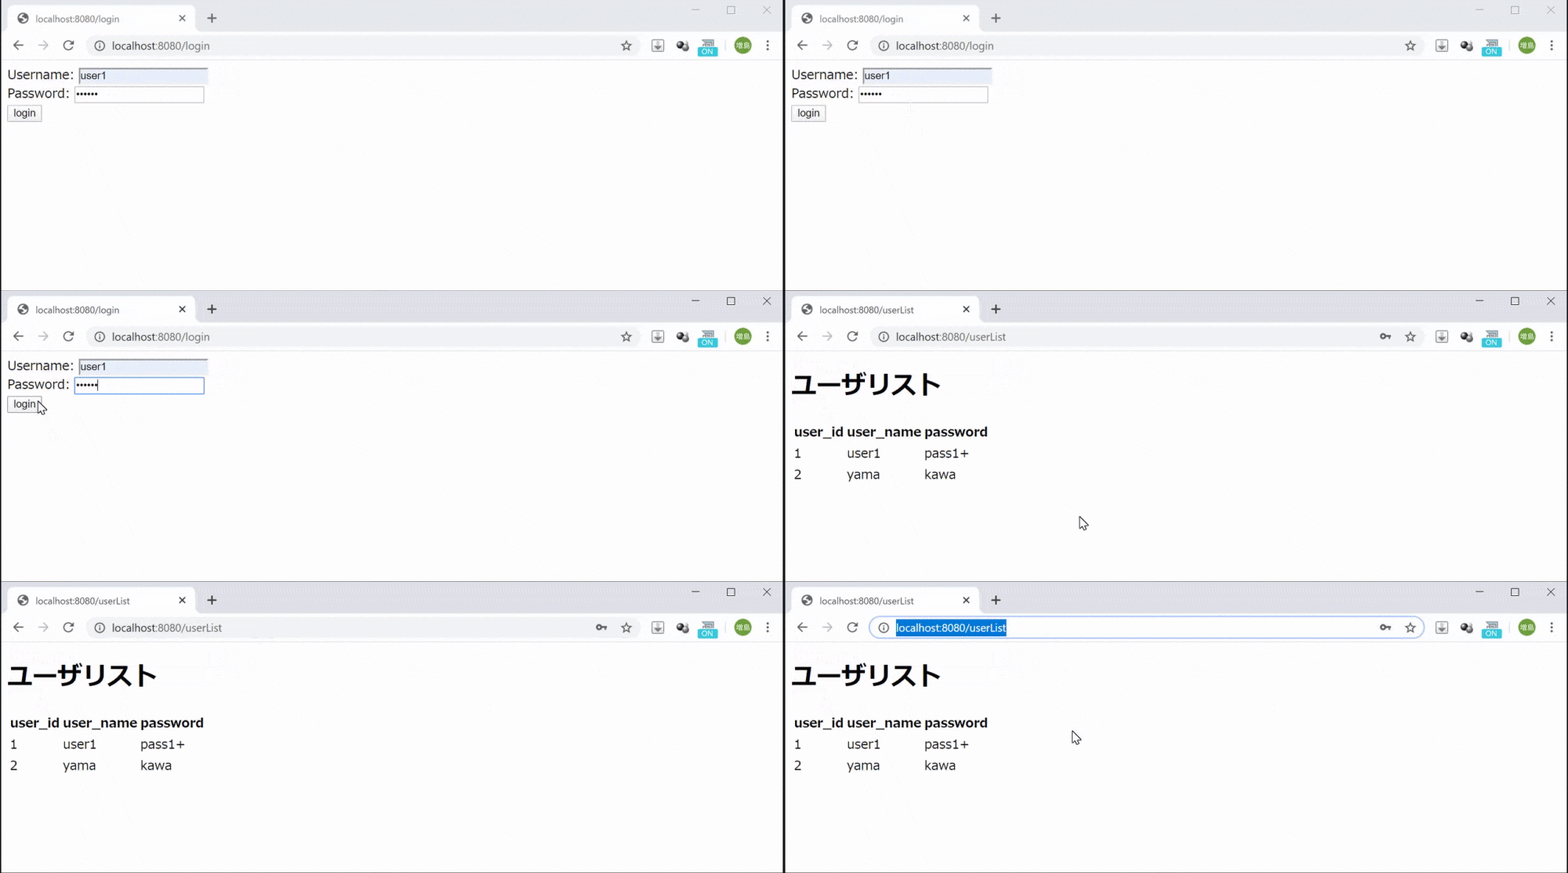
次に正規のユーザとパスでログインします。今回はユーザを2つ(user1, pass1+)(yama, kawa)作成してありますがどちらでもOKです。
・上のイメージの様に動いていたらOKです。
まとめ
これで以上になります。長らくお付き合いありがとうございました。認証機能、MySQLの使い方は何とか理解できたかと思います。私自身まだ理解しきれていないところもあるので間違っていたり、足りない記述がありましたら是非コメント下さい![]()
感想として正直Rails上がりと言うのもあり、少しなめていました。と言うのもRailsにはdeviceがあったのでログイン機能の実装には苦労しなかったからです。SpringSecurityは桁違いに難しかったです...
いろいろ記事を探し回ったのですが、これ本当に理解できて、まとめている人いるのかなぁ?と感じています。
今回理解仕切れてない状態で投稿する事に迷いましたが、自分と同じ様に悩んでる人の為にも早く投稿したかったのでこのような状態で投稿させていただきました!
自分もまだまだなのでもっとスキル磨きたいと思います!ありがとうございました。
