はじめに
おじさんは日夜頑張って報われない仕事をしているのですが、これが何度も挑戦してもうまくできなくて貴重な人生の時間をつぶしていました。それは、、、「RasPiをアクセスポイントにし、ノートPCやスマホからRasPiを操作する」です。まだ、できていません。。
今回、RasPiをアクセスポイントにするOSSがあり、本当に簡単にできたので紹介しておきます。また、関連する内容として、wlanの設定の確認のメモも書いておきます。
(修正) RasAPを使った生地を最初書きましたが、その後、もっと簡単にできる方法(Network Manager, nmcliの利用方法)が分かりました。記事を修正しましたが、もとのRaspAPの部分は残しておきます。
内容
GUIでの設定
Raspberry Pi OSでデスクトップ画面を開いている場合、最も簡単なのは画面右上にあるWiFIネットワークに関する設定を利用する方法です。"Advanced Options" から "Create Wi-Fi Hotspot" を選択します。network name, WI-FI security, Password を設定します。
CUIでの設定
Network Manager (nmcli)を用いて下記でできます。device で wifi を指定し、hotspot でモードでwlan0 というインターフェイスを動かします。
$ sudo nmcli device wifi hotspot ifname wlan0 ssid "myhotspot" password "mypassword"
設定したネットワーク接続 myhotspot をシステム起動時やネットワークを利用可能になった時に自動的に接続するように設定します。
$ sudo nmcli connection modify myhotspot autoconnect yes
設定の確認。
$ sudo nmcli connection show
参考情報(他の方法)
RaspAPでアクセスポイントにする
RaspAPというものが存在するようです。ありがたや、ありがたや。
RasPiとノートPCとモニターが手元にある環境で作業しました。
インストール
下記でインストールできました。最後 bash 以下でオプションを指定し、途中でY/nを答えることなく最後まで設定されます。
sudo apt-get update
sudo apt-get dist-upgrade
sudo reboot
curl -sL https://install.raspap.com | bash -s -- --yes --openvpn 1 --adblock 0
このinstall loader のオプションの説明はこちらのございます。
https://docs.raspap.com/quick/
設定と接続確認
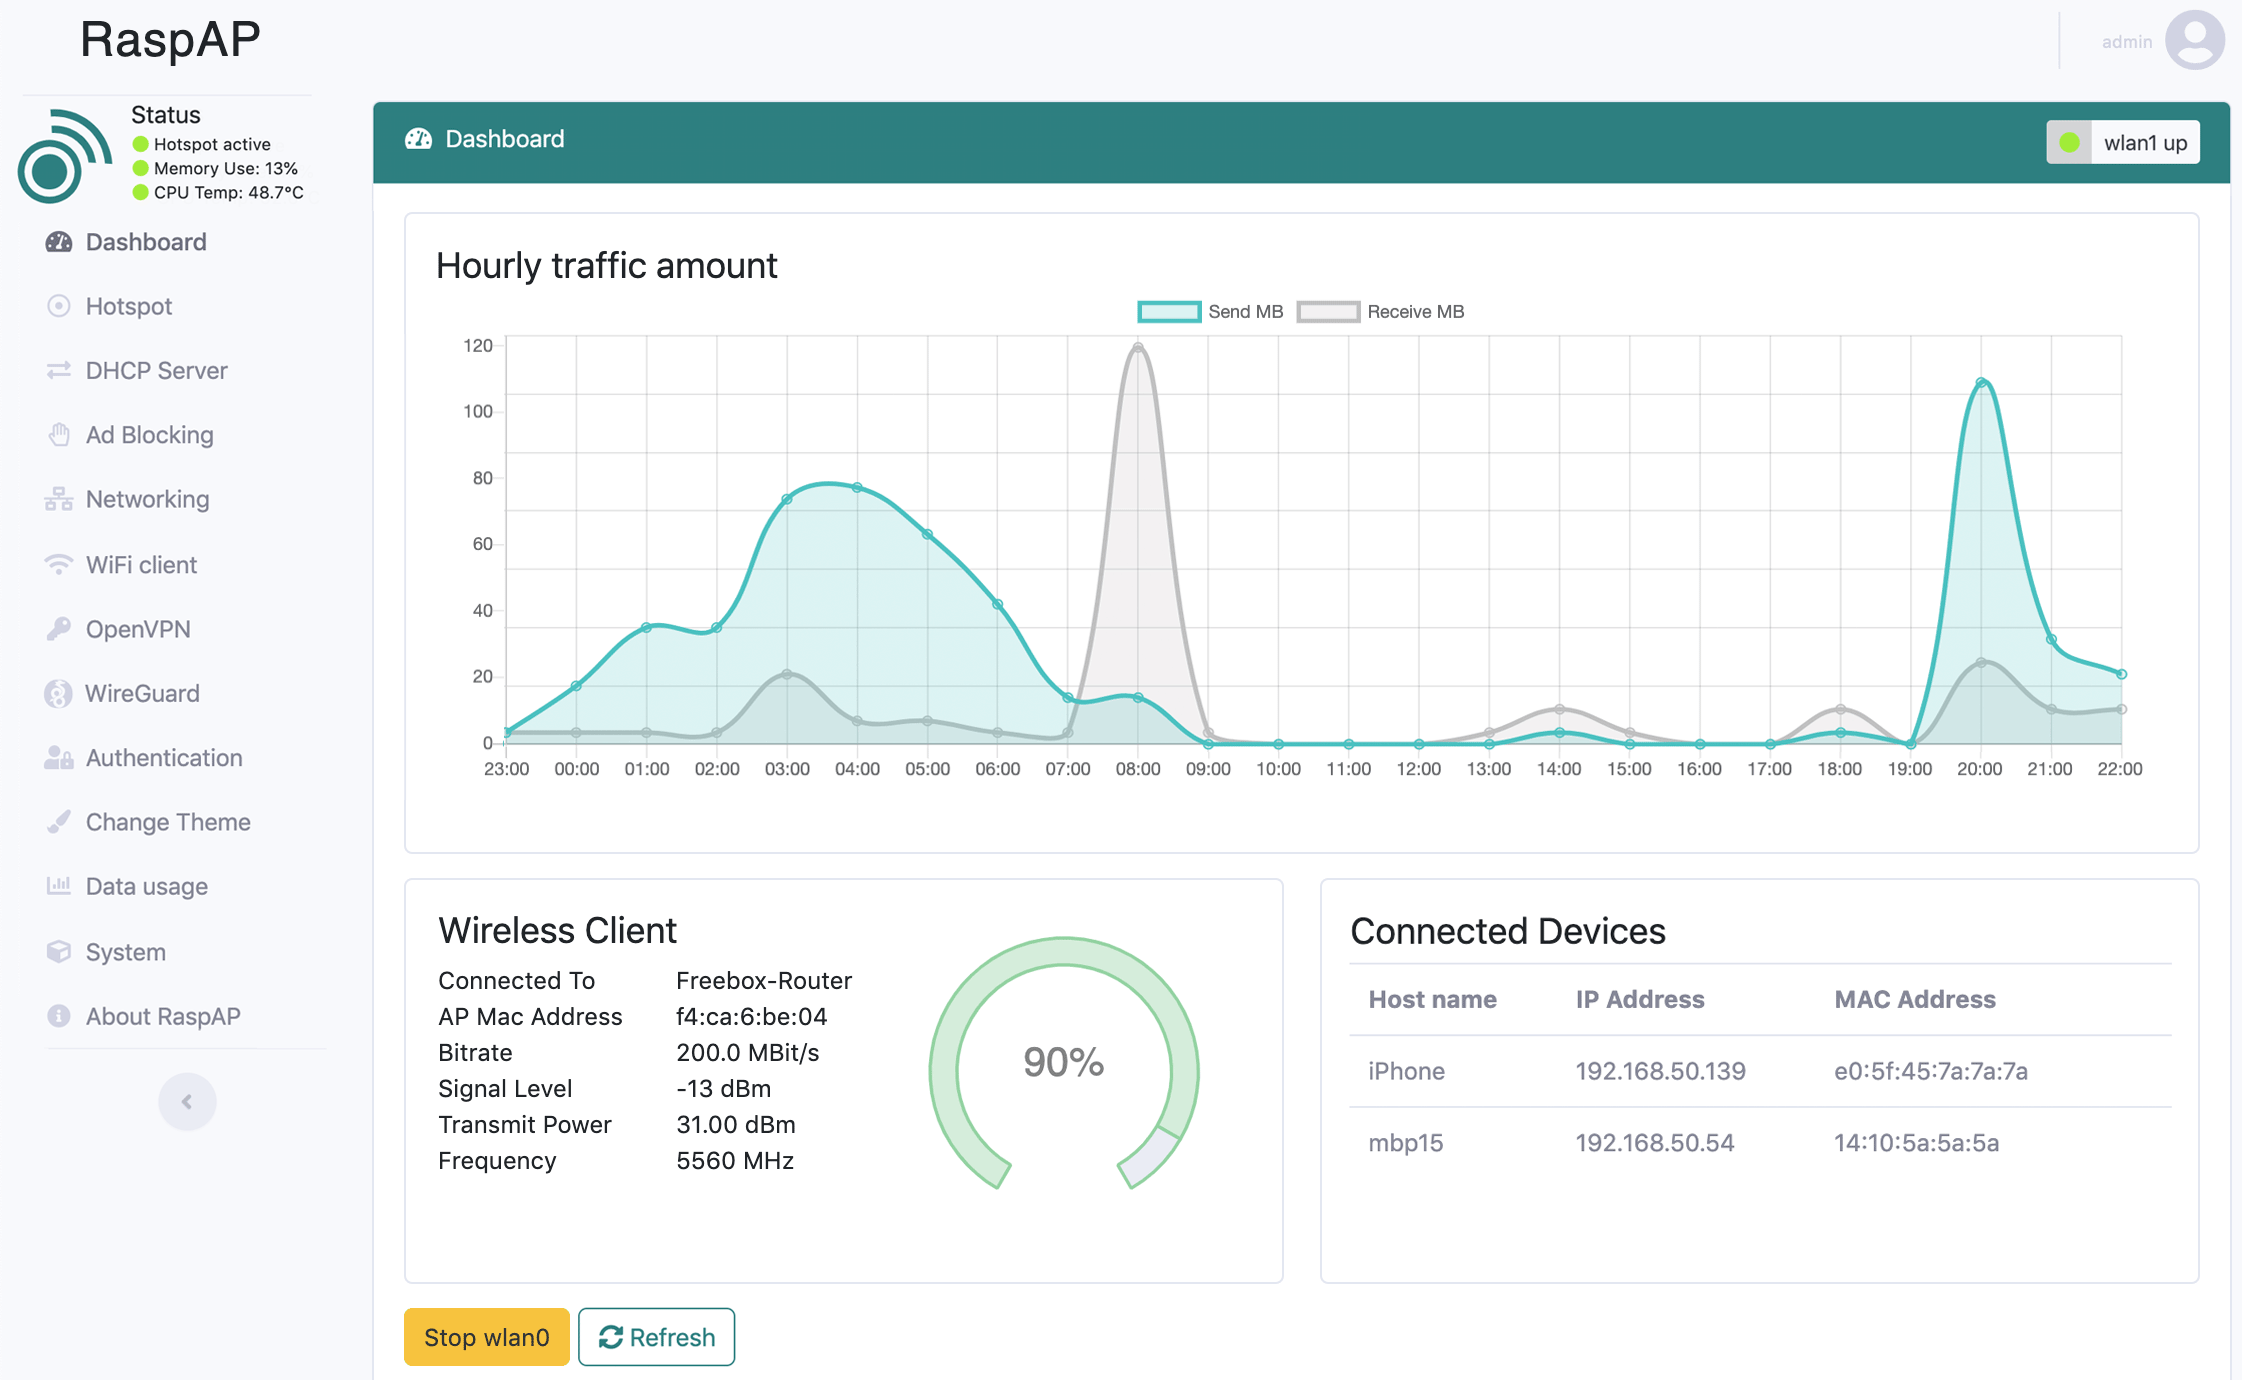
今、おいらはRasPiをモニターにつないでいるので、そのまま http://localhost をブラウザで開きました。
下記は、全てこのWebUIから全て行いました。デフォルトで、user: admin, password:secret のBasic認証で接続できたと思います。
- SSIDの変更 (default: RaspAP-webgui)
- channel 番号の設定(default: 1)
- PSK: "hotspot"の項目で "Security"タブを開くとPSKを編集できます。
"start hotspot" のボタンを押してみると、何かが立ち上がり、Hstspotの画面の右上が hstapt up が緑色になりました。
次に、ノートPC側でWiFi接続先を、今用意したAPに変更します。要求されるパスワードは "ChangeMe"です。無事に接続できると、IPアドレスが降られているはずです。コマンドプロンプトでIPアドレスを確認してみました。
Wireless LAN adapter Wi-Fi:

   接続固有の DNS サフィックス . . . . .:
   リンクローカル IPv6 アドレス. . . . .: fe80::52e0:d21d:add6:5bc9%3
   IPv4 アドレス . . . . . . . . . . . .: 10.3.141.108
   サブネット マスク . . . . . . . . . .: 255.255.255.0
   デフォルト ゲートウェイ . . . . . . .: 10.3.141.1
この状態で、GetewayにもなっているRasPiのアドレス http://10.3.141.1 をブラウザで開くと、同じように管理画面を開けます。また、"ssh pi@10.3.141.1" でログインもできました。
systemctl で raspapd の制御
再起動したとき、動いていると思います。サービス?として動いているのを確認できます。
$ sudo systemctl status raspapd
systemctl stop raspapd.service で停止することも、systemctl disable raspapd.service として起動しないようにすることもできるようです。
Access point にするためのrouting設定
ここまでの状態では
(internet) <---> eth0 [RasPi] wlan0 <---
という感じでeth0からは外のインターネットに接続できる一方で、wlan0は外から接続を求めてくるスマホなどにIPアドレスを割り振りRasPiにはアクセスできます。が、wlan0からeth0経由で外のインターネットにはいけませんでした。
この掲示板を情報に、以下の設定を行うとできるようになりました。
IPv4 forwarding を有効にする。
(1) まず/etc/sysctl.conf で下記を有効にします。初期設定ではコメントアウトされていたので、uncomment します。
net.ipv4.ip_forward=1
と編集して
$ sudo sysctl -p
(2) 下記を実行して転送するようにします。
$ sudo iptables -t nat -A POSTROUTING -o eth0 -j MASQUERADE
$ sudo iptables -A FORWARD -i eth0 -o wlan0 -m state --state RELATED,ESTABLISHED -j ACCEPT
$ sudo iptables -A FORWARD -i wlan0 -o eth0 -j ACCEPT
$ sudo netfilter-persistent save
wlan設定の確認
こちらの公式ドキュメントを参考にしています。
APをスキャンする
自宅に設定したWiFiルータにつなげたい、とかするとき、アクセスポイントが見えているかを確認できます。
pi@raspberrypi:~ $ sudo iwlist wlan0 scan | grep ESSID
                    ESSID:"Family Room TV.v,"
                    ESSID:"0C67XXXXXXXX-5G"
                    ESSID:"F660A-xxxx-G"
                    ESSID:"USPOT_xxxxxxxx_5.0G"
                    ESSID:"aterm-xxxxxx-g"
                    ESSID:"E81XXXXXXXX-2G"
                    ESSID:"TP-Link_XXXX"
                    ESSID:"pr500m-xxxxxx-3"
                    ESSID:"BCW720J-XXXXX-G"
                    ESSID:"SPWH_H32_XXXXXXX"                    ESSID:"\x00\x00\x00\x00\x00\x00\x00\x00\x00\x00\x00\x00\x00\x00\x00\x00\x00\x00\x00\x00\x00\x00\x00\x00\x00\x00\x00\x00\x00\x00"
                    ESSID:"TownWiFi"00001240
接続するには、パスワードを書かなくてはいけません。暗合するには
$ sudo su -
# wpa_passphrase your_ssid password >> /etc/wpa_supplican/wpa_supplicant.conf
$ sudo nano /etc/wpa_supplicant/wpa_supplicant.conf
で行えるようです。最後のファイル編集は、暗号化されていない passwordの行を削除するためのものです。
さて、下記でwlan0で取れているIPアドレスはこちらでも確認できるのかな?
pi@raspberrypi:~ $ arp -a
? (172.20.10.1) at <不完全> on wlan0
? (192.168.3.1) at 0c:67:00:00:00:00 [ether] on eth0
? (192.168.3.7) at 7c:2a:00:00:00:00 [ether] on eth0
固定IPアドレスを割り当てに成功しているようです。
pi@raspberrypi:~ $ ifconfig wlan0
wlan0: flags=4163<UP,BROADCAST,RUNNING,MULTICAST>  mtu 1500
        inet 172.20.10.10  netmask 255.255.0.0  broadcast 172.20.255.255
        inet6 fe80::e65f:1ff:0000:0000  prefixlen 64  scopeid 0x20<link>
        inet6 2400:2410:a9c1:b100:e65f:1ff:fea8:ab63  prefixlen 64  scopeid 0x0<global>
        ether e4:5f:01:00:00:00  txqueuelen 1000  (イーサネット)
        RX packets 51281  bytes 15158782 (14.4 MiB)
        RX errors 0  dropped 0  overruns 0  frame 0
        TX packets 98580  bytes 22841830 (21.7 MiB)
        TX errors 0  dropped 0 overruns 0  carrier 0  collisions 0
WiFiをリセットする
よくWiFiをオフにして、再度オンにするとかやりますよね。同じことを行いたいと思いました。
$ wpa_cli -i wlan0 reconfigure
OK
また、昔はifdownやifupのコマンドを使っていましたが、今では下記で行うようです。
$ sudo ifconfig wlan0 down
$ sudo ifconfig wlan0 up
とするようです。これ、忘れて何度も調べています。人生の時間の無駄だった。
IPアドレスの固定、動的取得
dhcpdがなくては。
$ sudo apt install dhcpcd
以前は /etc/network/interfaces に書いたが、現在は/etc/dhcpcd.confに書くらしい。
interface wlan0
static ip_address=192.168.2.10/24
static routers=192.168.0.1 # default gateway
static domain_name_servers=192.168.0.1 # DNS server
hostapd
まずはインストールする。
$ sudo apt install hostapd
設定ファイルを編集します。
$ sudo nano /etc/hostapd/hostapd.conf
これを参照するのように編集します。
...
DAEMON_CONF="/etc/hostapd/hostapd.conf"
そして、$ sudo systemctl restart hostapdでサービスを起動させるようです。
参考にしたサイト
https://blog.soracom.com/ja-jp/2022/10/31/how-to-build-wifi-ap-with-
bridge-by-raspberry-pi/
SSL Certificateを追加する
HTTPSを自分で発行した証明書で行うために、追加の作業が必要です。下記を参照。
mkcertによる証明書の作成とlighttpd の起動
mkcert というソフト?を使うのですが、manual install と quick install の二つの方法が紹介されています。私はquick の方で行いました。
$ curl -sL https://install.raspap.com | bash -s -- --cert

 888888ba                              .d888888   888888ba
 88     8b                            d8     88   88     8b
a88aaaa8P' .d8888b. .d8888b. 88d888b. 88aaaaa88a a88aaaa8P
 88    8b. 88    88 Y8ooooo. 88    88 88     88   88
 88     88 88.  .88       88 88.  .88 88     88   88
 dP     dP  88888P8  88888P  88Y888P  88     88   dP
                             88
                             dP      version 3.0.9

The Quick Installer will guide you through a few easy steps


RaspAP mkcert: Configure a new SSL certificate
Current system hostname is raspberrypi
Create an SSL certificate for raspberrypi.local? (Recommended) [y/N]y
Install to lighttpd SSL directory: /etc/lighttpd/ssl? [y/N]: y
***************************************************************
A new SSL certificate for: raspberrypi.local
will be installed to lighttpd SSL directory: /etc/lighttpd/ssl
***************************************************************
Complete installation with these values? [y/N]: y
RaspAP mkcert: Fetching mkcert binary
RaspAP mkcert: Installing mkcert
Created a new local CA at "/home/pi/.local/share/mkcert" 💥
The local CA is now installed in the system trust store! ⚡️
Warning: "certutil" is not available, so the CA can't be automatically installed in Firefox and/or Chrome/Chromium! ⚠️
Install "certutil" with "apt install libnss3-tools" and re-run "mkcert -install" 👈

RaspAP mkcert: Generating a new certificate for raspberrypi.local
Using the local CA at "/home/pi/.local/share/mkcert" ✨
Warning: the local CA is not installed in the Firefox and/or Chrome/Chromium trust store! ⚠️
Run "mkcert -install" to avoid verification errors ‼️

Created a new certificate valid for the following names 📜
 - "raspberrypi.local"
 - "*.raspberrypi.local.local"
 - "raspberrypi.local"

Reminder: X.509 wildcards only go one level deep, so this won't match a.b.raspberrypi.local.local ℹ️

The certificate is at "./raspberrypi.local+2.pem" and the key at "./raspberrypi.local+2-key.pem" ✅

RaspAP mkcert: Combining private key and certificate
OK
RaspAP mkcert: Creating SLL directory for lighttpd
OK
RaspAP mkcert: Setting permissions and moving .pem file
OK
RaspAP mkcert: Configuring lighttpd for SSL
Adding line server.modules += ("mod_openssl")
Adding line $SERVER["socket"] == ":443" {
Adding line ssl.engine = "enable"
Adding line ssl.pemfile = "/etc/lighttpd/ssl/raspberrypi.local.pem"
Adding line ssl.ca-file = "/home/pi/.local/share/mkcert/rootCA.pem"
Adding line server.name = "raspberrypi.local"
Adding line server.document-root = "/var/www/html"}
OK
RaspAP mkcert: Copying rootCA.pem to RaspAP web root
OK
RaspAP mkcert: Restarting lighttpd service
...
***************************************************************
Open a browser and enter the address: http://raspberrypi.local/rootCA.pem
Download the root certificate to your client and add it to your system keychain.
Note: Be sure to set this certificate to 'Always trust' to avoid browser warnings.
Finally, enter the address https://raspberrypi.local in your browser.
Enjoy an encrypted SSL connection to RaspAP 🔒
For advanced options, run mkcert -help
***************************************************************
PEMファイル/etc/lighttpd/ssl/raspberrypi.local.pem ルートCA証明書 /home/pi/.local/share/mkcert/rootCA.pem が作るようです。そして lighttpd というサービスが起動するようです。設定ファイル類は、/etc/lighttpd/にあります。
私はここに書かれているようにブラウザ経由でrootCA.pem を持ってくれなかったので、/var/www/html/rootCA.pem を scp で持ってきました。
ルートCA証明書のインストール
独自証明書のインストール方法を調べ、インストールしました。
https://qiita.com/msi/items/9cb90271836386dafce3
https://www.incredigeek.com/home/import-cert-pem-on-windows/
https://www.furukawa.co.jp/fitelnet/product/setting/pdf/l2tpv2_rsa_Windows10_certificate.pdf
まとめ
とりあえず、RaspAPでRasPiを起動直後にアクセスポイントにする、という目的は達成できていました。がいくつか課題があり、
- 起動しているのに、ノートPCからAPとして接続しようとしてもできない。(IPアドレスが割り振られない)という状態がある
- もとのWiFiの設定の戻せない。。
まぁ、どうしようか、、、という感じです。そのほか、気になるのはDocker での利用。
まぁ、何とかなるでしょう。生きてさえいれば。
(2024/2/12)
[追記]
- 「SSL Certificateを追加する」の節を追加しました(2024/3/7)
- IPv4 forwarding の設定方法を追記しました。(2024/8/19)
- RaspAPの方法を参考歳、nmcli(Network Manager)を利用する方法を書きました。(2024/11/4)
