独自の root CA 証明書をインストールする必要があり、まとめました。
色々とツールやアプリケーションを使っていると「OS に設定すればひと安心」というわけにはいかず、OS の設定に加えて、それぞれ個別に設定する必要があるものが少なくありません。
この記事では、以下の環境、ツールへの独自 root CA 証明書を設定する方法を記載します。
- Ubuntu (18.04)
- Red Hat / CentOS (7)
- Python - certifi/requests/ssl
- Mozilla Firefox
- Mozilla Thunderbird
- Windows 10
- Splunk
Ubuntu (18.04)
-
/usr/share/ca-certificates/の下に適当な(いい加減な、という意味ではなく)ディレクトリを作成します。
ここでは、mylocal とします。(以下、/usr/share/ca-certificates/mylocal/とする)
ディレクトリは管理組織単位などでまとめるためのもの。
(おそらく、mozilla/というディレクトリがあると思われますが、これは触らない)
ディレクトリは無くても構いませんが、ローカルなものは、ディレクトリでまとめた方が、後々、管理しやすいと思います。 -
作成したフォルダ mylocal の下に、証明書ファイルを置きます。
ここでは、mylocal-root-cacert.crt とします。(/usr/share/ca-certificates/mylocal/mylocal-root-cacert.crt) -
/etc/ca-certificates.confに、追加したファイルの/usr/share/ca-certificates/下の相対パスを追加します。
つまり、上の例では、 "mylocal/mylocal-root-cacert.crt" を追加します。 -
update-ca-certificates(/usr/sbin/update-ca-certificates) を実行します。 -
/etc/ssl/certs/下に/usr/share/ca-certificates/mylocal/mylocal-root-cacert.crt へのシンボリックリンクができていることを確認してください。
# cd /usr/share/ca-certificates
# mkdir mylocal
# cp somewhere/mylocal-root-cacert.crt mylocal/
# cp -p /etc/ca-certificates.conf /etc/ca-certificates.conf.bak
# echo "mylocal/mylocal-root-cacert.crt" >> /etc/ca-certificates.conf
# update-ca-certificates
# ls -l /etc/ssl/certs/ | grep mylocal-root-cacert
余談ですが、これが正しく行われると、CA bundle としてすべての CA 証明書が含まれる /etc/ssl/certs/ca-certificates.crt が作成されているので、必要に応じて、これを参照すると良いでしょう。例えば、python の requests() の引数に CA Bundle のパスを指定するような場合です。
update-ca-certificates が自動的に /etc/ssl/certs/ca-certificates.crt をアップデートするので、独自に追加するのは、厳禁です。
Red Hat / CentOS (7)
参照: Red Hat Enterprise Linux 7 | Red Hat Customer Portal - 共有システムの証明書の使用
/usr/share/pki/ca-trust-source/anchors/ 下に証明書ファイルを置き、update-ca-trust を実行します。
# cp somewhere/mylocal-root-cacert.crt /usr/share/pki/ca-trust-source/anchors/
# update-ca-trust
# ls -l /etc/pki/ca-trust/extracted/openssl/
/etc/pki/ca-trust/source/anchors/ 下でも同様です。
/usr/share/pki はバックワードコンパチビリティのためにあり、/etc/share/pki の設定が優先されます。
どちらにも設定されるように、ここでは /usr/share/pki/ca-trust-source/anchors/ 下に証明書を設置しています。
現在は、update-ca-trust に引数を与えても無視されますが、スクリプトの中を覗くと、コメントに将来的に "update-ca-trust extract" をサポートするとの記述があります。
# !/bin/sh

# set -vx

# At this time, while this script is trivial, we ignore any parameters given.
# However, for backwards compatibility reasons, future versions of this script must
# support the syntax "update-ca-trust extract" trigger the generation of output
# files in $DEST.

DEST=/etc/pki/ca-trust/extracted

# OpenSSL PEM bundle that includes trust flags
# (BEGIN TRUSTED CERTIFICATE)
/usr/bin/p11-kit extract --comment --format=openssl-bundle --filter=certificates --overwrite $DEST/openssl/ca-bundle.trust.crt
/usr/bin/p11-kit extract --comment --format=pem-bundle --filter=ca-anchors --overwrite --purpose server-auth $DEST/pem/tls-ca-bundle.pem
/usr/bin/p11-kit extract --comment --format=pem-bundle --filter=ca-anchors --overwrite --purpose email $DEST/pem/email-ca-bundle.pem
/usr/bin/p11-kit extract --comment --format=pem-bundle --filter=ca-anchors --overwrite --purpose code-signing $DEST/pem/objsign-ca-bundle.pem
/usr/bin/p11-kit extract --format=java-cacerts --filter=ca-anchors --overwrite --purpose server-auth $DEST/java/cacerts
設定した信頼済み CA 証明書の管理は trust コマンドで行います。
$ trust
usage: trust command <args>...

Common trust commands are:
  list             List trust or certificates
  extract          Extract certificates and trust
  extract-compat   Extract trust compatibility bundles
  anchor           Add, remove, change trust anchors
  dump             Dump trust objects in internal format

See 'trust <command> --help' for more information
trust コマンドを用いることで、設定済み CA の削除、変更ができますが、ここでは、省略します。
Python - certifi/requests/ssl
注意!!: OS の設定を確認してから、Python 環境の証明書追加作業をしてください。
python で使われる certifi/requests/ssl モジュールの設定をまとめます。
python - certifi/requests の CA 設定
requests を使用している場合には、certifi パッケージに依存している (requests 2.4 から、certifi を使用しているとのこと。参照: CA Certificates) ので、OS の参照先と異なる場合には、 certifi の CA bundle に追加します。
From Requests version 2.4.0 onwards, Requests will attempt to use certificates from certifi if it is present on the system. This allows for users to update their trusted certificates without having to change the code that runs on their system.
以下のようにして、参照先を確認できます。
$ python3 -c "import certifi; print(certifi.where())"
/etc/ssl/certs/ca-certificates.crt

$ python3 -c "import requests;print(requests.__version__)"
2.22.0

$ python3 -c "import requests; print(requests.certs.where())"
/etc/ssl/certs/ca-certificates.crt
OS の設定(例えば、Ubuntu 18.04 の openssl の場合には、/etc/ssl/certs/ca-certificates.crt) と同じものを参照している場合には、独自に追加する必要はありません。
OS と異なるファイルを参照している場合 (例えば、仮想環境など) には、表示されたパスのファイルに、text 形式の証明書を追加すれば、終了です。
以下の python スクリプトで同じことをしています。
カレントディレクトリにインストール証明書を mylocal-root-cacert.crt という名前で置き、Python スクリプトを実行します。
# !/usr/bin/env python
# -*- coding: utf-8 -*-

import certifi

cabundle = certifi.where()
local_rootCA = 'mylocal-root-cacert.crt'

print( 'read from {}'.format( local_rootCA ) )
with open( local_rootCA, 'rb' ) as infile:
    myrootca = infile.read()

print( 'append to {}'.format( cabundle ) )
with open( cabundle, 'ab' ) as outfile:
    outfile.write( myrootca )

print( '{} has been imported.'.format( local_rootCA ) )
(pythonsample) $ python local_ca_install.py
read from mylocal-root-cacert.crt
append to /home/.../envs/pythonsample/lib/python3.6/site-packages/certifi/cacert.pem
mylocal-root-cacert.crt has been imported.
(pythonsample) $
python - ssl の設定
ssl モジュールの参照先を確認します。
参照先のディレクトリが違っても、シンボリックリンクで、requests/certifi と同じ実体のディレクトリ/ファイルを参照していることがありますので、参照先も確認します。
$ python3 -c "import ssl; print(ssl.get_default_verify_paths())"; (set -x; ls -l /usr/lib/ssl)
DefaultVerifyPaths(cafile=None, capath='/usr/lib/ssl/certs', openssl_cafile_env='SSL_CERT_FILE', openssl_cafile='/usr/lib/ssl/cert.pem', openssl_capath_env='SSL_CERT_DIR', openssl_capath='/usr/lib/ssl/certs')
+ ls -l /usr/lib/ssl
total 4
lrwxrwxrwx 1 root root   14 Apr 23  2018 certs -> /etc/ssl/certs
drwxr-xr-x 2 root root 4096 Nov 20 06:52 misc
lrwxrwxrwx 1 root root   20 Nov 13 01:58 openssl.cnf -> /etc/ssl/openssl.cnf
lrwxrwxrwx 1 root root   16 Apr 23  2018 private -> /etc/ssl/private
参照先の実体が異なる場合には、openssl のディレクトリと同じ構成か、CA bundle を参照するように構成します。
python - 環境変数による変更
環境変数によって、参照先を変更できます。
環境変数 REQUESTS_CA_BUNDLE - requests
-
requests を使用する場合は、環境変数
REQUESTS_CA_BUNDLEに CA Bundle (つまり、上の例では/home/.../envs/pythonsample/lib/python3.6/site-packages/certifi/cacert.pemを設定することで、requests() はその CA を参照します。 -
また、環境変数ではありませんが、 requests.get/post の引数として、CA Bundle ファイルのパスを指定することができます( requests.get(..., verify='CA Bundle ファイルへのパス' ) です)。
ただし、パスをハードコードした場合には、汎用性が低くなりますので、注意が必要です。 -
verify を False にするのは最後の手段。一時的なテスト等に留めておくことをおすすめします。
環境変数 SSL_CERT_DIR と SSL_CERT_FILE - ssl
- ssl モジュールで参照している環境変数は
SSL_CERT_DIRとSSL_CERT_FILEです。
(ネットに色々と情報が転がっているものの、SSL_CERT_DIRとSSL_CERT_FILEに関する一次ソースが見つけられませんでした)
Conda/Anaconda 環境
Conda/Anaconda でも同様です。
Anaconda 利用の場合には、conda 環境で、certifi の cabundle に証明書を追加します。
Windows などでは、インストールしている場所によっては、AppData 下など、隠しファイル (フォルダ) の表示が必要になるかもしれません。
python 仮想環境
Python 仮想環境を使用している場合には、それぞれの仮想環境で設定が必要です。
Mozilla Firefox
Microsoft Windows 上の Firefox は、 Microsoft Windows とは別の証明書ストアで管理している (Linux, MacOS では未確認) ので、Microfoft Windows への証明書の設定とは別に、管理が必要です。(未確認ですが、プロファイルごとに設定する必要があると思われます)
[オプション] - [プライバシーとセキュリティ] - 「証明書」- [証明書を表示...(C)] - [認証局証明書] - [インポート(M)...] で、証明書の読み込みです。
Firefox を使っている方なら、この説明で十分でしょう。
Firefox: How to audit & reset the list of trusted servers/CAs - Red Hat Customer Portal
Mozilla Thunderbird
Thunderbird は、Microsoft Windows とは別の証明書ストアで管理している (Linux, MacOS では未確認) ので、Microfoft Windows への証明書の設定とは別に、管理が必要です。(未確認ですが、プロファイルごとに設定する必要があると思われます)
[オプション] - [詳細] - [証明書](タブ) - [証明書を管理(M)] - [認証局証明書] - [インポート(M)...] で、証明書の読み込みです。
Thunderbird を使っている方なら、この説明で十分でしょう。
Windows 10
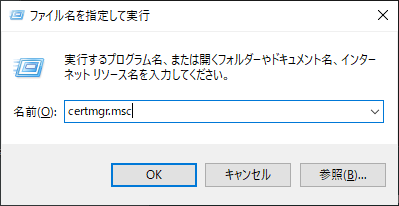
Windowsキーを 押しながら、"R" キーを押します。
「ファイル名を指定して実行」ダイアログが現れるので、certmgr.msc と入力して実行します。
(UAC (ユーザアクセス制御) ダイアログが表示された場合は、「はい」を選択して、実行します。)
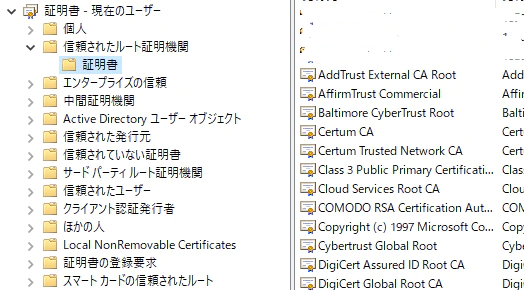
「証明書 - 現在のユーザー」が表示されます。
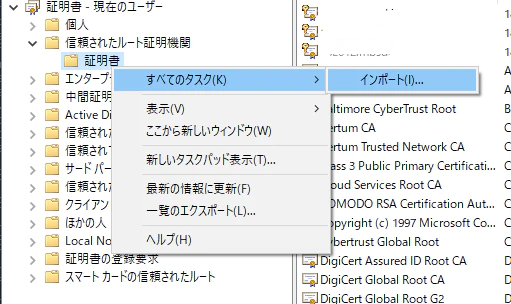
「信頼されたルート証明機関」-「証明書」を右クリックして、「すべてのタスク」-「インポート...」をクリックします。
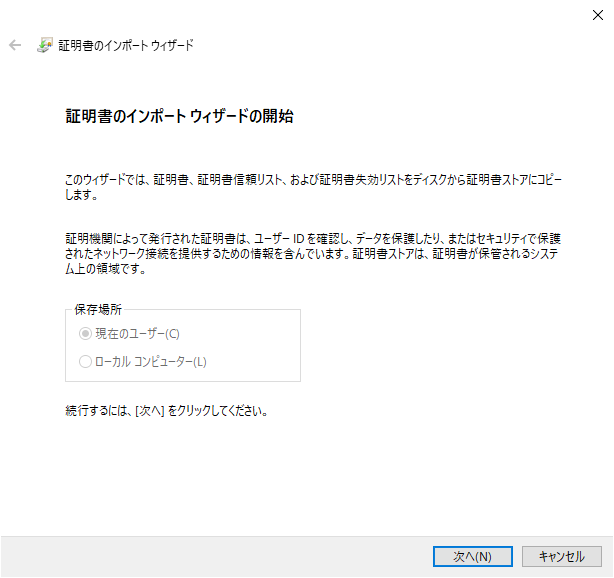
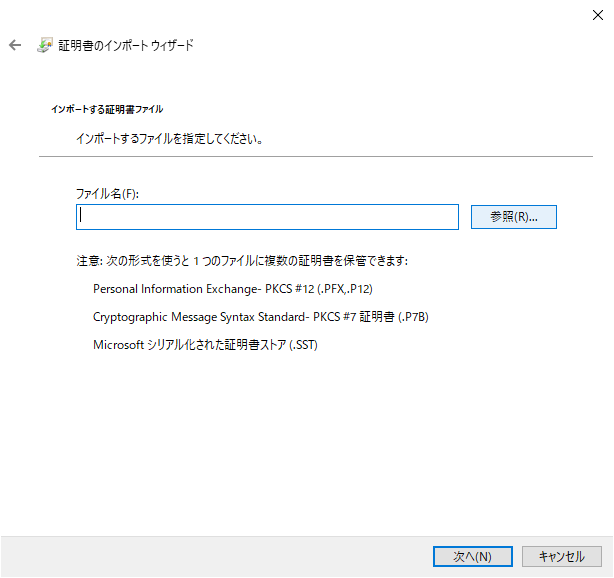
証明書のインポートウィザードのダイアログが表示されますので、ウィザードに従って、証明書をインポートします。
[次へ] をクリックし、読み込む証明書を [参照] で選択します。
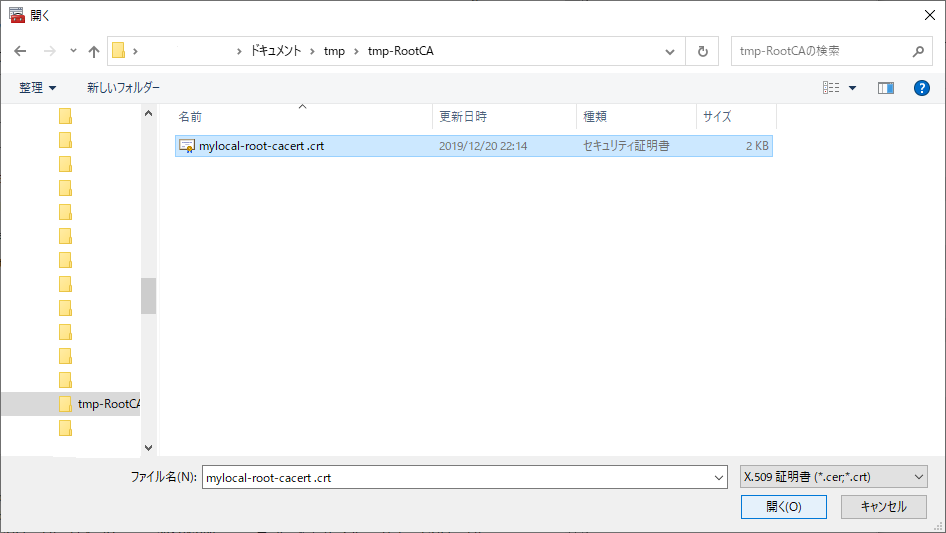
証明書を選択し、[開く]をクリックします。もとのウィンドウに戻りますので、[次へ] をクリックします。
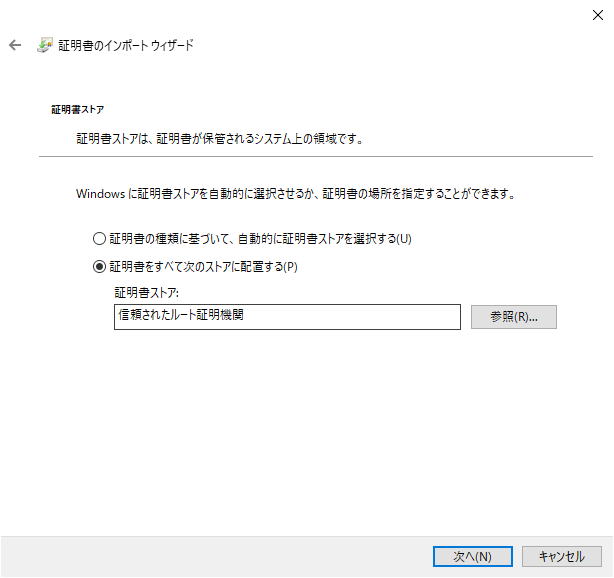
「証明書ストア」の選択では、「証明書をすべて次のストアに配置する」を選択し、プルダウンメニューから「信頼されたルート証明機関」を選びます。[次へ] をクリック。
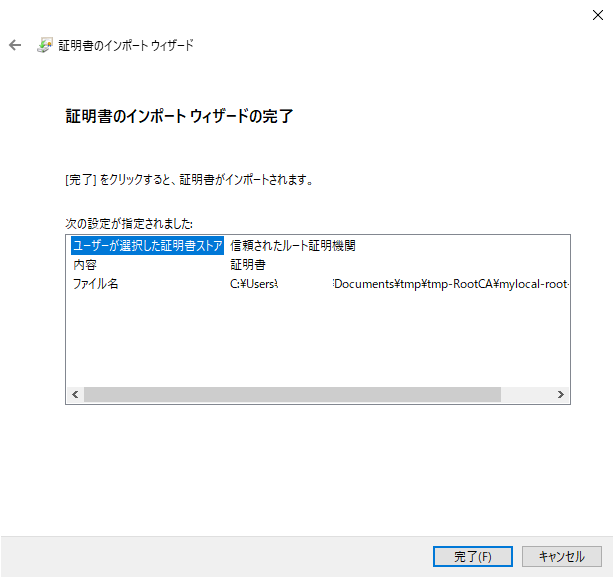
確認画面になりますので、間違いがなければ、[完了] をクリックします。
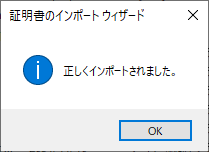
「正しくインポートされました」と表示されれば、終了です。
不要になった、certmgr は閉じてください。
余談ですが、ローカルな環境でリモートデスクトップを利用する際に警告が出る場合の証明書も、表示させてそのままインポートするのではなく、一旦、ファイルにエクスポートして、上の方法で設定することで、警告が出なくなります。
(理由はわかっていませんが、警告ダイアログから証明書を表示させて、そのままインポートさせても警告が消えないことがありました)
Splunk
Splunk では、SSL 通信については、以下の設定を行う必要があります。
- Splunk Apps の(python)環境設定
- Splunk がクライアントとなって外部サーバに接続に行く場合の設定
- Splunk が提供する SSL の設定
3番目の設定は、ここでは省略します。
Splunk Apps の(python)環境設定
以下の例では、SPLUNK_HOMOE=/opt/splunk です。
$ /opt/splunk/bin/splunk cmd python -c "import requests; print(requests.certs.where())"
/opt/splunk/lib/python2.7/site-packages/certifi/cacert.pem
$ /opt/splunk/bin/splunk cmd python -c "import certifi; print(certifi.where())"
/opt/splunk/lib/python2.7/site-packages/certifi/cacert.pem
$
$ /opt/splunk/bin/splunk cmd python3 -c "import requests; print(requests.certs.where())"
/opt/splunk/lib/python3.7/site-packages/certifi/cacert.pem
$ /opt/splunk/bin/splunk cmd python3 -c "import certifi; print(certifi.where())"
/opt/splunk/lib/python3.7/site-packages/certifi/cacert.pem
$
今後は、Python3 に移っていくことになると思いますが、しばらくは既存の App が python2 に依存しているので、python2 についても考慮が必要です。
Apps によっては、独自に site-packages に cacert.pem を持っていて参照しているものがありますので、これらにも対応する必要があります。
$ (cd /opt/splunk; sudo find . -name cacert.pem -ls)
 49024396    276 -r--r--r--   1 splunk   splunk     282085  6月 16  2019 ./lib/python2.7/site-packages/certifi/cacert.pem
 48893114    268 -r--r--r--   1 splunk   splunk     271088  8月  9 03:32 ./lib/python2.7/site-packages/botocore/cacert.pem
 49024315    268 -r--r--r--   1 splunk   splunk     271088  8月  9 03:32 ./lib/python2.7/site-packages/botocore/vendored/requests/cacert.pem
 49155480    276 -r--r--r--   1 splunk   splunk     282085  6月 16  2019 ./lib/python3.7/site-packages/certifi/cacert.pem
 49026412    268 -r--r--r--   1 splunk   splunk     271088  8月  9 03:32 ./lib/python3.7/site-packages/botocore/cacert.pem
 49155400    268 -r--r--r--   1 splunk   splunk     271088  8月  9 03:32 ./lib/python3.7/site-packages/botocore/vendored/requests/cacert.pem
 39325129      4 -rw-------   1 splunk   splunk       1265  8月  9  2018 ./etc/auth/cacert.pem
 41816513    344 -rw-r--r--   1 splunk   splunk     348799  2月 20  2019 ./etc/apps/splunk_app_addon-builder/bin/splunk_app_add_on_builder/requests/cacert.pem
 41943696    344 -rw-r--r--   1 splunk   splunk     348799  2月 20  2019 ./etc/apps/splunk_app_addon-builder/bin/ta_generator/resources_lib/requests/cacert.pem
 40370693    304 -rw-r--r--   1 splunk   splunk     308434  9月 18  2018 ./etc/apps/Splunk_SA_Scientific_Python_linux_x86_64/bin/linux_x86_64/lib/python2.7/site-packages/pip/_vendor/requests/cacert.pem
 40371155    340 -rw-r--r--   1 splunk   splunk     344712  9月 18  2018 ./etc/apps/Splunk_SA_Scientific_Python_linux_x86_64/bin/linux_x86_64/lib/python2.7/site-packages/requests/cacert.pem
$
Splunk がクライアントとなって外部サーバに接続に行く場合の設定
OS に設定を合わせるのであれば、(Ubuntuの場合) /etc/ssl/certs/ca-certificates.crt を参照するのがよいでしょう。
[sslConfig]
sslRootCAPath = /etc/ssl/certs/ca-certificates.crt
公式にどのように設定すべきか、については、記述が見当たりませんでした。(要再調査)
