はじめに
この記事は、
ml-agents/Learning-Environment-Create-New.md at master · Unity-Technologies/ml-agents · GitHub
に従って実際に強化学習のチュートリアルをやってみた、というだけのものです。
実行環境
- macOS Mojave 10.14.5
- Unity 2019.1.4f1
- ML-Agents Beta 0.8.1
ML-Agentsの導入
以下のリンク等を参考にしてML-Agentsを導入してください。
プロジェクトの準備
- Unityで
RollerBallという名前のプロジェクトを作成します。 - ProjectSetting -> Player -> Configuration でScripting Runtime Versionが .NET 4.x Equivalentになっていることを確認します。
-
ml-agents-masterフォルダをコピーしてRollerBall/Assets/にペーストします。
環境の作成
Floorの作成
- Planeの3D Objectを作成し、
Floorという名前を付けます。 -
FloorのTransformをPosition = (0, 0, 0),Rotation = (0, 0, 0),Scale = (1, 1, 1)にします。 -
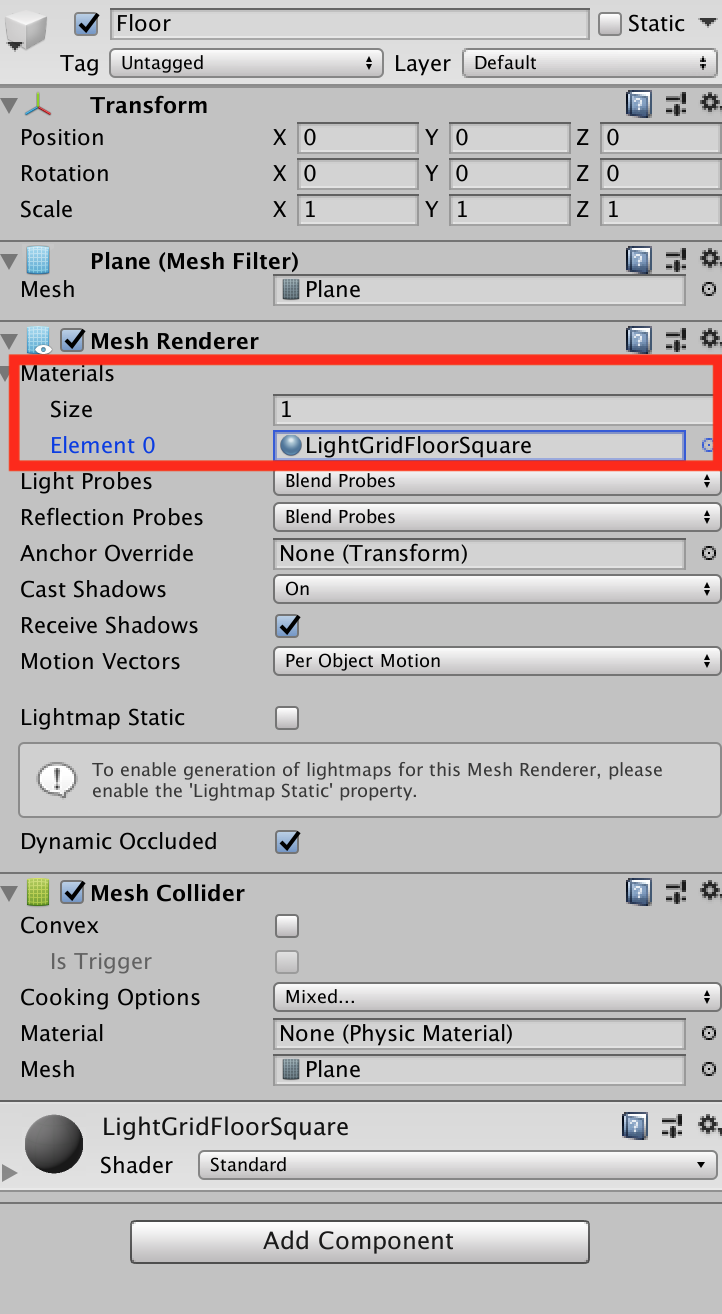
FloorのMesh RendererでMaterialをLightGridFloorSquareに変更します。

Targetの作成
- Cubeの3D Objectを作成し、
Targetという名前を付けます。 -
TargetのTransformをPosition = (3, 0.5, 3),Rotation = (0, 0, 0),Scale = (1, 1, 1)にします。 -
Floorと同様にTargetのMaterialをBlockに変更します。
Agentの作成
- Sphereの3D Objectを作成し、
RollerAgentという名前を付けます。 -
RollerAgentのTransformをPosition = (0, 0.5, 0),Rotation = (0, 0, 0),Scale = (1, 1, 1)にします。 - これまでと同様に
RollerAgentのMaterialをCheckerSquareに変更します。 -
RigidbodyをRollerAgentにAdd Componentします。

Academyの作成
Create Emptyで空のGameObjectを作成し、Academyという名前を付けます。
Academyの実装
- Create -> C# Scriptで
RollerAcademy.csを作成します。 -
RollerAcademy.csをAcademyにAdd Componentします。 -
RollerAcademy.csを次のように編集します。
using MLAgents;

public class RollerAcademy : Academy {

}
Brainの追加
- Assets -> Create -> ML-Agents で
Learning Brainを作成し、RollerBallBrainと名前を付けます。 - 同様にAssets -> Create -> ML-Agentsで
Player Brainを作成し、RollerBallPlayerと名前を付けます。
Agentの実装
- Create -> C# Scriptで
RollerAgent.csを作成し、RollerAgentにAdd Componentします。 -
RollerAgent.csを次のように編集します。
using MLAgents;

public class RollerAgent : Agent
{

}
今回の簡単な状況ではAcademyは使用せずに、Agentにのみ処理を担当させます。
Agentの実装(続き)
RollerAgent.csを次のように編集します。
using UnityEngine;
using MLAgents;

public class RollerAgent : Agent
{
    Rigidbody rBody;
    void Start () {
        rBody = GetComponent<Rigidbody>();
    }

    public Transform Target;
    public override void AgentReset()
    {
        if (this.transform.position.y < 0)
        {
            // If the Agent fell, zero its momentum
            this.rBody.angularVelocity = Vector3.zero;
            this.rBody.velocity = Vector3.zero;
            this.transform.position = new Vector3( 0, 0.5f, 0);
        }

        // Move the target to a new spot
        Target.position = new Vector3(Random.value * 8 - 4,
                                      0.5f,
                                      Random.value * 8 - 4);
    }
}
インスペクタ のTargetにTargetオブジェクトを代入します。
ここでは次のことを行なうための処理を書いています。
-
RollerAgentがTargetに到着した時、Done()を呼び出し、そのターン(エピソード)を終了させる。 -
RollerAgentがTargetに到着した時、Targetをランダムな場所に移動させる。 -
RollerAgentがFloorから落ちた時、そのRollerAgentをFloorの上に戻す。
観測
今回、RollerAgentが集めてRollerBallBrainに送る情報は次のものになります。
-
Targetの位置
AddVectorObs(Target.position); -
RollerAgentの位置
AddVectorObs(this.transform.position); -
RollerAgentの速度(RollerAgentがTargetを通り越したり、Floorから落ちないようにするために必要です)
AddVectorObs(rBody.velocity.x);
AddVectorObs(rBody.velocity.z);
よって情報を集めてRollerBallBrainへ送る処理を担当する、CollectObservations()メソッドは次のようになります。
public override void CollectObservations()
{
    // Target and Agent positions
    AddVectorObs(Target.position);
    AddVectorObs(this.transform.position);

    // Agent velocity
    AddVectorObs(rBody.velocity.x);
    AddVectorObs(rBody.velocity.z);
}
このCollectObservation()メソッドをRollerAgent.csに追加します。
using UnityEngine;
using MLAgents;

public class RollerAgent : Agent
{
    Rigidbody rBody;
    void Start()
    {
        rBody = GetComponent<Rigidbody>();
    }

    public Transform Target;
    public override void AgentReset()
    {
        if (this.transform.position.y < 0)
        {
            // If the Agent fell, zero its momentum
            this.rBody.angularVelocity = Vector3.zero;
            this.rBody.velocity = Vector3.zero;
            this.transform.position = new Vector3(0, 0.5f, 0);
        }

        // Move the target to a new spot
        Target.position = new Vector3(Random.value * 8 - 4,
                                      0.5f,
                                      Random.value * 8 - 4);
    }

    public override void CollectObservations()
    {
        // Target and Agent positions
        AddVectorObs(Target.position);
        AddVectorObs(this.transform.position);

        // Agent velocity
        AddVectorObs(rBody.velocity.x);
        AddVectorObs(rBody.velocity.z);
    }
}
報酬
RollerAgentがTargetに到着した時、RollerAgentにSetReward()メソッドを使って1.0の報酬を与え、Done()メソッドを実行して終了します。
float distanceToTarget = Vector3.Distance(this.transform.position,
                                          Target.position);
// Reached target
if (distanceToTarget < 1.42f)
{
    SetReward(1.0f);
    Done();
}
Floorから落ちた場合もDone()メソッドを実行して終了します。
// Fell off platform
if (this.transform.position.y < 0)
{
    Done();
}
AgentAction()メソッドの作成
以上より、AgentAction()メソッドは次のようになります。
public float speed = 10;
public override void AgentAction(float[] vectorAction, string textAction)
{
    // Actions, size = 2
    Vector3 controlSignal = Vector3.zero;
    controlSignal.x = vectorAction[0];
    controlSignal.z = vectorAction[1];
    rBody.AddForce(controlSignal * speed);

    // Rewards
    float distanceToTarget = Vector3.Distance(this.transform.position,
                                              Target.position);

    // Reached target
    if (distanceToTarget < 1.42f)
    {
        SetReward(1.0f);
        Done();
    }

    // Fell off platform
    if (this.transform.position.y < 0)
    {
        Done();
    }
}
したがって、最終的にRollerAgent.csは次のようになります。
using UnityEngine;
using MLAgents;

public class RollerAgent : Agent
{
    Rigidbody rBody;
    public float speed = 10;

    void Start()
    {
        rBody = GetComponent<Rigidbody>();
    }

    public Transform Target;
    public override void AgentReset()
    {
        if (this.transform.position.y < 0)
        {
            // If the Agent fell, zero its momentum
            this.rBody.angularVelocity = Vector3.zero;
            this.rBody.velocity = Vector3.zero;
            this.transform.position = new Vector3(0, 0.5f, 0);
        }

        // Move the target to a new spot
        Target.position = new Vector3(Random.value * 8 - 4,
                                      0.5f,
                                      Random.value * 8 - 4);
    }

    public override void CollectObservations()
    {
        // Target and Agent positions
        AddVectorObs(Target.position);
        AddVectorObs(this.transform.position);

        // Agent velocity
        AddVectorObs(rBody.velocity.x);
        AddVectorObs(rBody.velocity.z);
    }


    public override void AgentAction(float[] vectorAction, string textAction)
    {
        // Actions, size = 2
        Vector3 controlSignal = Vector3.zero;
        controlSignal.x = vectorAction[0];
        controlSignal.z = vectorAction[1];
        rBody.AddForce(controlSignal * speed);

        // Rewards
        float distanceToTarget = Vector3.Distance(this.transform.position,
                                                  Target.position);

        // Reached target
        if (distanceToTarget < 1.42f)
        {
            SetReward(1.0f);
            Done();
        }

        // Fell off platform
        if (this.transform.position.y < 0)
        {
            Done();
        }
    }
}
Unityエディタ側の設定
-
AcademyのインスペクターのBroadcast HubにRollerBallBrainとRollerBallPlayerを追加します。 -
RollerBallPlayerをRollerAgentのBrainに代入します。 - Decision Intervalを1から10に変更します。
-
TargetGameObjectをTargetに代入します。


RollerBallPlayerとRollerBallBrainのSpace Size(Vector Observation)、Space Type、Space Size(Vector Action)をそれぞれ次のように変更します。


テスト
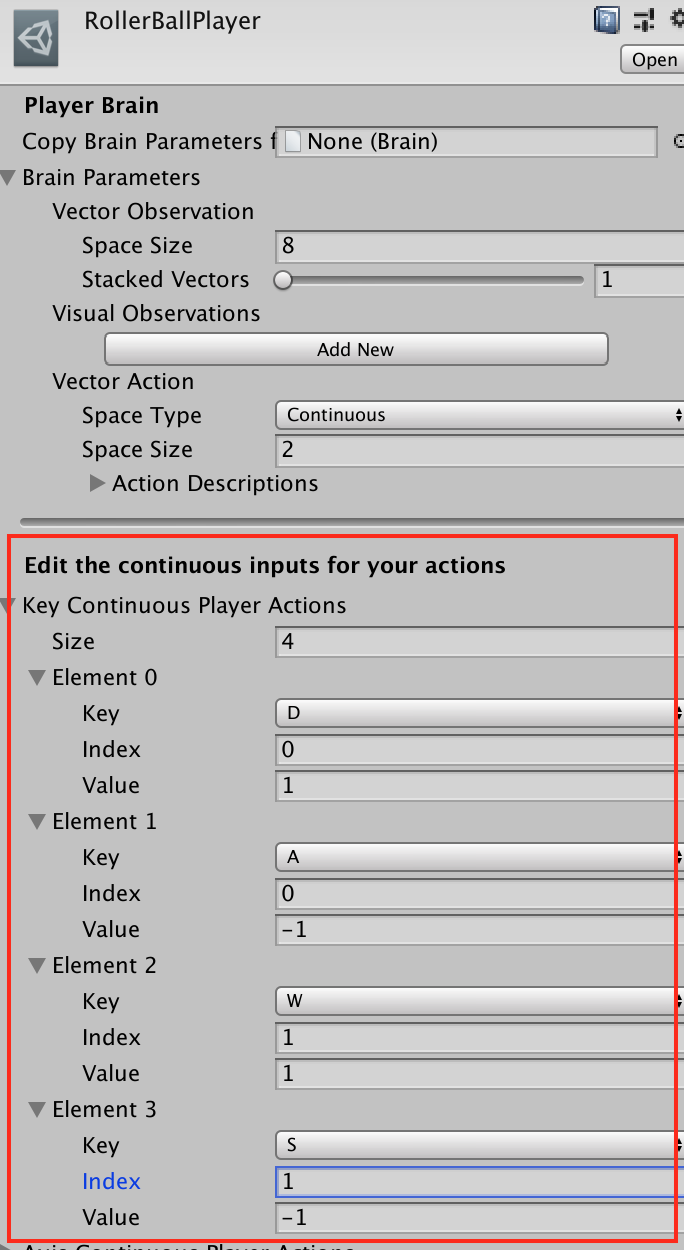
RollerBallPlayerのKey Continuous Player Actionsのサイズを4にして、Element0からElement3までを次のように設定します。
| Element | Key | Index | Value |
|---|---|---|---|
| Element 0 | D | 0 | 1 |
| Element 1 | A | 0 | -1 |
| Element 2 | W | 1 | 1 |
| Element 3 | S | 1 | -1 |

Indexは、AgentAction()メソッドに渡されるaction配列のindexに対応しています。 Keyを押すとaction[index]にValueが代入されます。
これでPlayするとWASDキーでRollerAgentを私達の手で操作できます。
RollerAgentがTargetに近づくとTargetの位置がランダムな位置に移ることも、RollerAgentがFloorから落ちると中心の位置に戻ることも確認できます。
学習
RollerAgentのBrainをRollerBallPlayerからRollerBallBrainに切り替えます。

AcademyにアタッチされているRollerAcademyで、Controlにチェックをします。

ターミナルでRollerBall/Assets/に移動して、
$ mlagents-learn ml-agents-master/config/trainer_config.yaml --run-id=RollerBall-1 --train
を実行します。
次のように表示されたらUnityエディタでPlayボタンを押します。
INFO:mlagents.envs:Start training by pressing the Play button in the Unity Editor.
次のように表示されたら無事に学習が開始したことになります。(今回は50000steps学習させます)
INFO:mlagents.envs:
'Academy' started successfully!
Unity Academy name: Academy
        Number of Brains: 2
        Number of Training Brains : 1
        Reset Parameters :

Unity brain name: RollerBallBrain
        Number of Visual Observations (per agent): 0
        Vector Observation space size (per agent): 8
        Number of stacked Vector Observation: 1
        Vector Action space type: continuous
        Vector Action space size (per agent): [2]
        Vector Action descriptions: ,
Unity brain name: RollerBallPlayer
        Number of Visual Observations (per agent): 0
        Vector Observation space size (per agent): 8
        Number of stacked Vector Observation: 1
        Vector Action space type: continuous
        Vector Action space size (per agent): [2]
        Vector Action descriptions: ,
2019-05-29 12:13:39.143382: I tensorflow/core/platform/cpu_feature_guard.cc:140] Your CPU supports instructions that this TensorFlow binary was not compiled to use: AVX2 FMA
INFO:mlagents.envs:Hyperparameters for the PPO Trainer of brain RollerBallBrain:
	batch_size:	1024
	beta:	0.005
	buffer_size:	10240
	epsilon:	0.2
	gamma:	0.99
	hidden_units:	128
	lambd:	0.95
	learning_rate:	0.0003
	max_steps:	5.0e4
	normalize:	False
	num_epoch:	3
	num_layers:	2
	time_horizon:	64
	sequence_length:	64
	summary_freq:	1000
	use_recurrent:	False
	summary_path:	./summaries/RollerBall-1-0_RollerBallBrain
	memory_size:	256
	use_curiosity:	False
	curiosity_strength:	0.01
	curiosity_enc_size:	128
	model_path:	./models/RollerBall-1-0/RollerBallBrain
INFO:mlagents.trainers: RollerBall-1-0: RollerBallBrain: Step: 1000. Time Elapsed: 11.076 s Mean Reward: 0.178. Std of Reward: 0.382. Training.
学習が終わると、推論モデルであるRollerBallBrain.nnファイルがAssets/models/RollerBall-1-0/に生成されるので、これをRollerBallBrainのModelにセットします。

また、RollerAcademyのControlのチェックを外します。
これでUnityのエディタでPlayボタンを押すと、RollerAgentが自発的に動きます。
あまり賢いとは言えませんが、Targetに向かっていこうとする意思は感じられます。
ターミナルで
$ tensorboard --logdir=summaries
を実行して、http://localhost:6006 をブラウザで開くと、今回の学習状況を詳細に調べることができます。


