27
11

Delete article

Deleted articles cannot be recovered.

Draft of this article would be also deleted.

Are you sure you want to delete this article?

More than 5 years have passed since last update.

ml-agents 0.8.0 で自分のプロジェクトで機械学習させる (Mac)(導入編)

Last updated at Posted at 2019-04-26

環境設定

  1. ml-agents 0.8.0
    https://github.com/Unity-Technologies/ml-agents/tags/0.8.0
    をダウンロードして、適当なところに配置

  2. anaconda をインストール
    ターミナルで「conda」と打って反応があれば既にインストール済み

  3. 仮想環境を作る
    conda info -e
    で[ml-agents]があれば良い。なければ↓でつくる。
    conda create -n ml-agents python=3.6
    で仮想環境を作る(なんか聞かれたら「y」と入力)
    conda activate ml-agents
    で仮想環境切り替え
    pip install tensorflow==1.7.1
    で tensorflow を仮想環境にインストール
    ★★★ 注意 ★★★
    このまま進めると、「kiwisolver」がビルドできなくて詰むので、別途独自に↓でインストールしておく。
    conda install kiwisolver
    これがなければ 次で kiwisolover をビルドしようとしてビルドできなくて詰む。

  4. ML-Agents が使うライブラリをインストール
    cd [ml-agentsのあるフォルダ]
    pip install mlagents

とりあえずサンプルを動かしてみる

  1. 仮想環境に入る
    既に↑で入っていればやらなくてもよし。入っていなければ↓を実行
    cd [ml-agentsのあるフォルダ]
    conda activate ml-agents

  2. Unityサンプルシーンを用意

  3. Unityを立ち上げて、[ml-agents]/UnitySDK を開く。

  4. [ml-agents]/UnitySDK/Assets/ML-Agents/Examples/[開きたいサンプル]/Scenes/[やりたいシーン]をUnityで開く

  5. Unityサンプルシーンを外部から機械学習できるようにする

  6. なんちゃらAcademy というGameObject のインスペクターをみる(ex:Ball3DAcademy)

  7. Brains の「Control」という項目をチェックを入れる

Item-0_と_AppleClockExtra_と_Item-0_と_Item-0_と_Item-0_と_Item-0_と_Item-0_と_Item-0_と_Item-0_と_AppleTimeMachineExtra_と_AppleBluetoothExtra_と_AirPortExtra_と_AppleVolumeExtra_と_BatteryExtra_と_AppleTextInputExtra.png
  1. 仮想環境で実行
    ターミナルに戻って、以下を実行
    mlagents-learn config/trainer_config.yaml --run-id=firstRun --train
    すると、Unityのスタートボタン待ちになる
ml-agents-0_8_0_—_python_◂_mlagents-learn_config_trainer_config_yaml_--run-id_firstRun_--train_—_112×44.png
  1. Unityでプレイ

  2. Unity でプレイボタンで始める。Unityで動くと、ターミナルでもなんか動いてる感じになる。
    Image from Gyazo

  3. しばらくほっておくとなんかいい具合になってる
    Image from Gyazo

  4. 学習済みデータの取得

  5. いい頃合いでUnityプレイボタンを再度押して終了させて、学習を終わらせる

  6. [ml-agents]/models/firstRun-0/[なんちゃら]Learning.nn ファイルをUnityプロジェクトにインポート(ドラッグ&ドロップ)。場所は適当。

  7. Assets/ML-Agents/Examples/[サンプル]/Brains/[なんちゃら]Learning.asset を選択

  8. 「Model」のところをさっきインポートした学習済みNNファイルをドラッグ&ドロップ
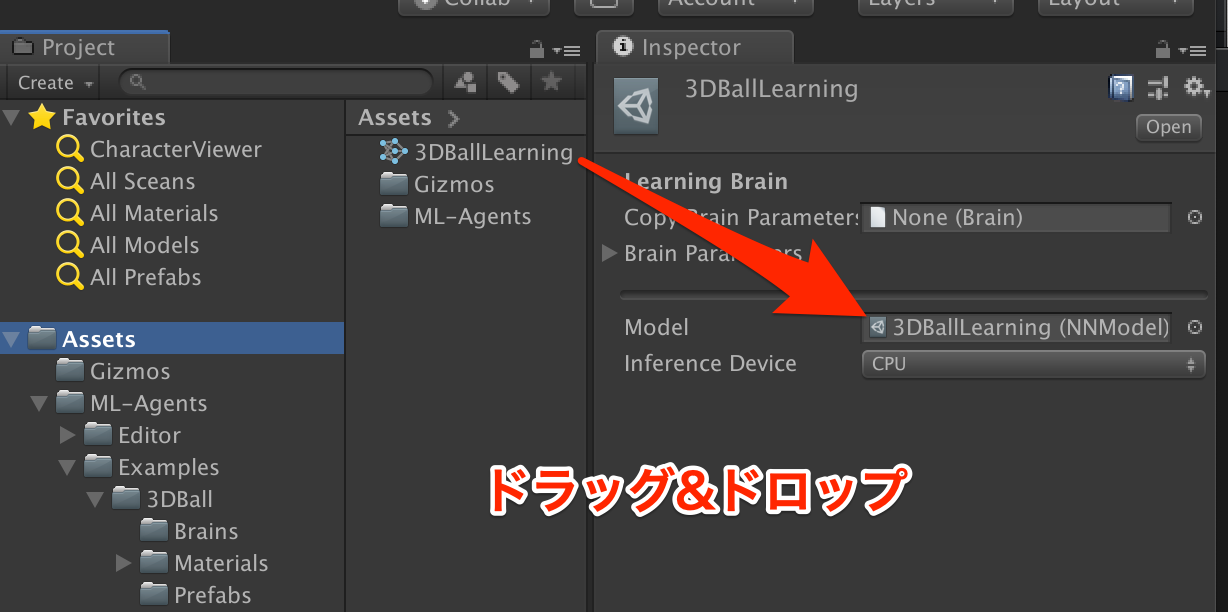
Unity_2018_3_0f2_-_3DBall_unity_-_UnitySDK_-_PC__Mac___Linux_Standalone__Metal__と_「ml-agents_0_8_0_で自分のプロジェクトで機械学習させる__Mac_」を編集_-_Qiita.png
  1. 先ほどのUnityサンプルを学習済みデータを使うようにする
    なんちゃらAcademy というGameObject のインスペクターの Brains の「Control」という項目をチェックをはずす
Unity_2018_3_0f2_-_3DBall_unity_-_UnitySDK_-_PC__Mac___Linux_Standalone__Metal__と_firstRun-0.png
  1. 学習済みデータで実行
    Unityプレイすると、最初からちゃんとできているようになる。
    Image from Gyazo

長くなったので続きは次回!

27
11
0

Register as a new user and use Qiita more conveniently

  1. You get articles that match your needs
  2. You can efficiently read back useful information
  3. You can use dark theme
What you can do with signing up
27
11

Delete article

Deleted articles cannot be recovered.

Draft of this article would be also deleted.

Are you sure you want to delete this article?