はじめに
この記事はUnityチュートリアルの玉転がし(Roll a Ball)と大体同じようなものをUnity DOTSで作る方法を解説したものです。
また、この記事よりも初歩的な内容に関しては
Unity DOTSとUnity Physicsでただ単純に球を動かしてみる
に書かせて頂きました。
少しでも参考になれば幸いです。
注意点
- preview packageを多く使用しています。今後、この記事のコードが使えなくなる可能性が高いのでご注意下さい。
- GameObject/Componentを併用した Hybrid ECS を前提としています。
- Unity DOTS(Unity ECS, C# Job System, Burst Compiler) やUnity Physics に関する詳しい説明は行わないのでご注意下さい。
環境
- macOS Catalina 10.15.1
- Unity 2019.2.12f1
- Entities preview 0.1.1
- Burst 1.1.2
- Jobs preview 0.1.1
- Mathematics 1.1.0
- Hybrid Renderer preview 0.1.1
- Unity Physics preview 0.2.4
実装
Stageを作成する
Planeの3D Objectを作成し、Positionを (0, 0, 0), Scaleを (5, 1, 5) くらいにします。
Mesh Colliderを削除し、PhysicsShapeAuthoringとConvertToEntityをAdd Componentします。

Ballを作成する
Sphereの3D Objectを作成し、Positionを (0, 0, 0)くらいにします。
Sphere Colliderを削除し、PhysicsShapeAuthoringとPhysicsBodyAuthoringとConvertToEntityをAdd Componentします。

Ballを操作する
Ball コンポーネント
Ballを識別するためのTagとして利用するために作成します。
using System;
using Unity.Entities;

[Serializable]
public struct Ball : IComponentData
{
}
Force コンポーネント
Ballに与える力に関するデータを管理するために作成します。
using System;
using Unity.Entities;
using Unity.Mathematics;

[Serializable]
public struct Force : IComponentData
{
    public float3 direction;
    public float magnitude;
}
BallAuthoring
次のようにBallAuthoringを作成し、Ball オブジェクトにAdd Componentします。
using System.Collections;
using System.Collections.Generic;
using Unity.Entities;
using UnityEngine;

[RequiresEntityConversion]
public class BallAuthoring : MonoBehaviour, IConvertGameObjectToEntity
{
    public void Convert(Entity entity, EntityManager dstManager, GameObjectConversionSystem conversionSystem)
    {
        dstManager.AddComponentData(entity, new Ball());
        dstManager.AddComponentData(entity, new Force{magnitude = 10});
    }
}
MoveBallSystem
次のようなBallを動かす処理を担当するスクリプトを作成します。
using Unity.Burst;
using Unity.Collections;
using Unity.Entities;
using Unity.Jobs;
using Unity.Physics;
using UnityEngine;

public class MoveBallSystem : JobComponentSystem
{
    [BurstCompile]
    struct MoveBallJob : IJobForEach<PhysicsVelocity, PhysicsMass, Ball, Force>
    {
        public float DeltaTime;

        public void Execute(ref PhysicsVelocity physicsVelocity,
            [ReadOnly] ref PhysicsMass physicsMass,
            [ReadOnly] ref Ball ball,
            ref Force force)
        {
            physicsVelocity.Linear += physicsMass.InverseMass * force.direction * force.magnitude * DeltaTime;
        }
    }

    protected override JobHandle OnUpdate(JobHandle inputDeps)
    {
        var job = new MoveBallJob
        {
            DeltaTime = Time.deltaTime,
        };

        return job.Schedule(this, inputDeps);
    }
}
ChangeForceSystem
次のような、キーボードの入力に応じてBallが動く向きを変える処理を担当するスクリプトを作成します。
using Unity.Burst;
using Unity.Collections;
using Unity.Entities;
using Unity.Jobs;
using Unity.Mathematics;
using Unity.Physics;
using UnityEngine;

public class ChangeForceSystem : JobComponentSystem
{
    [BurstCompile]
    private struct ChangeForceJob : IJobForEach<PhysicsVelocity, PhysicsMass, Ball, Force>
    {
        public float3 Direction;

        public void Execute(ref PhysicsVelocity physicsVelocity,
            [ReadOnly] ref PhysicsMass physicsMass,
            [ReadOnly] ref Ball ball,
            ref Force force)
        {
            force.direction = Direction;
        }
    }

    protected override JobHandle OnUpdate(JobHandle inputDeps)
    {
        var job = new ChangeForceJob();

        if (Input.GetKey(KeyCode.LeftArrow))
        {
            job.Direction = math.float3(-1, 0, 0);
        }

        if (Input.GetKey(KeyCode.RightArrow))
        {
            job.Direction = math.float3(1, 0, 0);
        }

        if (Input.GetKey(KeyCode.UpArrow))
        {
            job.Direction = math.float3(0, 0, 1);
        }

        if (Input.GetKey(KeyCode.DownArrow))
        {
            job.Direction = math.float3(0, 0, -1);
        }

        return job.Schedule(this, inputDeps);
    }
}
ここまでの内容はこの記事にもう少し詳しく書いたので是非参考にしてみて下さい。
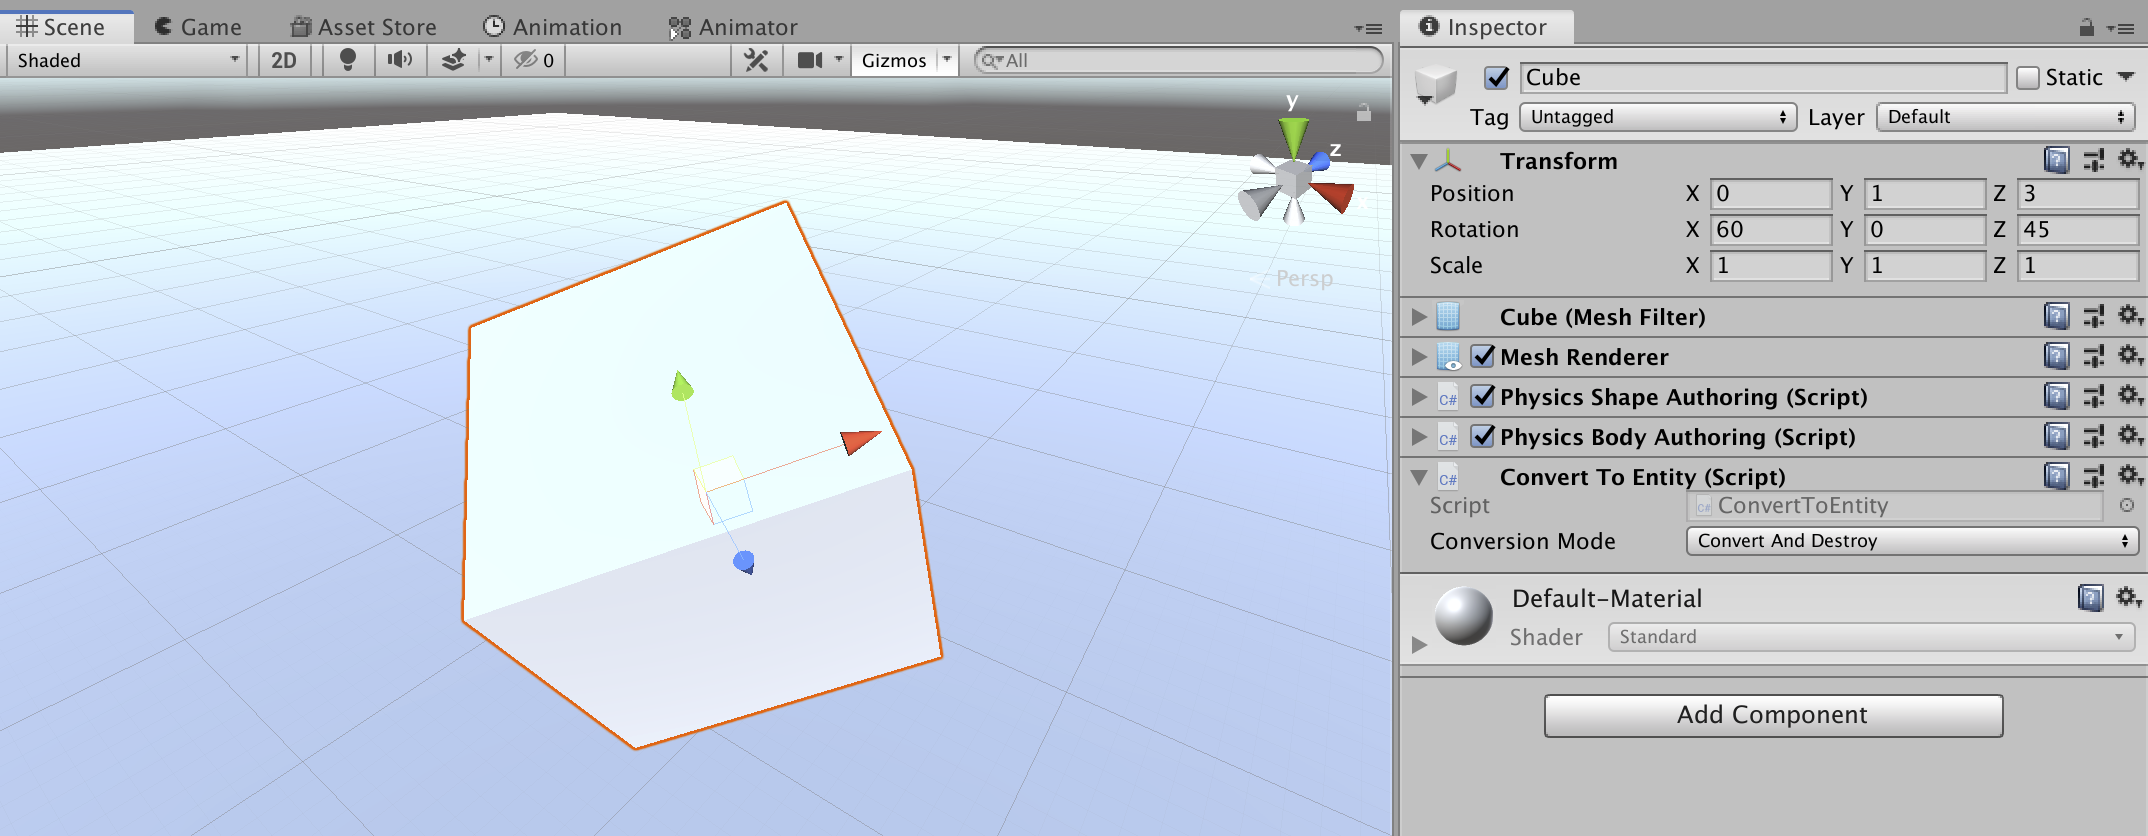
Cubeの作成
まずCubeの3D Objectを作成し、Positionを (0, 1, 3) に、Rotationを(60 , 0, 45) 程度に設定しておきます。
そしてBox Colliderを削除し、PhysicsShapeAuthoringとConvertToEntityをAdd Componentします。
Cube コンポーネント
Cubeを識別するためのTagとして利用するために作成します。
using System;
using Unity.Entities;

[Serializable]
public struct Cube : IComponentData
{
}
CubeAuthoring
次のようなスクリプトを作成し、Cubeオブジェクトにアタッチします。
using Unity.Entities;
using UnityEngine;

public class CubeAuthoring : MonoBehaviour, IConvertGameObjectToEntity
{
    public void Convert(Entity entity, EntityManager dstManager, GameObjectConversionSystem conversionSystem)
    {
        dstManager.AddComponentData(entity, new Cube());
    }
}
Cubeを回転させる
ここでCubeをy軸のまわりに自転させようと思います。
オブジェクトの回転は、ECSより前はtransform.Rotate()などのように実装していましたが、ECSではEntityに追加されているRotationというComponentDataを毎フレーム更新することによりCubeの回転を実現します。
RotationはQuaternion型なので、ここではRotationの計算はQuaternionを使って行います。
時刻 t におけるCubeのRotationを表すQuaternionを $q(t)$ 、
時刻 t のRotationから時刻 t + dt のRotationになるような回転を表すQuaternionを $q_{\mathrm{rot}}$とすると、
q(t + dt) = q_{\mathrm{rot}} \cdot q(t)
が成り立ちます。
この式を使ってCubeのRotationを毎フレーム更新することによりCubeを回転させる、という方針を取ります。
CubeRotationSpeed コンポーネント
Cubeの角速度を管理する、CubeRotationSpeedを作成します。
using System;
using Unity.Entities;

[Serializable]
public struct CubeRotationSpeed : IComponentData
{
    public float value;
}
それに伴い、以前作成したCubeAuthoringを次のように変更します。
using Unity.Entities;
using UnityEngine;

public class CubeAuthoring : MonoBehaviour, IConvertGameObjectToEntity
{
    public void Convert(Entity entity, EntityManager dstManager, GameObjectConversionSystem conversionSystem)
    {
        dstManager.AddComponentData(entity, new Cube());
        dstManager.AddComponentData(entity, new CubeRotationSpeed{value = 2});
    }
}
Cube EntityにCubeRotationSpeedを追加する処理を追記しました。
ここでは角速度の初期値を 2 [rad/s] としています。
RotateCubeSystem
Cubeをy軸の周りに自転させる処理を担当します。
using Unity.Burst;
using Unity.Collections;
using Unity.Entities;
using Unity.Jobs;
using Unity.Mathematics;
using Unity.Transforms;
using UnityEngine;

public class RotateCubeSystem : JobComponentSystem
{
    [BurstCompile]
    private struct RotateCubeJob : IJobForEach<Rotation, Cube, CubeRotationSpeed>
    {
        public float DeltaTime;

        public void Execute(ref Rotation rotation, [ReadOnly] ref Cube cube, [ReadOnly] ref CubeRotationSpeed cubeRotationSpeed)
        {
            rotation.Value = math.mul(quaternion.AxisAngle(math.up(), cubeRotationSpeed.value * DeltaTime), math.normalize(rotation.Value));
        }
    }

    protected override JobHandle OnUpdate(JobHandle inputDeps)
    {
        var job = new RotateCubeJob
        {
            DeltaTime = Time.deltaTime,
        };

        return job.Schedule(this, inputDeps);
    }
}
確かにy軸の周りに回転していますね。
解説
先ほどの
q(t + dt) = q_{\mathrm{rot}} \cdot q(t)
に対応するのがExecute()内にある
rotation.Value = math.mul(quaternion.AxisAngle(math.up(), cubeRotationSpeed.value * DeltaTime), math.normalize(rotation.Value));
です。
まずQuaternionの掛け算は、ECSでは q1 * q2 ではなく、math.mul(q1, q2) のように書かなければいけません。
また、Quaternionは非可換です。すなわち
q_1 \cdot q_2 \neq q_2 \cdot q_1
なので、math.mul()の引数の順序には注意が必要です。
また、$q_{\mathrm{rot}}$は
quaternion.AxisAngle(math.up(), cubeRotationSpeed.value * DeltaTime)
に相当していますが、
quaternion.AxisAngle()関数は、第一引数に回転の軸となる単位ベクトル、第二引数に回転する角度(rad)を要求します。
なのでここでは、第一引数にy軸方向の単位ベクトル、第二引数に微小時間 dt の間にCubeが回転する角度である (角速度 * dt) を代入しています。
BallとCubeの接触を判定し、接触していたらCubeを削除する
TriggerSystem
BallとCubeが接触しているかどうかを判定し、接触していたらCubeを消去するという処理を担当するTriggerSystemを次のように実装します。
using Unity.Collections;
using Unity.Entities;
using Unity.Jobs;
using Unity.Physics;
using Unity.Physics.Systems;

[UpdateAfter(typeof(EndFramePhysicsSystem))]
public class TriggerSystem : JobComponentSystem
{
    private BuildPhysicsWorld _buildPhysicsWorldSystem;
    private StepPhysicsWorld _stepPhysicsWorldSystem;
    private EntityCommandBufferSystem _bufferSystem;

    protected override void OnCreate()
    {
        _buildPhysicsWorldSystem = World.GetOrCreateSystem<BuildPhysicsWorld>();
        _stepPhysicsWorldSystem = World.GetOrCreateSystem<StepPhysicsWorld>();
        _bufferSystem = World.GetOrCreateSystem<EndSimulationEntityCommandBufferSystem>();
    }

    private struct TriggerJob : ITriggerEventsJob
    {
        [ReadOnly] public ComponentDataFromEntity<Cube> Cube;
        [ReadOnly] public ComponentDataFromEntity<Ball> Ball;
        public EntityCommandBuffer CommandBuffer;

        public void Execute(TriggerEvent triggerEvent)
        {
            var entityA = triggerEvent.Entities.EntityA;
            var entityB = triggerEvent.Entities.EntityB;

            var isBodyACube = Cube.Exists(entityA);
            var isBodyBCube = Cube.Exists(entityB);

            var isBodyABall = Ball.Exists(entityA);
            var isBodyBBall = Ball.Exists(entityB);

            // どちらもCubeではない場合は何もしない
            if (!isBodyACube && !isBodyBCube)
                return;

            // どちらもBallではない場合は何もしない
            if (!isBodyABall && !isBodyBBall)
                return;

            var cubeEntity = isBodyACube ? entityA : entityB;
            var ballEntity = isBodyABall ? entityA : entityB;

            CommandBuffer.DestroyEntity(cubeEntity);
        }
    }

    protected override JobHandle OnUpdate(JobHandle inputDeps)
    {
        var jobHandle = new TriggerJob
        {
            Cube = GetComponentDataFromEntity<Cube>(true),
            Ball = GetComponentDataFromEntity<Ball>(true),
            CommandBuffer = _bufferSystem.CreateCommandBuffer()
        }.Schedule(_stepPhysicsWorldSystem.Simulation, ref _buildPhysicsWorldSystem.PhysicsWorld, inputDeps);

        _bufferSystem.AddJobHandleForProducer(jobHandle);

        return jobHandle;
    }
}
CubeのPhysicsShapeAuthoringのIsTriggerにチェックを入れます。

BallとCubeが接触した時にCubeが消されるようになりました。
解説
Triggerに関する処理はITriggerEventsJobを実装した構造体(ここではTriggerJob)に書きます。
Execute()の引数のtriggerEventに、どの2つのEntityが接触に関与しているのか、という情報が格納されます。
それぞれのEntityは
var entityA = triggerEvent.Entities.EntityA;
var entityB = triggerEvent.Entities.EntityB;
のように取得します。
さらに、ここではentityAとentityBが具体的にどのEntityなのかを識別するために次のような処理を行います。
var isBodyACube = Cube.Exists(entityA);
var isBodyBCube = Cube.Exists(entityB);
var isBodyABall = Ball.Exists(entityA);
var isBodyBBall = Ball.Exists(entityB);

if (!isBodyACube && !isBodyBCube)
    return;

if (!isBodyABall && !isBodyBBall)
    return;

var cubeEntity = isBodyACube ? entityA : entityB;
var ballEntity = isBodyABall ? entityA : entityB;
CubeとBallの接触以外(CubeとStage、BallとStageの接触など)には今は興味が無いので、
if (!isBodyACube && !isBodyBCube)
    return;

if (!isBodyABall && !isBodyBBall)
    return;
で無視します。
CommandBuffer.DestroyEntity(cubeEntity);
では、Cubeを削除する処理をメインスレッドで行うように命令をしています。
Entityを削除する処理はメインスレッド上でしか行えないため、「Cubeを削除する」というタスクの発行のみを非同期で行い、後で実際にメインスレッドで削除する、ということをEntityCommandBufferSystemを使って行っています。
(参考 : 【Unity】C# Job SystemからECSのEntityやComponentDataを追加・削除・変更する指示を出す - テラシュールブログ)
また、EntityCommandBufferSystemを使う場合は、OnUpdate()内に
_bufferSystem.AddJobHandleForProducer(jobHandle);
のように書く必要があります。
ここではJobが完了する前にCommandBuffer中の命令が実行されてしまうのを防ぐために依存関係を設定する役割を担っています。
(参考 : Class EntityCommandBufferSystem | Package Manager UI website)
複数のCubeを生成して円形に配置する
実行時に複数のCubeを生成して円形に配置する、という処理をここで実装します。
CubeSpawnerオブジェクトの作成
Create Emptyで空オブジェクトを作成し(CubeSpawnerと名付けます)、ConvertToEntityをAdd Componentします。
CubeSpawnData
生成するCubeの個数、配置する円の半径、CubeのPrefabのEntityなどのデータを管理するCubeSpawnDataを作成します。
using System;
using Unity.Entities;

[Serializable]
public struct CubeSpawnerData : IComponentData
{
    public float radius;
    public int number;
    public Entity cubePrefabEntity;
}
CubeSpawnerAuthoring
次のようなスクリプトを作成し、CubeSpawnerにアタッチします。
using System.Collections.Generic;
using Unity.Entities;
using UnityEngine;

[RequiresEntityConversion]
public class CubeSpawnerAuthoring : MonoBehaviour, IConvertGameObjectToEntity, IDeclareReferencedPrefabs
{
    [SerializeField] private GameObject cubePrefab = default;

    public void DeclareReferencedPrefabs(List<GameObject> referencedPrefabs)
    {
        referencedPrefabs.Add(cubePrefab);
    }

    public void Convert(Entity entity, EntityManager dstManager, GameObjectConversionSystem conversionSystem)
    {
        var spawnerData = new CubeSpawnerData
        {
            number = 24,
            radius = 7.5f,
            cubePrefabEntity = conversionSystem.GetPrimaryEntity(cubePrefab)
        };

        dstManager.AddComponentData(entity, spawnerData);
    }
}
ここでは生成するCubeの個数は24個、円の半径を7.5としています。
CubeをPrefab化し、CubeSpawnerAuthoringのCube Prefabの欄に代入します。

解説
Prefabは、ECSでは単にPrefabというComponentDataが付いているだけのEntityです。
ここではCubeSpawnerAuthoringにIDeclareReferencedPrefabsを実装させ、DeclareReferencedPrefabs()関数内で
public void DeclareReferencedPrefabs(List<GameObject> referencedPrefabs)
{
    referencedPrefabs.Add(cubePrefab);
}
のようにCubeのPrefab(GameObject)をリストに追加すると、自動的にCube Prefabに対応するEntityを生成して、そのEntityにPrefab ComponentDataを付加してくれます。
(参考 : 【Unity】 ECS まとめ(後編) - エフアンダーバー)
また、Convert()関数内の
cubePrefabEntity = conversionSystem.GetPrimaryEntity(cubePrefab)
では、まずconversionSystem.GetPrimaryEntity(cubePrefab)で、cubePrefabに対応するEntityを取得していて、それをCubeSpawnerDataのメンバ変数であるcubePrefabEntityに代入しています。
これによって、CubeSpawner(Entity)はCubePrefab(Entity)に対する参照を持つことができるようになります。
SpawnCubeSystem
CubeSpawnerを基にCubeの生成を行う、SpawnCubeSystemを作成します。
using Unity.Collections;
using Unity.Entities;
using Unity.Jobs;
using Unity.Mathematics;
using Unity.Transforms;

public class SpawnCubeSystem : JobComponentSystem
{
    private EntityCommandBufferSystem _bufferSystem;

    protected override void OnCreate()
    {
        _bufferSystem = World.GetExistingSystem<EndSimulationEntityCommandBufferSystem>();
    }

    private struct SpawnCubeJob : IJobForEachWithEntity<CubeSpawnerData, LocalToWorld>
    {
        public EntityCommandBuffer.Concurrent CommandBuffer;

        public void Execute(Entity entity, int index, [ReadOnly] ref CubeSpawnerData cubeSpawnerData, [ReadOnly] ref LocalToWorld localToWorld)
        {
            for (var i = 0; i < cubeSpawnerData.number; i++)
            {
                var instance = CommandBuffer.Instantiate(index, cubeSpawnerData.cubePrefabEntity);
                var posX = cubeSpawnerData.radius * math.cos(2 * math.PI / cubeSpawnerData.number * i);
                var posZ = cubeSpawnerData.radius * math.sin(2 * math.PI / cubeSpawnerData.number * i);

                CommandBuffer.SetComponent(index, instance, new Translation {Value = math.float3(posX, 1, posZ)});
            }

            // 1回Executeを実行したらCubeSpawnEntityを削除する
            CommandBuffer.DestroyEntity(index, entity);
        }
    }

    protected override JobHandle OnUpdate(JobHandle inputDeps)
    {
        var job = new SpawnCubeJob
        {
            CommandBuffer = _bufferSystem.CreateCommandBuffer().ToConcurrent()
        }.Schedule(this, inputDeps);

        _bufferSystem.AddJobHandleForProducer(job);
        return job;
    }
}
解説
Entityの生成はメインスレッドでしか行えないので、ここでもEntityCommandBufferSystemを使います。
先ほど(TriggerJobの時)とは少し異なり、Job内での宣言時の型名がEntityCommandBuffer.Concurrent となっていますが、今回のように複数のWorker Threadで並列処理を行う場合はこのように宣言する必要があります。
EntityCommandBuffer.Concurrentを使った処理はEntityCommandBufferとほとんど同じですが、APIが少し異なり、
CommandBuffer.Instantiate(index, cubeSpawnerData.cubePrefabEntity);
のように第一引数にJobのIDを入れる必要があります。
これは特に難しいことではなく、Execute()の第二引数のindexをそのまま入れてやればokです。
(参考 : 【Unity】ECSの並列処理(IJobParallelForやIJobForEach系)でEntityCommandBufferを使う - テラシュールブログ/【Unity】 ECS まとめ(後編) - エフアンダーバー)
カウンターの実装
Ballが接触したCubeの個数を表示する、処理をここで実装します。
まず、Hierarchyビューで UI > Text でTextを作成して、見やすいようにInspectorをいじります。(このTextオブジェクトをCounterと名付けます)

これにConvertToEntityをAdd Componentして...といきたいところですが、現在(2019年12月)はまだUnityEngine.UIはDOTSに対応していません。なので少し工夫が必要です。
Count コンポーネント
Countの値を管理するComponentDataです。
using System;
using Unity.Entities;

[Serializable]
public struct Count : IComponentData
{
    public int value;
}
CounterMonoBehavior
次のようなCounterMonoBehaviorを作成し、Counterオブジェクトにアタッチします。
using Unity.Entities;
using UnityEngine;
using UnityEngine.UI;

public class CounterMonoBehavior : MonoBehaviour
{
    private Text _countText;

    private void Awake()
    {
        _countText = this.GetComponent<Text>();

        var entityManager = World.Active.EntityManager;
        entityManager.CreateEntity(typeof(Count));
    }

    public void SetCount(int count)
    {
        _countText.text = count.ToString();
    }
}
解説
先述したようにConvertToEntityが使えないのでAwake()関数内の
var entityManager = World.Active.EntityManager;
entityManager.CreateEntity(typeof(Count));
でCounterのEntityをEntityManagerを通して作成します。
CountUp コンポーネント
次のようなCountUpという空のComponentDataを作成します。
このようなものを作る理由は後述します。
using System;
using Unity.Entities;

[Serializable]
public struct CountUp : IComponentData
{
}
CountUpSystem
CountUpSystemではカウンターの数値を+1する処理を行います。
using Unity.Entities;
using UnityEngine;

public class CountUpSystem : ComponentSystem
{
    private CounterMonoBehavior _counter;
    private EntityManager _entityManager;

    protected override void OnCreate()
    {
        _counter = GameObject.FindObjectOfType<CounterMonoBehavior>();
        _entityManager = World.Active.EntityManager;
    }

    protected override void OnUpdate()
    {
        Entities.ForEach((Entity entity, ref Count count, ref CountUp countUp) =>
        {
            count.value += 1;
            _counter.SetCount(count.value);
            _entityManager.RemoveComponent<CountUp>(entity);
        });
    }
}
解説
まず、OnCreate()関数内の
_counter = GameObject.FindObjectOfType<CounterMonoBehavior>();
でCounterMonoBehaviorの参照を取得します。
次にOnUpdate()関数内では、CountとCountUpが付いているEntityのみを処理の対象としています。
まず、
count.value += 1;
_counter.SetCount(count.value);
でカウンターの数字を+1した後に、
_entityManager.RemoveComponent<CountUp>(entity);
でCountUpをEntityから削除しています。
つまり、カウンターの数字を+1したい時は、Counter(Entity)にCountUpを付加すればよい、ということになります。
ところで、CountUpSystemはJobComponentSystemではなくComponentSystemを継承していて、C# Job Systemを使っていません。
何故かというと、UIに変更を加えるには今回だと
_counter.SetCount(count.value);
のように参照型の変数(今回だとCounterMonoBehavior型の変数_counter)を使うことを避けられませんが、C# Job Systemを使う場合Jobの中で参照型の変数を使うことができないため処理を書くことができないからです。
TriggerSystemの変更
カウンターの数字を+1したい時はCounter(Entity)にCountUpを付加すればよいので、ここではBallがCubeに接触した時にCounter(Entity)にCountUpを付加する処理を実装するために以前作成したTriggerSystemにコードを追加します。
using Unity.Collections;
using Unity.Entities;
using Unity.Jobs;
using Unity.Physics;
using Unity.Physics.Systems;

[UpdateAfter(typeof(EndFramePhysicsSystem))]
public class TriggerSystem : JobComponentSystem
{
    private BuildPhysicsWorld _buildPhysicsWorldSystem;
    private StepPhysicsWorld _stepPhysicsWorldSystem;
    private EntityCommandBufferSystem _bufferSystem;

    // 追加
    private EntityQuery _entityQuery;

    protected override void OnCreate()
    {
        _buildPhysicsWorldSystem = World.GetOrCreateSystem<BuildPhysicsWorld>();
        _stepPhysicsWorldSystem = World.GetOrCreateSystem<StepPhysicsWorld>();
        _bufferSystem = World.GetOrCreateSystem<EndSimulationEntityCommandBufferSystem>();

        // 追加
        _entityQuery = GetEntityQuery(ComponentType.ReadOnly<Count>());
    }

    private struct TriggerJob : ITriggerEventsJob
    {
        [ReadOnly] public ComponentDataFromEntity<Cube> Cube;
        [ReadOnly] public ComponentDataFromEntity<Ball> Ball;
        public EntityCommandBuffer CommandBuffer;

        // 追加
        [DeallocateOnJobCompletion] [ReadOnly] public NativeArray<Entity> CountArray;

        public void Execute(TriggerEvent triggerEvent)
        {
            var entityA = triggerEvent.Entities.EntityA;
            var entityB = triggerEvent.Entities.EntityB;

            var isBodyACube = Cube.Exists(entityA);
            var isBodyBCube = Cube.Exists(entityB);

            var isBodyABall = Ball.Exists(entityA);
            var isBodyBBall = Ball.Exists(entityB);

            if (!isBodyACube && !isBodyBCube)
                return;

            if(!isBodyABall && !isBodyBBall)
                return;

            var cubeEntity = isBodyACube ? entityA : entityB;
            var ballEntity = isBodyABall ? entityA : entityB;

            CommandBuffer.DestroyEntity(cubeEntity);

            // 追加
            foreach (var entity in CountArray)
            {
                CommandBuffer.AddComponent(entity, new CountUp());
            }
        }
    }

    protected override JobHandle OnUpdate(JobHandle inputDeps)
    {
        var jobHandle = new TriggerJob
        {
            Cube = GetComponentDataFromEntity<Cube>(true),
            Ball = GetComponentDataFromEntity<Ball>(true),
            CommandBuffer = _bufferSystem.CreateCommandBuffer(),
            // 追加
            CountArray = _entityQuery.ToEntityArray(Allocator.TempJob)
        }.Schedule(_stepPhysicsWorldSystem.Simulation, ref _buildPhysicsWorldSystem.PhysicsWorld, inputDeps);

        _bufferSystem.AddJobHandleForProducer(jobHandle);

        return jobHandle;
    }
}
解説
EntityQueryを使って操作の対象となるEntityを絞り込み、
CommandBuffer.AddComponent(entity, new CountUp());
でCounter(Entity)にCountUpを付加しています。
EntityQueryを使ったEntityの絞り込みは、これまで扱ってきた方法よりも少し複雑です。
まず
private EntityQuery _entityQuery;
でEntityQuery型の変数を宣言し、
_entityQuery = GetEntityQuery(ComponentType.ReadOnly<Count>());
で絞り込む条件を設定します。
そして、
[DeallocateOnJobCompletion] [ReadOnly] public NativeArray<Entity> CountArray;
CountArray = _entityQuery.ToEntityArray(Allocator.TempJob)
のように絞りこみの結果を受け取るNativeArrayを用意します。
このCountArrayは宣言時に[DeallocateOnJobCompletion]をつけて宣言されていて、Allocator.TempJobで初期化されているのでJobの完了時に自動的にDisposeされます。
(参考 : 【Unity】Allocator.TempJobで作ったNativeArrayを自動的に開放する - テラシュールブログ)
完成!
おわりに
ここまで読んでくださりありがとうございました。
少しでも参考になれば幸いです。
参考
- GitHub - Unity-Technologies/EntityComponentSystemSamples
- 【Unity】C# Job SystemからECSのEntityやComponentDataを追加・削除・変更する指示を出す - テラシュールブログ
- 【Unity】ECSの並列処理(IJobParallelForやIJobForEach系)でEntityCommandBufferを使う - テラシュールブログ
- Class EntityCommandBufferSystem | Package Manager UI website
- 【Unity】 ECS まとめ(前編) - エフアンダーバー
- 【Unity】 ECS まとめ(後編) - エフアンダーバー
- クォータニオンと回転 - エフアンダーバー
- 【Unity】 Quaternionの使い方 - エフアンダーバー
- Unityでわかる!ゲーム数学(加藤潔)|翔泳社の本