はじめに
たのしいDOTS〜初級から上級まで〜 - Unite Tokyo 2019 を見て、
「Unity DOTS凄い!」
「Unity Physics凄い!」
「使えるようになりたい!」
と思ったのですが、何から始めたら良いか分からなかったのでとりあえず「ただ球を動かす」ところから始めようと思い、その過程を本記事にまとめました。
私と同じような思いを持っている人の助けになれば幸いです。
注意点
- preview packageを多く使用しています。今後、本記事のコードが使えなくなる可能性が高いのでご注意下さい。
- GameObject/Componentを併用した Hybrid ECS を前提としています。
- Unity DOTS(Unity ECS, C# Job System, Burst Compiler) やUnity Physics に関する詳しい説明は行わないのでご注意下さい。
環境
- macOS Catalina 10.15.1
- Unity 2019.2.12f1
- Entities preview 0.1.1
- Burst 1.1.2
- Jobs preview 0.1.1
- Mathematics 1.1.0
- Hybrid Renderer preview 0.1.1
- Unity Physics preview 0.2.4
PackagesのInstall
Window > Package Manager で Packages タブを開きます。
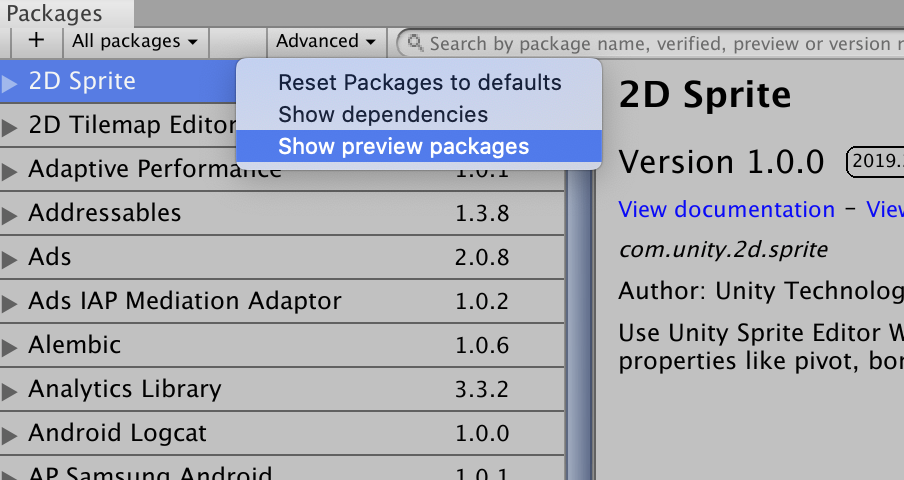
Entities や Hybrid Renderer はこの記事を書いている時点(2019年12月)では preview package なのでリストには表示されていません。
なので Advanced > Show preview packages にチェックを入れ、preview package を選択できるようにします。
Entitiesがリストに表示されたのでInstallします。
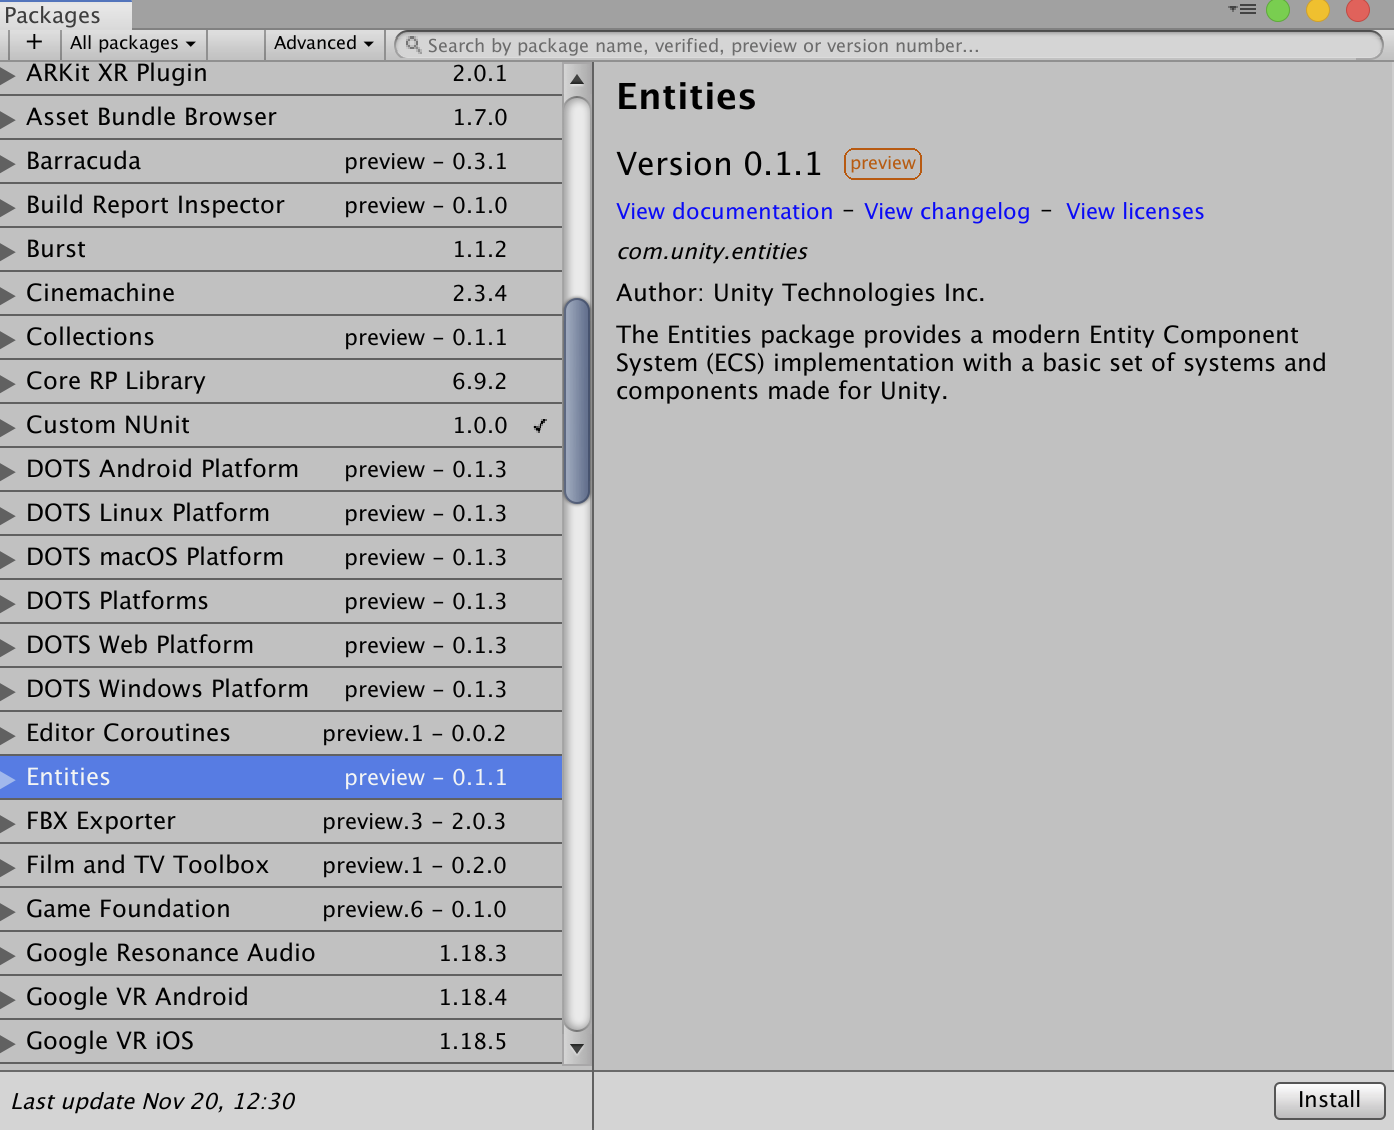
EntitiesをInstallすると、Burst, Jobs, Mathematicsも自動的に一緒にInstallされるので、新たにBurst, Jobs, MathematicsをInstallする必要はありません。
最後にEntitiesと同様に Hybrid Renderer と Unity Physics をInstallします。
Unity Physicsとは
簡単に説明しておくとUnity PhysicsとはDOTSで作られた、C#の物理エンジンです。
主に次のような特徴があります。
- ステートレスで決定論的
- 高パフォーマンス
詳しくは たのしいDOTS〜初級から上級まで〜 - Unite Tokyo 2019 をご覧ください。
地面を作る
3D Objectの作成
まず土台となる地面を作ります。
Cubeでも良いのですが、ここではPlaneの3D Objectを作成して Stage とでも名前を付けておきましょう。
Positionは (0, 0, 0)、Scaleは (5, 1, 5) くらいにしておきます。
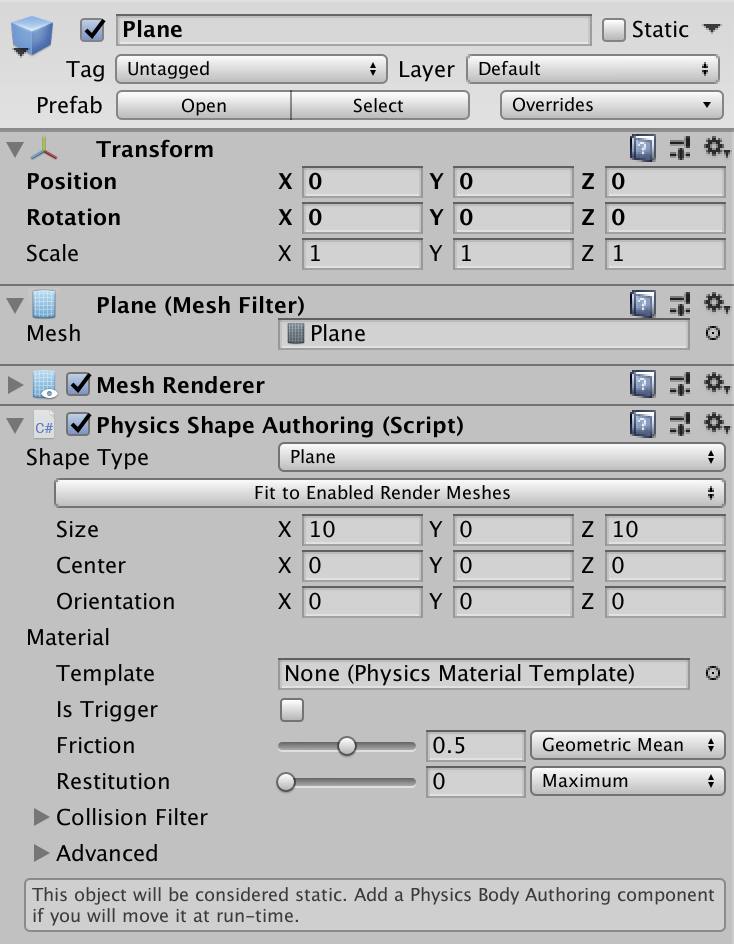
Colliderを交換する

ここでStageにアタッチされているMesh Collider(CubeならBox Collider)はUnity Physicsでは使えないのでRemoveします。
代わりにUnity Physics版のColliderである Physics Shape をAdd Componentします。

ちゃんとAdd Componentできました。(Add ComponentするとInspectorには Physics Shape Authoring と表示されます)
しかし、Inspectorの上部に何か警告が出ています。
The PhysicsShapeAuthoring component on `Stage` is meant for entity conversion, but it is not part of a SubScene or ConvertToEntity component.
Please move the game object to a SubScene or add the ConvertToEntity component.
この警告はStageオブジェクトをEntityに変換する処理を設定していないことが原因で表示されています。
(余談) [RequiresEntityConversion] の意味
そこでPhysicsShapeAuthoringの実装を見てみると、
[AddComponentMenu("DOTS/Physics/Physics Shape")]
[DisallowMultipleComponent]
[RequiresEntityConversion]
public sealed partial class PhysicsShapeAuthoring : MonoBehaviour, IInheritPhysicsMaterialProperties, ISerializationCallbackReceiver
{
     /* ... */
}
このようにクラスの頭に RequiresEntityConversion Attribute が付いています。
これを試しにコメントアウトしてみると、
警告が消えました。
どうやら RequiresEntityConversion Attributeは、GameObjectがEntityにきちんと変換されるかどうかを監視する役割があるようです。
GameObjectがEntityに変換されるかどうか、は万が一のために監視して欲しいので、コメントアウトしたところを元に戻しておきます。
GameObjectをEntityに変換する
StageオブジェクトをEntityに変換します。
GameObjectをEntityに変換する方法はいくつかありますが、ここでは ConvertToEntity コンポーネントを使います。
Stageに ConvertToEntity をAdd Componentします。
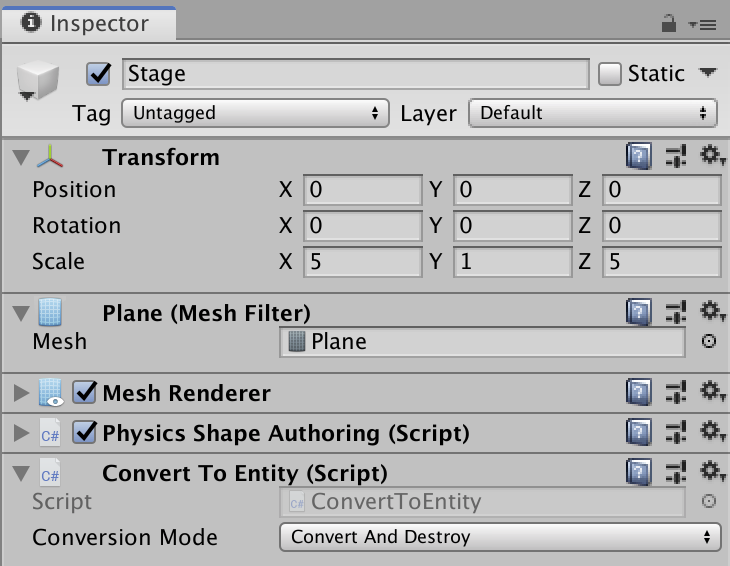
先ほどの警告は消え、これで実行時にStageはGameObjectからEntityに変換されるはずです。
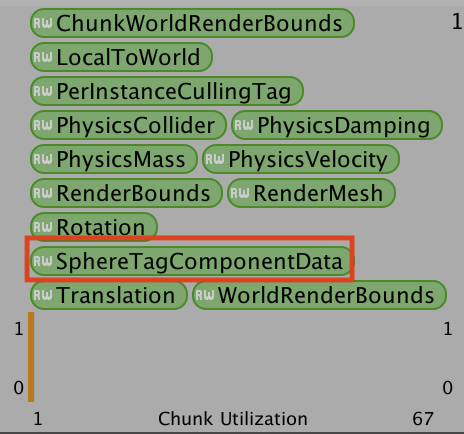
Entity Debuggerを使って確かめる
ConvertToEntity が実際にきちんと働いたか確かめてみます。
Window > Analysis > Entity Debugger でEntity Debuggerを開きます。
そしてUnityエディタを実行します。
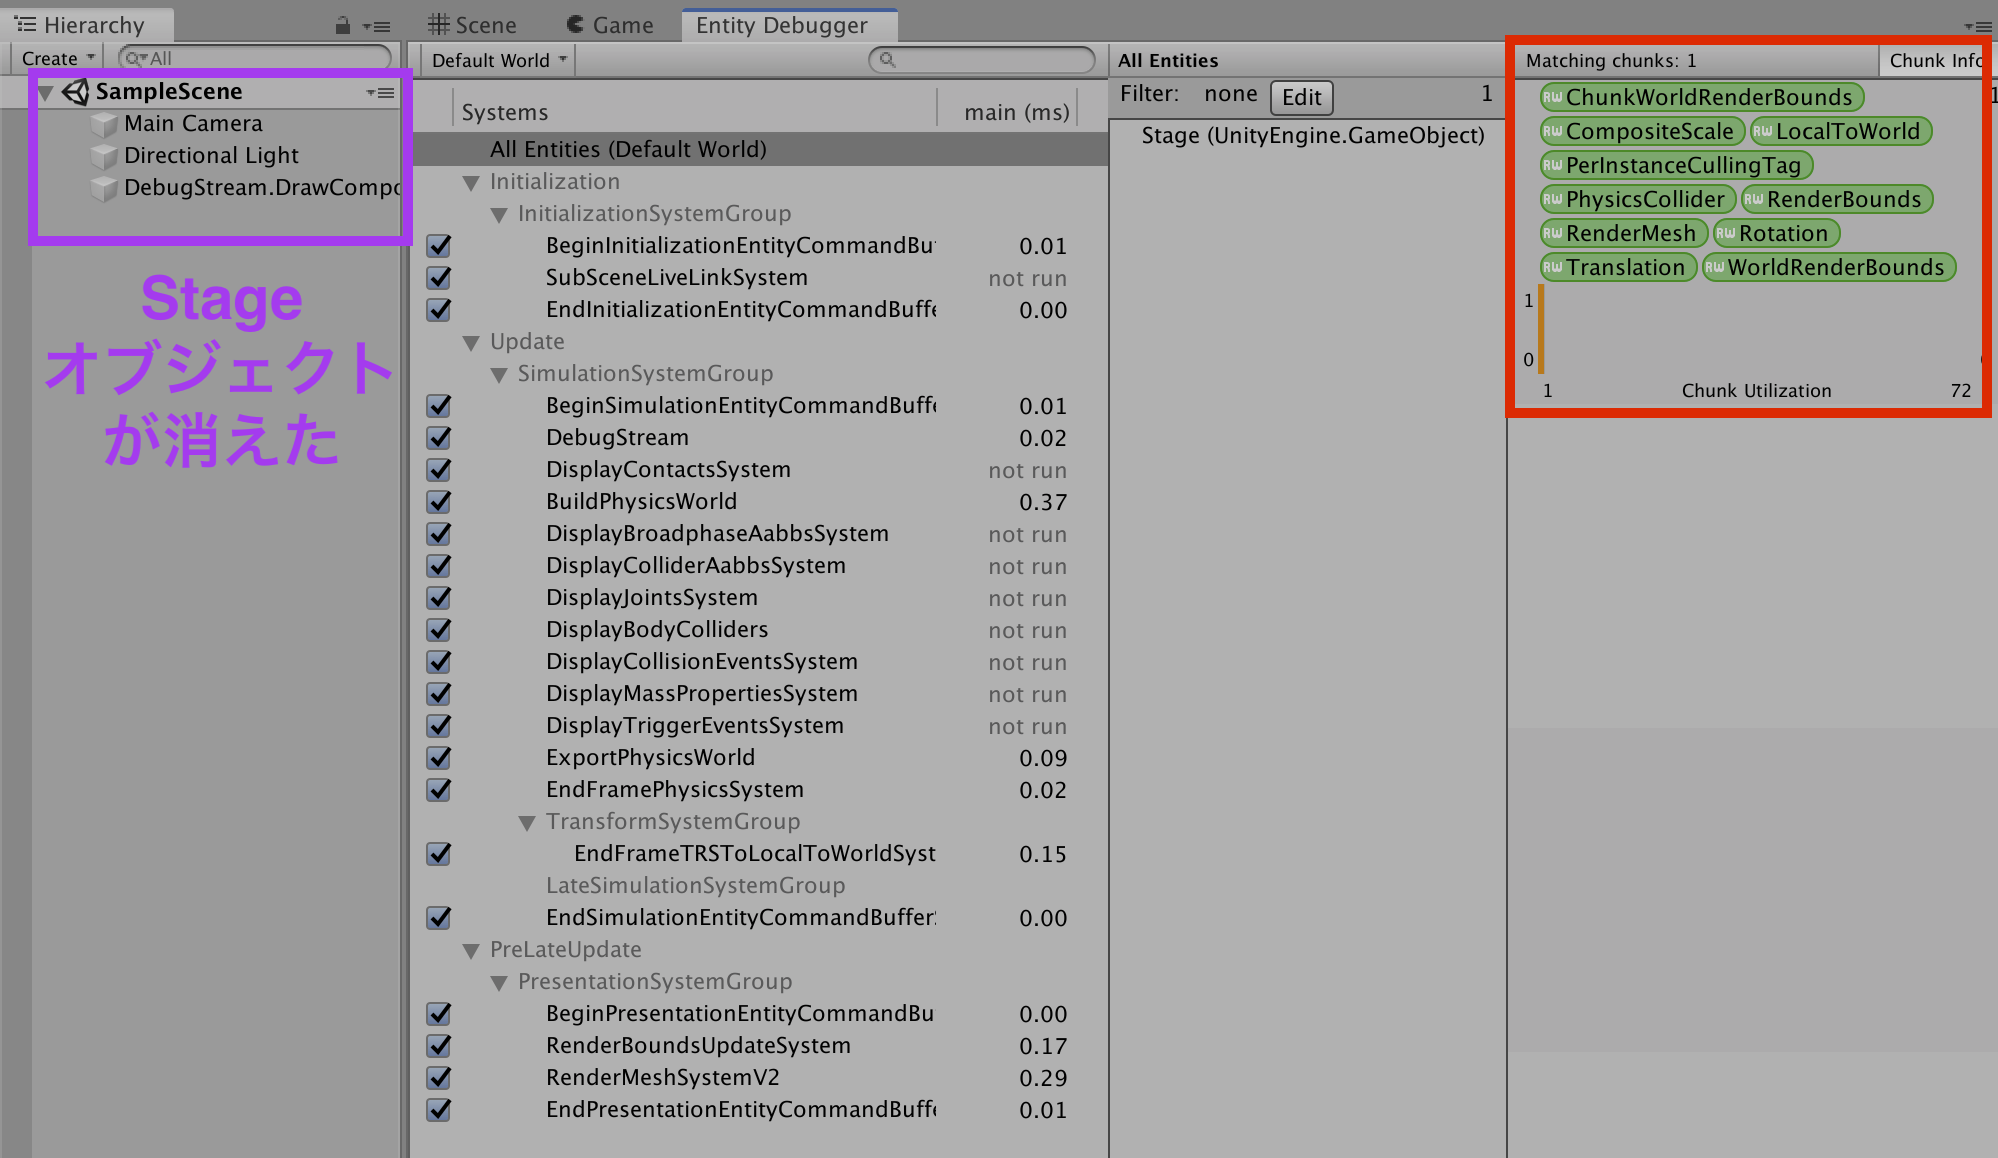
すると、まず左のHierarchyビューからはStageオブジェクトが消えます。
また、Matching Chunksの所(上の画像で右の赤い四角に囲われた所)に、StageオブジェクトにアタッチされていたComponentから変換されたComponentDataの情報が表示されています。
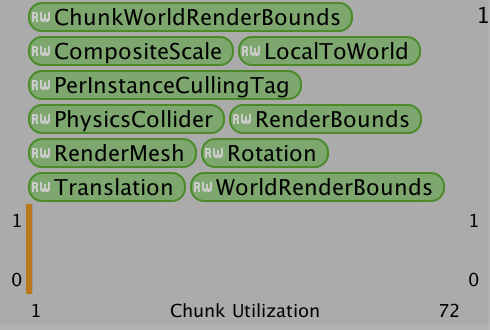
試しにPhysicsShapeAuthoringを削除してから実行し、もう一度Entity Debuggerを確認してみます。
すると、PhysicsColliderが消えました。(他にもCompositeScale が NonUniformScale になっていたりしています)
つまり、3D ObjectにPhysicsShapeAuthoringをアタッチしてEntity化することによって、PhysicsColliderというComponentDataが自動的にEntityに追加される、ということが分かりました。
Colliderの形を変更する
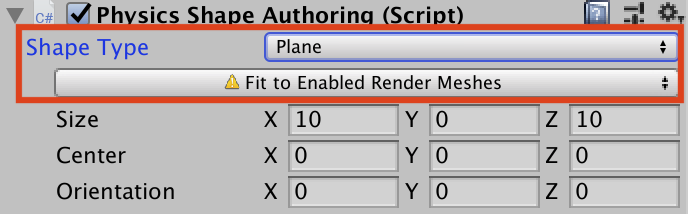
PhysicsShapeAuthoringの Shape type を Plane に変更して、 Fit to Enabled Render Meshes > Apply を選択します。
球を作る
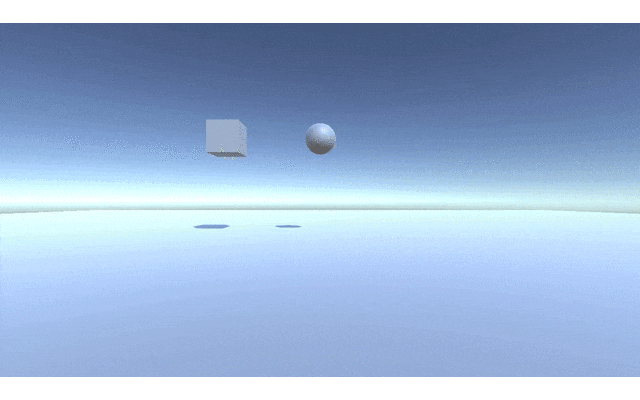
Sphereの3D Objectを作成して、Position を (0, 3, 0)くらいにしておきます。
Sphere Collider を削除して Physics Shape と ConvertToEntity をAdd Componentします。
そしてPhysicsShapeAuthoring の Shape Type を Sphere に設定し、Fit To Enabled Render Meshes > Apply を選択します。
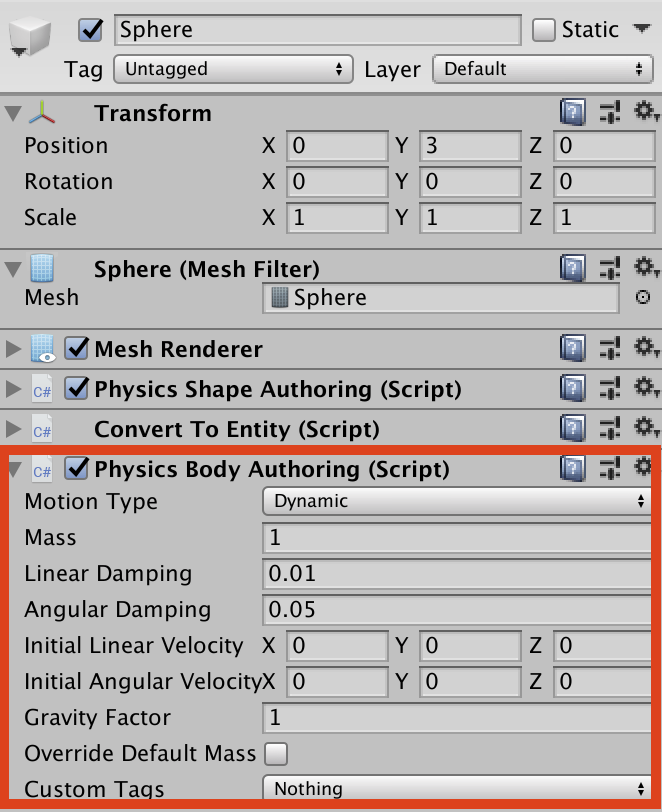
次に Sphere に Physics Body をAdd Componentします。(Add ComponentするとPhysics Body Authoringと表示されます)
PhysicsBodyAuthoringはRigidbodyのUnity Physics版のようなものです。
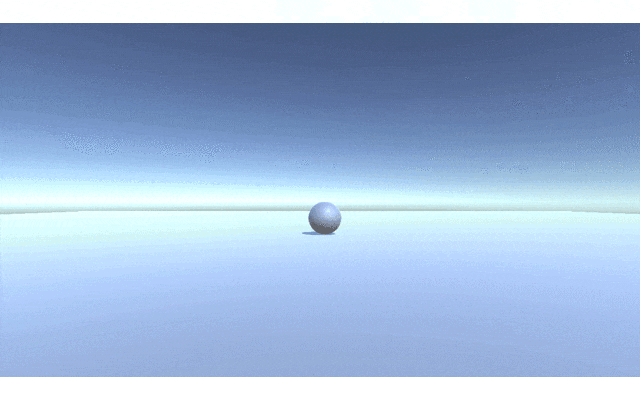
試しに実行してみます。
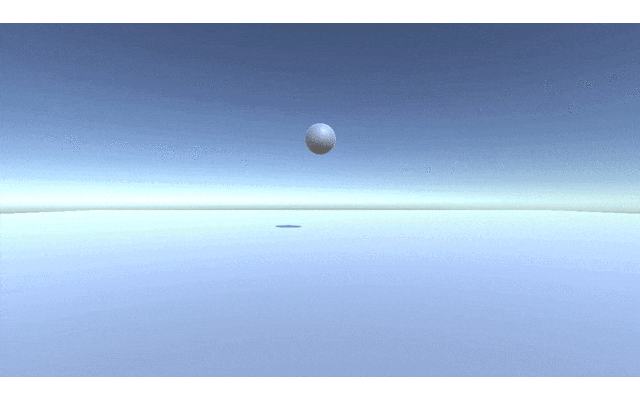
確かに Sphere が落下し Stage と衝突することが確認できました。
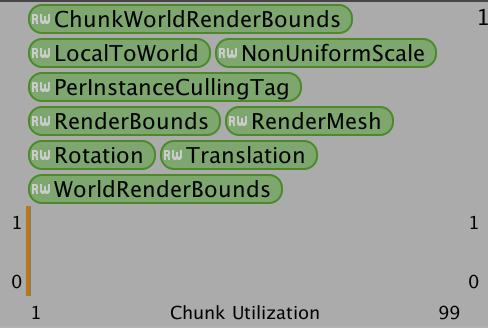
Entity Debuggerを見てみます。

PhysicsDamping, PhysicsMass, PhysicsVelocity という3つのComponentDataが新たに増えています。
つまり、PhysicsBodyAuthoringをアタッチしてEntity化することによって、PhysicsDamping, PhysicsMass, PhysicsVelocity という3つのComponentDataが自動的にEntityに追加される、ということが分かりました。
Sphereを動かす
ここでようやくSphereを動かしてみます。
Unity ECSで何らかの処理を行うには ComponentSystem を継承したクラスを作成し、 OnUpdate() メソッド内に具体的な処理を書きます。
今回は次のような MoveSphereSystem というクラスを作成しました。
using Unity.Entities;
using Unity.Physics;

public class MoveSphereSystem : ComponentSystem
{
    protected override void OnUpdate()
    {
        Entities.ForEach((ref PhysicsVelocity physicsVelocity) =>
        {
            physicsVelocity.Linear.x = 1.0f;
        });
    }
}
OnUpdate() メソッド内にあるEntities.ForEach() では、引数でWorldに存在するEntityの中から操作の対象を絞り込み、絞り込んだEntityに付随しているComponentDataの値を変更することによって目的の処理を実現しています。
ここでは PhysicsVelocity をComponentDataとして持っている(関連付けられている)Entity全てに対して処理を行っています。
今は PhysicsVelocity をComponentDataとして持っているEntityはSphere(をEntity化したもの)だけなので、結局Sphereの速度(のx成分)を設定していることになります。
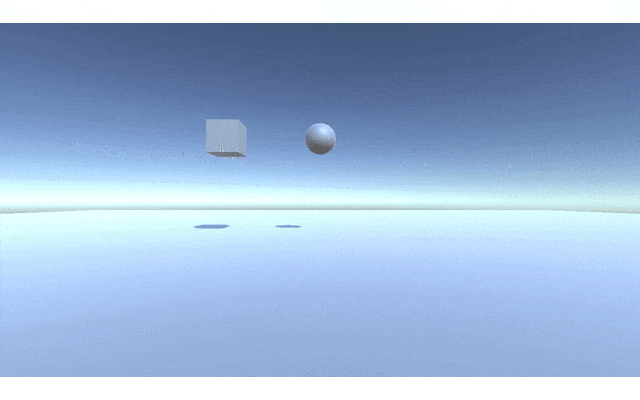
実際に実行してみると、確かにSphereが動いていることが確認できます。
Sphere「だけ」を動かす
ただ、PhysicsVelocityが付いているEntityが今はたまたまSphereしか無かったのでSphereだけが動きましたが、他にもPhysicsVelocityが付いているEntityがある場合、それらに対してもMoveSphereSystemは動作してしまいます。
例えば、Cubeの3D Objectを作成し、ConvertToEntity, Physics Shape Authoring, Physics Body Authoringをアタッチして実行してみると、
このようにSphereと一緒にCubeも動いてしまいます。
複数のモノを動かすことが目的なら勿論これで全く構わないのですが、例えば「Sphereだけを動かしたい!」というような場合だと困りますよね。
何故このようなことになってしまったのかというと、MoveSphereSystem内のEntities.ForEach()の引数で操作の対象となるEntityを絞り込む際の絞り込みが甘かったからです。
CubeもSphereと同様にPhysicsBodyAuthoringがアタッチされていますから、PhysicsVelocityがCubeのEntityに付いています。
そこでEntities.ForEach()の引数による絞り込みの条件を「PhysicsVelocityが付いていること」だけにしてしまうとSphereだけでなくCubeも処理の対象としてヒットしてしまう、というわけです。
なので絞り込みの条件をキツくして、絞り込んだ結果Sphereだけを処理の対象とするようにするために、次のようなComponentDataを作成し、SphereのEntityに追加することにします。
using System;
using Unity.Entities;

[Serializable]
public struct SphereTagComponentData : IComponentData
{
}
単に絞り込みの条件をキツくするためだけのComponentDataなので中身は空でOKです。
そして次のようなSphereAuthoringクラスを作り、Sphereオブジェクトにアタッチします。
using UnityEngine;
using Unity.Entities;

[RequiresEntityConversion]
public class SphereAuthoring : MonoBehaviour, IConvertGameObjectToEntity
{
    public void Convert(Entity entity, EntityManager dstManager, GameObjectConversionSystem conversionSystem)
    {
        dstManager.AddComponentData(entity, new SphereTagComponentData());
    }
}
これで実行時にSphereのEntityにSphereTagComponentDataが追加されます。
MoveSphereSystemを次のように変更します。
using Unity.Entities;
using Unity.Physics;

public class MoveSphereSystem : ComponentSystem
{
    protected override void OnUpdate()
    {
        Entities.ForEach((ref PhysicsVelocity physicsVelocity, ref SphereTagComponentData sphereTagComponentData) =>
        {
            physicsVelocity.Linear.x = 1.0f;
        });
    }
}
これによりEntityの絞り込み条件が「PhysicsVelocityとSphereTagComponentDataを両方持つこと」になったのでSphereのみがこの条件にヒットし、結果的にSphereのみを動かすことができます。
C# Job Systemを使う
MoveSphereSystemをJob Component Systemを使って書き直すことにより並列化することができます。
ComponentSystemではなくJobComponentSystemを継承したクラスを作成し、そのクラス内にさらにIJobForEachを実装した構造体(ここではMoveSphereJob)を作成し、その構造体内のExecute()メソッド内に具体的な処理を書きます。
Execute()メソッドの引数で先ほどのEntities.ForEach()と同じように、操作の対象を絞り込んでいます。
OnUpdate()メソッド内で、たった今定義した処理(Job)を他のスレッドに投げる、ということを行っています。
using Unity.Burst;
using Unity.Collections;
using Unity.Entities;
using Unity.Jobs;
using Unity.Physics;

public class MoveSphereSystem : JobComponentSystem
{
    private struct MoveSphereJob : IJobForEach<PhysicsVelocity, SphereTagComponentData>
    {
        public void Execute(ref PhysicsVelocity physicsVelocity, [ReadOnly] ref SphereTagComponentData sphereTagComponentData)
        {
            physicsVelocity.Linear.x = 1.0f;
        }
    }

    protected override JobHandle OnUpdate(JobHandle inputDeps)
    {
        var job = new MoveSphereJob();
        return job.Schedule(this, inputDeps);
    }
}
Burst Compilerにより高速化する
コードはほとんど同じでMoveSphereJobの直前に[BurstCompile]をつけるだけです。
using Unity.Burst;
using Unity.Collections;
using Unity.Entities;
using Unity.Jobs;
using Unity.Physics;

public class MoveSphereSystem : JobComponentSystem
{
    [BurstCompile]
    private struct MoveSphereJob : IJobForEach<PhysicsVelocity, SphereTagComponentData>
    {
        public void Execute(ref PhysicsVelocity physicsVelocity, [ReadOnly] ref SphereTagComponentData sphereTagComponentData)
        {
            physicsVelocity.Linear.x = 1.0f;
        }
    }

    protected override JobHandle OnUpdate(JobHandle inputDeps)
    {
        var job = new MoveSphereJob();
        return job.Schedule(this, inputDeps);
    }
}
Sphereに力を加えて動かす
ここまでSphereを一定の速度で動かしていましたが、ここではSphereに力を加えて加速させたいと思います。
$ m $ : Sphereの質量
$ \textbf{v} $ : Sphereの速度
$ \textbf{F} $ : Sphereが受ける外力
$ t $ : 時刻
とするとニュートンの運動方程式より
m \frac{d\textbf{v}}{dt} = \textbf{F}
が成り立ちます。
両辺に$dt / m$をかけると
d\textbf{v} = \frac{1}{m}\textbf{F} dt
となります。
左辺に
d\textbf{v} = \textbf{v}(t + dt) - \textbf{v}(t)
を代入して整理すると、
\textbf{v}(t + dt) = \textbf{v}(t) + \frac{1}{m}\textbf{F}dt
となります。
Sphereの質量$m$はPhysicsMassから取得できます。
これをMoveSphereSystemに実装すると、次のようになります。
using Unity.Burst;
using Unity.Collections;
using Unity.Entities;
using Unity.Jobs;
using Unity.Mathematics;
using Unity.Physics;
using UnityEngine;

public class MoveSphereSystem : JobComponentSystem
{
    [BurstCompile]
    private struct MoveSphereJob : IJobForEach<PhysicsVelocity, PhysicsMass, SphereTagComponentData>
    {
        public float3 F;
        public float DeltaTime;

        public void Execute(ref PhysicsVelocity physicsVelocity, [ReadOnly] ref PhysicsMass physicsMass, [ReadOnly] ref SphereTagComponentData sphereTagComponentData)
        {
            physicsVelocity.Linear += physicsMass.InverseMass * F * DeltaTime;
        }
    }

    protected override JobHandle OnUpdate(JobHandle inputDeps)
    {
        var job = new MoveSphereJob
        {
            F = math.float3(5, 0, 0),
            DeltaTime = Time.deltaTime
        };

        return job.Schedule(this, inputDeps);
    }
}
非常に分かりづらいですが、力が加わって加速して動いているように見えなくもないです。
キーボードの入力に応じてSphereを動かす
次にキーボード入力によりSphereを動かす方向を変えられるようにします。
まずForceというComponentDataを新たに作成し、SphereAuthoring内でSphereのEntityに追加します。
using System;
using Unity.Entities;
using Unity.Mathematics;

[Serializable]
public struct Force : IComponentData
{
    public float3 value;
}
using UnityEngine;
using Unity.Entities;

[RequiresEntityConversion]
public class SphereAuthoring : MonoBehaviour, IConvertGameObjectToEntity
{
    public void Convert(Entity entity, EntityManager dstManager, GameObjectConversionSystem conversionSystem)
    {
        dstManager.AddComponentData(entity, new SphereTagComponentData());
        dstManager.AddComponentData(entity, new Force());
    }
}
これに伴い、MoveSphereSystemも次のように変更します。
using Unity.Burst;
using Unity.Collections;
using Unity.Entities;
using Unity.Jobs;
using Unity.Physics;
using UnityEngine;

public class MoveSphereSystem : JobComponentSystem
{
    [BurstCompile]
    private struct MoveSphereJob : IJobForEach<PhysicsVelocity, PhysicsMass, SphereTagComponentData, Force>
    {
        public float DeltaTime;

        public void Execute(ref PhysicsVelocity physicsVelocity,
            [ReadOnly] ref PhysicsMass physicsMass,
            [ReadOnly] ref SphereTagComponentData sphereComponentData,
            ref Force force)
        {
            physicsVelocity.Linear += physicsMass.InverseMass * force.value * DeltaTime;
        }
    }

    protected override JobHandle OnUpdate(JobHandle inputDeps)
    {
        var job = new MoveSphereJob()
        {
            DeltaTime = Time.deltaTime,
        };
        return job.Schedule(this, inputDeps);
    }
}
以前は外力$\textbf{F}$の値をMoveSphereSystemのOnUpdate()内で具体的に設定していたのに対し、それをここではForceというComponentDataに切り出しています。
そしてForceに対する処理を行うChangeForceSystemを作成します。
using Unity.Burst;
using Unity.Collections;
using Unity.Entities;
using Unity.Jobs;
using Unity.Mathematics;
using Unity.Physics;
using UnityEngine;

public class ChangeForceSystem : JobComponentSystem
{
    [BurstCompile]
    private struct ChangeForceJob : IJobForEach<PhysicsVelocity, PhysicsMass, SphereTagComponentData, Force>
    {
        public float3 Force;

        public void Execute(ref PhysicsVelocity physicsVelocity,
            [ReadOnly] ref PhysicsMass physicsMass,
            [ReadOnly] ref SphereTagComponentData sphereComponentData,
            ref Force force)
        {
            force.value = Force;
        }
    }
    protected override JobHandle OnUpdate(JobHandle inputDeps)
    {
        var job = new ChangeForceJob();

        if (Input.GetKey(KeyCode.LeftArrow))
        {
            job.Force = math.float3(-10, 0, 0);
        }

        if (Input.GetKey(KeyCode.RightArrow))
        {
            job.Force = math.float3(10, 0, 0);
        }

        if (Input.GetKey(KeyCode.UpArrow))
        {
            job.Force = math.float3(0, 0, 10);
        }

        if (Input.GetKey(KeyCode.DownArrow))
        {
            job.Force = math.float3(0, 0, -10);
        }

        return job.Schedule(this, inputDeps);
    }
}
キーボードの矢印の入力に従ってSphereを動かすことができました。
今回のサンプルはこちらに置いてあるので良ければ参考にしてみてください。
おわりに
Unity DOTS初心者を対象としているのに、DOTS(ECS, C# Job System, Burst Compiler)自体の詳しい説明はしない、という一体誰をターゲットにしているのかよく分からない中途半端な記事になってしまったことをお許しください。
DOTSを勉強する際は参考に挙げている記事や動画が特にオススメです。
- 追記 -
この記事の続編にあたる Unity DOTSでRoll a Ball(玉転がし)を作る を書きました。
少しでも参考になれば幸いです。
参考
- たのしいDOTS〜初級から上級まで〜 - Unite Tokyo 2019
- Introduction to Unity Physics
- 【Unity】新しい物理演算、Unity Physicsについて
- 【Unity】 ECS まとめ(前編) - エフアンダーバー
- 【Unity】 ECS まとめ(後編) - エフアンダーバー
- 【Unity】 ECSへ 思考の移行ガイド - エフアンダーバー
- 【Unity】Unity 2018のEntity Component System(通称ECS)について(1) - テラシュールブログ
- 大量のオブジェクトを含む広いステージでも大丈夫、そうDOTSならね - Unite Tokyo 2019
- EntityComponentSystemSamples