THREE.SphereGeometryのFacesが非対称で気になった
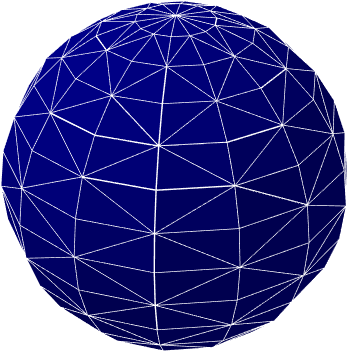
ふと球体の頂点を引っ張りあげてトゲトゲにしてみたいと思い、標準の球体のジオメトリーであるSphereGeometryをワイヤー表示させてみた。
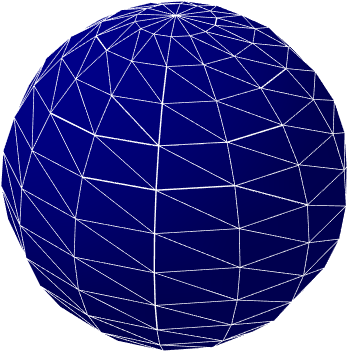
解像度をあげて使う分にはこれで問題ないのだろうが、荒くすると各面(Face)の分割が左右非対称なのが気になって仕方がない。
そこで球体のGeometryを自作してみることに。
頂点座標の作成
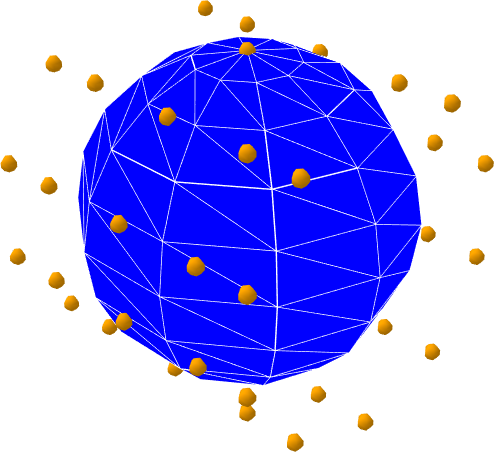
まずはTHREE.SphereGeometryの引数と互換性があるように、垂直分割、水平分割で球体を分割した頂点を作るテストプログラムを作成しました。
let radius = 20 //半径
let rows = 10 //水平分割
let columns = 10 //垂直分割

let vertices = [] //頂点座標のArray

// 上の頂点
let top = new THREE.Vector3(0, radius, 0)

// 下の頂点
let bottom = new THREE.Vector3(0, -radius, 0)

vertices.push(top)

for (let j = 1; j < rows; j++) {

	// 高さ
	let y = Math.cos((j / rows) * Math.PI) * radius

	for (let i = 0; i <= columns; i++) {

		// 横軸
		let x = Math.cos((i / columns) * Math.PI * 2) * radius

		// 奥行き
		let z = Math.sin((i / columns) * Math.PI * 2) * radius

		// Y軸で回転させる
		x *= Math.sin((j / rows) * Math.PI)
		z *= Math.sin((j / rows) * Math.PI)

		// できた頂点座標
		let cord = new THREE.Vector3(x, y, z)

		vertices.push(cord)

	}

}

vertices.push(bottom)
数学はあまり得意ではないので計算した座標とTHREE.SphereGeometryを比べてみて「なんでそうなるー!?」と頭を抱えているところ。
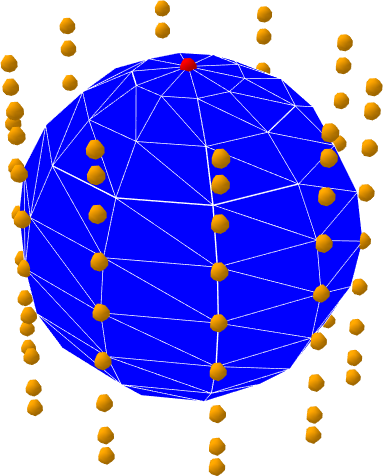
試行錯誤の末やっとなんとかうまく合致させることに成功。
クラスの作成
できたプログラムを元にTHREE.Geometryクラスを親に持つクラスを作成します。
まずは頂点座標を入れるところ。
THREE.TestGeometry.prototype = Object.create(THREE.Geometry.prototype)

THREE.TestGeometry = function (radius, columns, rows) {
	THREE.Geometry.call(this);

	this.vertices = [];
	let indexes = [];

	// create vertex

	let top = new THREE.Vector3(0, radius, 0)
	let bottom = new THREE.Vector3(0, -radius, 0)

	indexes[0] = [this.vertices.push(top) - 1]

	for (let j = 1; j < rows; j++) {

		indexes[j] = []

		let d = Math.sin((j / rows) * Math.PI)

		let y = Math.cos((j / rows) * Math.PI) * radius

		for (let i = 0; i <= columns; i++) {

			let x = Math.cos((i / columns) * Math.PI * 2) * radius * d

			let z = Math.sin((i / columns) * Math.PI * 2) * radius * d

			let cord = new THREE.Vector3(x, y, z)

			indexes[j].push(this.vertices.push(cord) - 1)

		}

	}

	indexes[rows] = [this.vertices.push(bottom) - 1]

	this.center();
	this.mergeVertices();
}
THREE.TestGeometry.prototype.constructor = THREE.TestGeometry
このままでは面情報(faces)が無いのでエラーとなりますので、ここに今回の目的である交互分割の面情報を入れていきます。
THREE.TestGeometry = function (radius, columns, rows) {
	THREE.Geometry.call(this);

	this.vertices = [];
	let indexes = [];

	// create vertices

	//~~~~~~~中略~~~~~~~

	this.faces = []
	let white = new THREE.Color(1, 1, 1)

	// 範囲チェック付きで配列の中身を取得する関数
	let get = (o, a, b) => {
		return b < o[a].length ? o[a][b] : o[a][o[a].length - 1]
	}

	// 重複チェック付きで push する関数
	let push = (o, a) => {
		return o.indexOf(a) >= 0 ? o.indexOf(a) + 1 : o.push(a)
	}

	// 面を作成
	for (let j = 0; j < rows; j++) {

		for (let i = 0; i < columns; i++) {

			//4個または3個の頂点の配列インデックスを取得
			let v = []
			push(v, get(indexes, j + 0, i + 0))
			push(v, get(indexes, j + 0, i + 1))
			push(v, get(indexes, j + 1, i + 1))
			push(v, get(indexes, j + 1, i + 0))

			//頂点が4個
			if (v.length == 4) {

				let f = Math.floor((j + i) % 2) //垂直+水平の剰余で分割を交互させる
				// 0_____1 0_____1
				// |\    | |    /|
				// |  \  | |  /  |
				// |____\| |/____|
				// 3     2 3     2

				this.faces.push(
					new THREE.Face3(v[0], v[1], v[2 + f], THREE.vertexNormals, white, 0),
					new THREE.Face3(v[0 + f], v[2], v[3], THREE.vertexNormals, white, 0)
				)

			//球体の上下の頂点ならば3個
			} else {

				this.faces.push(
					new THREE.Face3(v[2], v[0], v[1], THREE.vertexNormals, white, 0)
				)

			}

		}

	}

	this.center();
	this.mergeVertices();
	this.computeFaceNormals()
}
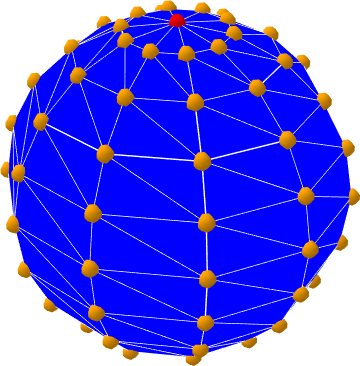
表示結果:
やったぞ!これぞ求めていた分割!!!
UV座標の追加
これでも使えることは使えますが、ちゃんと行儀よくUV座標の情報も入れておきます。
THREE.TestGeometry = function (radius, columns, rows) {
	THREE.Geometry.call(this);

	this.vertices = [];
	let indexes = [];

	// create vertices

	//~~~~~~~中略~~~~~~~

	// UV座標の計算(X軸を反転させているのは横の面(face)設定が時計回りの為、面が右から左へ向かって追加されている為)
	let uvs = []
	for (let j = 0; j < rows; j++) {

		uvs[j] = []

		for (let i = 0; i < columns; i++) {

			if (j == 0) {
				//上面のテクスチャ用
				uvs[j][i] = [{
					x: 1 - (i + 0.5) / columns,
					y: 1 - j / rows
				},
				{
					x: 1 - i / columns,
					y: 1 - (j + 1) / rows
				},
				{
					x: 1 - (i + 1) / columns,
					y: 1 - (j + 1) / rows
				},
				]

			} else if (j == rows - 1) {
				//下面のテクスチャ用
				uvs[j][i] = [{
					x: 1 - i / columns,
					y: 1 - j / rows
				},
				{
					x: 1 - (i + 1) / columns,
					y: 1 - j / rows
				},
				{
					x: 1 - (i + 0.5) / columns,
					y: 1 - (j + 1) / rows
				},
				]

			} else {
				//側面のテクスチャ用
				uvs[j][i] = [{
					x: 1 - i / columns,
					y: 1 - j / rows
				},
				{
					x: 1 - (i + 1) / columns,
					y: 1 - j / rows
				},
				{
					x: 1 - (i + 1) / columns,
					y: 1 - (j + 1) / rows
				},
				{
					x: 1 - i / columns,
					y: 1 - (j + 1) / rows
				},
				]

			}
		}
	}

	// create face

	this.faces = []
	let white = new THREE.Color(1, 1, 1)

	let get = (o, a, b) => {
		return b < o[a].length ? o[a][b] : o[a][o[a].length - 1]
	}

	let push = (o, a) => {
		return o.indexOf(a) >= 0 ? o.indexOf(a) + 1 : o.push(a)
	}

	for (let j = 0; j < rows; j++) {

		for (let i = 0; i < columns; i++) {

			let v = []
			push(v, get(indexes, j + 0, i + 0))
			push(v, get(indexes, j + 0, i + 1))
			push(v, get(indexes, j + 1, i + 1))
			push(v, get(indexes, j + 1, i + 0))

			let p = uvs[j][i]

			if (v.length > 3) {

				let f = Math.floor((j + i) % 2)

				this.faces.push(
					new THREE.Face3(v[0], v[1], v[2 + f], THREE.vertexNormals, white, 0),
					new THREE.Face3(v[0 + f], v[2], v[3], THREE.vertexNormals, white, 0)
				)

				// UV座標の追加
				this.faceVertexUvs[0].push(
					[new THREE.Vector2(p[0].x, p[0].y), new THREE.Vector2(p[1].x, p[1].y), new THREE.Vector2(p[2 + f].x, p[2 + f].y)],
					[new THREE.Vector2(p[f].x, p[f].y), new THREE.Vector2(p[2].x, p[2].y), new THREE.Vector2(p[3].x, p[3].y), ],
				)

			} else {

				this.faces.push(
					new THREE.Face3(v[2], v[0], v[1], THREE.vertexNormals, white, 0)
				)


				// UV座標の追加(上下でちゃんと向きが変わるようにする)
				let f = j == 0 ? 0: 1

				this.faceVertexUvs[0].push(
					[new THREE.Vector2(p[1 + f].x, p[1 + f].y), new THREE.Vector2(p[0].x, p[0].y), new THREE.Vector2(p[2 - f].x, p[2 - f].y)]
				)

			}

		}

	}

	this.center()
	this.mergeVertices()
	this.computeFaceNormals()

}
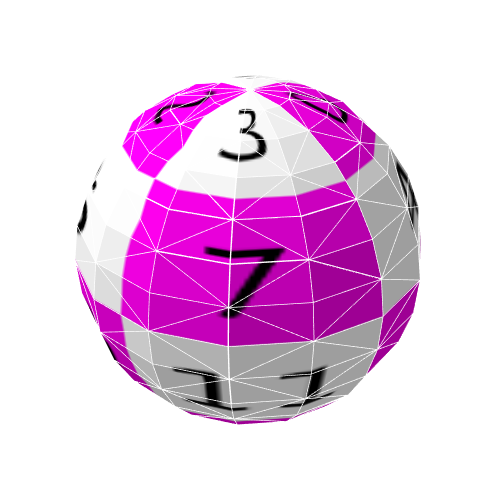
テクスチャの貼り付けテスト。これで完成です!
実際のクラスと動作はCodePenにアップロードしました。
CodePen - THREE.KusudamaGeometry
See the Pen THREE.KusudamaGeometry by Urushibara (@pneuma01) on CodePen.