はじめに
株式会社マイスター・ギルド新規事業部のウサギーです。
弊社新規事業部では、新規サービスの立ち上げを目指して
日々、アイディアの検証やプロトタイプの作成を行っています!
今回は、考えていたサービス案についてプロトタイプを作成するため、
オンライン通信の機能を用意したくて、SkyWayの1:1通信を試してみました。
なぜSkyWay?
今回の目的は、新規事業部で使う実験用のプロトタイプです。
製品そのものを作るわけではないので
○ とにかく早く
○ カスタマイズ性は高く
むしろ
△(保守性や拡張性を気にして)実験開始が遅れる
そのため
○ ベストやベターな技術選定でなくてもよい
と考えています。
極論を言うとWebアプリでなくてもよかったのですが、
弊社としてはWebアプリにするのが一番早いと思われたのでWebアプリを採用しました。
そうした事情から社内で調査実績があるSkyWayをチョイス。
以前の調査記事はこちら。弊社エンジニア619さんの執筆です。
SkyWayとは
NTTコミュニケーションズが提供する、ビデオ・音声通話を簡単に実装できるSDKとAPIです。
マルチプラットフォームに対応しており、JavaScript/iOS/Android向けのSDKと
ブラウザ外からも利用できるWebRTCエンジン等が提供されています。
WebRTC(Web Real-Time Communication)はウェブブラウザやモバイルアプリでリアルタイム通信を提供するAPI(と、そのプロジェクト)のことのようです。WebRTC?なにそれ?な知識レベルですが問題なくSkyWayが使えました。
SkyWayには2つの通信モデルが用意されています。
1.電話モデル
2.ルームモデル
ルームモデルはビデオ会議のようなモデルになります。
今回はブラウザ間での1:1、つまり、電話モデル使いたいと思います。
チュートリアル
さすが日本企業、SkyWayのエンジニア向けドキュメントはとても親切です。
チュートリアルの通り進めれば問題なくサンプルを動かすことができると思います。
チュートリアル
以下、チュートリアルを実施後に個人的にまとめた記録となります。
アカウントとAPIキーの作成
SkyWayのWebページからCommunity Edition(無料版)に登録します。

「無料で始める」から登録画面に入れます。

アカウントが作成できたら、API Keyを作成します。

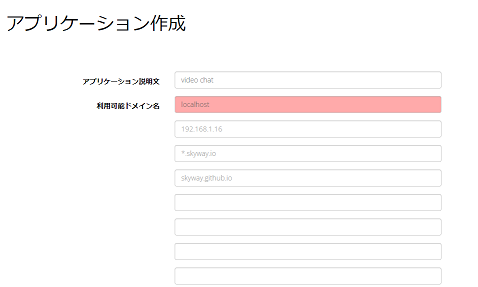
「新しくアプリケーションを追加する」からアプリケーション作成画面に入ります。

「アプリケーション説明文」と「利用可能ドメイン名」を入力します。
ローカル環境での開発用なのでlocalhostを入力しました。値はあとからも変更できます。
Webサーバーにアップロードするときは、サーバーのドメインもここに追加します。

とりあえず設定はデフォルトのままで「アプリケーションを作成する」をクリック。

※ステータスが利用中になっていないと通信できないので注意。
ローカルWebサーバーの準備
docker環境下でnginxを使用しています。
私がポヤポヤしてる間に新規事業部のヒツジーさんが用意してくれたのでそのまま使っています。
たぶん私1人でやっていたらVisual Studio Codeの拡張機能Live Serverを使ってたと思います。
HTML
HTMLファイルにSDKをインポート
   :
    <script src="//cdn.webrtc.ecl.ntt.com/skyway-latest.js"></script>
    <script src="./js/main.js"></script>
</body>
</html>
video要素を用意
自分のカメラ映像を表示するvideo要素
<video id="my-video" width="384px" height="216px" autoplay muted playsinline></video>
相手のカメラ映像を表示するvideo要素も
<video id="their-video" width="384px" height="216px" autoplay muted playsinline></video>
自分のPeerIDを表示する要素を用意
<p class="my-id-label">自分のPeerID: <span id="my-id"></span></p>
通信相手のPeerIDを入力するフォームと発信ボタンを用意
<p>
<label class="call-id-form-label" for="their-id">相手のPeerID: </label>
<input id="their-id" class="call-id-form">
<button type="button" id="call-btn">発信</button>
</p>
JavaScript
カメラ映像と音声を取得
let localStream;
const myVideo = document.getElementById('my-video');
navigator.mediaDevices.getUserMedia({ video: true, audio: true })
    .then(stream => {
        myVideo.srcObject = stream;
        myVideo.play();
        localStream = stream;
    }).catch(error => {
        console.error('mediaDevice.getUserMedia() error:', error);
    });
Peerの作成
const peer = new Peer({
    key: 'SkyWayのAPI Keyを入れてね',
    debug: 3
});
Peerオブジェクトは接続を管理するしているオブジェクトです。
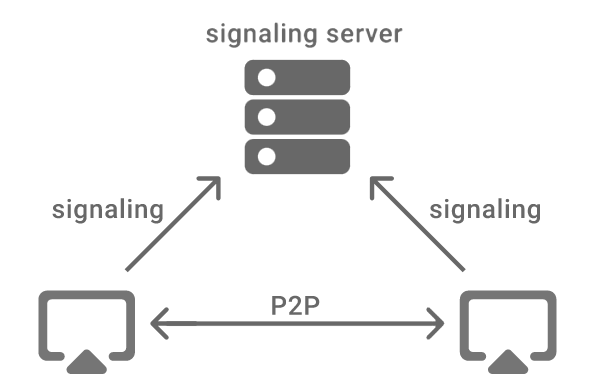
Peerオブジェクトを通じてシグナリングサーバーにアクセスしたり、通信相手と音声・映像を送受信します。
keyには作成したAPI Keyを入れてください。
Peer:SkyWayより引用
debugはログ出力レベルで、「3」は「開発用に全てのログを出力」の意。
シグナリングサーバー???となったので調べてみましたが、「通信相手を探す」ためのサーバーで、
シグナリングサーバーを通じて通信相手の情報を取得できるようになっているとのことです。
自分のPeerIDを取得して画面に表示
peer.on('open', () => {
    document.getElementById('my-id').textContent = peer.id;
});
PeerIDはPeerオブジェクトの’open’イベント発生時に取得。
’open’イベントはSkyWayのシグナリングサーバとの接続が成功したタイミングで発生するイベントとのこと。
発信処理
相手のPeerIDを入力し「発信」ボタンを押したときの動作を用意。
document.getElementById('call-btn').onclick = () => {
    const theirID = document.getElementById('their-id').value;
    const mediaConnection = peer.call(theirID, localStream);
    setEventListener(mediaConnection);
};
発信処理はPeerオブジェクトのcallメソッドを使います。
引数は2つ
- 通信相手のPeerID
- 自分のカメラ映像(localStream)
callメソッドは、相手に接続したときにMediaConnectionオブジェクトを返します。
そのため、MediaConnectionを待ち受けるイベントリスナーを用意します。
相手のカメラ映像を表示(MediaConnectionを待ち受けるイベントリスナー)
const theirVideo = document.getElementById('their-video');
const setEventListener = mediaConnection => {
    mediaConnection.on('stream', stream => {
        theirVideo.srcObject = stream;
        theirVideo.play();
    });
}
相手の映像を取得するにはMediaConnectionオブジェクトの’stream’イベントを使います。
’stream’イベントは相手の映像を取得したときに発生するため、
MediaConnectionを待ち受けるイベントリスナー内で’stream’イベント発生時の処理を用意しておきます。
着信処理
着信時の処理も用意しておきます。
相手から接続要求が来たタイミングでPeerオブジェクトのcallイベントが発生するので、このcallイベントを使用します。
peer.on('call', mediaConnection => {
    mediaConnection.answer(localStream);
    setEventListener(mediaConnection);
});
callイベントの発生時にMediaConnectionオブジェクトが取得できます。
MediaConnectionオブジェクトのanswerメソッドで自分のカメラ映像を相手に渡せます。
相手の映像は発信時と同様にMediaConnectionオブジェクトの’stream’イベントを使います。
実行
別タブで開きます。
一方のPeerIDをコピペして発信を押す
接続できました!
↓video要素の”muted”をとれば音声をONにできますが、
ハウリングするので、ミュートでテストするのがおすすめです。
<video autoplay muted playsinline></video>
コード全体
<!DOCTYPE html>
<html lang="ja">
<head>
    <meta charset="UTF-8">
    <meta name="viewport" content="width=device-width, initial-scale=1">
    <title>1対1ビデオ通話</title>
    <style type="text/css">
        .container{
            width: 900px;
        }
        .main-wrapper{
            height: 600px;
        }
        .my-section{
            float: left;
            width: 50%;
            height: 100%;
        }
        .their-section{
            float: right;
            width: 50%;
            height: 100%;
        }
    </style>
</head>
<body>
    <h1>1対1ビデオ通話のサンプル</h1>
    <div class="container">
        <div class="my-section">
            <p class="my-id-label">自分のPeerID: <span id="my-id"></span></p>
            <video id="my-video" width="384px" height="216px" autoplay muted playsinline></video>
        </div>
        <div class="their-section">
            <p>
                <label class="call-id-form-label" for="their-id">相手のPeerID: </label>
                <input id="their-id" class="call-id-form">
                <button type="button" id="call-btn">発信</button>
            </p>
            <video id="their-video"  width="384px" height="216px" autoplay muted playsinline></video>
        </div>
    </div>
    <script src="//cdn.webrtc.ecl.ntt.com/skyway-latest.js"></script>
    <script src="./main.js"></script>
</body>
</html>
window.__SKYWAY_KEY__ = 'SkyWayのAPI Keyを入れてね';

let localStream;
const myVideo = document.getElementById('my-video');
const theirVideo = document.getElementById('their-video');

navigator.mediaDevices.getUserMedia({ video: true, audio: true })
    .then(stream => {
        myVideo.srcObject = stream;
        myVideo.play();
        localStream = stream;
    }).catch(error => {
        console.error('mediaDevice.getUserMedia() error:', error);
});

const peer = new Peer({
    key: window.__SKYWAY_KEY__,
    debug: 3
});

peer.on('open', () => {
    document.getElementById('my-id').textContent = peer.id;
});

document.getElementById('call-btn').onclick = () => {
    const theirID = document.getElementById('their-id').value;
    const mediaConnection = peer.call(theirID, localStream);
    setEventListener(mediaConnection);
};

const setEventListener = mediaConnection => {
    mediaConnection.on('stream', stream => {
        theirVideo.srcObject = stream;
        theirVideo.play();
    });
}

peer.on('call', mediaConnection => {
    mediaConnection.answer(localStream);
    setEventListener(mediaConnection);
});
おわりに
WebRTC?なにそれ?状態からでも1:1通信のアプリを作ることが出来ました。
これをベースに「実験用のプロトタイプ」を作成し、色々実験していきたいと思います。
お手元で試してみたい方は、上記のコードをコピペしてみてくださいねー


