はじめに
株式会社マイスター・ギルド新規事業部のウサギーです。
弊社新規事業部では、新規サービスの立ち上げを目指して
日々、アイディアの検証やプロトタイプの作成を行っています。
今回はブラウザで使えるQRコードリーダーをさっくり作りたいな~と思いjsQRを使ってみました。
jsQRとは?
javascriptで作られたQRコード読み取りライブラリです。
公式ページ https://github.com/cozmo/jsQR
デモページ https://cozmo.github.io/jsQR/
使用方法
公式のDemoページと同じようなものを作ってみます。
1 jsQR.jsを使う準備
jsQR.jsをDLしてプロジェクトに含めます。

HTMLにjsQR.jsを読み込みます。
<script src="./jsQR.js"></script>
2 表示の準備
・QR読み込みのためのカメラ映像を表示する<video>要素
・<video>要素をもとにカメラ映像を表示する<canvas>要素
・QRコードの周りに赤枠を表示するための<canvas>要素
を準備します。
<div id="wrapper">
    <video id="video" autoplay muted playsinline></video>
    <canvas id="camera-canvas"></canvas>
    <canvas id="rect-canvas"></canvas>
</div>
次で説明しますが、jsQRを使ってQRコードを検出するときのinputソースにvideo要素が使えないため
カメラ映像を表示用の<canvas>要素も用意しています。
これらを重ねて表示したい&video要素は見えなくてもよいので、cssは次のように用意しました。
#wrapper{
    position: relative;
}

#video{
    position: absolute;
    top: 0px;
    left: 0px;
    visibility: hidden;
}

#camera-canvas{
    position: absolute;
    top: 0px;
    left: 0px;
    z-index: 50;
}

#rect-canvas{
    position: absolute;
    top: 0px;
    left: 0px;
    z-index: 100;
}
3 カメラ映像の表示
// Webカメラの起動
const video = document.getElementById('video');
let contentWidth;
let contentHeight;

const media = navigator.mediaDevices.getUserMedia({ audio: false, video: {width:640, height:480} })
   .then((stream) => {
      video.srcObject = stream;
      video.onloadeddata = () => {
         video.play();
         contentWidth = video.clientWidth;
         contentHeight = video.clientHeight;
         canvasUpdate(); // 次で記述
         checkImage(); // 次で記述
      }
   }).catch((e) => {
      console.log(e);
   });
// カメラ映像のキャンバス表示
const cvs = document.getElementById('camera-canvas');
const ctx = cvs.getContext('2d');
const canvasUpdate = () => {
   cvs.width = contentWidth;
   cvs.height = contentHeight;
   ctx.drawImage(video, 0, 0, contentWidth, contentHeight);
   requestAnimationFrame(canvasUpdate);
}
4 QRコードの検出
const code = jsQR(imageData, width, height, options?);

if (code) {
  console.log("Found QR code", code);
}
QRコードの検出は上記のコードを使います。
jsQRメソッドの第一引数が「 imageData 」なので、<canvas>要素を用意した訳です。
// QRコードの検出
const rectCvs = document.getElementById('rect-canvas');
const rectCtx =  rectCvs.getContext('2d');
const checkImage = () => {
   // imageDataを作る
   const imageData = ctx.getImageData(0, 0, contentWidth, contentHeight);
   // jsQRに渡す
   const code = jsQR(imageData.data, contentWidth, contentHeight);

   // 検出結果に合わせて処理を実施
   if (code) {
      console.log("QRcodeが見つかりました", code);
      drawRect(code.location);
   } else {
      console.log("QRcodeが見つかりません…", code);
      rectCtx.clearRect(0, 0, contentWidth, contentHeight);
   }
   setTimeout(()=>{ checkImage() }, 500);
}
// 四辺形の描画
const drawRect = (location) => {
   rectCvs.width = contentWidth;
   rectCvs.height = contentHeight;
   drawLine(location.topLeftCorner, location.topRightCorner);
   drawLine(location.topRightCorner, location.bottomRightCorner);
   drawLine(location.bottomRightCorner, location.bottomLeftCorner);
   drawLine(location.bottomLeftCorner, location.topLeftCorner)
}

// 線の描画
const drawLine = (begin, end) => {
   rectCtx.lineWidth = 4;
   rectCtx.strokeStyle = "#F00";
   rectCtx.beginPath();
   rectCtx.moveTo(begin.x, begin.y);
   rectCtx.lineTo(end.x, end.y);
   rectCtx.stroke();
}
これで、検出部はできました!
5 QRコードの情報取得
QRコードの情報も取り出してみます。
表示部を用意
<span id="qr-msg">QRコード: 見つかりません</span>
#qr-msg{
    position: absolute;
    top: 500px;
    left: 0px;
}
// QRコードの検出
const rectCvs = document.getElementById('rect-canvas');
const rectCtx =  rectCvs.getContext('2d');
const checkImage = () => {
   // imageDataを作る
   const imageData = ctx.getImageData(0, 0, contentWidth, contentHeight);
   // jsQRに渡す
   const code = jsQR(imageData.data, contentWidth, contentHeight);

   // 検出結果に合わせて処理を実施
   if (code) {
      console.log("QRcodeが見つかりました", code);
      drawRect(code.location);
+     document.getElementById('qr-msg').textContent = `QRコード:${code.data}`;
   } else {
      console.log("QRcodeが見つかりません…", code);
      rectCtx.clearRect(0, 0, contentWidth, contentHeight);
+     document.getElementById('qr-msg').textContent = `QRコード: 見つかりません`;
   }
   setTimeout(()=>{ checkImage() }, 500);
}
コード全体
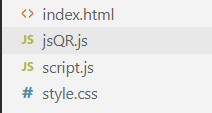
index.html
<!DOCTYPE html>
<head>
    <title>QRコードのテスト</title>
    <link rel="stylesheet" href="style.css">
</head>
<body>
        <div id="wrapper">
            <video id="video" autoplay muted playsinline></video>
            <canvas id="camera-canvas"></canvas>
            <canvas id="rect-canvas"></canvas>
            <span id="qr-msg">QRコード: 見つかりません</span>
        </div>
    <script src="./jsQR.js"></script>
    <script src="./script.js"></script>
</body>
</html>
style.css
#wrapper{
    position: relative;
}

#video{
    position: absolute;
    top: 0px;
    left: 0px;
    visibility: hidden;
}

#camera-canvas{
    position: absolute;
    top: 0px;
    left: 0px;
    z-index: 50;
}

#rect-canvas{
    position: absolute;
    top: 0px;
    left: 0px;
    z-index: 100;
}

#qr-msg{
    position: absolute;
    top: 500px;
    left: 0px;
}
script.js
// Webカメラの起動
const video = document.getElementById('video');
let contentWidth;
let contentHeight;

const media = navigator.mediaDevices.getUserMedia({ audio: false, video: {width:640, height:480} })
   .then((stream) => {
      video.srcObject = stream;
      video.onloadeddata = () => {
         video.play();
         contentWidth = video.clientWidth;
         contentHeight = video.clientHeight;
         canvasUpdate();
         checkImage();
      }
   }).catch((e) => {
      console.log(e);
   });

// カメラ映像のキャンバス表示
const cvs = document.getElementById('camera-canvas');
const ctx = cvs.getContext('2d');
const canvasUpdate = () => {
   cvs.width = contentWidth;
   cvs.height = contentHeight;
   ctx.drawImage(video, 0, 0, contentWidth, contentHeight);
   requestAnimationFrame(canvasUpdate);
}

// QRコードの検出
const rectCvs = document.getElementById('rect-canvas');
const rectCtx =  rectCvs.getContext('2d');
const checkImage = () => {
   // imageDataを作る
   const imageData = ctx.getImageData(0, 0, contentWidth, contentHeight);
   // jsQRに渡す
   const code = jsQR(imageData.data, contentWidth, contentHeight);

   // 検出結果に合わせて処理を実施
   if (code) {
      console.log("QRcodeが見つかりました", code);
      drawRect(code.location);
      document.getElementById('qr-msg').textContent = `QRコード:${code.data}`;
   } else {
      console.log("QRcodeが見つかりません…", code);
      rectCtx.clearRect(0, 0, contentWidth, contentHeight);
      document.getElementById('qr-msg').textContent = `QRコード: 見つかりません`;
   }
   setTimeout(()=>{ checkImage() }, 500);
}

// 四辺形の描画
const drawRect = (location) => {
   rectCvs.width = contentWidth;
   rectCvs.height = contentHeight;
   drawLine(location.topLeftCorner, location.topRightCorner);
   drawLine(location.topRightCorner, location.bottomRightCorner);
   drawLine(location.bottomRightCorner, location.bottomLeftCorner);
   drawLine(location.bottomLeftCorner, location.topLeftCorner)
}

// 線の描画
const drawLine = (begin, end) => {
   rectCtx.lineWidth = 4;
   rectCtx.strokeStyle = "#F00";
   rectCtx.beginPath();
   rectCtx.moveTo(begin.x, begin.y);
   rectCtx.lineTo(end.x, end.y);
   rectCtx.stroke();
}
おまけ
QRコードでなんか遊べないかなぁ、と思って
ドレミファソラシドの音が出るプログラムを作ってみました。
「C4」~「C5」のQRコードを作ってかざすと音が出ます。
   // 検出結果に合わせて処理を実施
   if (code) {
      console.log("QRcodeが見つかりました", code);
      drawRect(code.location);
      document.getElementById('my-qr-msg').textContent = `QRコード:${code.data}`;
+     playPitche(code.data);
   }
+// 指定周波数音を出す
+let audioCtx = new AudioContext();
+const playMelody = (hz) => {
+    let osc = audioCtx.createOscillator();
+    osc.frequency.value = hz;
+    let audDes = audioCtx.destination;
+    osc.connect(audDes);
+    osc.start = osc.start || osc.noteOn;
+    osc.start();
+    setTimeout(function() { osc.stop(0);}, 200);
+}

+// ドレミファソラシドを鳴らす
+const playPitche = (name) => {
+    switch(name){
+        case 'C4':
+            playMelody(261);
+            break;
+        case 'D4':
+            playMelody(294);
+            break;
+        case 'E4':
+            playMelody(330);
+            break;
+        case 'F4':
+            playMelody(349);
+            break;
+        case 'G4':
+            playMelody(392);
+            break;
+        case 'A4':
+            playMelody(440);
+            break;
+        case 'B4':
+            playMelody(494);
+            break;
+        case 'C5':
+            playMelody(522);
+            break;
+    }
+}


