Unityに付属するImage Effectsのbloomコンポーネントは、フルスクリーンのブルーム効果を実現するために使用されます。
サブカメラBloom
サブカメラにbloom要件がある場合、bloomコンポーネントを直接用いるには問題があります。たとえば、シーン内の特殊効果のみをbloomしたい場合は、bloomコンポーネントを特殊効果カメラに掛けると、メインカメラと特殊効果カメラが同じrender targetを描画するため、シーン全体がbloomされます。
解決策は、render targetを使用してbloomカメラのrender targetをメインカメラから分離し、bloom後のrender textureをメインカメラの描画コンテンツと重ね合わせて効果を実現することです。
以下に、おおよその実装手順の概要を示します。
bloomカメラを作成する
黒の背景を設定し、bloomが必要なlayer(ここではEffectレイヤーを指す)のみを描画し、レンダリングターゲットはrender textureを設定します。
private void SetupGlowCamera()
    {
        GlowCamera.CopyFrom(GetComponent<Camera>());
        GlowCamera.clearFlags = CameraClearFlags.Nothing;
        GlowCamera.rect = new Rect(0, 0, 1, 1);
        GlowCamera.backgroundColor = new Color(0, 0, 0, 0);
        GlowCamera.cullingMask = 1 << LayerMask.NameToLayer("Effect");
        GlowCamera.orthographic = false;
        GlowCamera.targetTexture = glowTexture;

        GlowCamera.enabled = false;
    }
Render Textureを描画する
メインカメラのOnRenderImageでbloomカメラのRenderを手動で呼び出して、render textureを描画します。
void OnRenderImage(RenderTexture source, RenderTexture destination)
    {
        ...

        glowTexture = RenderTexture.GetTemporary(source.width, source.height, 24, rtFormat);
        SetupGlowCamera();
        GlowCamera.Render();

        ...
   }
次に、元のメインrender target——sourceをglowTextureに置き換えて、bloom効果がglowTextureだけに有効するようにします。
重畳
最後に、bloom後のrender textureとsourceを重畳します。
half4 fragAdd (v2f i) : SV_Target
   {
	half4 addedbloom = tex2D(_MainTex, UnityStereoScreenSpaceUVAdjust(i.uv[0].xy, _MainTex_ST));
	half4 screencolor = tex2D(_ColorBuffer, UnityStereoScreenSpaceUVAdjust(i.uv[1], _ColorBuffer_ST));
	return _Intensity * addedbloom + screencolor;
   }
次の図は、立方体を順番にbloom効果を実現させる各ステップの結果を示しています。
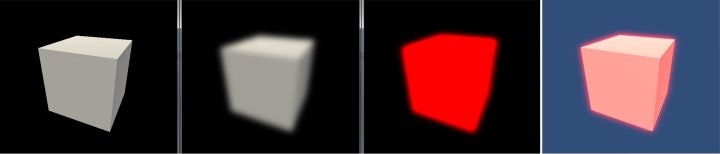
立方体bloom効果の分解図
深度ベースのカリング
複雑なシーンでは、サブカメラのBloomにも問題があります。Bloomカメラのrender targetがメインカメラから分離されている場合、Bloomカメラにはメインカメラのdepth buffer(render target はcolor bufferとdepth bufferからなっている)がなくなって、Bloomカメラにオクルージョンされたコンテンツが描画されます。下図参照:
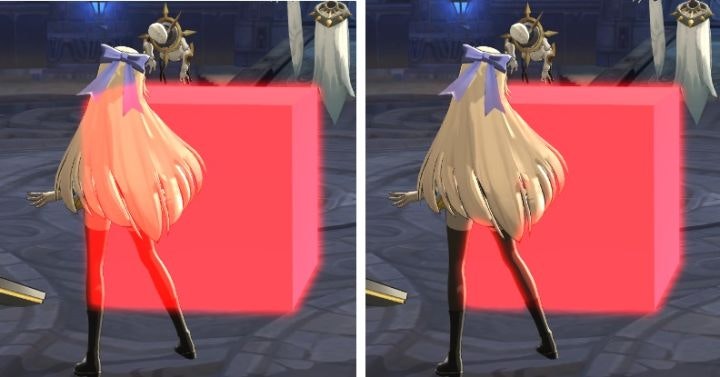
左側の立方体はキャラクターによって遮られておらず、右側の画像は正しい表示です
解決策は、sourceのdepth bufferを使用することです。OnRenderImage関数では:
...
GlowCamera.SetTargetBuffers(glowTexture.colorBuffer, source.depthBuffer);
GlowCamera.Render();
...
GlowCamera.SetTargetBuffers関数は、カラー出力をglowTextureのcolorBufferに設定し、深度出力をメインカメラの深度bufferであるsource.depthBufferに設定します。このように、glowモデルが描画されると、メインカメラの深度bufferがZTestおよびZWrite設定に従って更新されます(OpaqueのデフォルトはZTest LEqual、ZWrite On)。
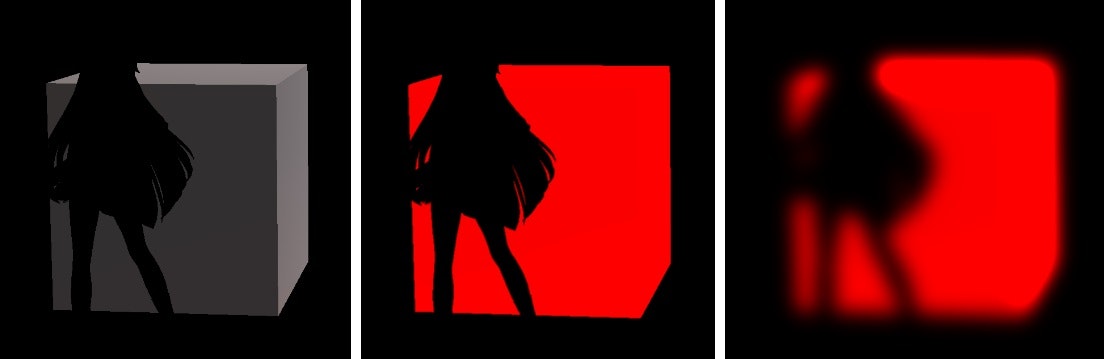
デプスカリング後の効果の分解図
MSAAをオンにした実装
MSAA(マルチサンプリングアンチエイリアシング)をオンにすると、メインカメラのcolorBufferとdepthBufferが2〜8倍大きくなります(特定のMSAA設定による)。このときglowTextureを作成すると、antiAliasing設定はMSAA設定と同じである必要があります。そうでない場合、深度書き込みが失敗します(エラー報告なし、効果なし)。
OnRenderImage関数では:
...
glowTexture = RenderTexture.GetTemporary(rtW, rtH, 0, RenderTextureFormat.Default, RenderTextureReadWrite.Default, 4);
...
ここで、QualitySettingでの設定はMSAAの4倍であり、これに対応します。
ただし、このようにUnityを実行すると、RenderTexture.GetTemporaryが呼び出されるたびに、次のwarningが表示されます。RenderTexture: Resolving a destination texture that is NULL.。バージョンのbugではないかと思っていますが。
別の実装は次のとおりです。bloomカメラのターゲット深度bufferとして、深度カメラを作成してAnti-Aliasingなしの深度render textureを生成する。
private void SetupDepthCamera()
    {
        DepthCamera.CopyFrom(GetComponent<Camera>());
        DepthCamera.allowMSAA = false;

        DepthCamera.targetTexture = depthTexture;

        DepthCamera.enabled = false;
}
OnRenderImage関数では:
...
	depthTexture = RenderTexture.GetTemporary(rtW, rtH, source.depth, RenderTextureFormat.Depth);
	SetupDepthCamera();

        // render depth texture first
	DepthCamera.Render();

	...
	GlowCamera.SetTargetBuffers(glowTexture.colorBuffer, depthTexture.depthBuffer);
	...
このようにしたら、warningの問題が解決され、アンチエイリアシングのオーバーヘッドが節約されます(ぼかしに使用されるtextureアンチエイリアシングには意味がありません)が、深度を生成するための追加の描画コストがあります。
完全なコードは次を参照してください。
参考文献:
UWA Technologyは、モバイル/VRなど様々なゲーム開発者向け、パフォーマンス分析と最適化ソリューション及びコンサルティングサービスを提供している会社でございます。
今なら、UWA GOTローカルツールが15日間に無償試用できます!!
よければ、ぜひ!
UWA公式サイト:https://jp.uwa4d.com
UWA GOT OnlineレポートDemo:https://jp.uwa4d.com/u/got/demo.html
UWA公式ブログ:https://blog.jp.uwa4d.com