目次
- 今から始めるReact入門 〜 React の基本
- 今から始めるReact入門 〜 React Router 編
- 今から始めるReact入門 〜 flux編
- 今から始めるReact入門 〜 Redux 編: immutability とは
- 今から始めるReact入門 〜 Redux 編: Redux 単体で状態管理をしっかり理解する
- 今から始めるReact入門 〜 Redux 編: Redux アプリケーションを作成する ←★ここ
- 今から始めるReact入門 〜 Mobx 編
GitHub リポジトリ側は既に修正してありますので、正確なソースコードについてはそちらの参照をお願いします。
React + Redux でアプリを作成してみる
ここまででReact とRedux をそれぞれ学習し、React とRedux の知識もついたところで、ここからは実際にReact とRedux を組み合わせたアプリケーションの作成を行っていきたいと思います。
今回は簡単なtweet を取得するアプリケーションを例にReact + Redux について学んでいきます。
サンプル
今回のサンプルソースコードは以下の場所に置いてあります。
プロジェクトの作成
プロジェクトを新規作成します。
$ mkdir tweet-app
$ cd tweet-app
$ npm init -y
$ npm install --save-dev @babel/core babel-loader \
        @babel/plugin-proposal-decorators @babel/preset-env @babel/preset-react \
        webpack webpack-cli webpack-dev-server \
        react react-dom react-redux react-router react-router-dom \
        redux redux-logger redux-promise-middleware redux-thunk \
        axios
今回React + Redux なアプリを開発するためにES6 のdecorators 構文を使用します。そのためbabel-plugin-transform-decorators-legacy もこの時点でインストールしておきます。
そしていつもの通り、npm start でwebpack-dev-server が起動するようにpackage.json に以下のように追記しましょう。
   ......
   "scripts": {
+    "start": "webpack-dev-server --content-base src --mode development --inline",
     "test": "echo \"Error: no test specified\" && exit 1"
   },
   ......
webpack.config.js は次のようになります。
var debug   = process.env.NODE_ENV !== "production";
var webpack = require('webpack');
var path    = require('path');

module.exports = {
  context: path.join(__dirname, "src"),
  entry: "./js/client.js",
  module: {
    rules: [{
      test: /\.jsx?$/,
      exclude: /(node_modules|bower_components)/,
      use: [{
        loader: 'babel-loader',
        options: {
          plugins: [
            'react-html-attrs',
            [require('@babel/plugin-proposal-decorators'), {legacy: true}]
          ],
          presets: ['@babel/preset-react', '@babel/preset-env']
        }
      }]
    }]
  },
  output: {
    path: __dirname + "/src/",
    filename: "client.min.js",
    publicPath: '/'
  },
  devServer: {
    historyApiFallback: true
  },
  plugins: debug ? [] : [
    new webpack.optimize.OccurrenceOrderPlugin(),
    new webpack.optimize.UglifyJsPlugin({ mangle: false, sourcemap: false }),
  ],
};
残りのファイル含め、最終的に以下のようなテンプレートを作成します。
ファイルは以下のリンクにあるので参考になればと思います。
+ src/
   + js/
     + actions/
       + tweetsActions.js
       + userActions.js
     + components/
       + Layout.js
     + reducers/
       + index.js
       + tweetsReducer.js
       + userReducer.js
     + client.js
     + store.js
   + index.html
+ package.json
+ webpack.config.js
上記のapplication はRedux のコードも一部含まれていますが、React とRedux がまだ接続されていない状態で、State の管理ができていない状態のReact アプリケーションです。
これをRedux で状態管理も管理していくようにアプリケーションを改修していきましょう。
src/js/client.js ファイルを開いてみましょう。
import React from "react";
import ReactDOM from "react-dom";

import Layout from "./components/Layout";

const app = document.getElementById('app');

ReactDOM.render(<Layout />, app);
ただ単にLayout コンポーネントをレンダリングしているだけのプログラムです。
次にsrc/js/components/Layout.js ファイルを開いてみましょう。
import React from "react";

export default class Layout extends React.Component {
  render() {
    return null;
  }
}
仮でnull を返すようになっており、このままでは何もレンダリングされない状態です。
次にsrc/js/store.js ファイルを開いてみましょう。
import { applyMiddleware, createStore } from "redux";

import { createLogger } from "redux-logger";
import thunk from "redux-thunk";
import { createPromise } from 'redux-promise-middleware';

import reducer from "./reducers";

const promise = createPromise({ types: { fulfilled: 'success' } });
const middleware = applyMiddleware(promise, thunk, createLogger());

export default createStore(reducer, middleware);
このファイルには、Redux のロジックが既に書かれています。
Store はアプリケーションに1 つだけ存在するもので、このStore をimport したコンポーネントにインスタンス化されて存在し続けることになります。
import reducer from "./reducers"; の記述は./reducers ディレクトリにある./reducers/index.js ファイルを読み込みimport します。
import { combineReducers } from "redux";

import tweetsReducer from "./tweetsReducer";
import userReducer from "./userReducer";

export default combineReducers({
  tweetsReducer,
  userReducer
})
中身を見ると、combineReducers で./reducers/tweetsReducer.js, ./reducers/userReducer.js らのreducer を統合しています。
export default function reducer(state={
    tweets: [],
    fetching: false,
    fetched: false,
    error: null,
  }, action) {

    switch (action.type) {
      case "FETCH_TWEETS": {
        return {...state, fetching: true};
      }
      ......
    }

    return state;
}
export default function reducer(state={
    user: {
      id: null,
      name: null,
      age: null,
    },
    fetching: false,
    fetched: false,
    error: null,
  }, action) {

    switch (action.type) {
      case "FETCH_USER": {
        return {...state, fetching: true};
      }
      ......
    }

    return state;
}
tweetsReducer.js, userReducer.js をそれぞれ見ると、State の初期値をES6 記法で定義し、各Action type 毎にswitch 文で処理を分岐しているコンポーネントになります。
これらreducer の注意点として、immutable を意識して、新しい値を設定する場合は常に新しいObject を生成して返すようにしてください。
次はAction を見ていきましょう。
export function fetchUser() {
  return {
    type: "FETCH_USER_FULFILLED",
    payload: {
      id: 0,
      name: "Will",
      age: 35
    }
  };
}

export function setUserName(name) {
  return {
    type: 'SET_USER_NAME',
    payload: name
  };
}

export function setUserAge(age) {
  return {
    type: 'SET_USER_AGE',
    payload: age
  };
}
Action には上記のようにstate を変更するための関数が用意されており、どのようにこれが呼ばれるかなどは特に指定されていません。
fetchUser 関数はユーザ名が固定で定義されていますが、実際は外部のAPI などから取得してきた値がここに設定されることになるでしょう。
import axios from "axios";

export function fetchTweets() {
  return function(dispatch) {
    dispatch({type: "FETCH_TWEETS"});

    axios.get("http://localhost:18080")
      .then((response) => {
        dispatch({type: "FETCH_TWEETS_FULFILLED", payload: response.data})
      })
      .catch((err) => {
        dispatch({type: "FETCH_TWEETS_REJECTED", payload: err})
      });
  };
}

export function addTweet(id, text) {
  return {
    type: 'ADD_TWEET',
    payload: {
      id,
      text
    }
  };
}

export function updateTweet(id, text) {
  return {
    type: 'UPDATE_TWEET',
    payload: {
      id,
      text
    }
  };
}

export function deleteTweet(id) {
  return { type: 'DELETE_TWEET', payload: id};
}
tweetsActions.js については外部のREST FULL API から情報を取得してきてそれに応じてthunk middleware としてdispatcher を起動するようになっています。
これらのAction は外部から以下のようにimport して関数を利用することができるようになります。
import { setUserName } from "../userActions";
......
setUserName("Will");
それではこのアプリをReact + Redux として改修を実施していきましょう。
Redux を接続する
まずはreact-redux をインストールします。
$ npm install --save-prod redux react-redux redux-thunk redux-logger redux-promise-middleware
react-redux をインストールしたら、まず最初にやるのはsrc/js/client.js でトップレベルコンポーネントをRedux コンポーネントでwrap することです。
 import React from "react";
 import ReactDOM from "react-dom";
+import { Provider } from "react-redux";

 import Layout from "./components/Layout";

 const app = document.getElementById('app');

-ReactDOM.render(<Layout />, app);
+ReactDOM.render(
+  <Provider>
+    <Layout />
+  </Provider>, app);
次にStore とReact を結びつけるためにstore をimport してProvider コンポーネントのprops として定義を追加します。
 import React from "react";
 import ReactDOM from "react-dom";
 import { Provider } from "react-redux";

 import Layout from "./components/Layout";
+import store from "./store";

 const app = document.getElementById('app');

 ReactDOM.render(
-  <Provider>
+  <Provider store={store}>
     <Layout />
   </Provider>, app);
このようにRedux はReact とStore を接続するような機構が既に用意されています。
これでReact とRedux は接続されている状態になりました。
すなわち、様々なcomponent からstore が変更されたことを検知して随時画面をレンダリングする準備ができている状態です。
さて、React とRedux が接続されたことで、早速src/js/components/Layout.js ファイルを編集して、レンダリング処理を記述していきましょう。
client.js とは別のコンポーネントでRedux を利用するにはconnect をimport して利用する必要があります。
 import React from "react";
+import { connect } from "react-redux";

+@connect()
 export default class Layout extends React.Component {
   render() {
     return null;
   }
 }
上記のコードの中で@connect() という見慣れない記述が出てきましたが、これはdecolator というものです。
package.json のbabel-plugin-transform-decorators-legacy パッケージによって変換されるもので、これを有効化するためにwebpack.config.js で以下のオプションも有効化することを忘れないようにしてください。
      ...
      use: [{
        loader: 'babel-loader',
        options: {
          plugins: [
            'react-html-attrs',
            [require('@babel/plugin-proposal-decorators'), {legacy: true}]
          ],
          presets: ['@babel/preset-react', '@babel/preset-env']
        }
      }]
      ...
このconnect decolator はReact とRedux Store を接続する役割を持っており、引数にstate をprops と対応付ける関数と、dispatch をprops に対応付ける関数を指定することができます。
これらはstore から提供される関数を指定します。
そして@connect decolator で実行される1 つ目の関数はprops としてstore の値を取得する関数です。
返り値としてstate のkey を指定することによって、connect されたクラスのthis.props からstate の値を取得することができます。
では実際に具体的な動きを見てみましょう。
 import React from "react";
 import { connect } from "react-redux";

-@connect()
+@connect((store) => {
+  return {
+    user: store.userReducer.user
+  };
+})
 export default class Layout extends React.Component {
   render() {
+    console.log(this.props.user);
     return null;
   }
 }
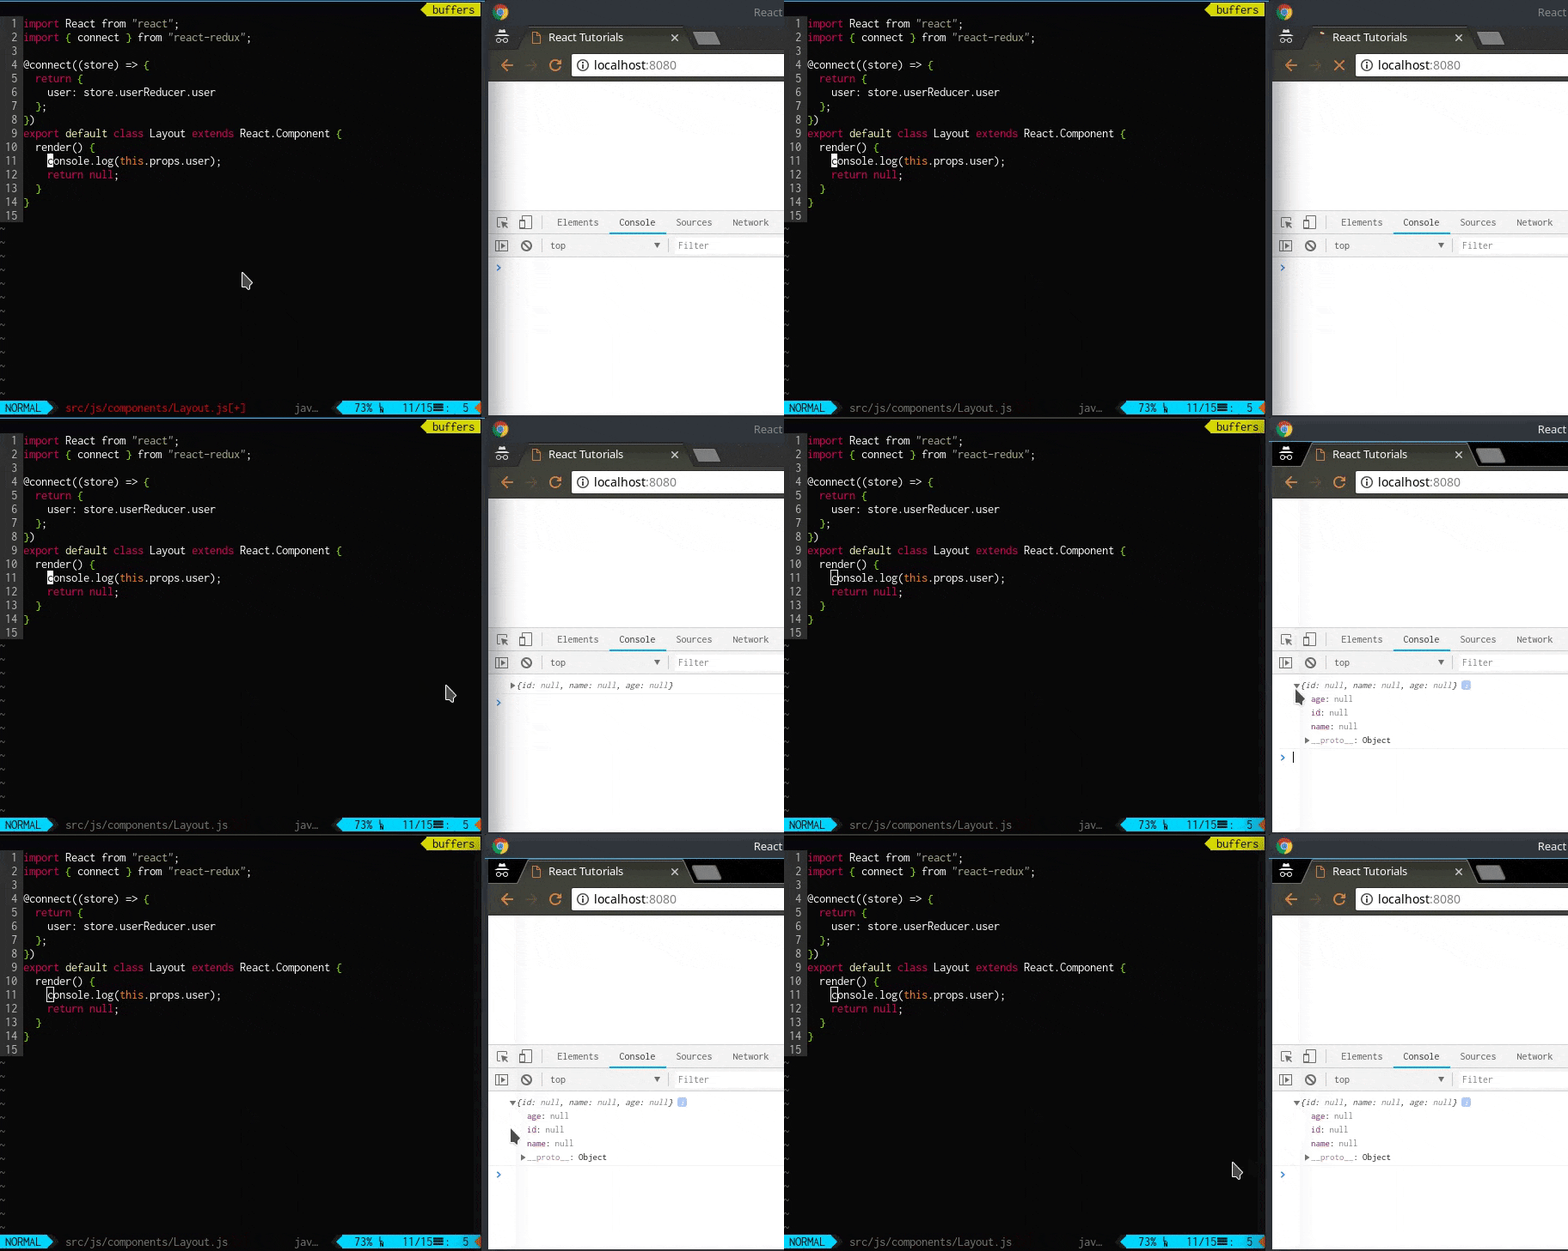
ソースコードを書き換えたら、console で出力内容を確認してみましょう。
Layout クラス内でthis.props を通じてuser オブジェクトが出力されており、そのkey としてage: null, id: null, name: null といった値が取れています。
この値がどこで定義した値かというのは、以下の2 つのファイルを見るとわかります。
......
import userReducer from "./userReducer";

export default combineReducers({
  tweetsReducer,
  userReducer
})
export default function reducer(state={
    user: {
      id: null,
      name: null,
      age: null,
    },
    fetching: false,
    fetched: false,
    error: null,
  }, action) {
    ......
    return state;
}
index.js 内のcombineReducers で統合されたreducer のuserReducer のstate の初期値user のage, id, name です。
このconnect デコレータはReact にRedux のstate に対してアクセスできるよう接続(値のマッピング)を行う役割を持っています。
上記からもわかるように、userReducer のfetched をReact からアクセスできるようにするには、user と同様にconnect デコレータに定義を追加してあげればできるようになります。
 import React from "react";
 import { connect } from "react-redux";

 @connect((store) => {
   return {
-    user: store.userReducer.user
+    user: store.userReducer.user,
+    userFetched: store.userReducer.fetched
   };
 })
 export default class Layout extends React.Component {
   render() {
     console.log(this.props.user);
+    console.log(this.props.userFetched);
     return null;
   }
 }
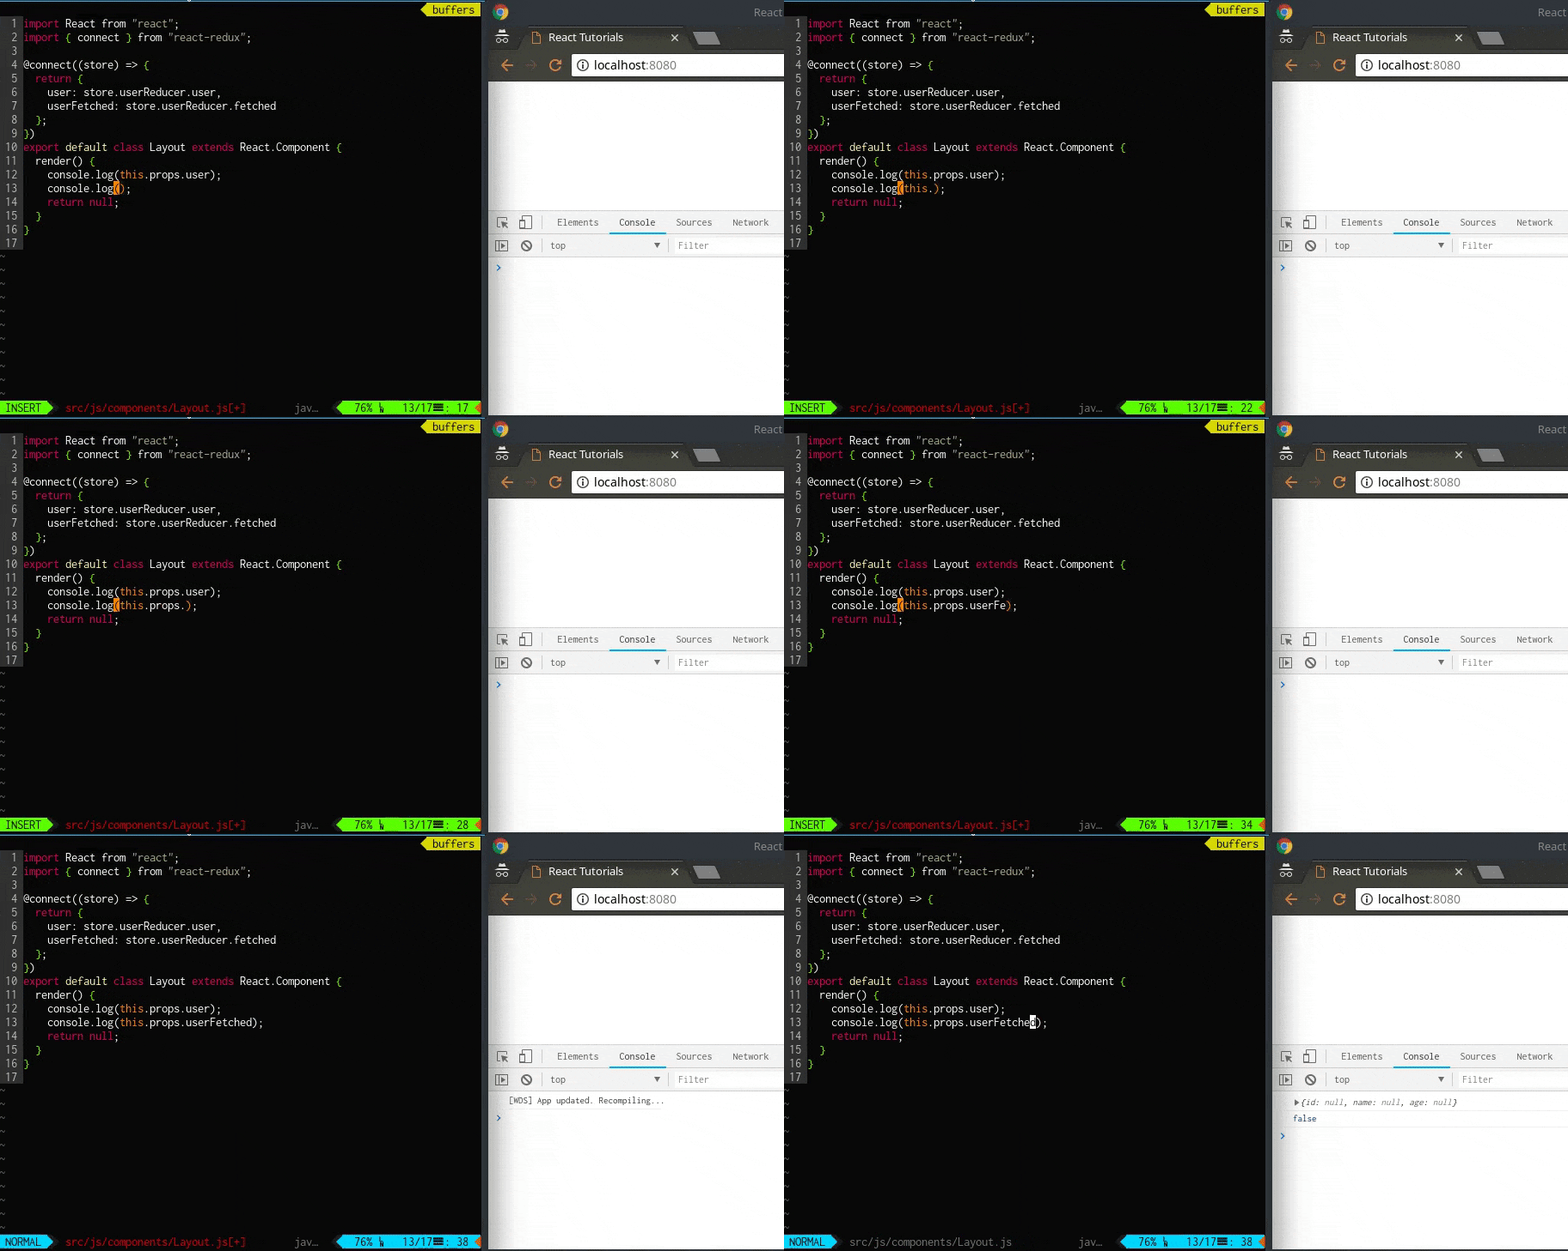
ここでもう一度console を確認してみましょう。
すると想定通りuserReducer のfetched の値も取得できています。
connect デコレータの動きがわかったところで、続いてtweetReducer のstate も定義を追加していきましょう。
 import React from "react";
 import { connect } from "react-redux";

 @connect((store) => {
   return {
     user: store.userReducer.user,
-    userFetched: store.userReducer.fetched
+    userFetched: store.userReducer.fetched,
+    tweets: store.tweetsReducer.tweets
   };
 })
 export default class Layout extends React.Component {
   render() {
     console.log(this.props.user);
     console.log(this.props.userFetched);
     return null;
   }
 }
更にuser 情報も取得してみます。
user 情報を取得する関数はsrc/js/actions/userActions.js ファイルに定義されています。
export function fetchUser() {
  return {
    type: "FETCH_USER_FULFILLED",
    payload: {
      id: 0,
      name: "Will",
      age: 35
    }
  };
}
......
これをsrc/js/components/Layout.js でReact のcomponentDidMount 関数を定義してその中でfetch 関数を使って値を設定するようにします。
 import React from "react";
 import { connect } from "react-redux";

+import { fetchUser } from "../actions/userActions";
+
 @connect((store) => {
   return {
     user: store.userReducer.user,
     userFetched: store.userReducer.fetched,
     tweets: store.tweetsReducer.tweets
   };
 })
 export default class Layout extends React.Component {
+  componentDidMount() {
+    this.props.dispatch(fetchUser());
+  }
   render() {
     console.log(this.props.user);
     console.log(this.props.userFetched);
     return null;
   }
 }
fetchUser() 関数はaction type type: "FETCH_USER_FULFILLED" なオブジェクトを返す関数なのでそれがdispatcher に渡されてreducer が実行されます。このfetchUser() 関数のことをAction Creator と呼びます。
action type FETCH_USER_FULFILLED を処理する箇所はsrc/js/reducers/userReducer.js の中の以下の箇所になります。
export default function reducer(state={
  ......
  }, action) {

    switch (action.type) {
      ......
      case "FETCH_USER_FULFILLED": {
        return {
          ...state,
          fetching: false,
          fetched: true,
          user: action.payload
        };
      }
    ......
    return state;
}
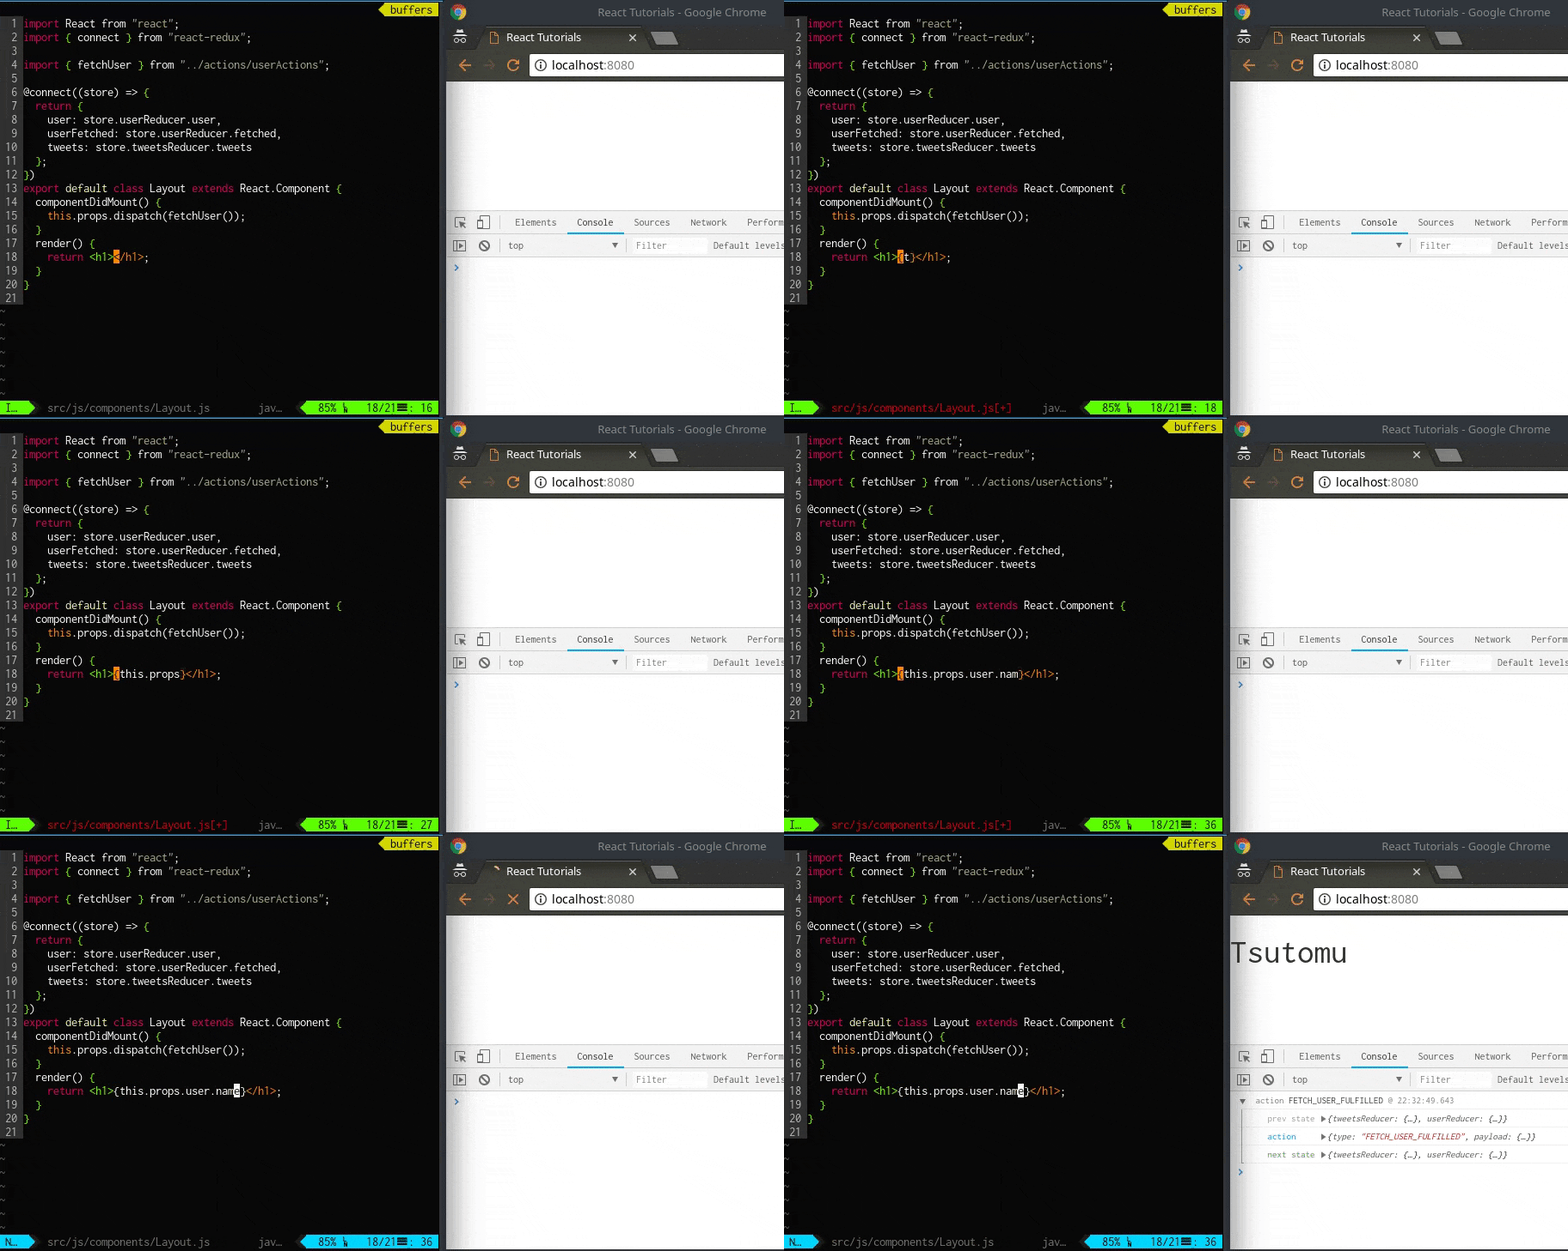
userReducer で処理されたstate の結果はコンソールで確認できます。
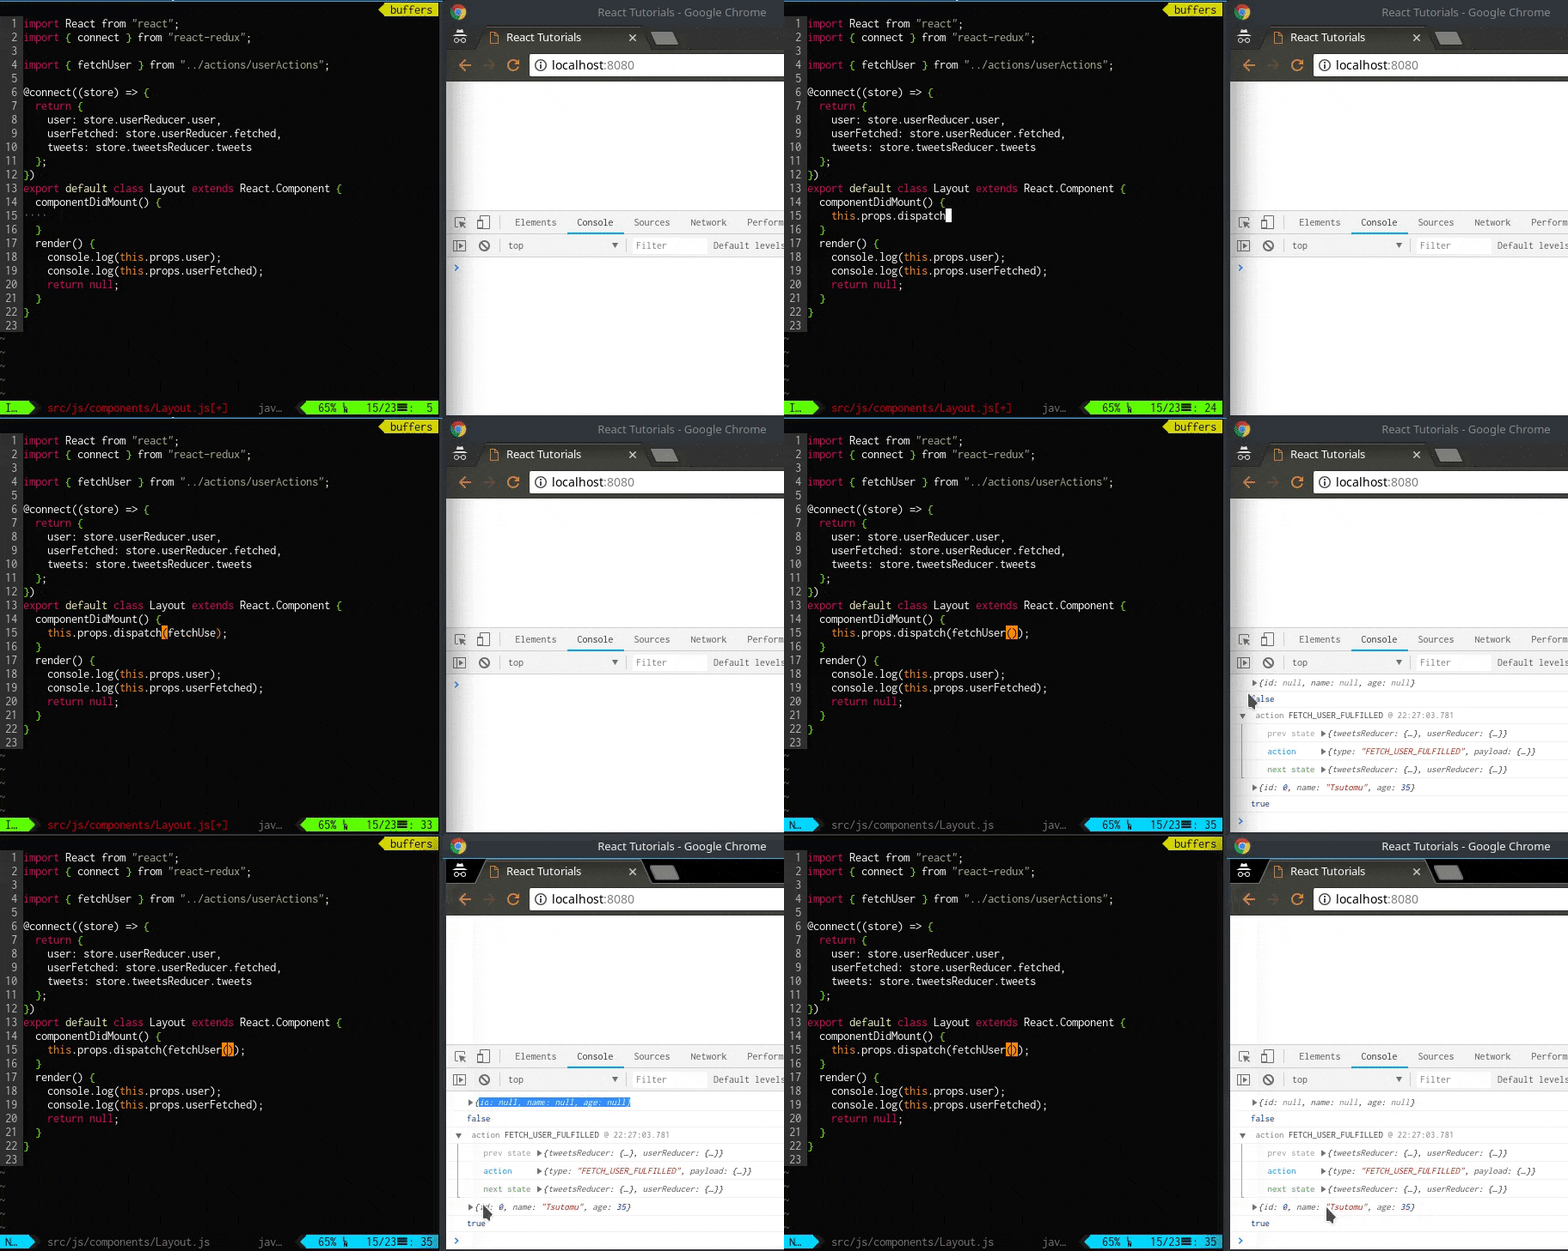
dispatch 前と後でstate が変わっていることが確認できます。
ここまで来たら後はReact でデータをレンダリングするだけです。
src/js/components/Layout.js を書き換えてレンダリング処理を追加しましょう。
 import React from "react";
 import { connect } from "react-redux";

 import { fetchUser } from "../actions/userActions";

 @connect((store) => {
   return {
     user: store.userReducer.user,
     userFetched: store.userReducer.fetched,
     tweets: store.tweetsReducer.tweets
   };
 })
 export default class Layout extends React.Component {
   componentDidMount() {
     this.props.dispatch(fetchUser());
   }
   render() {
-    console.log(this.props.user);
-    console.log(this.props.userFetched);
-    return null;
+    return <h1>{this.props.user.name}</h1>;
   }
 }
画面にユーザ名が表示されました。
この状態でReact はRedux のstate が変更された時に直ちにstate を再レンダリングするといった仕組みが既に出来上がっていることになります。
次はtweet 情報を取り出してみましょう。
src/js/actions/tweetsActions.js 内でaxios を使っているので、まずはそれをインストールします。
$ npm install --save-prod axios
 import React from "react";
 import { connect } from "react-redux";

 import { fetchUser } from "../actions/userActions";
+import { fetchTweets } from "../actions/tweetsActions";

 @connect((store) => {
   return {
     user: store.userReducer.user,
     userFetched: store.userReducer.fetched,
     tweets: store.tweetsReducer.tweets
   };
 })
 export default class Layout extends React.Component {
   componentWillMount() {
     this.props.dispatch(fetchUser());
   }
+  fetchTweets() {
+    this.props.dispatch(fetchTweets());
+  }
   render() {
-    return <h1>{this.props.user.name}</h1>;
+    const { user, tweets } = this.props;
+    if (!tweets.length) {
+      return <button onClick={this.fetchTweets.bind(this)}>load tweets</button>;
+    }
+
+    const mappedTweets = tweets.map(tweet => <li key={tweet.id}>{tweet.text}</li>);
+
+    return (
+      <div>
+        <h1>{user.name}</h1>
+        <ul>{mappedTweets}</ul>
+      </div>
+    );
   }
 }
ダミーサーバを立ててブラウザを確認してみましょう。
$ node << EOF
var http = require('http');
http.createServer(function (req, res) {
  res.writeHead(200, {'Content-Type': 'application/json', 'Access-Control-Allow-Origin': '*'});
  setTimeout(() => res.end('[{"id": 0, "text": "My first tweet."}, {"id": 1, "text": "Good afternoon."}]'), 1000);
}).listen(18080);
EOF
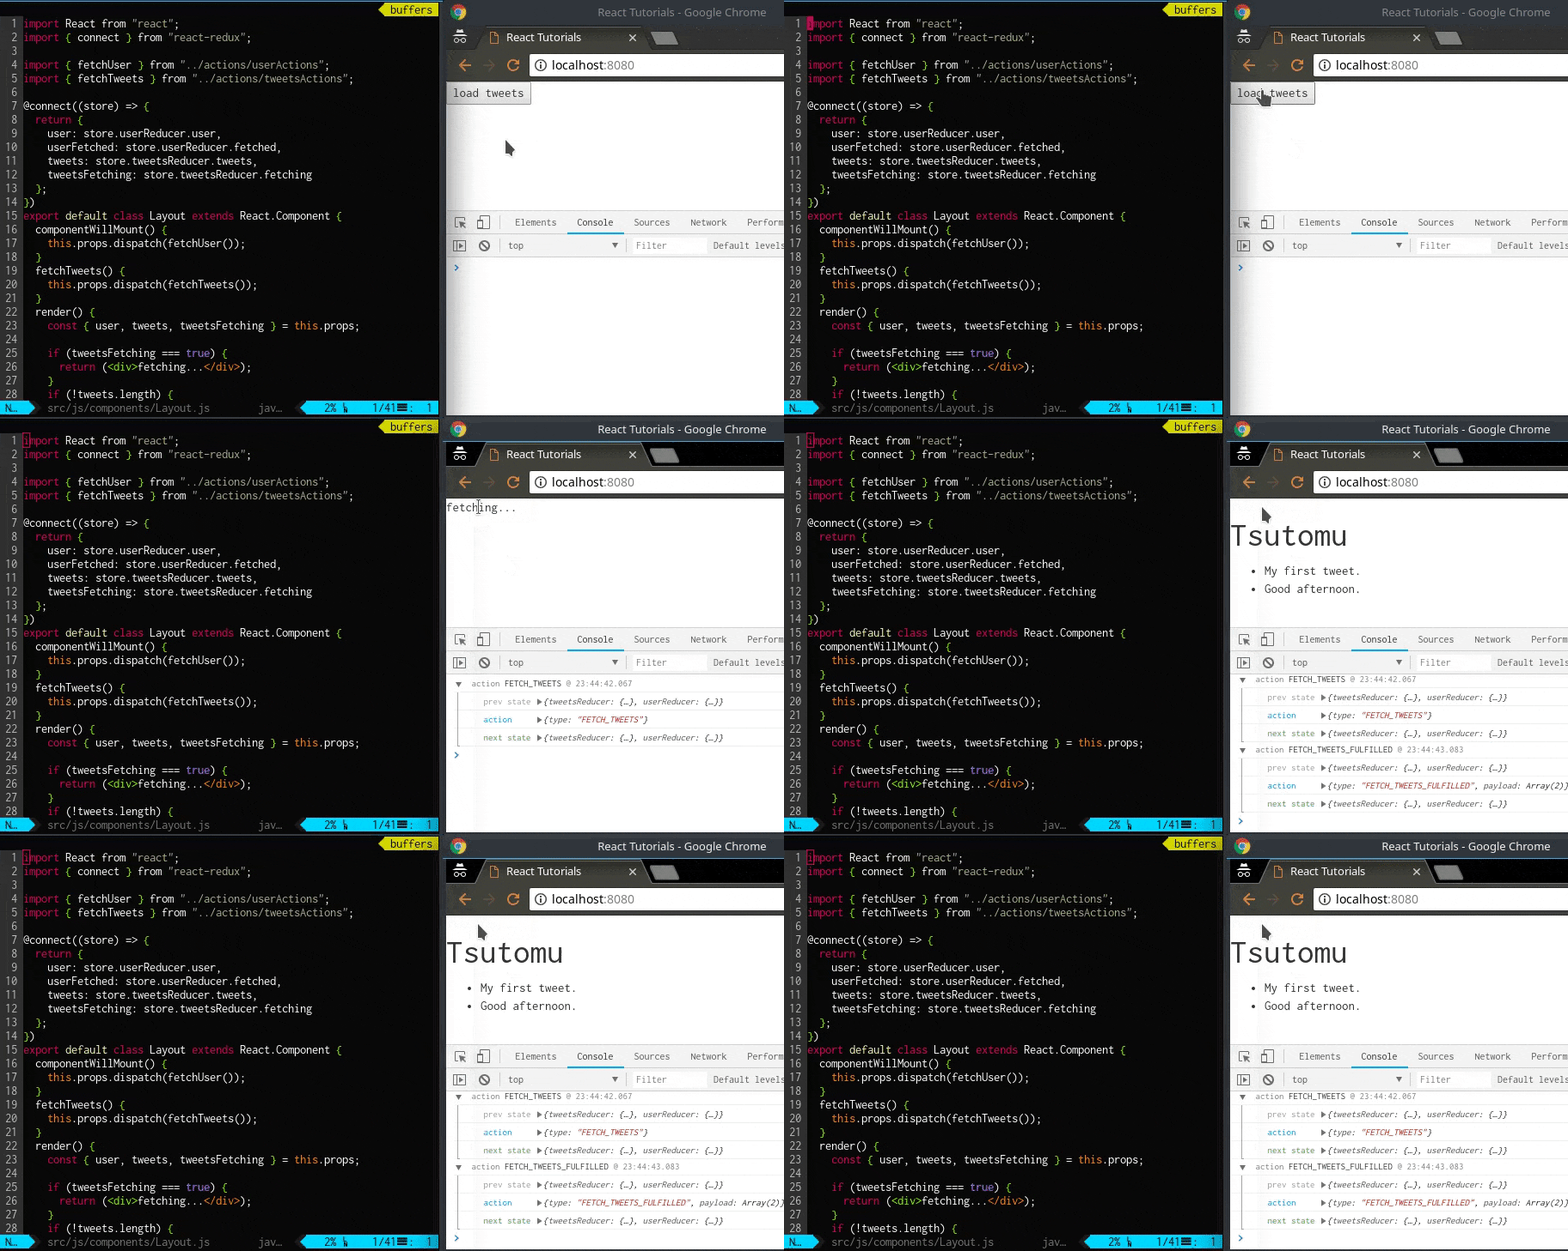
ボタンを押して、約1 秒後にtweet 一覧が表示されます。
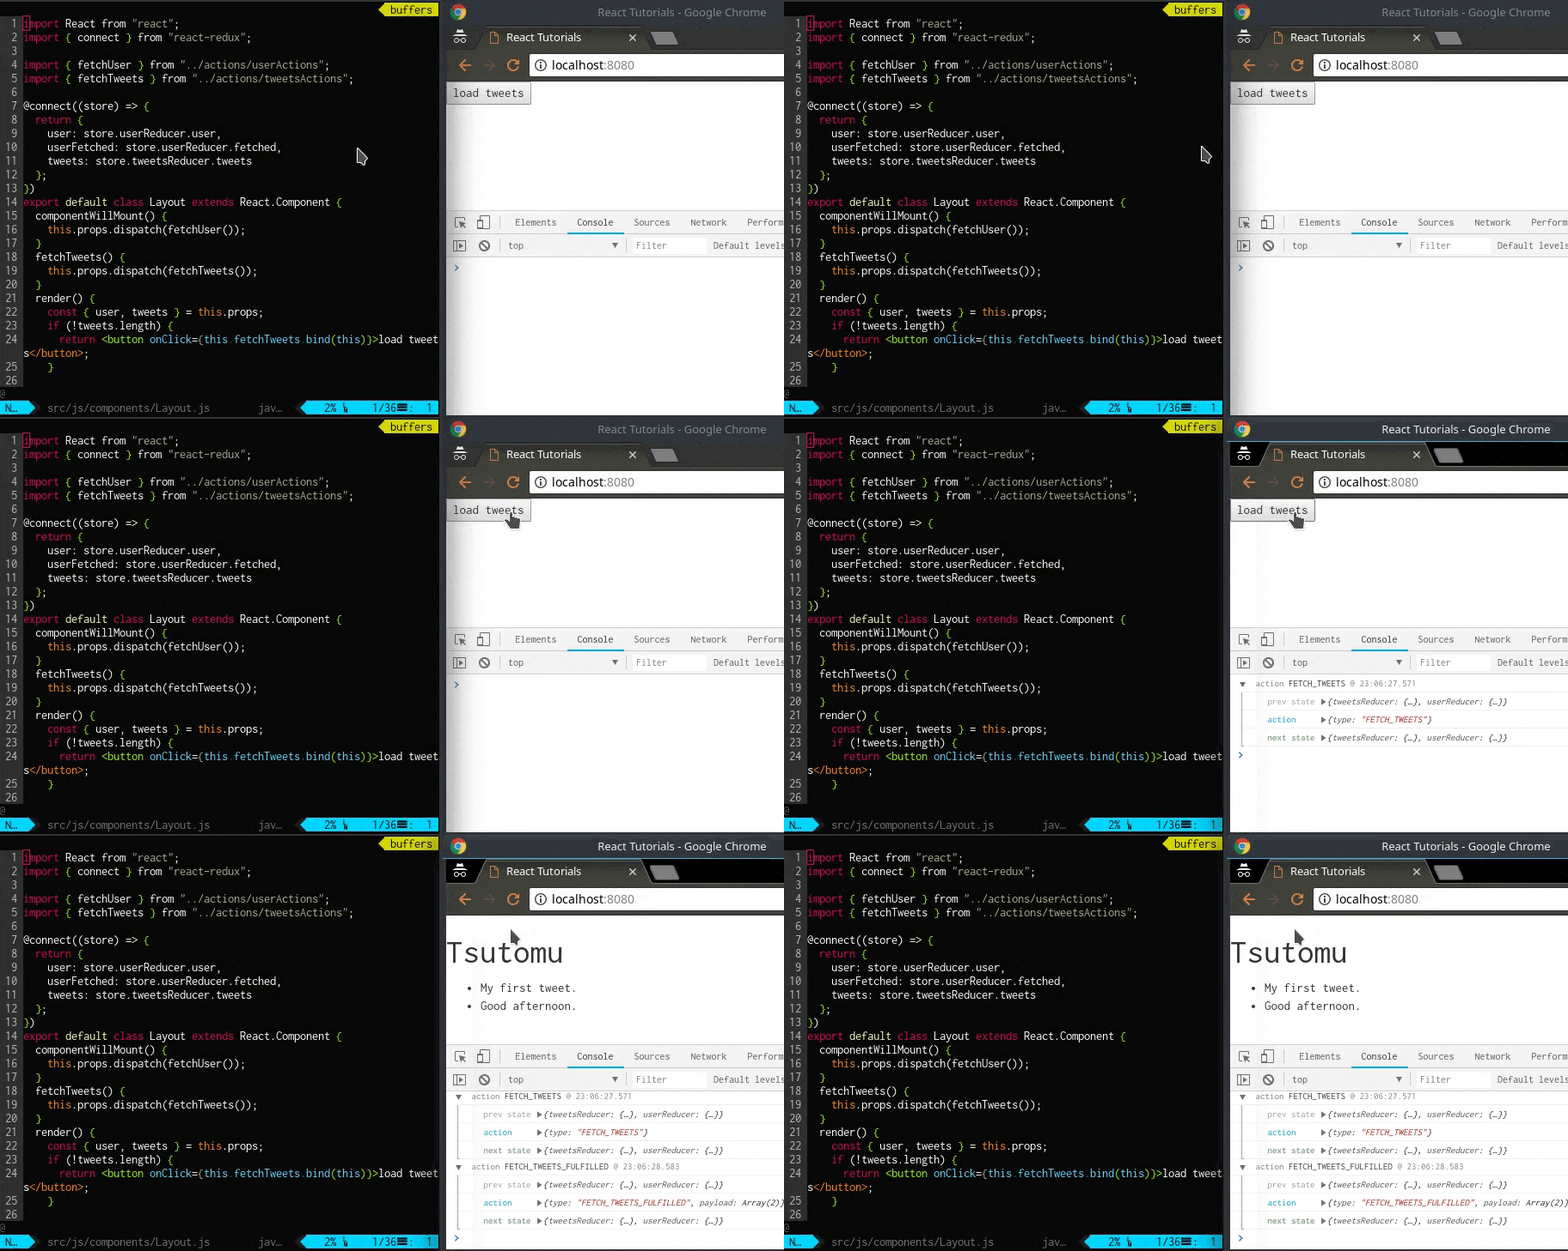
これで基本的なReact とRedux を組み合わせたアプリケーションの作成は完了です。
ロード中のメッセージを表示する
これまでのサンプルではダミーサーバーで約1 秒、実際のインターネットの遅延を想定した遅延をシミュレートしていましたが、本番用のプログラムでこのサーバからのレスポンスを待っている時間にLoading... なメッセージを表示させることはできないのでしょうか?
React + Redux を使えばそれも問題なく実現することができます。
これまでのサンプルで、React とRedux を接続すればState の非同期な変更をトリガーにして再レンダリングができることを見てきましたが、ボタンを押下した時からサーバのレスポンスを受け取る間にLoading...のようなメッセージを表示させてみるようにしたいと思います。
まずはload tweets ボタンを押下した時のメソッドの処理を見てみるとsrc/js/components/Layout.js 内に定義されたonClick イベントからsrc/js/components/Layout.js のfetchTweets メソッドが呼ばれていることがわかります。
export default class Layout extends React.Component {
  ......
  render() {
    if (!tweets.length) {
      return <button onClick={this.fetchTweets.bind(this)}>load tweets</button>;    // <- ココ
    }
    ......
    return (
      ......
    );
  }
}
......
export function fetchTweets() {
  return function(dispatch) {
    dispatch({type: "FETCH_TWEETS"});
    axios.get("http://localhost:18080")
      .then((response) => {
        dispatch({type: "FETCH_TWEETS_FULFILLED", payload: response.data})
      })
      .catch((err) => {
        dispatch({type: "FETCH_TWEETS_REJECTED", payload: err})
      });
  };
}
......
export default function reducer(state={
    tweets: [],
    fetching: false,
    fetched: false,
    error: null,
  }, action) {

    switch (action.type) {
      case "FETCH_TWEETS": {
        return {...state, fetching: true};
      }
      ......
    }

    return state;
}
src/js/actions/tweetsActions.js を見るとaxios を使って非同期でWeb サーバにアクセスしている箇所がありますが、axios でリクエストを送信する前にdispatch({type: "FETCH_TWEETS"}); とdispatch しており、リクエストを送信する前から、リクエストの送信が完了するまでの間、一時的にstate を変更する処理が既に実装されていることがわかります。
これを再利用して、ボタンを押してからダウンロードが完了するまでの間、Loading... というメッセージを表示させる処理を実装してみましょう。
処理を実装するにはsrc/js/components/Layout.js の@connect decolator にパラメータの追加とstate のfetching の値を見てレンダリング内容を変更する処理を追加するだけです。
以下のようになります。
 import React from "react";
 import { connect } from "react-redux";

 import { fetchUser } from "../actions/userActions";
 import { fetchTweets } from "../actions/tweetsActions";

 @connect((store) => {
   return {
     user: store.userReducer.user,
     userFetched: store.userReducer.fetched,
-    tweets: store.tweetsReducer.tweets
+    tweets: store.tweetsReducer.tweets,
+    tweetsFetching: store.tweetsReducer.fetching
   };
 })
 export default class Layout extends React.Component {
   componentWillMount() {
     this.props.dispatch(fetchUser());
   }
   fetchTweets() {
     this.props.dispatch(fetchTweets());
   }
   render() {
-    const { user, tweets } = this.props;
+    const { user, tweets, tweetsFetching } = this.props;
+
+    if (tweetsFetching === true) {
+      return (<div>fetching...</div>);
+    }
     if (!tweets.length) {
       return <button onClick={this.fetchTweets.bind(this)}>load tweets</button>;
     }

     const mappedTweets = tweets.map(tweet => <li key={tweet.id}>{tweet.text}</li>);

     return (
       <div>
         <h1>{user.name}</h1>
         <ul>{mappedTweets}</ul>
       </div>
     );
   }
 }
このように、ロード中は任意のメッセージを表示させたりスピナーを表示させることもできたりすることも簡単にできるようになります。
まとめ
以上をもって、React + Redux のアプリケーション作成のチュートリアルは完了です。
上記のようにRedux を使うことでStore のリアルタイムな状態遷移を複雑に考えること無く、Store の状態変化に応じた画面表示を安全且つ簡単に実装することができるようになります。
また、State を変更しうるAction が幾つに増えようともStore は1 つなので、React 側としては1 つのStore に注視すれば良く、他のところから画面に反映すべき情報が飛んでくるかもしれない可能性については気にする必要が無くなるのです。
例を上げるならば、ユーザからのボタンクリックであったり、スクロールであったり、バックグラウンドのサーバやAPI からのpush 通知であったり、あらゆる要因による状態の変化が発生してもReact では後ろのreducer やmiddleware がどんな処理をしているのかを気にせずに1 つのStore から送られてくるState の変更にさえ注視していればよいのです。
ここまでくれば自作のアプリケーションをどんどん作成することができるようになっていることでしょう。
React を使って自分のアプリケーションづくりを楽しんでください。Good luck!
おまけ: redux-saga を使用した場合
上記プログラムをredux-saga で書き換えたものを以下のGitHub リポジトリにアップロードしておきました。
redux-saga で組む場合の参考になればと思います。
参考
-
Connecting React & Redux - Redux Tutorial #7
-
redux-sagaで非同期処理と戦う
