はじめに
前回の記事でArduinoに付けた温度センサからRaspberry Pi経由でAWSにあげていたのですが、やはり温度変化をグラフでみたいなと思い、今回は、温度データをKinesisにPutし、Lambdaでデータを取得してkintoneに入れてグラフィカルにみることにチャレンジしてみました。
kintoneを使った理由は、プログラミングせずにリッチなアプリが簡単に作れるのとUIがとてもわかり易く、グラフ集計なども簡単にできるためです。
全体構成
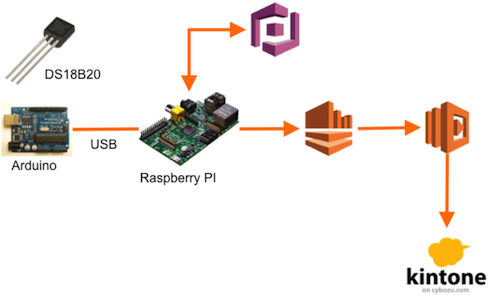
今回は、温度データをKinesis, Lambdaを介してkintoneに入れる構成を作りました。
Raspberry Piから直接kintoneにAPIコールすることも可能ですが、KinesisとLambdaを介すことでETL処理、他のデータとのJoinなどができるようになると思います。今回は、一定間隔で一括取得したデータの平均をLambda側で集計してkintoneに入れるようにしています。
kintoneの設定
Kinetoneの30日間無料お試しを利用させて頂きました!(https://kintone.cybozu.com/jp/)
初めてKinetoneを触ったのですが、はじめてのkintoneガイドを最初にみるとよいと思います。
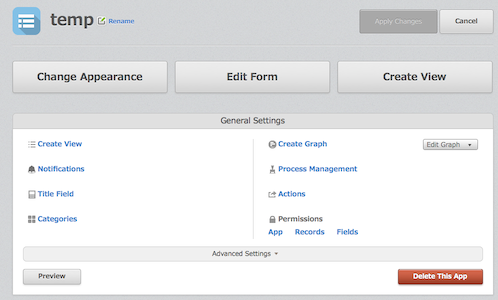
手順的には、スペースを作り、そこにTempというアプリを作りました。
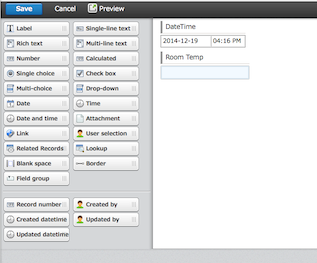
フォームは日時と温度だけの単純なカラムにしました。
また、データを入れ時にカラム名をわかりやすくするためフィード名をroomに修正しました。
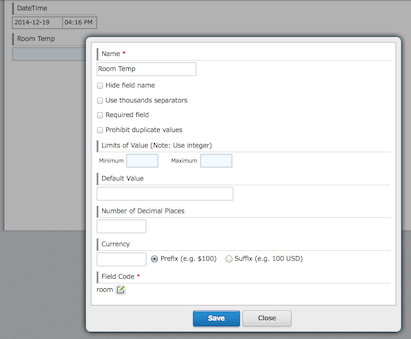
これだけで格納先はできました!
まずは、Curlを使ってkintone API経由でデータを入れてみます。
(Kinetone APIはこちら)
認証は、Basic認証と独自のユーザ認証の2つがあります。両方ともBase64.Encode("アカウント:パスワード")です。
curl -X POST -H 'Host: {自分のホスト名}.cybozu.com' -H 'Authorization: Basic {Base64.Enode("アカウント:パスワード")}' -H 'X-Cybozu-Authorization: {Base64.Encode("アカウント:パスワード")}' -H 'Content-Type: application/json' https://{自分のホスト名}.cybozu.com/k/guest/{スペースID}/v1/record.json -d '{'app':アプリID,'record': {'room': {'value': '13'}}'
これでデータを入力できると思います!
Raspberry PIの実装
Cognitoでトークンを取得し、Kinesisに対してPutしてます。
# !/usr/bin/env python
# -*- coding:utf-8 -*-
import sys,traceback
import serial
import datetime,time
import boto
from boto import kinesis

STREAM = ''
ACCOUNT_ID = ''
IDENTITY_POOL_ID = ''
ROLE_ARN = ''

class Auth:
	def doAuth(self):
		cognito = boto.connect_cognito_identity()
		cognito_id = cognito.get_id(ACCOUNT_ID, IDENTITY_POOL_ID)
		print str(cognito_id)
		token = cognito.get_open_id_token(cognito_id['IdentityId'])
		sts = boto.connect_sts()
		assumedRoleObject = sts.assume_role_with_web_identity(ROLE_ARN, "bototest", token['Token'])
		self.client = kinesis.connect_to_region(
			"us-east-1",
			aws_access_key_id=assumedRoleObject.credentials.access_key,
			aws_secret_access_key=assumedRoleObject.credentials.secret_key,
			security_token=assumedRoleObject.credentials.session_token)
	def getClient(self):
		return self.client


if __name__ == '__main__':
	auth = Auth()
	auth.doAuth()
	while True:
		try:
			s = serial.Serial('/dev/ttyACM0', 9600)
			line = s.readline()
			temp = line.strip()
			if temp != '':
				print temp
				d = datetime.datetime.today()
				partitionKey = d.strftime("%Y%m%d%H%M%S")
				client = auth.getClient()
				client.put_record(STREAM, temp , partitionKey, b64_encode=True)
				time.sleep(900)
		except KeyboardInterrupt:
			sys.exit()
		except:
			info = sys.exc_info()
			tbinfo = traceback.format_tb( info[2] )
			print "Error:", tbinfo
			auth = Auth()
			auth.doAuth()
Lambda Functionの実装
特に意味はないのですが、@Keisuke69さんのAWS LambdaのfunctionをPythonで書くを試したかったのでLambda FunctionはPythonコードを読みだして実行するだけです。いや、試したかっただけです。
exports.handler = function(event, context) {
    var exec = require('child_process').exec;
    var temp = 0;
    console.log(JSON.stringify(event, null, '  '));
    for(i = 0; i < event.Records.length; ++i) {
        encodedPayload = event.Records[i].kinesis.data;
        payload = new Buffer(encodedPayload, 'base64').toString('ascii');
        temp += parseFloat(payload);
    }
    temp = temp/event.Records.length;
    var cmd = "curl -s https://s3.amazonaws.com/{バケット}/postkintone.py > /tmp/test.py;chmod 755 /tmp/test.py;/tmp/test.py " + temp;
    var child = exec(cmd, function(error, stdout, stderr) {
        if (!error) {
            context.done();
        } else {
            console.log("error code: " + error.code + ", err: " + error);
            context.done(error,'lambda');
        }
    });
};
Kinesisで取得したデータ群の平均をPython側のプログラムに標準入力で渡して、Python側でKinetonにPOSTするようにしてみました。
# ! /usr/bin/python

import urllib2,json,sys
AUTH = ''
X_CY_AUTH = ''
ENDPOINT = ''

def main(temp):
        try:
                postdata = {'app':00,'record': {'room': {'value': temp}}}
                print postdata
                req = urllib2.Request(ENDPOINT)
                req.add_header('Content-Type','application/json')
                req.add_header('Host', 'toshiake.cybozu.com')
                req.add_header('Authorization',AUTH)
                req.add_header('X-Cybozu-Authorization',X_CY_AUTH)
                data = json.dumps(postdata)
                response = urllib2.urlopen(req,data)
                print response
        except:
                print "Unexpected error:", sys.exc_info()[0]

if __name__ == '__main__':
        argvs = sys.argv
        argc = len(argvs)
        if (argc != 2):
                print 'Usage: # python %s temp' % argvs[0]
                sys.exit()
        temp = argvs[1]
        main(temp)
Lambda FunctionをKinesis Applicationとして利用する場合は、Invocation Roleを作成し、Event Sourceの追加が必要になります。
Invocation Roleは、以下のような感じです。
{
  "Version": "2012-10-17",
  "Statement": [
    {
      "Effect": "Allow",
      "Action": [
        "lambda:InvokeFunction"
      ],
      "Resource": "*"
    },
    {
      "Effect": "Allow",
      "Action": [
        "kinesis:*"
      ],
      "Resource": "*"
    }
  ]
}
Event Sourceの登録は、CLIで実行します。
$ aws lambda add-event-source \
   --region us-east-1 \
   --function-name {Function名}  \
   --role arn:aws:iam::{アカウントID}:{上で作ったロール名} \
   --event-source {Kinesis StreamのARN} \
   --batch-size 100 \
   --parameters '{"InitialPositionInStream": "LATEST"}'
パラメータに"InitialPositionInStream": "LATEST"を指定することで初回起動時に最新データから取得されるようになります。
kintoneのグラフビューで確認
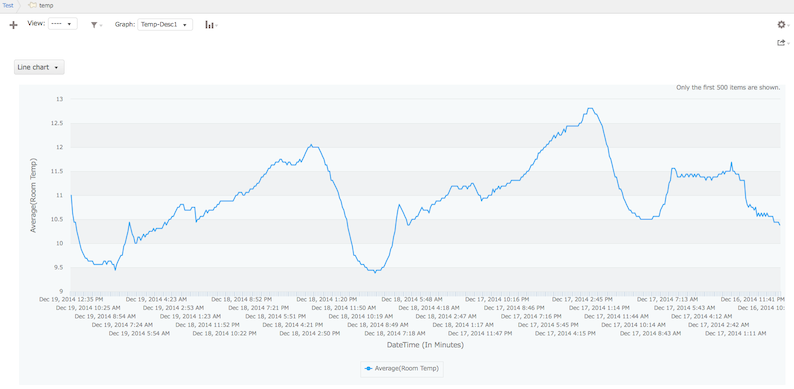
こんな感じでみえました。異常に自分の部屋がサムイことがわかりました。。
最後に
kintoneはプログラミングいらずにデータの格納やグラフィカルなViewの作成など簡単にできました。
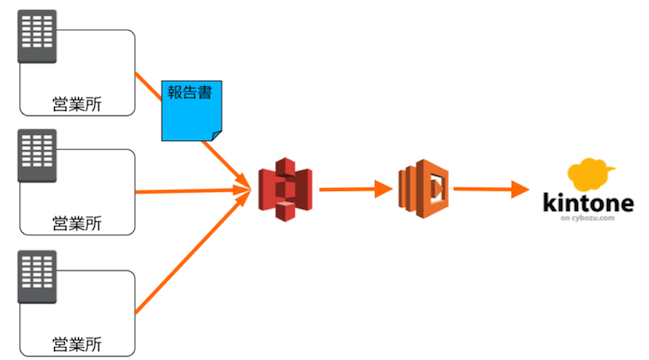
今回は、温度センサーの情報を使ったのですが、AWSとkintoneの組み合わせですと、例えば、営業所からの報告書がS3に上がってきて、S3 Event NortificationトリガーでLambda Functionが呼ばれて、データの精査、マスタデータとの連結などをしてkintoneにいれるという使い道やS3,CloudFront,ELBなどのログを可視化するのにkintoneを利用することもできそうです。使い道は無限に広がりそうですね!
免責
こちらは個人の意見で、所属する企業や団体は関係ありません。
