オープンソースのライブラリ利用者はわがままである.あまり更新のアクティビティが少ないと「大丈夫か?」と心配になるし,多すぎると「変化が激しくてついていけない」という嘆きが多くなる.TensorFlowは,明らかに後者であると感じているが,本記事では,TensorFlowの新しい(新しめの)APIである,tf.dataとtf.estimatorを調べた.
元ネタは,Google開発者ブログ.
Introduction to TensorFlow Datasets and Estimators - Google Developers Blog
https://developers.googleblog.com/2017/09/introducing-tensorflow-datasets.html
TensorFlowの状況を再確認
先日,TensorFlow 1.4.0-rc0 がリリースされている.今年2017年の初め,ver.1.0 リリースに合わせTensorFlow Dev summitが開催され,いくつかのRoadmapが発表されたが,TF 1.1 〜 1.4 でこのRoadmapにあった内容が新機能として実装されてきている.TF 1.4 で個人的に注目しているのは,以下の点である.
- Keras model APIが,ようやくAPIのtop-levelに移った.(TF 1.3 までは,
tf.contrib.kerasのレベルでしたが,tf.kerasとなったようです.) -
tf.dataのAPIが整備された.(TF 1.3 では,tf.contrib.dataの扱いでした.)
TesnforFlowの構成図を,上記ブログ記事から引用する.
Fig. TensorFlow Architecture (I added arrows)

Keras model API はすでに有名であるし,Layers (tf.layers)は以前記事にしたので,ここでは比較的新しいAPIである,tf.data, tf.estimatorについて説明してみたい.
tf.data は機械学習におけるデータ入力を支援するAPI
TensorFlowを使い始めてまずやってみるのがMNIST(手書き文字)データセットの分類である.サンプルコードでは,MNISTのデータを取り扱うモジュールが用意されていて,それをimportするところから処理が始まっている.
from tensorflow.examples.tutorials.mnist import input_data
mnist = input_data.read_data_sets("MNIST_data/", one_hot=True)

(中略)

for _ in range(1000):
  batch_xs, batch_ys = mnist.train.next_batch(100)
  sess.run(train_step, feed_dict={x: batch_xs, y_: batch_ys})
ここで行っていることは,予め tf.placeholder(データの置き場所)'x", "y_" を用意して,モデル訓練時に実データをこれに当てはめるというものである.TensorFlowを始めた当初は難しいと感じたが,理解してしまえば特に問題なし.現在の私のコードでは,ほぼ100%このやり方でデータを入力している.tf.data はこのやり方を一般化するためのAPIである.(Chainerを使っている方は,chainer.training.Trainerのようなものという印象だろうか?)ユーザが扱うデータは,構造化されたもの,非構造化のもの(画像,テキスト, etc.)と多岐にわたるので,tf.data は,それに対応するようになっている(はずである).
以下は,TensorFlowドキュメントからの抜粋(少し変更)した,IRISデータの入力方法である.
# The CSV features in our training & test data
feature_names = [
    'SepalLength',
    'SepalWidth',
    'PetalLength',
    'PetalWidth']

# Create an input function reading a file using the Dataset API
# Then provide the results to the Estimator API

def my_input_fn(file_path, perform_shuffle=False, repeat_count=1):
    def decode_csv(line):
        parsed_line = tf.decode_csv(line, [[0.], [0.], [0.], [0.], [0]])
        label = parsed_line[-1:]  # Last element is the label
        del parsed_line[-1]  # Delete last element
        features = parsed_line  # Everything but last elements are the features
        d = dict(zip(feature_names, features)), label
        return d

    dataset = (tf.contrib.data.TextLineDataset(file_path)  # Read text file
               .skip(1)  # Skip header row
               .map(decode_csv))  # Transform each elem by applying decode_csv fn
    if perform_shuffle:
        # Randomizes input using a window of 256 elements (read into memory)
        dataset = dataset.shuffle(buffer_size=256)
    dataset = dataset.repeat(repeat_count)  # Repeats dataset this # times
    dataset = dataset.batch(32)  # Batch size to use
    iterator = dataset.make_one_shot_iterator()
    batch_features, batch_labels = iterator.get_next()
    return batch_features, batch_labels

next_batch = my_input_fn("./iris_training.csv", True)  # Will return 32 random elements

# debug print (REM. these are out of tf.Session())
print('type of next_batch = ', type(next_batch))
print('type of next_batch[0] = ', type(next_batch[0]))
print('next_batch[0].values() = ', next_batch[0].values())
ご存知,IRISデータは4つの特徴量,全体で150サンプルの小さなデータセットであるが,この入力に上記のコードが必要となる.(厳密に言えば,入力だけでなく,反復計算のためのイテレータを準備していますが.)
まだ tf.data について勉強途中なので細かい解説は加えないが,全体を理解するには,しっかり関連ドキュメントを読み込む必要がありそうである.以下のドキュメント(スライド)が参考になる.
The tf.data API - tf.dataを紹介したGoogleドキュメント
https://t.co/kCmBsDoqh2
tf.estimator の採否は,コード全体の構成に影響を及ぼす
さて,tf.estimator を見てみる.まずは,ドキュメントを参照する.
tf.estimator
Estimators is a high-level API that reduces much of the boilerplate code you previously needed to write when training a TensorFlow model. Estimators are also very flexible, allowing you to override the default behavior if you have specific requirements for your model.
Esitimatorsは,高レベルAPIであり,TensorFlowモデルの学習に必要となる"熱々の"(boilerplate)コードを書かなくて済むようにする.Estimatorsはまた大変柔軟で,すでにあるモデルのディフォルトの挙動を
オーバーライドすることを可能にする.
"boilerplate code"が(俗語?)上手く訳せないので分かりにくいが,高レベルAPIであるので,Estimatorの導入でコードの抽象化に繋がることには違いないと思われる.
tf.estimator で覚えておきたいのが,以下の2種類があるという点である.
- Pre-made Estimator (既製服のようなもの)
- Custom Estimator (カスタム版のもの)
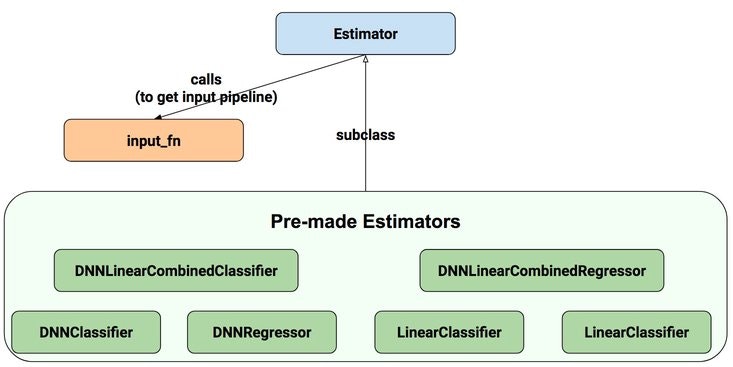
(上に示した,TensorFlow構成図において,一番上の段にあるのが,Pre-made Estimator, 二段目にある"Estimator"とのみ表記されているのが,Custom Estimatorである.)次に,ドキュメントより,Estimatorの構成図を引用する.
Fig. Estimator structure
以下,2種類のEstimatorを紹介する.
1. Pre-made Estimator
ドキュメントによると...
-
tf.estimator.LinearClassifier: Constructs a linear classification model. -
tf.estimator.LinearRegressor: Constructs a linear regression model. -
tf.estimator.DNNClassifier: Construct a neural network classification model. -
tf.estimator.DNNRegressor: Construct a neural network regression model. -
tf.estimator.DNNLinearCombinedClassifier: Construct a neural network and linear combined classification model. -
tf.estimator.DNNLinearCombinedRegressor: Construct a neural network and linear combined regression model.
のように6種類のEstimatorが用意されている.但し,個人的に断定してしまうが,この中で有用なのは,tf.estimator.DNNClassifier と tf.estimator.DNNRegressor の2つである."Linear"がつくものは,Generalized Linear Model(GLM)のためのもので,"Combined"がつくものは,”Linear"モデルと"DNN"モデルを組み合わせたものである.TensorFlowというツールを選択した時点で"DNN"(Deep neural network)モデルを想定しているはずなので,上記2つをとりあえず知っていればいい,というのが私の意見である.
但し,TensorFlowサイトでは,それなりに詳しく紹介されているので,必要となるケースでは以下を参照のこと.
TensorFlow Wide & Deep Learning Tutorial
tensorflow models / wide_deep - GitHub
以下は,tf.estimator.DNNClassifierを用いたMNISTのコードである.
import numpy as np
import tensorflow as tf

N_DIGITS = 10       # Number of digits.
X_FEATURE = 'x'     # Name of the input feature.

def main(unused_args):
    ### Load MNIST dataset, prep. input funcs
    mnist = tf.contrib.learn.datasets.DATASETS['mnist']('../MNIST_data')
    train_input_fn = tf.estimator.inputs.numpy_input_fn(
        x={X_FEATURE: mnist.train.images},
        y=mnist.train.labels.astype(np.int32),
        batch_size=100,
        num_epochs=None,
        shuffle=True)
    test_input_fn = tf.estimator.inputs.numpy_input_fn(
        x={X_FEATURE: mnist.train.images},
        y=mnist.train.labels.astype(np.int32),
        num_epochs=1,
        shuffle=False)

    ### DNNClassifier (MLP network)
    feature_columns = [
        tf.feature_column.numeric_column(
            X_FEATURE, shape=np.array(mnist.train.images).shape[1:])]
    classifier = tf.estimator.DNNClassifier(
        feature_columns=feature_columns,
        hidden_units=[512, 256],
        n_classes=N_DIGITS,
        optimizer=tf.train.ProximalAdagradOptimizer(
            learning_rate=0.1,
            l1_regularization_strength=0.001
    ))

    print('Training...')
    classifier.train(input_fn=train_input_fn, steps=400)
    print('Done.\nEvaluating...')
    scores = classifier.evaluate(input_fn=test_input_fn)
    print('Accuracy (conv_model): {0:f}'.format(scores['accuracy']))

if __name__ == '__main__':
    tf.app.run()
確かにコードは短くなり,学習ループや,TensorFlowの決まり事,"tf.placeholder"の設定や,"tf.Session"の立ち上げも隠されている.しかし,代わりに覚えなくてはいけない事柄が増えている気もする.使いこなすには,もう少し調べる必要がありそうである.(特に,tf.feature_column.xxxxx の関数は,重要な部分に見える.)
2. Custom Estimator
前記の通り,Pre-made Estimatorでは,"DNNClassifier", "DNNRegresor"が使えるが,これらは,MLP(Multi-layer Perceptron)モデルである.より複雑なモデル,例えばCNN,RNN等を使いたければ,Custom Estimatorの枠組みを使う必要がある.ここで使う tf.estimator.Estimator は,上記Pre-made Estimatorのベース・クラスであるので,より柔軟なモデル作製ができるようになっている.(もちろん,その分,書くコードの分量は増えますが.)
Custom Estimatorについては,以下のドキュメント,サンプルコードが参考になる.
Creating Estimators in tf.estimator
Estimator Examples - GitHub
(特に,この中のMNISTコード(CNN版): https://github.com/tensorflow/tensorflow/blob/master/tensorflow/examples/learn/mnist.py )
(追加) Creating Estimators from Keras models
これもどれほどの需要があるのかわからないが,すでにあるKeras modelを使って,Estimatorが作れるとのことである.(TensorFlow 1.4より.)
https://www.tensorflow.org/versions/r1.4/programmers_guide/estimators
少しドキュメントより引用させていただく.
You can convert existing Keras models to Estimators. Doing so enables your Keras model to access Estimator's strengths, such as distributed training. Call
tf.keras.estimator.model_to_estimatoras in the following sample:
# Instantiate a Keras inception v3 model.
keras_inception_v3 = tf.keras.applications.inception_v3.InceptionV3(weights=None)
# Compile model with the optimizer, loss, and metrics you'd like to train with.
keras_inception_v3.compile(optimizer=tf.keras.optimizers.SGD(lr=0.0001, momentum=0.9),
                          loss='categorical_crossentropy',
                          metric='accuracy')
# Create an Estimator from the compiled Keras model.
est_inception_v3 = tf.keras.estimator.model_to_estimator(keras_model=keras_inception_v3)
# Treat the derived Estimator as you would any other Estimator. For example,
# the following derived Estimator calls the train method:
est_inception_v3.train(input_fn=my_training_set, steps=2000)
なるほど,Kerasのpre-trainedモデルを使うケースでは便利かも知れない.
感想
現時点で(2017年10月時点で),どれほどの割合のTensorFlowユーザが,tf.data, tf.estimatorを使っているか,使ってみようと考えているか,やや疑問である.但し,これからユーザを増やしていこうとGoogleのTenforFlowチームが考えているのは,間違いないと思われる.個人的な意見として,「よく分からないから使わない」のではなく,これらAPIのざっくりした知識を持ったうえで「使う/使わない」を選択する姿勢が大切なのではないか,と考えている.
また本記事のタイトルtf.dataとtf.estimatorの関係であるが,正直,まだ全体像を理解できていない.tf.estimatorコードのデータ入力関数では,tf.data の使用が推奨されると思われるが,これら2つのモジュールを別々なものしても使える,という”緩い”関係性であると理解している.
参考文献,web site
- Introduction to TensorFlow Datasets and Estimators - Google Developers Blog
https://developers.googleblog.com/2017/09/introducing-tensorflow-datasets.html - tf.dataを紹介したGoogleドキュメント
https://t.co/kCmBsDoqh2 - TensorFlow - Estimator Examples
https://github.com/tensorflow/tensorflow/tree/master/tensorflow/examples/learn - TensorFlow Estimator APIを使ったコードが紹介されているリポジトリ
https://github.com/aymericdamien/TensorFlow-Examples