イントロ
ついに TensorFlow Dev SummitにてTensorFLow 1.0 がアナウンスされた.Graph コンパイラ XLA の試験リリースの話題もあるが,個人的には,TensorFlowのAPI (Application Programming Interface) 構成がどうなるかが気になっていた.
(Google Developers Blog "Announcing TensorFlow 1.0" より抜粋.)
- Higher-level API modules tf.layers, tf.metrics, and tf.losses - brought over from tf.contrib.learn after incorporating skflow and TF Slim
ここ最近,乱立模様を呈していた High-level API について,どう整理されるかversion 1.0に期待していたので,状況を少し調べてみた.
初期のCNNモデルのコード
以前,High-level API が多くなかった状況にて,CNN(Convolutional Neural Network)モデルを扱うにあたり,以下のように自前のクラスを用意してコーディングを行っていた.
#   my_lib_nn.py
#   例えば...  Convolution 2-D Layer
class Convolution2D(object):
    '''
      constructor's args:
          input     : input image (2D matrix)
          input_siz ; input image size
          in_ch     : number of incoming image channel
          out_ch    : number of outgoing image channel
          patch_siz : filter(patch) size
          weights   : (if input) (weights, bias)
    '''
    def __init__(self, input, input_siz, in_ch, out_ch, patch_siz, activation='relu'):
        self.input = input
        self.rows = input_siz[0]
        self.cols = input_siz[1]
        self.in_ch = in_ch
        self.activation = activation

        wshape = [patch_siz[0], patch_siz[1], in_ch, out_ch]
                w_cv = tf.Variable(tf.truncated_normal(wshape, stddev=0.1),
                            trainable=True)
        b_cv = tf.Variable(tf.constant(0.1, shape=[out_ch]),
                            trainable=True)
        self.w = w_cv
        self.b = b_cv
        self.params = [self.w, self.b]

    def output(self):
        shape4D = [-1, self.rows, self.cols, self.in_ch]

        x_image = tf.reshape(self.input, shape4D)  # reshape to 4D tensor
        linout = tf.nn.conv2d(x_image, self.w,
                  strides=[1, 1, 1, 1], padding='SAME') + self.b
        if self.activation == 'relu':
            self.output = tf.nn.relu(linout)
        elif self.activation == 'sigmoid':
            self.output = tf.sigmoid(linout)
        else:
            self.output = linout

        return self.output
下請けのライブラリとして tf.nn.xxx() の関数を用いるが,それを使いやすくするwrapperを作って利用するやり方である.自作ライブラリはカスタマイズも容易であるが,それがあだとなることもあって,細かいメンテナンスも自分で行わなければならない.(大したライブラリではありませんが...)
Keras を知ってからは「Kerasを使うべきか」と選択肢に入れていたが,慣れや細かいデバッグのしやすさ,柔軟性を考え,TensorFlowライブラリを直接使うコーディングスタイルが多かった.
TensorFlow Slim vs. tf.layers
「薄いTensorFlow wapper」という視点で注目していたのが,"Slim" である.Qiitaでも何件か取り上げられているようである.これを用いてMNISTを分類するためのコードを書くと以下のようになった.
import numpy as np
import tensorflow as tf
import tensorflow.contrib.slim as slim
from tensorflow.examples.tutorials.mnist import input_data

mnist = input_data.read_data_sets("../MNIST_data/", one_hot=True)

# Create the model
def my_nn(images, keep_prob):
   net = slim.layers.conv2d(images, 32, [5,5], scope='conv1')
   net = slim.layers.max_pool2d(net, [2,2], scope='pool1')
   net = slim.layers.conv2d(net, 64, [5,5], scope='conv2')
   net = slim.layers.max_pool2d(net, [2,2], scope='pool2')
   net = slim.layers.flatten(net, scope='flatten3')
   net = slim.layers.fully_connected(net, 1024, scope='fully_connected4')
   net = slim.layers.dropout(net, keep_prob)
   net = slim.layers.fully_connected(net, 10, activation_fn=None,
                                        scope='fully_connected5')
   return net

def inference(x, y_, keep_prob):
    x_image = tf.reshape(x, [-1, 28, 28, 1])
    y_pred = my_nn(x_image, keep_prob)

    slim.losses.softmax_cross_entropy(y_pred, y_)
    total_loss = slim.losses.get_total_loss()
    correct_prediction = tf.equal(tf.argmax(y_pred, 1), tf.argmax(y_, 1))
    accuracy = tf.reduce_mean(tf.cast(correct_prediction, tf.float32))

    return total_loss, accuracy, y_pred
Nueral network モデルを短いコードでわかりやすく記述できる.また,関数"inference"内で用いたように,損失関数も slim のAPIで書くことができた.かなり使いやすい印象をもった.
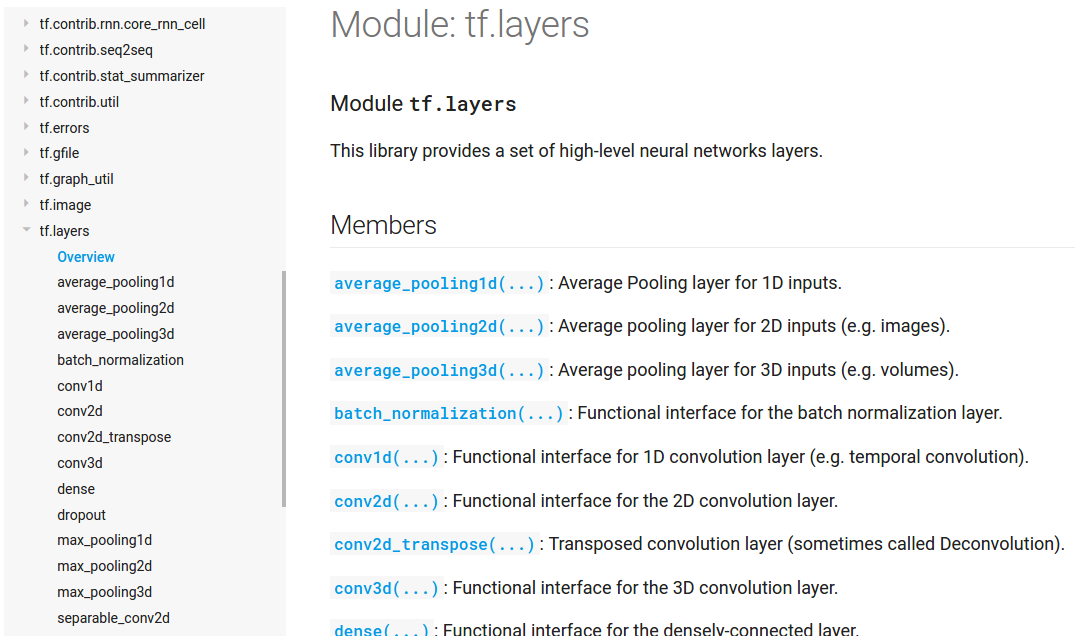
次に今回,TensorFlow 1.0 で用意された tf.layers のモジュールを調べてみた.APIのドキュメントにしっかり説明があったので,それを参考にコーディングを行った.
Fig. TensorFlow APIドキュメントより(イメージ抜粋)

上記Googleアナウンスの抜粋にもあるが,tf.contrib.layers というのもドキュメントに記載があるが,今回の tf.layers は別物なので要注意である.
以下は,tf.layersを用いたCNNのコードである.
import tensorflow as tf
from tensorflow.python.layers import layers
from tensorflow.examples.tutorials.mnist import input_data

mnist = input_data.read_data_sets("../MNIST_data/", one_hot=True)

# Create the model
def my_nn(images, drop_rate):
   net = tf.layers.conv2d(images, 32, [5,5], padding='same',
                                activation=tf.nn.relu, name='conv1')
   net = tf.layers.max_pooling2d(net, pool_size=[2,2], strides=[2,2],
                                name='pool1')
   net = tf.layers.conv2d(net, 64, [5,5], padding='same',
                                activation=tf.nn.relu, name='conv2')
   net = tf.layers.max_pooling2d(net, pool_size=[2,2], strides=[2,2],
                                name='pool2')
   net = tf.reshape(net, [-1, 7*7*64])
   net = tf.layers.dense(net, 1024, activation=tf.nn.relu, name='dense1')
   net = tf.layers.dropout(net, rate=drop_rate)
   net = tf.layers.dense(net, 10, activation=None, name='dense2')
   return net

def inference(x, y_, keep_prob):
    x_image = tf.reshape(x, [-1, 28, 28, 1])
    drop_rate = 1.0 - keep_prob
    y_pred = my_nn(x_image, drop_rate)

    loss = tf.losses.softmax_cross_entropy(y_, y_pred)
    correct_prediction = tf.equal(tf.argmax(y_pred, 1), tf.argmax(y_, 1))
    accuracy = tf.reduce_mean(tf.cast(correct_prediction, tf.float32))

    return loss, accuracy, y_pred
当初,「slimみたいなものだろう」という予断を持ってslimのコードから始めたのだが,意外に関数のスペックに違いがあり戸惑った.("my_nn()" 関数内のコードに着目下さい.)
関数の名前違い (max_pool2d <-> max_pooling2d,fully_connected <-> dense) は「ありがち」として受け入れるとして,引数のキーワードが違っていたり,引数のディフォルトに相違があったりと,細かい調整が必要であった.特に気になった(許せない)ポイントとして,Dropout のパラメータとして,処理後にユニット影響を残す割合 "keep_prob" を与える仕様となっていたものを,効果を省く(落とす)割合を与える仕様に変更している点である.(対策として drop_rate = 1.0 - keep_prob の一行を入れています.)プログラマの「好み」で分かれる点なのかも知れないが,ここはこれまでとの互換性を考えて欲しかった...
これでは,TensorFlow API の整理,整頓ということにはなっていないなと,今の仕様に,やや期待外れな印象を持った.
さてどうしよう?
以上の状況を考慮して選択肢をあげてみる.
- 準備中の Keras2 を待つ.ユーザー数も多いので,APIの洗練度も継続的に向上される期待も大きい.
- まだ登場直後であることを考慮し, tf.layers, tf.metrics, tf.losses の今後の完成度upに期待する.
(オープンソースなのだから,「こうした方がいい」とGitHubで積極的に発言していくのがベストですが.) - さらに別のAPIを調べてみる.(tf.contrib.layers, TFLearn など.)
- 自分の持っているクラスライブラリを見捨てず,メンテしながら使っていく. (気になるAPIのいいところを取り入れていくという作戦もとれます.)
Dropoutのパラメータ(残す割合 or 捨てる割合)のように詳細については「好み」が反映されることが多いので,「どれがベストなAPIか」であまり悩んでも仕方ない気もしてきた.今回取り上げたのが,画像を扱うCNN用関数が中心であったが,Deep Learning の柔軟なモデリング能力(例えば RNN や生成系モデルなど)を考えると,APIの細かいところにこだわることなく(適宜,使い分けながら),広範囲な技術内容をフォローしていく方が建設的かも知れない.
(ご意見,アドバイス等ありましたら,コメント承ります.)
(執筆時のプログラミング環境は,以下になります: Python 3.5.2, TensorFlow 1.0.0 )
参考文献,Web site
- TensorFlow API Document
https://www.tensorflow.org/api_docs/ - Announcing TensorFlow 1.0 - Google Developers Blog
https://developers.googleblog.com/2017/02/announcing-tensorflow-10.html - TensorFlow Dev Summit の動画 - YouTube