きっかけ
Autoencoder(自己符号化器)は他のネットワークモデルに比べるとやや地味な存在である.文献「深層学習」(岡谷氏著,講談社)では第5章に登場するが,
自己符号化器とは,目標出力を伴わない,入力だけの訓練データを使った教師なし学習により,データをよく表す特徴を獲得し,ひいてはデータのよい表現方法を得ることを目標とするニューラルネットです.ディープネットの事前学習,すなわちその重みのよい初期値を得る目的にも利用されます.
と説明されている.「事前学習」を実施する機会はあまりなさそう,ということでこの章は目を通すにとどめ,次の章,畳込みニューラルネット(CNN)や再帰型ニューラルネット(RNN)の章に進む方も多いと思われる.
ただよく調べると,事前学習の他にもAutoencoderの使用目的として以下があるようだ.
- データ圧縮.
- データノイズ除去.(Denoising Autoencoder)
- 画像の区画分割(Semantic Segmentation - 画像の中身を認識した上でのセグメンテーション)
現在,Kaggleでは医療画像に関するコンペ(Ultrasound Nerve)が行われているが,Autoencoderを使った手法が本命になるとフォーラムで発言されていた.それならばということで,勉強のため,MNIST(手書き数字データ)を題材にAutoencoderを実装してみることにした.
KerasのAutoencoderに関する記事
ツールとしてTensowFlowを考えたが,残念ながらTensorFlowドキュメント,特にTutorialにはAutoencoderはない.別のDeep Learningフレームワーク,Kerasにブログ記事としてAutoencoderが取り上げられており,それが非常に参考になった.
Building Autoencoders in Keras : http://blog.keras.io/building-autoencoders-in-keras.html
この中には,さまざまな種類のAutoencoderについて分かりやすく説明がされている.まず,これを写経して理解を深め,次に,この中から次の二つをTensorFlowに移植してみた.
- 一番シンプルなAutoencoder
- 畳込みAutoencoder
特に「畳込みAutoencoder」の方では,通常の畳込み予測モデル(CNN)で行う,「畳込み」-> 「プーリング」の,(画像のチャネル数を増やしながら)画像サイズを小さくする処理の逆,(画像のチャネル数を減らしながら)画像サイズを大きくしていく処理がAutoencoderで必要となるので,ここのところでいろいろ悩むこととなった.
(以下,TensorFlowによる実装の話になりますが,上記のKerasブログ記事にはAutoencoderに関する内容のみならず,KerasでTensorBoardを使う方法等,とてもためになる情報が紹介されています.ぜひ参照ください.)
(本記事のプログラミング環境は,Python 2.7.11, Keras 1.0.5, TensorFlow 0.9.0rc0 になります.)
一番シンプルなAutoencoder
Kerasのブログ記事でも最初に登場する.入力から重みw,バイアスbを使って中間層を生成し,そこからまた別の重みw',バイアスb'を使って入力データを再生成するというモデル.Kerasでのモデル部分のコードは,以下の通り.
# this is our input placeholder
input_img = Input(shape=(784,))
# "encoded" is the encoded representation of the input
encoded = Dense(encoding_dim, activation='relu')(input_img)
# "decoded" is the lossy reconstruction of the input
decoded = Dense(784, activation='sigmoid')(encoded)

# this model maps an input to its reconstruction
autoencoder = Model(input=input_img, output=decoded)

# this model maps an input to its encoded representation
encoder = Model(input=input_img, output=encoded)

# create a placeholder for an encoded (32-dimensional) input
encoded_input = Input(shape=(encoding_dim,))
# retrieve the last layer of the autoencoder model
decoder_layer = autoencoder.layers[-1]
# create the decoder model
decoder = Model(input=encoded_input, output=decoder_layer(encoded_input))

autoencoder.compile(optimizer='adadelta', loss='binary_crossentropy')
Keras(特にSequential model API)ではネットワークの入力側から出力側に向けてモデルを記述していく.上記は,入力からフル結合層(Dense())で中間値を求め,そこからすぐに折り返してフル結合層を経てデコード値を求めている.
これをTensorFlowに直すと以下のようになる.
# Variables
x = tf.placeholder("float", [None, 784])
y_ = tf.placeholder("float", [None, 10])

w_enc = tf.Variable(tf.random_normal([784, 625], mean=0.0, stddev=0.05))
w_dec = tf.Variable(tf.random_normal([625, 784], mean=0.0, stddev=0.05))
# w_dec = tf.transpose(w_enc) # if you use tied weights
b_enc = tf.Variable(tf.zeros([625]))
b_dec = tf.Variable(tf.zeros([784]))

# Create the model
def model(X, w_e, b_e, w_d, b_d):
    encoded = tf.sigmoid(tf.matmul(X, w_e) + b_e)
    decoded = tf.sigmoid(tf.matmul(encoded, w_d) + b_d)

    return encoded, decoded

encoded, decoded = model(x, w_enc, b_enc, w_dec, b_dec)
上記の通り,重みwの形は,encode側とdecode側で転置させた関係となる.上のコードでは,encode側とdecode側で別の重みを設定したが,重み共有を行う場合は,tf.transpose() で変数を転置させる.(コメント箇所)重み共有を用いる/用いないに関しては,明確なルールはないとのことなので,ケースごとに使い分けることになる.
モデルがシンプルなので,すぐに動作させることができた.計算結果は,次のようになった.
Training...
step, loss = 0: 0.721
step, loss = 1000: 0.262
step, loss = 2000: 0.243
step, loss = 3000: 0.237
step, loss = 4000: 0.229
step, loss = 5000: 0.209
step, loss = 6000: 0.212
step, loss = 7000: 0.200
step, loss = 8000: 0.196
step, loss = 9000: 0.178
step, loss = 10000: 0.189
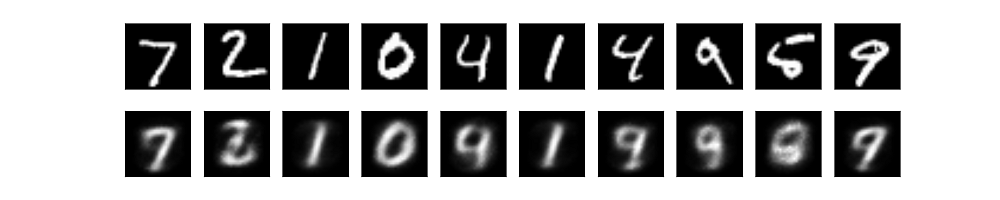
loss (test) = 0.180014
Fig. 入力画像と復元された画像(シンプルAutoencoder)
畳込みAutoencoder(ConvolutionalなAutoencoder)
畳込みAutoencoderがどのようなものか,Kerasのブログから引用する.
Since our inputs are images, it makes sense to use convolutional neural networks (convnets)
as encoders and decoders. In practical settings, autoencoders applied to images are always
convolutional autoencoders --they simply perform much better.
画像を扱うにあたりConvolution処理は有効で,Autoencoderも単純に高機能になるとのこと.そこでまずKerasでの実装を参考にする.
input_img = Input(shape=(1, 28, 28))

x = Convolution2D(16, 3, 3, activation='relu', border_mode='same')(input_img)
x = MaxPooling2D((2, 2), border_mode='same')(x)
x = Convolution2D(8, 3, 3, activation='relu', border_mode='same')(x)
x = MaxPooling2D((2, 2), border_mode='same')(x)
x = Convolution2D(8, 3, 3, activation='relu', border_mode='same')(x)
encoded = MaxPooling2D((2, 2), border_mode='same')(x)

# at this point the representation is (8, 4, 4) i.e. 128-dimensional

x = Convolution2D(8, 3, 3, activation='relu', border_mode='same')(encoded)
x = UpSampling2D((2, 2))(x)
x = Convolution2D(8, 3, 3, activation='relu', border_mode='same')(x)
x = UpSampling2D((2, 2))(x)
x = Convolution2D(16, 3, 3, activation='relu')(x)
x = UpSampling2D((2, 2))(x)
decoded = Convolution2D(1, 3, 3, activation='sigmoid', border_mode='same')(x)

autoencoder = Model(input_img, decoded)
さすがにKerasのコードは読みやすい.
3組の畳込み層とMaxPooing層からなるencodeプロセスと,その後折り返して,画像を復元するdecodeプロセスでこのAutoencoderは構成されている.endcodeの部分は,画像分類などで用いる通常のCNN分類器のものと同じであるが,Autoencoderに特有なのは後半部分である.Kerasコードでは,Convolution2D()とUpSampling2D()の関数が用いられているが,このUpsampling2D()に対して,TensorFlowに同様のものはない.
これに代わるのが "tf.nn.conv2d_transpose()" である.これを使うにあたり注意しなければならないのが,Kerasの UpSampling2D() を1対1に置き換えるのではなく,Convolutional2D() + UpSampling2D() の機能を "tf.nn.conv2d_transpose" が持っている点である.ここに注意し,TensorFlowで実装したのが以下である.
from my_nn_lib import Convolution2D, MaxPooling2D

# Conv 2-D transpose Layer (deconvolutoinal Layer)
class Conv2Dtranspose(object):
    '''
      constructor's args:
          input      : input image (2D matrix)
          output_siz : output image size
          in_ch      : number of incoming image channel
          out_ch     : number of outgoing image channel
          patch_siz  : filter(patch) size
    '''
    def __init__(self, input, output_siz, in_ch, out_ch, patch_siz, activation='relu'):
        self.input = input
        self.rows = output_siz[0]
        self.cols = output_siz[1]
        self.out_ch = out_ch
        self.activation = activation

        wshape = [patch_siz[0], patch_siz[1], out_ch, in_ch]    # note the arguments order

        w_cvt = tf.Variable(tf.truncated_normal(wshape, stddev=0.1),
                            trainable=True)
        b_cvt = tf.Variable(tf.constant(0.1, shape=[out_ch]),
                            trainable=True)
        self.batsiz = tf.shape(input)[0]
        self.w = w_cvt
        self.b = b_cvt
        self.params = [self.w, self.b]

    def output(self):
        shape4D = [self.batsiz, self.rows, self.cols, self.out_ch]
        linout = tf.nn.conv2d_transpose(self.input, self.w, output_shape=shape4D,
                            strides=[1, 2, 2, 1], padding='SAME') + self.b
        if self.activation == 'relu':
            self.output = tf.nn.relu(linout)
        elif self.activation == 'sigmoid':
            self.output = tf.sigmoid(linout)
        else:
            self.output = linout

        return self.output

def mk_nn_model(x, y_):
    # Encoding phase
    x_image = tf.reshape(x, [-1, 28, 28, 1])
    conv1 = Convolution2D(x_image, (28, 28), 1, 16,
                          (3, 3), activation='relu')
    conv1_out = conv1.output()

    pool1 = MaxPooling2D(conv1_out)
    pool1_out = pool1.output()

    conv2 = Convolution2D(pool1_out, (14, 14), 16, 8,
                          (3, 3), activation='relu')
    conv2_out = conv2.output()

    pool2 = MaxPooling2D(conv2_out)
    pool2_out = pool2.output()

    conv3 = Convolution2D(pool2_out, (7, 7), 8, 8, (3, 3), activation='relu')
    conv3_out = conv3.output()

    pool3 = MaxPooling2D(conv3_out)
    pool3_out = pool3.output()
    # at this point the representation is (8, 4, 4) i.e. 128-dimensional
    # Decoding phase
    conv_t1 = Conv2Dtranspose(pool3_out, (7, 7), 8, 8,
                         (3, 3), activation='relu')
    conv_t1_out = conv_t1.output()

    conv_t2 = Conv2Dtranspose(conv_t1_out, (14, 14), 8, 8,
                         (3, 3), activation='relu')
    conv_t2_out = conv_t2.output()

    conv_t3 = Conv2Dtranspose(conv_t2_out, (28, 28), 8, 16,
                         (3, 3), activation='relu')
    conv_t3_out = conv_t3.output()

    conv_last = Convolution2D(conv_t3_out, (28, 28), 16, 1, (3, 3),
                         activation='sigmoid')
    decoded = conv_last.output()

    decoded = tf.reshape(decoded, [-1, 784])
    cross_entropy = -1. *x *tf.log(decoded) - (1. - x) *tf.log(1. - decoded)
    loss = tf.reduce_mean(cross_entropy)

    return loss, decoded
TensorFlowのニューラルネット関係APIを使いやすくするために,クラス"Convolution2D"と"MaxPooling2D"を定義している.( "tf.nn.conv2d()"と"tf.nn.max_pool()のwrapperになります.)
今回,これに加えて,tf.nn.conv2d_transpose()を包む"Conv2Dtranspose"クラスを定義し,それをネットワークモデルを定義する関数で使用している.
これらのクラス使用にあたり,(クラスで引数を少なくしようとはしているが,)指定しなければならない引数が多く,特にdimension関係は,適切に設定してあげないとエラーにつながる.(tf.nn.conv2d_transpose()は,tf.nn.conv2d() と同じようなパラメータ設定をして間違うケースが多いようで,stack overflow等でBug Fixのアドバイスを受けている記事がいくつかありました.)
このコードを実行した状況は,以下のようになった.
Training...
  step, loss =      0:  0.616
  step, loss =   1000:  0.158
  step, loss =   2000:  0.132
  step, loss =   3000:  0.125
  step, loss =   4000:  0.116
  step, loss =   5000:  0.113
  step, loss =   6000:  0.108
  step, loss =   7000:  0.116
  step, loss =   8000:  0.114
  step, loss =   9000:  0.109
  step, loss =  10000:  0.108
loss (test) =  0.106951
Fig. 入力画像と復元された画像(Convolutional Autoencoder)
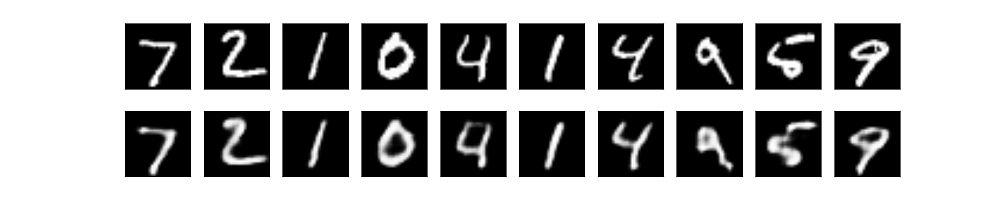
上の「一番シンプルな」の結果画像と比較すると,同じ学習回数でより明瞭な画像が復元できている.
初めはAutoencoderを避けていたが,こうして実際動かしてみるとなかなか興味深い動作をすることが分かった.また,今回は勉強のためにTensorFlowでの実装を行ったが,改めてKerasの(短いコードでかける)有用さを実感できた.
(本記事のコードは,Gist : https://gist.github.com/tomokishii/7ddde510edb1c4273438ba0663b26fc6 に載せています.)
参考文献 / web site
- Building Autoencoders in Keras - Keras Blog
http://blog.keras.io/building-autoencoders-in-keras.html - Kerasドキュメント http://keras.io/
- TensorFlowドキュメント https://www.tensorflow.org/versions/r0.9/api_docs/index.html
- 深層学習(岡谷氏著,講談社 機械学習プロフェッショナルシリーズ)
- TensorFlowで機械学習と戯れる: AutoEncoderを作ってみる - Qiita
http://qiita.com/mokemokechicken/items/8216aaad36709b6f0b5c