Denoというランタイムのことを最近知りまして、触ってみたくなったので簡単に触ってみようと思います。
Denoを知るきっかけはこちらです:Denoの登場でNode.jsの時代は終わるのか?
インストールと環境設定とか
OSはmacOS Catalinaです。
今回はhomebrewでいれます。
brew install deno
deno --version

deno 1.0.0
v8 8.4.300
typescript 3.9.2
その他は公式のやつを参考に、必要なやつだけやれば大丈夫そうです。
https://deno.land/manual/getting_started/setup_your_environment
deno completionsでコマンドの補完用のスクリプトを生成できます。
自分はfishなのでfish用の補完スクリプトを設定します。
deno completions fish > ~/.config/fish/completions/deno.fish
vscodeの拡張も開発されているみたいです。
とりあえず入れておきました。
https://marketplace.visualstudio.com/items?itemName=justjavac.vscode-deno
Hello World
とりあえずのハローワールド
console.log("Hello World");
deno run hello.ts

Compile file:///Users/shiotomo/deno/hello.ts
Hello World
Webサーバ立ててみる
入門
スタンダードライブラリにhttpというのがあるので、それを使います
https://deno.land/std/http
これが噂のURLインポートか
import { listenAndServe } from "https://deno.land/std/http/mod.ts";

listenAndServe({ port: 3000 }, async (req) => {
  if (req.method === "GET" && req.url === "/") {
    req.respond({
      status: 200,
      body: "Hello World.",
    });
  } else if (req.method === "GET" && req.url === "/bye") {
    req.respond({
      status: 200,
      body: "Bye World.",
    });
  } else {
    req.respond({
      status: 404,
      body: "not found",
    });
  }
});
実行する時は--allow-netを忘れずに
付けないとパーミッションでエラーになります。
これが噂のSecure by default.か
deno run --allow-net server.ts
ブラウザからローカルホストにアクセスすると動いていることがわかると思います。
htmlを返す
index.htmlを用意します、中身は適当です
index.htmlの中身
<html>
<head>
    <title>Index !!!</title>
</head>
<body>
    Index !!!!!
</body>
</html>
/へのリクエストにhtmlを返すようにします
import { listenAndServe } from "https://deno.land/std/http/mod.ts";

listenAndServe({ port: 3000 }, async (req) => {
  if (req.method === "GET" && req.url === "/") {
    // htmlをopen
    const file = await Deno.open("./index.html");
    req.respond({
      status: 200,
      body: file,
    }).then(() => Deno.close(file.rid)); // openしたのをclose(適切な方法かどうかは不明)
  } else if (req.method === "GET" && req.url === "/bye") {
    req.respond({
      status: 200,
      body: "Bye World.",
    });
  } else {
    req.respond({
      status: 404,
      body: "not found",
    });
  }
});
そして実行
deno run --allow-net --allow-read server.ts
ちなみに--allow-readを付けなくても実行はできましたが、
/にアクセスした時にエラーになりました。
ファイルの読み取りについても許可が必要になります。
Secure by default.
WebSocket
どうやらWebSocketもスタンダードライブラリで扱えるようです。
WebSocketといえばチャットなので、簡単なチャットができるようにします。
まずはチャットの機能部分を作ります。
WebSocketのライブラリは↓です
https://deno.land/std/ws/mod.ts
// ライブラリのインポート
import {
  WebSocket,
  isWebSocketCloseEvent,
} from "https://deno.land/std/ws/mod.ts";

let sockets: WebSocket[] = new Array();

// これをserver.tsでインポートします
export const chat = async (ws: WebSocket): Promise<void> => {
  sockets.push(ws);
  broadcast("Someone is connected.");

  for await (const event of ws) {
    if (isWebSocketCloseEvent(event)) {
      sockets = sockets.filter((socket) => socket !== ws);
      broadcast("Someone is disconnected.");
      break;
    }

    const message = typeof event === "string" ? event : "";
    broadcast(message);
  }
};

const broadcast = async (message: string): Promise<void> => {
  if (!message) {
    return;
  }
  await Promise.all(sockets.map((socket) => socket.send(message)));
};
そしたらserver.tsを修正します。
import { listenAndServe } from "https://deno.land/std/http/mod.ts";
import {
  acceptWebSocket,
  acceptable,
  WebSocket,
} from "https://deno.land/std/ws/mod.ts";

// chat機能のインポート
import { chat } from "./chat.ts";

listenAndServe({ port: 3000 }, async (req) => {
  if (req.method === "GET" && req.url === "/") {
    const file = await Deno.open("./index.html");
    req.respond({
      status: 200,
      body: file,
    }).then(() => Deno.close(file.rid));
  } else if (req.method === "GET" && req.url === "/bye") {
    req.respond({
      status: 200,
      body: "Bye World.",
    });
  } else if (req.method === "GET" && req.url === "/chat") {
    // 通信をWebSocketにする
    if (acceptable(req)) {
      acceptWebSocket({
        conn: req.conn,
        bufReader: req.r,
        bufWriter: req.w,
        headers: req.headers,
      })
        .then((ws: WebSocket) => {
          // 機能部分
          chat(ws);
        });
    }
  } else {
    req.respond({
      status: 404,
      body: "not found",
    });
  }
});
あとはindex.htmlでメッセージを送れるようにします。
久々に素のjsを書いた気がします。
<html>
<head>
    <title>Index !!!</title>
</head>
<body>
    <div id="messages"></div>
    <div>
        <input id="input-message" type="text" />
        <button onclick="sendMessage()">send</button>
    </div>
    <script>
        let socket;

        const sendMessage = () => {
            const message = document.getElementById("input-message").value;
            socket.send(message);
            document.getElementById("input-message").value = "";
        };

        const receiveMessage = ({ data }) => {
            const messagesDom = document.getElementById("messages");
            const messageDom = document.createElement("p");
            const content = document.createTextNode(data);
            messageDom.appendChild(content);
            messagesDom.appendChild(messageDom);
        }

        window.onload = () => {
            socket = new WebSocket("ws://localhost:3000/chat");
            socket.addEventListener("message", receiveMessage);
        }
    </script>
</body>
</html>
実行して、挙動を確認!
deno run --allow-net --allow-read server.ts
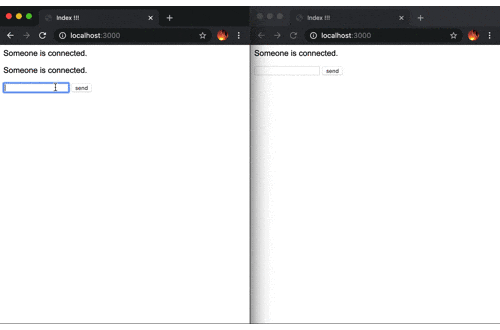
うまくいきました。
自分が接続した時もSomeone is connected.って出ちゃいますけど、まぁいいやとします。
フレームワーク
最後に、
ここまでは標準ライブラリを使いましたが、
より大きな物を作ろうとした時はフレームワーク使う方が楽だと思います。
調べてみるといくつかありましたので載せておきます。
自分も軽く触ってみようかなと思います。
- deno-express
- https://github.com/NMathar/deno-express
- NodeのExpressっぽいやつです
- pogo
- https://github.com/sholladay/pogo
- jsxがビルトインでサポートされているらしいです
参考
-
Denoの登場でNode.jsの時代は終わるのか?
- Denoを知るきっかけです
-
Deno: インストール〜Webサーバ起動
- インストールからサーバについてまで参考にさせていただきました
-
Learn Deno: Chat app
- 正直、この記事の焼き直しと言っても過言ではないです
- Deb.toの方の同じ記事もURLを貼っておきます
-
deno doc
- 各種ドキュメント、URLから動的にドキュメントを生成してくれる地味にすごいやつ
-
deno land
- 困った時は正規のマニュアル読めば何とかなる