本記事のゴール
ボタンを押したら発話する
前提
APL v1.7
やること
TouchWrapperを使用してタッチイベントを発火する。
TouchWrapperとは
子要素がタッチされたときに onPress のコマンドを送信するコンポーネント
ボタンを配置
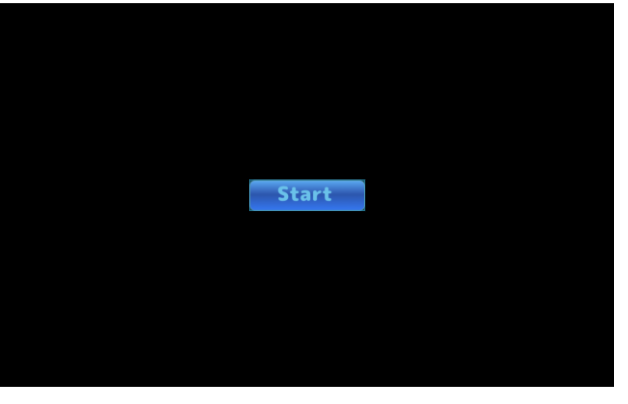
素材はこれ


        "items": [
            {
                "items": [
                    {
                        "type": "TouchWrapper",
                        "items": [
                            {
                                "source": "https://qiita-image-store.s3.ap-northeast-1.amazonaws.com/0/113504/bad9d928-77b7-c399-c316-49eb6329cda9.png",
                                "type": "Image",
                                "width": "241",
                                "height": "65"
                            }
                        ]
                    }
                ],
                "alignItems": "center",
                "justifyContent": "center",
                "type": "Container"
            }
        ]
ボタンタッチを検知してサーバーに送信
onPress されたら SendEventコマンドを実行することにより、サーバーにボタンがタッチされたことを通知する。
書き方はサンプルが非常に参考になる。
{
  "type": "TouchWrapper",
  "id": "idForTheTouchWrapper",
...
  "onPress": [
    {
      "type": "SendEvent",
      "arguments": [
        "textWasPressed",
        "このデータをスキルに送信する"
      ],
      "components": [
        "idForTheTextComponent"
      ]
    }
  ],
...
}
argumentsに関してはボタンを検知するだけなら不要なので書かない。(デフォルト[])
componentsもとりあえず不要。
また、サーバーにどのボタンが押されたのかを伝えるために TouchWrapper に固有のIDをつける。
                        "type": "TouchWrapper",
                        "id": "startButton",
                        "onPress": [
                            {
                                "type": "SendEvent"
                            }
                        ]
onPressの部分はAPLの部分に直書きする。(長いから)
Handlerを書く
Alexaから送信されたリクエストを処理する
にhandlerの書き方が書かれている。
// (1)
const isButtonPress = (requestEnvelope, componentId) => {
    const source = requestEnvelope.request.source
    return Alexa.getRequestType(requestEnvelope) === 'Alexa.Presentation.APL.UserEvent'
        && source.handler === 'Press'
        && source.id === componentId;
};

// (2)
const StartButtonHandler = {
    canHandle(handlerInput) { // (2.1)
        return isButtonPress(handlerInput.requestEnvelope, 'startButton');
    },
    handle(handlerInput) { // (2.2)
        const speakOutput = 'ボタンが押されました';
        return handlerInput.responseBuilder
            .speak(speakOutput)
            .getResponse();
    }
}
...

// (3)
exports.handler = Alexa.SkillBuilders.custom()
    .addRequestHandlers(
        LaunchRequestHandler,
        HelloWorldIntentHandler,
        StartButtonHandler,
...
(2) Handlerの書き方の構造は、第一引数(2.1)に「実行するかどうか」、第二引数(2.2)に「実行する処理」を書く。
今回の「実行するかどうか」は「idがstartButtonのTouchWrapperからSendEventが送られてきたら」である。
では、どのようにデータが送られてくるのか。
SendEventのドキュメントには以下のように書かれている
スキルにAlexa.Presentation.APL.UserEventリクエストを送信します
このあたりにやり方が書いてある。
で、実際にくるデータは以下のような感じ
    "event": {
        "header": {
            "namespace": "Alexa.Presentation.APL",
            "name": "UserEvent",
            "messageId": "messageId",
            "dialogRequestId": "b63a281e-36f3-47c1-bf27-3140e53ff84b"
        },
        "payload": {
            "presentationToken": "amzn1.as-tt.v1.ThirdPartySdkSpeechlet#TID#amzn1.ask.skill.ce32fc86-b796-4238-9496-537069c1ccec::",
            "arguments": [],
            "source": {
                "type": "TouchWrapper",
                "handler": "Press",
                "id": "startButton"
            },
            "components": {},
            "dialogRequestId": "b63a281e-36f3-47c1-bf27-3140e53ff84b"
        }
    },
    "context": [
...
}
handlerInput.requestEnvelope.requestで上記リクエストのpayloadがとってこれる。
あとはsource.handlerでタッチイベントかどうか、source.idで何がタッチされたのかどうかを判断している。(1)
(3) HandlerはaddRequestHandlersに登録する必要があるため、これを忘れないようにする。
他ドキュメント
Processing-Request
getRequestType
参考