概要
pygameでボール反射ゲームを作ったので、このゲームをAIでプレイさせようと思います。
自分で操作しているボール反射ゲーム↓

環境
- windows10
- Python(Anaconda)
ライブラリインストール
AnacondaのCMD.exePromptを起動してcondaとpipで必要なライブラリをインストールしましょう。
conda install tensorflow
conda install keras
pip install gym
pip install keras-rl
pip install keras-rl2
Keras-rlとOpenAIgym
- Keras-rl
深層学習用ライブラリであるkerasを用いて、深層強化学習のアルゴリズムを実装したライブラリ。 - OpenAIgym
強化学習アルゴリズムの開発と評価のためのプラットフォーム。
強化学習では「エージェント」の行動を「環境」が評価して報酬を渡します。「エージェント」はもらった報酬から新たに行動を決め、実行します。
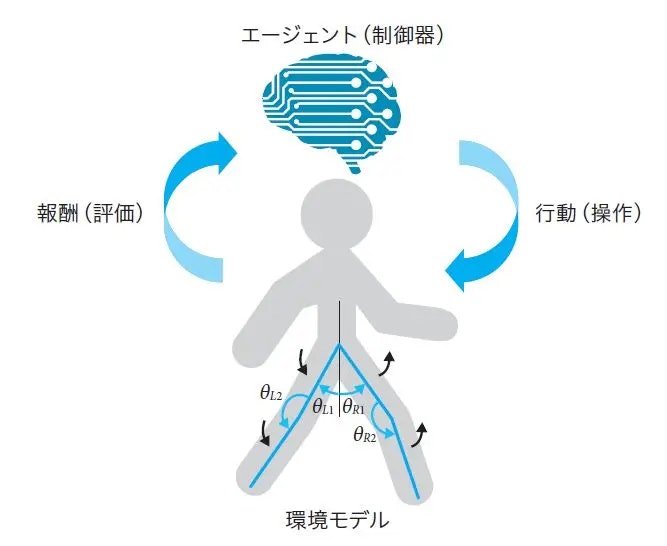
「深層学習が強化学習において果たす役割とは?『現場で使える!Python深層強化学習入門』から紹介」より参照
今回は「エージェント」をKeras-rl、「環境」をOpenAIgymで作っていきます。
ボール反射ゲーム
画面端で反射するボールをプレーヤーが皿を動かして打ち返すだけのゲームです。
import pygame
from pygame.locals import *
import sys
import math
import random

def main():
    #初期化
    pygame.init()
    #ウィンドウサイズ
    window_x=1280
    window_y=720
    screen = pygame.display.set_mode((window_x, window_y)) # ウィンドウサイズの指定
    pygame.display.set_caption('斜方投射') # ウィンドウタイトルの指定
    font = pygame.font.Font(None, 55)

    #ボール位置初期化
    ball_x=random.randint(20,1260)
    ball_y=random.randint(20,200)

    rect_width=200#的の幅
    rect_height=5#的の高さ
    #的の位置(左上)
    rect_x=0#random.randint(v0,window_x-rect_width)
    rect_y=window_y-rect_height

    point=0

    rand=random.randint(0,3)
    if rand==0:
        ball_x_direction=1
        ball_y_direction=1
    elif rand==1:
        ball_x_direction=-1
        ball_y_direction=1
    elif rand==2:
        ball_x_direction=1
        ball_y_direction=-1
    elif rand==3:
        ball_x_direction=-1
        ball_y_direction=-1

    spped=10

    while(True):
        screen.fill((0, 0, 0, 0))  # 画面の背景色
        pygame.time.wait(30)        # 更新時間間隔
        pressed_key = pygame.key.get_pressed()
        if pressed_key[K_LEFT]:
            rect_x-=20
        if pressed_key[K_RIGHT]:
            rect_x+=20
        if rect_x<0:
            rect_x=0
        if rect_x>window_x-rect_width:
            rect_x=window_x-rect_width

        ball_x+=spped*ball_x_direction
        ball_y+=spped*ball_y_direction

        if ball_x>rect_x and ball_x<rect_x+rect_width and ball_y>window_y:
            ball_y_direction*=-1
            point+=1
        elif (ball_y>window_y):
            #ボール位置初期化
            ball_x=random.randint(20,700)
            ball_y=random.randint(20,200)
        if(ball_x<0):
            ball_x_direction*=-1
        if(ball_x>window_x):
            ball_x_direction*=-1
        if(ball_y<0):
            ball_y_direction*=-1

        ball_x_next=ball_x+spped*ball_x_direction
        ball_y_next=ball_y+spped*ball_y_direction

        angle=math.atan2(ball_y-ball_y_next,ball_x_next-ball_x)*(180/3.14)
        print(angle)

        pygame.draw.rect(screen, (255,0,0), (rect_x,rect_y,rect_width,rect_height))#的の描画
        pygame.draw.circle(screen, (0,95,0), (ball_x,ball_y), 10, width=0)#ボールの描画
        pygame.draw.aaline(screen, (255,0,255), (ball_x,ball_y), (ball_x_next,ball_y_next), 0)#バーの描画
        text = font.render('Score:'+str(point), True, (255,255,255))   # 描画する文字列の設定
        screen.blit(text, [10, 10])# 文字列の表示位置
        pygame.display.update()#画面更新

        for event in pygame.event.get():#終了処理
            if event.type == QUIT:
                pygame.quit()
                sys.exit()

if __name__ == "__main__":
    main()
ボール反射ゲームを強化学習の「環境」にする
「OpenAI Gym用のオリジナル環境自作方法と自作例を紹介!」を参考に環境を作りました。
Gym形式の強化学習環境を作成する際の定義
コンストラクタには以下の3つを定義する
action_space :エージェントが取りうる行動空間を定義
observation_space:エージェントが受け取りうる観測空間を定義
reward_range :報酬の範囲[最小値と最大値]を定義
少なくとも以下の3つのメソッドを定義する
reset(self) :環境を初期状態にして初期状態(state)の観測(observation)をreturnする
step(self, action) :行動を受け取り行動後の環境状態(state)の観測(observation)・即時報酬(reward)・エピソードの終了判定(done)・情報(info)をreturnする
render(self, mode) :modeで指定されたように描画もしは配列をreturnする
必須ではないが極力以下の2つのメソッドも定義する
close(self) :環境を終了する際に必要なクリーンアップ処理を実施する
seed(self, seed=None) :シードを設定する
stepメソッドの返り値は以下を満たす必要がある
observation :object型。observation_spaceで設定した通りのサイズ・型のデータを格納。
reward :float型。reward_rangeで設定した範囲内の値を格納。
done :bool型。エピソードの終了判定。
info :dict型。デバッグに役立つ情報など自由に利用可能。
これに従って環境を作る
ボール反射ゲーム環境の概要
- ボールの位置、射出方向はランダムで初期化をする
- プレーヤーがとりうるアクションは3つあり、「左移動」、「右移動」、「何もしない」の3つ
- 状態はボールの位置、射出方向と皿の位置を利用。
- 報酬は1stepごとにreward=1とする。つまり、長く継続できれば報酬が多くなる。
import gym
import numpy as np
import pygame
import math
import random

class MyEnv(gym.Env):
    def __init__(self):

        #初期化
        pygame.init()
        #ウィンドウサイズ
        self.window_x=1280
        self.window_y=720

        screen = pygame.display.set_mode((self.window_x, self.window_y)) # ウィンドウサイズの指定
        pygame.display.set_caption('反射球') # ウィンドウタイトルの指定
        font = pygame.font.Font(None, 55)

        self.rect_width=150#プレーヤーの幅
        self.rect_height=5#プレーヤーの高さ

        self.spped=10#球のスピード

        # アクション数定義
        ACTION_NUM=3 #アクションの数が3つの場合
        self.action_space = gym.spaces.Discrete(ACTION_NUM)

        # 状態の範囲を定義
        LOW = np.array([0,0,0,-135.06847396007072])
        HIGH = np.array([self.window_x,self.window_y,self.window_x-self.rect_width,135.06847396007072])
        self.observation_space = gym.spaces.Box(low=LOW, high=HIGH)

        self.reset()

    def reset(self):
        #ボール位置初期化
        self.ball_x=random.randint(20,1260)
        self.ball_y=random.randint(20,200)

        #球の進む方向をランダムで決める
        rand=random.randint(0,3)
        if rand==0:
            self.ball_x_direction=1
            self.ball_y_direction=1
        elif rand==1:
            self.ball_x_direction=-1
            self.ball_y_direction=1
        elif rand==2:
            self.ball_x_direction=1
            self.ball_y_direction=-1
        elif rand==3:
            self.ball_x_direction=-1
            self.ball_y_direction=-1

        #プレーヤーの位置
        self.rect_x=10
        self.rect_y=self.window_y-self.rect_height

        #ボールが次に進む位置
        self.ball_x_next=self.ball_x+self.spped*self.ball_x_direction
        self.ball_y_next=self.ball_y+self.spped*self.ball_y_direction

        #ボールの角度
        self.angle=math.atan2(self.ball_y-self.ball_y_next,self.ball_x_next-self.ball_x)*(180/3.14)

        observation=[self.ball_x,self.ball_y,self.rect_x,self.angle]

        return observation

    def step(self, action_index):
        done=False
        #アクションによってプレーヤーを移動する
        if action_index==0:
            self.rect_x-=20
        if action_index==1:
            self.rect_x+=20
        if self.rect_x<0:
            self.rect_x=0
        if self.rect_x>self.window_x-self.rect_width:
            self.rect_x=self.window_x-self.rect_width

        #ボール位置計算
        self.ball_x+=self.spped*self.ball_x_direction
        self.ball_y+=self.spped*self.ball_y_direction

        #ボールがプレーヤに当たったら反転
        if self.ball_x>self.rect_x and self.ball_x<self.rect_x+self.rect_width and self.ball_y>self.window_y:
            self.ball_y_direction*=-1
        elif (self.ball_y>self.window_y):#ボールがプレーヤに当たらずに画面下に当たったら終了フラグ
            done=True

        #画面端に当たったら反転
        if(self.ball_x<0):
            self.ball_x_direction*=-1
        if(self.ball_x>self.window_x):
            self.ball_x_direction*=-1
        if(self.ball_y<0):
            self.ball_y_direction*=-1

        #ボールが次に進む位置
        self.ball_x_next=self.ball_x+self.spped*self.ball_x_direction
        self.ball_y_next=self.ball_y+self.spped*self.ball_y_direction

        #ボールの角度
        self.angle=math.atan2(self.ball_y-self.ball_y_next,self.ball_x_next-self.ball_x)*(180/3.14)

        #状態の保存
        observation=[self.ball_x,self.ball_y,self.rect_x,self.angle]

        #ゲームが続くと報酬
        reward=1
        return observation, reward, done, {}

    def render(self,mode):
        screen = pygame.display.set_mode((self.window_x, self.window_y)) # ウィンドウサイズの指定
        pygame.time.wait(20)#更新時間間隔
        pygame.display.set_caption("Pygame Test") # ウィンドウの上の方に出てくるアレの指定
        screen.fill((0,0,0,)) # 背景色の指定。RGBだと思う

        pygame.draw.rect(screen, (255,0,0), (self.rect_x,self.rect_y,self.rect_width,self.rect_height))#的の描画
        pygame.draw.circle(screen, (0,95,0), (self.ball_x,self.ball_y), 10, width=0)#ボールの描画
        pygame.draw.aaline(screen, (255,0,255), (self.ball_x,self.ball_y), (self.ball_x_next,self.ball_y_next), 0)#バーの描画
        pygame.display.update() # 画面更新

    def close(self):
        pygame.quit()
エージェントを作る
環境ファイルをインポートしてエージェントを作成し、強化学習を行います。
from tensorflow.keras.optimizers import Adam
import gym
from tensorflow.keras.models import Sequential
from tensorflow.keras.layers import Dense, Activation, Flatten
from rl.agents.dqn import DQNAgent
from rl.policy import BoltzmannQPolicy
from rl.policy import EpsGreedyQPolicy
from rl.memory import SequentialMemory
import pygame
from environment import MyEnv

# 環境の生成
env = MyEnv()
nb_actions = env.action_space.n

# モデルの定義
model = Sequential()
model.add(Flatten(input_shape=(1,) + env.observation_space.shape))
model.add(Dense(16))
model.add(Activation('relu'))
model.add(Dense(16))
model.add(Activation('relu'))
model.add(Dense(16))
model.add(Activation('relu'))
model.add(Dense(nb_actions))
model.add(Activation('linear'))

# エージェントの設定
memory = SequentialMemory(limit=1000000, window_length=1)
policy = EpsGreedyQPolicy(eps=0.1)
dqn = DQNAgent(model=model, nb_actions=nb_actions, memory=memory, nb_steps_warmup=10,target_model_update=1e-2, policy=policy)
dqn.compile(Adam(lr=1e-3), metrics=['mae'])

# 学習
dqn.fit(env, nb_steps=200000, visualize=False, verbose=1)

# 評価
dqn.test(env, nb_episodes=3, visualize=True,nb_max_episode_steps=1000)
pygame.quit()
- モデルの定義ではエージェントのニューラルネットワークを構築しています。Kerasでのニューラムネットワーク構築について簡単に知りたいなら「Kerasでニューラルネットワークの作成の簡単イメージ」をご覧ください。
- エージェントの設定では強化学習に必要なメモリやポリシーについての設定をします。
- モデルを学習させます。今回は200000step分学習させました
学習結果

AIにゲームを操作させていますが、しっかりボールの位置に先回りしてボールを反射させていますね。
移動するごとに報酬が減るようにすれば、最小限の動きでプレイしてくれるかもしれません。