前提として、以下の記事ようにTensorFLowSharpの導入が済んでいること。
C#でTensorFlowを動かす。

直接、C#のコードでグラフを作成しようとしたが、どうやら先人たちはPython上でグラフを書き、学習モデルを作成後、それを他の言語上で読み込んでいる。
モデルを読み込む際に、Android(Java)やC++上でも同様であるが、チェックポイント(シリアル化された変数)のエクスポートデータを直接読込むことはできないので、プロトコルバッファ(シリアル化されたグラフ)にチェックポイントをマージしなければ使うことができない。つまり、変数の状態をもつプロトコルバッファを作成する。
グラフとテンソルデータの両方を出力するためには、VariablesをConstantに変換後、再度グラフを作成してProtocolBuffersファイルとして出力する必要がある。
方法としては、2つあり、手動で変換する方法と、自動で変換する方法がある。今回は両方法を示す。
実行環境
macOS Sierra
TensorFlow on python3: 1.0.0
TensorFlow on c#(c): 1.0.0-rc0
Python 3.6.0
Visul Studio for Mac ver 7.0.1
model作成
まずは、以下のCNNのモデルを作成する.
input_data.pyを、ここから落として、model.pyの同層に配置する。
# -*- coding: utf-8 -*-
from __future__ import absolute_import, unicode_literals
import input_data
import tensorflow as tf
import shutil
import os

# モデルの出力先
export_dir = './models'

if os.path.exists(export_dir):
    shutil.rmtree(export_dir)
    os.mkdir(export_dir);
else:
    os.mkdir(export_dir);

# 勾配消失問題を防ぐために小さなノイズで重みを初期化する2つの関数
'''
Weight Initialization

To create this model, we're going to need to create a lot of weights and biases.
One should generally initialize weights with a small amount of noise for symmetry breaking,
and to prevent 0 gradients. Since we're using ReLU neurons, it is also good practice to initialize
them with a slightly positive initial bias to avoid "dead neurons." Instead of doing this repeatedly
while we build the model, let's create two handy functions to do it for us.
'''
def weight_variable(shape):
    initial = tf.truncated_normal(shape, stddev=0.1)
    return tf.Variable(initial)

def bias_variable(shape):
    initial = tf.constant(0.1, shape=shape)
    return tf.Variable(initial)

# 畳み込み層
def conv2d(x, W):
    return tf.nn.conv2d(x, W, strides=[1, 1, 1, 1], padding='SAME')

# プーリング層
def max_pool_2x2(x):
    return tf.nn.max_pool(x, ksize=[1, 2, 2, 1],
                          strides=[1, 2, 2, 1], padding='SAME')

mnist = input_data.read_data_sets("MNIST_data/", one_hot=True)

# グラフを作成する
g = tf.Graph()
with g.as_default():
    x = tf.placeholder("float", shape=[None, 784])
    y_ = tf.placeholder("float", shape=[None, 10])

    # 第一レイヤー
    # [5, 5, 1, 32] は最初の5,5はパッチサイズ,1は入力チャンネル数,32は出力チャンネル数
    W_conv1 = weight_variable([5, 5, 1, 32])
    b_conv1 = bias_variable([32])
    x_image = tf.reshape(x, [-1, 28, 28, 1])
    h_conv1 = tf.nn.relu(conv2d(x_image, W_conv1) + b_conv1)
    h_pool1 = max_pool_2x2(h_conv1)

    # 第二レイヤー
    W_conv2 = weight_variable([5, 5, 32, 64])
    b_conv2 = bias_variable([64])
    h_conv2 = tf.nn.relu(conv2d(h_pool1, W_conv2) + b_conv2)
    h_pool2 = max_pool_2x2(h_conv2)

    # 全結合層
    # チャネルを全て平坦化する。
    W_fc1 = weight_variable([7 * 7 * 64, 1024])
    b_fc1 = bias_variable([1024])
    h_pool2_flat = tf.reshape(h_pool2, [-1, 7 * 7 * 64])
    h_fc1 = tf.nn.relu(tf.matmul(h_pool2_flat, W_fc1) + b_fc1)

    # 過学習制御のためのDropout
    keep_prob = tf.placeholder("float")
    h_fc1_drop = tf.nn.dropout(h_fc1, keep_prob)

    # 読み出し層
    # 第一層と同様にsoftmax(ロジスティック回帰)を追加する
    W_fc2 = weight_variable([1024, 10])
    b_fc2 = bias_variable([10])

    y_conv = tf.nn.softmax(tf.matmul(h_fc1_drop, W_fc2) + b_fc2)

    # モデルの学習と評価
    cross_entropy = -tf.reduce_sum(y_ * tf.log(y_conv))
    train_step = tf.train.AdamOptimizer(1e-4).minimize(cross_entropy)
    correct_prediction = tf.equal(tf.argmax(y_conv, 1), tf.argmax(y_, 1))
    accuracy = tf.reduce_mean(tf.cast(correct_prediction, "float"))

    # セッションを作成し、変数を初期化する
    with tf.Session() as sess:
        sess.run(tf.global_variables_initializer())

        # 学習を開始する
        for i in range(20000):
            batch = mnist.train.next_batch(50)
            if i % 100 == 0:
                train_accuracy = accuracy.eval(
                    {x: batch[0], y_: batch[1], keep_prob: 1.0}, sess)
                print("step %d, training accuracy %g" % (i, train_accuracy))
            train_step.run(
                {x: batch[0], y_: batch[1], keep_prob: 0.5}, sess)

        # スコア表示
        print("test accuracy %g" % accuracy.eval(
            {x: mnist.test.images, y_: mnist.test.labels, keep_prob: 1.0}, sess))
参考
https://github.com/miyosuda/TensorFlowAndroidMNIST/blob/master/trainer-script/expert.py
TensorFlow 畳み込みニューラルネットワークで手書き認識率99.2%の分類器を構築
手動で変換する方法
学習後に、Variableの値をevalで取り出して、Constantにする。
流れとしてはViriables -> ndarray -> Constantと変換する。その後、Constantでグラフを再構成して、プロトコルバッファとして書き出す。名前は、C#上でモデルを読込むときに対応させるためのもの。
with tf.Session() as sess:
        ...
        # Viriablesの内容をndarrayに変換する
        _W_conv1 = W_conv1.eval(sess)
        _b_conv1 = b_conv1.eval(sess)
        _W_conv2 = W_conv2.eval(sess)
        _b_conv2 = b_conv2.eval(sess)
        _W_fc1 = W_fc1.eval(sess)
        _b_fc1 = b_fc1.eval(sess)
        _W_fc2 = W_fc2.eval(sess)
        _b_fc2 = b_fc2.eval(sess)


# ndarrayをConstantに変換後、新しいグラフを再構成する。
g_2 = tf.Graph()
with g_2.as_default():
    # 入力ノードは"input"とする。これは、.pb を読み込むときに指定する。
    x_2 = tf.placeholder("float", shape=[None, 784], name="input")

    W_conv1_2 = tf.constant(_W_conv1, name="constant_W_conv1")
    b_conv1_2 = tf.constant(_b_conv1, name="constant_b_conv1")
    x_image_2 = tf.reshape(x_2, [-1, 28, 28, 1])
    h_conv1_2 = tf.nn.relu(conv2d(x_image_2, W_conv1_2) + b_conv1_2)
    h_pool1_2 = max_pool_2x2(h_conv1_2)

    W_conv2_2 = tf.constant(_W_conv2, name="constant_W_conv2")
    b_conv2_2 = tf.constant(_b_conv2, name="constant_b_conv2")
    h_conv2_2 = tf.nn.relu(conv2d(h_pool1_2, W_conv2_2) + b_conv2_2)
    h_pool2_2 = max_pool_2x2(h_conv2_2)

    W_fc1_2 = tf.constant(_W_fc1, name="constant_W_fc1")
    b_fc1_2 = tf.constant(_b_fc1, name="constant_b_fc1")
    h_pool2_flat_2 = tf.reshape(h_pool2_2, [-1, 7 * 7 * 64])
    h_fc1_2 = tf.nn.relu(tf.matmul(h_pool2_flat_2, W_fc1_2) + b_fc1_2)

    W_fc2_2 = tf.constant(_W_fc2, name="constant_W_fc2")
    b_fc2_2 = tf.constant(_b_fc2, name="constant_b_fc2")

    # 学習後のデータを出力するだけなので、ドロップアウトは入れなくて良い
    # 出力ノードは"output"とする。入力ノードと同様に.pb を読み込むときに指定する。
    y_conv_2 = tf.nn.softmax(tf.matmul(h_fc1_2, W_fc2_2) + b_fc2_2, name="output")

    with tf.Session() as sess_2:
        init_2 = tf.global_variables_initializer();
        sess_2.run(init_2)

        # グラフを ProtocolBuffersファイルとして書き出す。
        graph_def = g_2.as_graph_def()
        tf.train.write_graph(graph_def, export_dir, 'Manual_model.pb', as_text=False)

        # 訓練後のモデルのテストを行う
        y__2 = tf.placeholder("float", [None, 10])
        correct_prediction_2 = tf.equal(tf.argmax(y_conv_2, 1), tf.argmax(y__2, 1))
        accuracy_2 = tf.reduce_mean(tf.cast(correct_prediction_2, "float"))

        # スコア表示
        print("check accuracy %g" % accuracy_2.eval(
            {x_2: mnist.test.images, y__2: mnist.test.labels}, sess_2))
参考
https://github.com/miyosuda/TensorFlowAndroidMNIST/blob/master/trainer-script/expert.py
TesorFlow: Pythonで学習したデータをAndroidで実行
自動で変換する方法
TensorFlowで学習してモデルファイルを小さくしてコマンドラインアプリを作るシンプルな流れ
上記の記事のように_freeze_graph.py_は使おうとしたが、エラーが何度も出て、r12の新しいモデル形式への未対応やpython3のとき引数が増えたりするので面倒になり、使わないことにした。
そのため、今回は_convert_variables_to_constants()_のみを使った。
モデルの学習後に、convert_variables_to_constants()でvariableからconstantへ変換後、プロトコルバッファとして書き出す。
ただし、手動で変換していたときは、グラフの再構成するときに各ノードに名前をつけていたが、今回は学習を行ったグラフを変換するため、各ノードに名前をつけておく必要がある。この名前がC#上で読込むときに対応する。
with g.as_default() as gr_def:
    x = tf.placeholder("float", shape=[None, 784], name="input")
    y_ = tf.placeholder("float", shape=[None, 10], name="labels")

    ...

    keep_prob = tf.placeholder("float", name="dropout")

    ...

    y_conv = tf.nn.softmax(tf.matmul(h_fc1_drop, W_fc2) + b_fc2, name="output")

    with tf.Session() as sess:

        ...

        # variablesをconstantsに変換したグラフを生成する
        # 出力ノードの名前を指定
        converted_graph = graph_util.convert_variables_to_constants(sess, sess.graph_def, ['output'])
        # プロトコルバッファとして書き出し
        tf.train.write_graph(converted_graph, export_dir, 'Auto_model.pb',  as_text=False)
参考
http://tyfkda.github.io/blog/2016/09/14/tensorflow-protobuf.html
読込み及び推測
手動での変換と、convert_variables_to_constants()を用いた変換では、モデルの実行方法が少し異なる。
手動での変換では推論では使わないDropoutは入れてないが、convert_variables_to_constants()で変換したときDropoutのplaceholderはそのままなので、実行時に値を入れる必要がある。
以下に手動で変換したときに書き出したモデルのManual_model.pbの読込み及び推測のコードを示す。
using System;
using System.Runtime.CompilerServices;
using System.Runtime.InteropServices;
using TensorFlow;
using System.IO;
using System.Collections.Generic;
using Learn.Mnist;
using System.Linq;

namespace SampleTest
{
	class MainClass
	{

		// Convert the image in filename to a Tensor suitable as input to the Inception model.
		static TFTensor CreateTensorFromImageFile(string file)
		{
			var contents = File.ReadAllBytes(file);

			// DecodeJpeg uses a scalar String-valued tensor as input.
			var tensor = TFTensor.CreateString(contents);

			TFGraph graph;
			TFOutput input, output;

			// Construct a graph to normalize the image
			ConstructGraphToNormalizeImage(out graph, out input, out output);

			// Execute that graph to normalize this one image
			using (var session = new TFSession(graph))
			{
				var normalized = session.Run(
						 inputs: new[] { input },
						 inputValues: new[] { tensor },
						 outputs: new[] { output });

				return normalized[0];
			}
		}

		//開始モデルは、非常に特定の正規化されたフォーマット(特定の画像サイズ、入力テンソルの形状、正規化されたピクセル値など)
		//でテンソルによって記述された画像を入力として取ります。
		//このファンクションは、入力としてJPEGでエンコードされた文字列を取り込み、
		//入力モデルとしての入力として適したテンソルを戻すTensorFlow操作のグラフを作成します。
		static void ConstructGraphToNormalizeImage(out TFGraph graph, out TFOutput input, out TFOutput output)
		{
			// - モデルは28x28ピクセルにスケーリングされた画像で訓練されました。
			// - モノクロなので表される色は1色のみ。(値 - 平均)/ スケールを使用してfloatに変換して使用する。
			// 画素値を0-255 から 0-1 の範囲にするので、変換値 = (Mean - 画素値) / Scale の式から,
			// Mean = 255, Scale = 255 となる。

			const int W = 28;
			const int H = 28;
			const float Mean = 255;
			const float Scale = 255;
			const int channels = 1;

			graph = new TFGraph();
			input = graph.Placeholder(TFDataType.String);

			output = graph.Div(
                x: graph.Sub(
                  x: graph.Const(Mean, "mean"),
                    y: graph.ResizeBilinear(
                        images: graph.ExpandDims(
                            input: graph.Cast(graph.DecodeJpeg(contents: input, channels: channels), DstT: TFDataType.Float),
                            dim: graph.Const(0, "make_batch")),
                        size: graph.Const(new int[] { W, H }, "size"))),
                y: graph.Const(Scale, "scale"));
		}
		// pythonで作成したモデルの読込を行う
		void MNSIT_read_model()
		{
			var graph = new TFGraph();

			//var model = File.ReadAllBytes("tensorflow_inception_graph.pb");

			// シリアル化されたGraphDefをファイルからロードします。
			var model = File.ReadAllBytes("Manual_model.pb");
			graph.Import(model, "");

			using (var session = new TFSession(graph))
			{
				var labels = File.ReadAllLines("labels.txt");

				var file = "temp.jpg";

				//画像ファイルに対して推論を実行する
				//複数のイメージの場合、session.Run()はループで(同時に)呼び出すことができます。
				//あるいは、モデルが画像データのバッチを入力として受け入れるので、画像をバッチ処理することができる。
				var tensor = CreateTensorFromImageFile(file);

				var runner = session.GetRunner();
				// 学習モデルのグラフを指定する。
				// 入出力テンソルの名前をsessionに登録する
				// 手動で変換したモデルの読込のときは、.AddInput(graph["dropout"][0], 0.5f)はいらない。
				runner.AddInput(graph["input"][0], tensor).Fetch(graph["output"][0]);
				var output = runner.Run();

				// output[0].Value()は、「バッチ」内の各画像のラベルの確率を含むベクトルです。 バッチサイズは1であった。
				//最も可能性の高いラベルインデックスを見つけます。
				var result = output[0];
				var rshape = result.Shape;
				if (result.NumDims != 2 || rshape[0] != 1)
				{
					var shape = "";
					foreach (var d in rshape)
					{
						shape += $"{d} ";
					}
					shape = shape.Trim();
					Console.WriteLine($"Error: expected to produce a [1 N] shaped tensor where N is the number of labels, instead it produced one with shape [{shape}]");
					Environment.Exit(1);
				}

				var bestIdx = 0;
				float best = 0;
                // 尤も確率が高いものを調べて表示する
				var probabilities = ((float[][])result.GetValue(true))[0];
				for (int i = 0; i < probabilities.Length; i++)
				{
					Console.WriteLine(probabilities[i]);
					if (probabilities[i] > best)
					{
						bestIdx = i;
						best = probabilities[i];
					}
				}
				Console.WriteLine($"{file} best match: [{bestIdx}] {best * 100.0}% {labels[bestIdx]}");
			}
		}
		public static void Main(string[] args)
		{
			Console.WriteLine(Environment.CurrentDirectory);
			Console.WriteLine("TensorFlow version: " + TFCore.Version);


			var t = new MainClass();
			t.MNSIT_read_model();
		}
	}
}
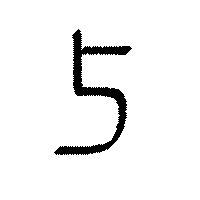
以下のlabels.txtとtemp.jpg、作成した学習モデルを実行ファイルと同層に配置する。
0
1
2
3
4
5
6
7
8
9
temp.jpg ↓
convert_variables_to_constants()で変換したときは、以下のようにコードを変更する。
var model = File.ReadAllBytes("Manual_model.pb");
↓
var model = File.ReadAllBytes("Auto_model.pb");
runner.AddInput(graph["input"][0], tensor).Fetch(graph["output"][0]);
↓
runner.AddInput(graph["input"][0], tensor).AddInput(graph["dropout"][0], 0.5f).Fetch(graph["output"][0]);
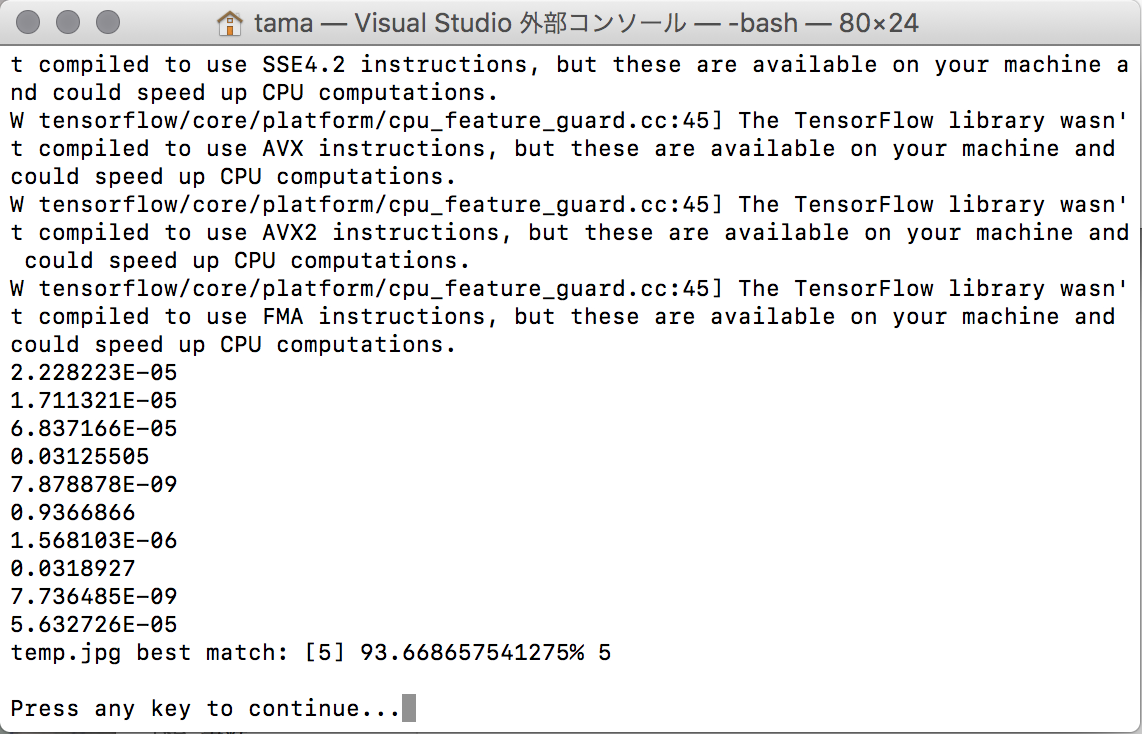
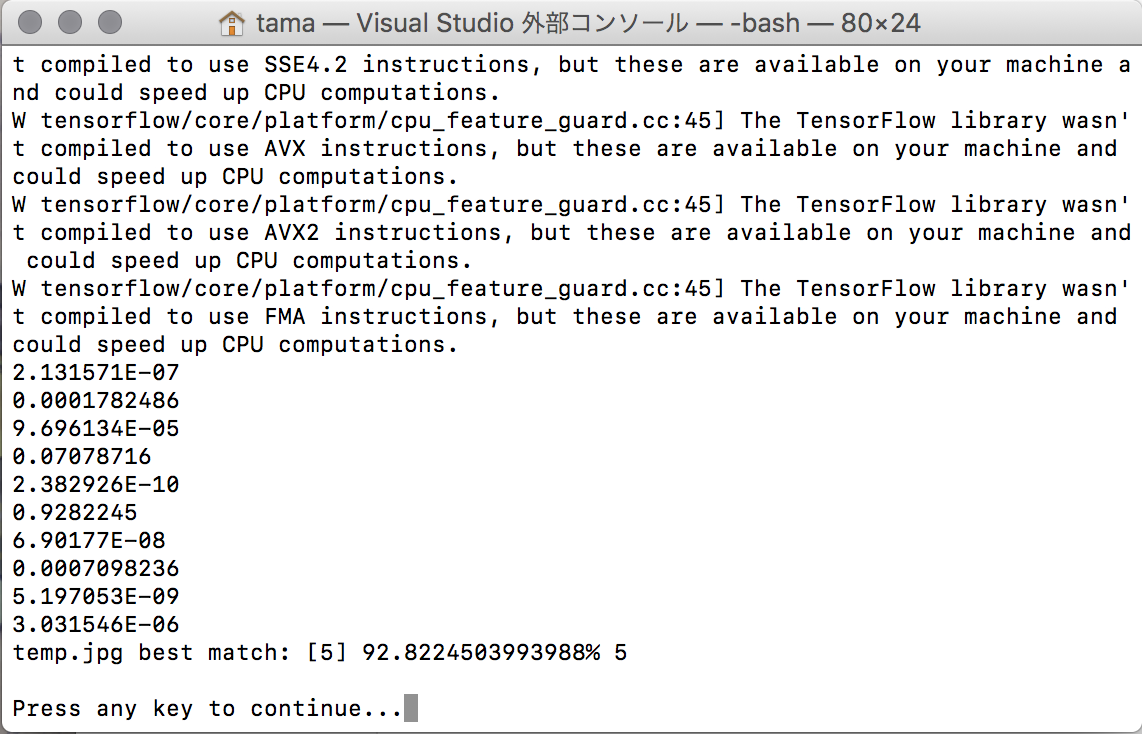
一応実行時の結果の画像を示す。
Manual_model.pbの実行結果
Auto_model.pbの実行結果
学習
C#上で学習をさせたくて、一からモデルを構築しようとしたが、最適化関数が一つしか見つからず、リファレンスもなくなってたので使い方が分からず詰んだ。また、python上でモデルをつくって読み込み後、グラフを再構築すればよいとも考えたが、チェックポイントファイルから最適化器のデータを取り除いてあるので、pythonので書いてもC#上では使えない。
今後の課題としては、最適化関数の使い方を知ってC#上で学習をさせたい。