はじめに
AI Builder のプロンプトで情報を出力する際、出力の形式を JSON に指定できます。

※架空の請求書、架空の値段です
例えば、上記のようにすることで、テキスト情報から請求書の情報および注文した商品の明細を複数取得することができます。
このようにすることで、例えば、以下のように注文明細に関する SharePoint リストに対して複数行のデータを登録することが可能です。

※請求書リスト側は、以下のように一行のデータが登録されています。

また、この際、例えば、Power Apps で以下のように、読み取った情報を一旦表示して、必要に応じて修正をした上で登録したい場合があると思います。

このようなアプローチについて説明します。
プロンプト
以下のようなプロンプトを作成します。

出力形式は JSON にしています。
{
  "invoice_number": "0002",
  "invoice_registration_number": "T2330000000000",
  "issue_date": "2023-10-31",
  "due_date": "2023-11-30",
  "sub_total_amount": "63696",
  "tax": "6367",
  "total_amount": "70063",
  "payment_method": "銀行振込",
  "billing_to": {
    "billing_to_name": "株式会社TAKMASPOWER",
    "billing_to_address": "熊本県熊本市中央区 000-0000"
  },
  "billed_by": {
    "billed_by_name": "マイクロソフト株式会社",
    "billed_by_address": "東京都港区 100-0000"
  },
  "line_items": [
    {
      "description": "Microsoft 365 Business Standard",
      "quantity": 12,
      "unit_price": "1560",
      "total_price": "18720"
    },
    {
      "description": "Power Apps per app",
      "quantity": 12,
      "unit_price": "750",
      "total_price": "9000"
    },
    {
      "description": "Power Apps Premium",
      "quantity": 12,
      "unit_price": "2998",
      "total_price": "35976"
    }
  ]
}
Power Apps 側
一旦、OCR で請求書からテキストを抽出して、プロンプトを呼び出して、結果をテキストインプットコントロールにそのまま表示しています。


次にこれを Power Apps で扱いやすくするよう変換処理を行います。ここがポイントです。
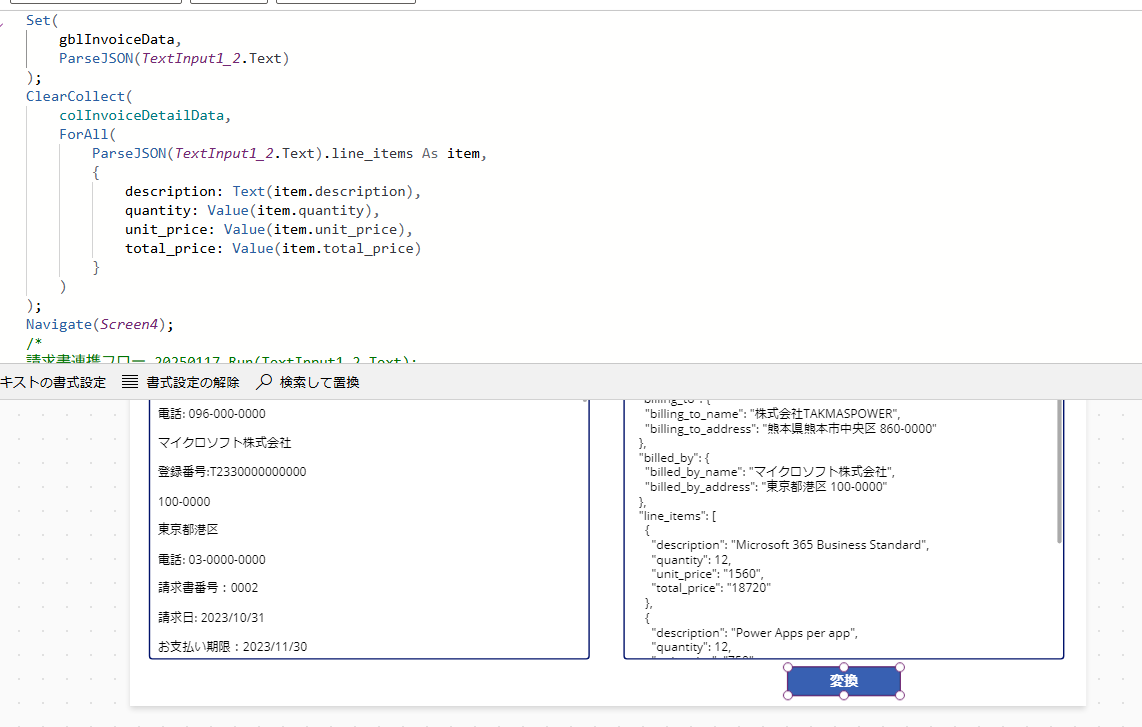
まず、請求書番号や合計金額などの注文情報は、以下の部分で変数に格納します。
Set(
    gblInvoiceData,
    ParseJSON(TextInput1_2.Text)
);
そして、明細部分は、以下のようにしてコレクションに格納します。
ClearCollect(
    colInvoiceDetailData,
    ForAll(
        ParseJSON(TextInput1_2.Text).line_items As item,
        {
            description: Text(item.description),
            quantity: Value(item.quantity),
            unit_price: Value(item.unit_price),
            total_price: Value(item.total_price)
        }
    )
);
そして、注文情報は、以下のようにして、フォームの各項目の既定値に代入します。
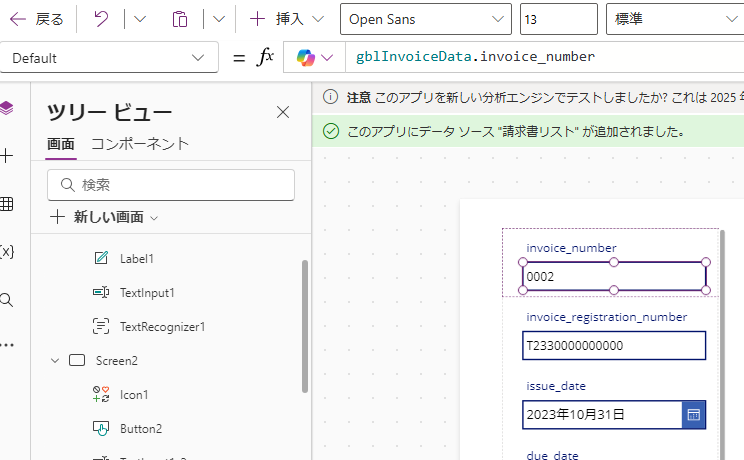
gblInvoiceData. と入力しても候補が出ないため、注意が必要です。
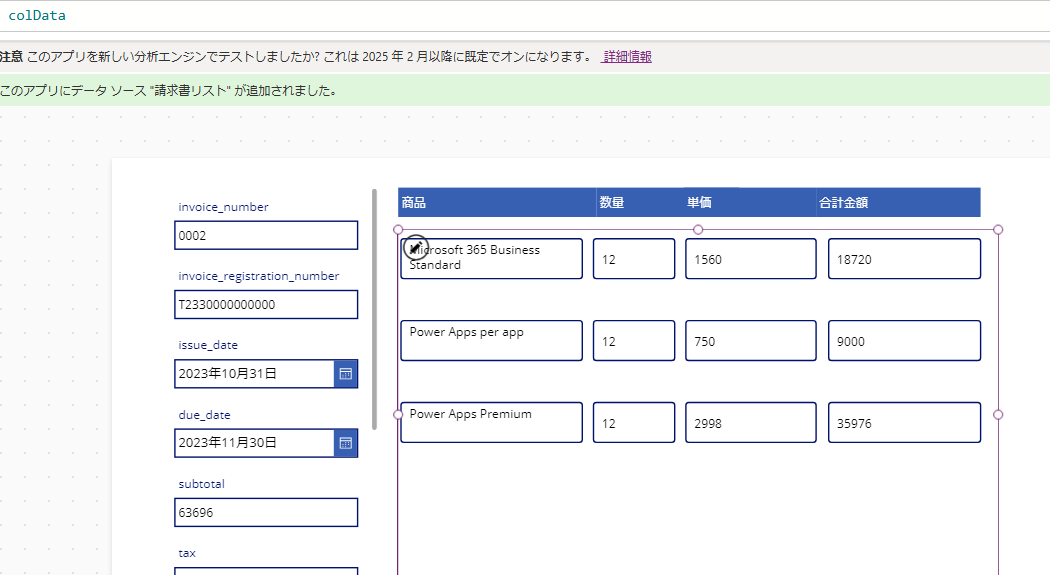
明細部分はコレクションにしているため、単にギャラリー内の各テキストインプットコントロールに表示しているだけです。
フォームコントロールの[OnSuccess]には以下のような処理を入れています。注文情報が登録できたら、明細情報をギャラリーの行だけ追加します。

ForAll(
    Gallery1.AllItems,
    Patch(
        請求書明細,
        Defaults(請求書明細),
        {
            description: ThisRecord.TextInput3.Text,
            quantity: Value(ThisRecord.TextInput3_1.Text),
            unit_price: Value(ThisRecord.TextInput3_2.Text),
            total_price: Value(ThisRecord.TextInput3_3.Text),
            invoice_number:Text(gblInvoiceData.invoice_number)
        }
    )
);
ResetForm(Form1);
Notify("請求書の登録処理が成功しました",NotificationType.Success)
このようにすることで、Power Apps 上で必要に応じて修正しつつ登録することができます。
補足
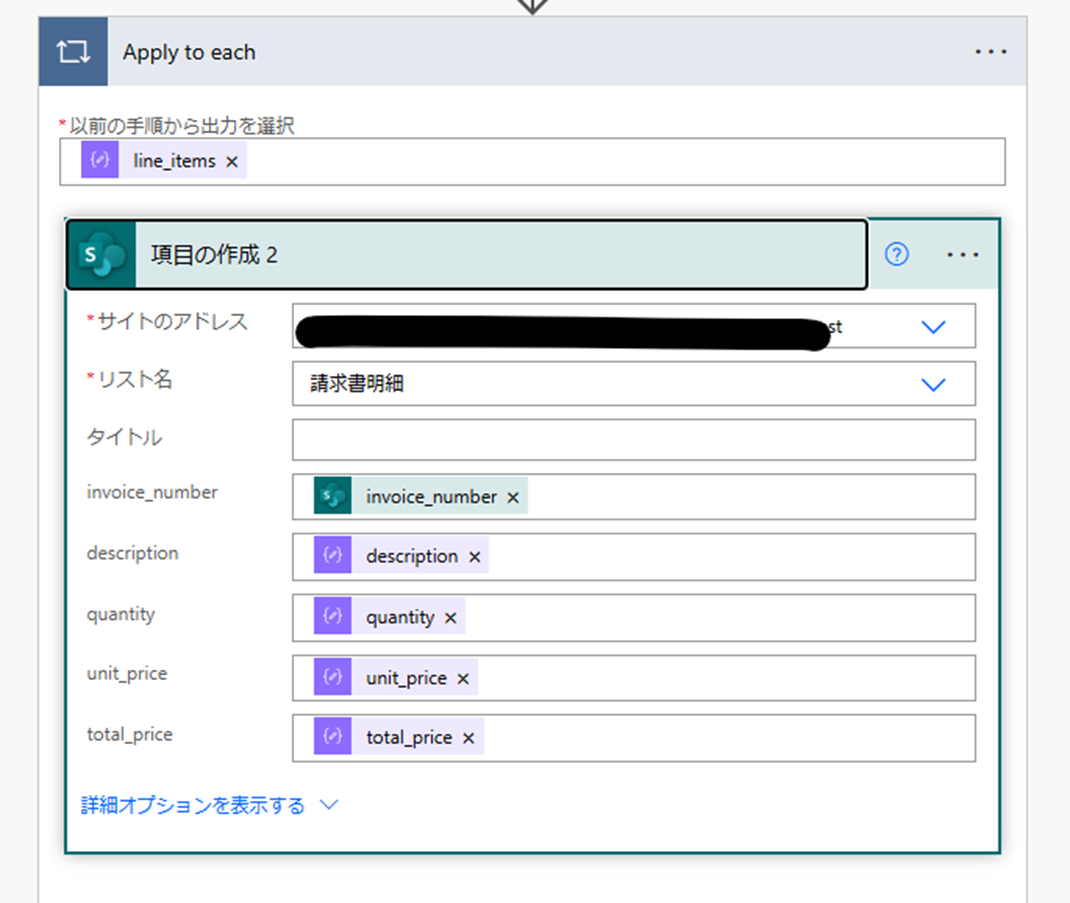
なお、JSON にした情報を Power Apps 側で修正する必要はなく、一旦登録して問題ない場合は、いつも通り (?)、Power Automate に JSON データを渡して、[JSON の解析] アクションで解析後、例えば、SharePoint に転記する場合は、項目の作成アクションを使えばいいです。こちらの場合、[JSON の解析] アクションの使い方に慣れる必要はありますが、上記で紹介したアプローチよりは簡単だと思います。

サンプルの JSON からスキーマを作成します。Power Apps またはプロンプトでテストした結果などを張り付ければいいです。

それぞれの列に代入する値は、動的な値から選択するだけのため簡単です。

注文明細の方は配列のため勝手にループ処理になります。