ADX for Unity環境下におけるエディタでのカテゴリごとミュート
先日実施されたUnity Japan主催のイベントUnity SYNCの講演にて、「痒いところに手が届く!Editor拡張で開発をチョット快適にするススメ」というセッションがありました。
- 痒いところに手が届く!Editor拡張で開発をチョット快適にするススメ(株式会社ポケラボ)
https://learning.unity3d.jp/8858/
その中の一節で、「エディター内で音声をカテゴリごとにミュートする機能」について紹介がありました。本公演で取り上げていたポケラボ社開発の『シノアリス』はCRIWARE採用タイトルで、サウンドの実装はADXが使用されています。講演は非常に限られた時間だったため、ミュートの詳細な実装については紹介については触れられていませんでした。そこで、同様のミュート機能の実装と、プラスアルファした形で作ってみました。
- デモ動画
ADXにおける「カテゴリ」とは
ADXのワークフローでは、「音データ」側に様々な制御パラメータを埋め込んで、ゲームランタイム上で再生する際の制御コードを減らすアプローチをとっています。
その代表的なものとして「カテゴリ」があります。これは、音データごとに属性をタグのように付与できるもので、再生しているAudio Source(的なもの)にかかわらずカテゴリごとに音量制御などができます。
カテゴリ機能
https://game.criware.jp/manual/unity_plugin/latest/contents/atom4u_keys_category.html
参考1:ゲーム内の機能として音量コンフィグを実装
ゲーム内でカテゴリーごとに音量を変更するオプション画面を作る場合の説明は以下にあります。
- ADX for Unityで音量コンフィグを実装
https://qiita.com/nimushiki/items/4e6db6fcd82177a3d117
参考2:ADX使用環境における全体のミュート
ADX導入環境下において、Game ViewのミュートボタンをADX対応にする拡張については、実はgistで公開しています。
https://gist.github.com/TakaakiIchijo/6d2f8573ac92e877a621e5aa679c7a18
Muteボタンが押されているかどうかのステートをEditorUtility.audioMasterMuteから取れるので、これの値の変化を監視してADXシステム全体のミュートを設定します。
これで、標準のミュートボタンをオーバーライドして、エディタ実行時にADX再生音のミュートを行うことができます。
using CriWare;
using UnityEditor;

[InitializeOnLoadAttribute]
public class CriWareGameViewMuteButton
{
    private static bool isAudioMute = false;

    static CriWareGameViewMuteButton()
    {
        EditorApplication.update  += () =>
        {
            if (isAudioMute == EditorUtility.audioMasterMute) return;

            isAudioMute = EditorUtility.audioMasterMute;

            CriAtomExAsr.SetBusVolume(0, isAudioMute ? 0f : 1f);
        };
    }
}
カテゴリごとのミュート
本題のカテゴリごとのミュートを作っていきます。発想のもととなったポケラボ社さんの講演では、ミュート操作用のエディタウィンドウを用意し、チェックボックスでオンオフをする実装がとられていました。実際、このやり方が一番エディタ拡張のカロリーが低いです。そこで今回はちょっとチャレンジして、Game Viewに専用ボタンを表示するアプローチをとりました。
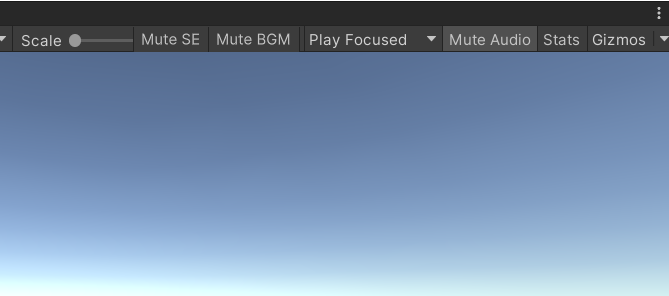
Game Viewの「Mute Audio」とは別に「Mute SE」「Mute BGM」が表示されています。
ADXカテゴリごとのミュートオンオフ関数
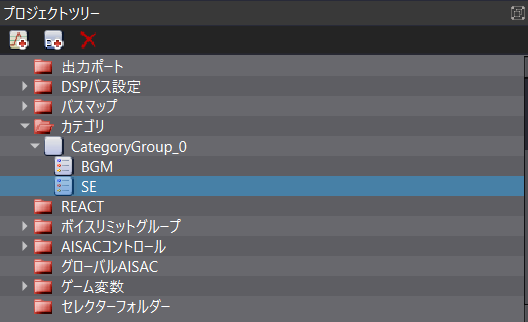
まずはサウンドの制御側を作ります。「BGM」「SE」の2カテゴリがあるとします。Atom Craft側のカテゴリ設定は次の通りです。
これらのカテゴリが、各音声データ(ADX用語で言うところの「キュー」)に設定されているものとします。
Unity側のランタイムでカテゴリごとにミュートを設定するコードは以下の通りです。
CriAtomExCategory.Mute("BGM", true);
指定のカテゴリ名でミュートをオンオフする関数を作っておきます。
using UnityEditor;

    private static void SetAdx2Mute(string categoryName, bool isMute)
    {
        if (Application.isPlaying)
        {
            CriAtomExCategory.Mute(categoryName, isMute);
        }
    }
この関数を通じてオンオフを行うボタンを作っていきます。
Game Viewにボタンを足す
Game Viewにボタンを生やします。
UnityEditor.UIElementsでToolbarToggleを描画し、UnityEditor.GameViewを取得してツールバーに乗せてあげましょう。
Toolbar Toggle
https://docs.unity3d.com/ScriptReference/UIElements.ToolbarToggle.html
Game Viewの参照はReflectionを使って以下の手続きで取得できます。
using System.Reflection;

//中略

var asm = Assembly.Load("UnityEditor");
var typeGameView = asm.GetType("UnityEditor.GameView");
var gameView = EditorWindow.GetWindow(typeGameView, false, "Game", false);
Toggleの描画は以下の通りです。
    private const string EditorPrefsIsBGMMute = "Editor_Prefs_IsBGMMute";
    private const string EditorPrefsIsSEMute = "Editor_Prefs_IsSEMute";


//中略

        var toolbarToggleBGM = new ToolbarToggle() { text = "Mute BGM" };
        var toolbarToggleSE = new ToolbarToggle() { text = "Mute SE" };

        var toolbar = new VisualElement();
        var style = toolbar.style;
        var rootVisualElement = gameView.rootVisualElement;

        style.flexDirection = FlexDirection.RowReverse;
        style.height = 20;
        style.marginTop = 1;
        style.marginRight = 300;
        style.paddingLeft = 100;

        toolbarToggleBGM.value = EditorPrefs.GetBool(EditorPrefsIsBGMMute);

        toolbarToggleBGM.RegisterValueChangedCallback(x =>
        {
            EditorPrefs.SetBool(EditorPrefsIsBGMMute, toolbarToggleBGM.value);
            SetAdx2Mute("BGM",toolbarToggleBGM.value);
        });

        toolbarToggleSE.value = EditorPrefs.GetBool(EditorPrefsIsSEMute);

        toolbarToggleSE.RegisterValueChangedCallback(x =>
        {
            EditorPrefs.SetBool(EditorPrefsIsSEMute, toolbarToggleSE.value);
            SetAdx2Mute("SE",toolbarToggleSE.value);
        });

        toolbar.Add(toolbarToggleBGM);
        toolbar.Add(toolbarToggleSE);

        toolbar.BringToFront();

        rootVisualElement.Clear();
        rootVisualElement.Add(toolbar);
トグルの状態はPlayごとにリセットされてしまうため、EditorPrefを使ってEditorPrefsIsBGMMute, EditorPrefsIsSEMuteの名前でトグルの状態を保存しています。
これらをクラスにまとめ、[InitializeOnLoad]で起動時に読み込むようにすればボタンが出ます。
using System.Reflection;
using UnityEngine;
using UnityEditor;
using UnityEditor.UIElements;
using UnityEngine.UIElements;
using CriWare;

[InitializeOnLoad]
public static class GameViewExtension
{
    private const string EditorPrefsIsBGMMute = "Editor_Prefs_IsBGMMute";
    private const string EditorPrefsIsSEMute = "Editor_Prefs_IsSEMute";

    static GameViewExtension()
    {
           //ここに上記処理を書く
    }
}
エディタ再生時にトグルボタンの状態を取得して反映
この状態でも動きますが、エディター停止状態からミュートボタンを押したときはその設定が反映されません。プレイ中の操作のみが反映されます。
これを解消するために、Playが始まったときにボタン状況を確認してすぐミュートする処理を足します。
    private static void OnChangedPlayMode(PlayModeStateChange state)
    {
        if (state == PlayModeStateChange.EnteredPlayMode)
        {
            if (EditorPrefs.HasKey(EditorPrefsIsBGMMute))
            {
                var isMute = EditorPrefs.GetBool(EditorPrefsIsBGMMute, false);
                if (isMute == false) return;

                SetAdx2Mute("BGM",true);
            }

            if (EditorPrefs.HasKey(EditorPrefsIsSEMute))
            {
                var isMute = EditorPrefs.GetBool(EditorPrefsIsSEMute, false);
                if (isMute == false) return;

                SetAdx2Mute("SE",true);
            }
        }
    }
この関数を先ほどのstatic GameViewExtension()初期化関数の中で呼ぶことで、エディターがplayになる前にミュートボタンをクリックした操作が反映されます。
まとめ
今回はリフレクションを使ったあまりエレガントでない方法ですが、もしかするとGameViewの中にUI要素を表示する「Overlays」を使ったほうが便利かもしれません。
今後調査します。

