先日React Routerを学習したので、そのアウトプットとして何か作ってみたいと思い、自分のアメリカ留学をテーマにした簡単なサイトを作成してみました!
以下、サイトのURLとGitHubリポジトリです。(サイトはGitHub Pagesにデプロイしています。)
サイトURL:https://taikiyamano.github.io/MyLifeInTheUS/#/
Githubリポジトリ:https://github.com/TaikiYamano/MyLifeInTheUS
また、今回のWebサイトを作成するにあたり、こちらの記事を参考にさせて頂きました![]()
ディレクトリ構造
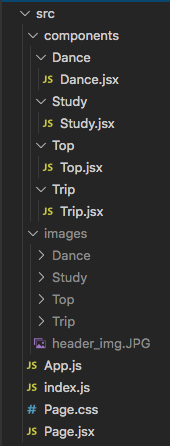
今回作成したWebサイトのディレクトリ構造は以下のようになります。(create-react-appコマンドでデフォルトで作成されるいくつかのファイルは削除しています。)

componentsディレクトリの中に各ルーティングに対するページのディレクトリ(DanceやStudyなど)を作り、その中に各フォルダ名に対応するJSXファイルを作成しています。今回はディレクトリの中にJSXファイルしかないので、コンポーネント毎にディレクトリを作成する必要もなかったのですが、今後コンポーネント毎に別のCSSを当てるということが起きた先に柔軟に対応できるよう、componentsディレクトリの中に各コンポーネント用のディレクトリを作成しました。
imagesディレクトリの中には各ページで表示する為の画像を入れたディレクトリがあり、Page.jsxにはページ全体のヘッダーとヘッダーメニュー、ルーティングを記述しています。Page.cssはページ全体のCSSを記述していて、App.jsでPageコンポーネント(Page.jsxの内容)とPage.cssを読み込んでいます。
App.js
import React from 'react';
import './Page.css';
import Page from './Page';

function App() {
  return (
    <Page/>
  );
}

export default App;
App.jsの中身はこんな感じです。上記のようにPage.cssとPageコンポーネントをインポートし、AppコンポーネントでPageコンポーネントをreturnしているだけになります。
Page.jsx
import React from 'react';
//1
import {
    HashRouter,
    Route,
    Link
} from 'react-router-dom';
//2
import Top from './components/Top/Top';
import Study from './components/Study/Study';
import Dance from './components/Dance/Dance';
import Trip from './components/Trip/Trip';
import '../src/Page.css';

function Page(){
    return(
        <header className="header_wrapper">
            //3
            <HashRouter>
                <nav>
                    <ul className="header_menu">
                        //4
                        <li><Link to="/">Top</Link></li>
                        <li><Link to="/study">Study</Link></li>
                        <li><Link to="/dance">Dance</Link></li>
                        <li><Link to="/trip">Trip</Link></li>
                    </ul>
                </nav>
                <div className="header_title_img">
                    <h1 className="header_title">My Life In The U.S.</h1>
                </div>
                //5
                <Route path="/" exact component={Top} />
                <Route path="/study" exact component={Study} />
                <Route path="/dance" exact component={Dance} />
                <Route path="/trip" exact component={Trip} />
            </HashRouter>
        </header>
    )
}

export default Page;
Page.jsxの中身はこんな感じです。
1、こちらではreact-router-domからHashRouter Router、Routeをインポートしました。(詳細は後ほど説明します。)
2、こちらでは、各ページのコンポーネントをインポートしています。
3、今回、GitHub Pagesに静的ファイルをデプロイしたかったので、1でBrouserRouterではなくHashRouterをインポートし、使用しました。(因みにGitHubPagesにデプロイする際、BrouserRouterを使っていると、デプロイしたサイトをリロードした時に404ページが返ってきます![]() 原因としては、リロードするとサーバーまでリクエストが走ってしまい、「そのパスにはページが存在していないよ!」と返されるかららしいです。一方、HashRuterを使用すると、URLの後ろに/#/が付き、その場でリロードしてもページがそのまま読み込まれる形となり、404は出なくなります。URLの見栄えは少し悪くなりますが...)
原因としては、リロードするとサーバーまでリクエストが走ってしまい、「そのパスにはページが存在していないよ!」と返されるかららしいです。一方、HashRuterを使用すると、URLの後ろに/#/が付き、その場でリロードしてもページがそのまま読み込まれる形となり、404は出なくなります。URLの見栄えは少し悪くなりますが...)
4、ヘッダーメニュー部分に1でインポートしたLinkを使用して、toの部分に各表示部分のパスを設定しています。
5、Routeではpathの部分で指定したパスにアクセスをした際に、どのコンポーネントを表示させるかをcomponent部分で指定しています。今回の場合、
| アクセスするパス | 表示するコンポーネント |
|---|---|
| / | Topコンポーネント |
| /study | Studyコンポーネント |
| /dance | Danceコンポーネント |
| /trip | Tripコンポーネント |
となります。
また、Route内にexactと記述していますが、この記述がないとパスが部分的に一致した場合でも、そのコンポーネントを表示してしまいます。つまり今回の場合では、どのパスにも「/」が入っている為、exactがないと、「/」が部分的に一致し、どのパスにアクセスしても、常にTopコンポーネントが表示された状態になります。exactを記述すると、パスが完全に一致した時にだけ、対応するコンポーネントを表示するようにするので、Topコンポーネントが常に表示されるという事態を防ぐことができます。
Trip.jsx
今回は各ページのコンポーネントファイルの中身がほとんど同じなので、それぞれのファイルの中身を一つずつ説明はしないのですが、Tripコンポーネントのみ、ImageGalleryというコンポーネントをインポートしてカルーセルのイメージギャラリーを表示させるようにしたので、それも踏まえてTripコンポーネントを、全てのページコンポーネントファイルを代表して中身を説明していきます。
import React from 'react';
//1
import '../../Page.css';
//2
import NiagaraFalls from '../../images/Trip/niagarafalls.JPG';
import TimesSquare from '../../images/Trip/timessquare.JPG';
import Trip_img1 from '../../images/Trip/trip_img1.JPG';
import Trip_img2 from '../../images/Trip/trip_img2.JPG';
import Trip_img3 from '../../images/Trip/trip_img3.JPG';
import Trip_img4 from '../../images/Trip/trip_img4.JPG';
import Trip_img5 from '../../images/Trip/trip_img5.JPG';
import Trip_img6 from '../../images/Trip/trip_img6.JPG';
import Trip_img7 from '../../images/Trip/trip_img7.JPG';
import Trip_img8 from '../../images/Trip/trip_img8.JPG';
import Trip_img9 from '../../images/Trip/trip_img9.JPG';
import Trip_img10 from '../../images/Trip/trip_img10.JPG';
//3
import ImageGallery from 'react-image-gallery';
import "react-image-gallery/styles/css/image-gallery.css";

function Trip(){
//4
    const images = [
    {
        original: `${Trip_img1}`,★
        thumbnail: `${Trip_img1}`,
        description: "Grand Central Terminal",
    },
    {
        original: `${Trip_img2}`,
        thumbnail: `${Trip_img2}`,
        description: "The Statue of Liberty",
    },
    {
        original: `${Trip_img3}`,
        thumbnail: `${Trip_img3}`,
        description: "Landscape of NYC",
    },
    {
        original: `${Trip_img4}`,
        thumbnail: `${Trip_img4}`,
        description: "Me in front of Niagara Falls' billboard",
    },
    {
        original: `${Trip_img5}`,
        thumbnail: `${Trip_img5}`,
        description: "A church in New York (Maybe St. Patrick's Cathedral)",
    },
    {
        original: `${Trip_img6}`,
        thumbnail: `${Trip_img6}`,
        description: "Trump Tower",
    },
    {
        original: `${Trip_img7}`,
        thumbnail: `${Trip_img7}`,
        description: "Night Brooklyn bridge",
    },
    {
        original: `${Trip_img8}`,
        thumbnail: `${Trip_img8}`,
        description: "Night view from Brooklyn bridge",
    },
    {
        original: `${Trip_img9}`,
        thumbnail: `${Trip_img9}`,
        description: "New York Public Library",
    },
    {
        original: `${Trip_img10}`,
        thumbnail: `${Trip_img10}`,
        description: "Niagara Falls from the ship"
    },
  ];
//5
    return(
        <div className="whole_wrapper">
            <div className="inner">
                <h1 className="page_title">Trip</h1>
                <p className="trip_top_text">
                    I couldn't visit a lot of places while studying abroad becase I was so busy with studying. But I visited NewYork City twice, and Niagara Falls twice.
                </p>
                <div className="content">
                    <div className="img_space img_right">
                        <img src={NiagaraFalls} alt="NiagaraFalls"/>
                        <span className="picture_description">Picture: NiagaraFalls</span>
                    </div>
                    <p className="text_space text_left">
                        Niagara Falls was very amazing and powerful place! I had only seen it in books and on videos,<br/>so I was very glad to see
                        the real one!
                        In Niagara Falls, I got on a ship and could see Niagara Falls very close up! <br/>
                        It was so dynamic and beautiful! If you like nature, I recomend to visit here!<br/>
                    </p>
                </div>
                <div className="content">
                    <div className="img_space img_left">
                        <img src={TimesSquare} alt="NiagaraFalls"/>
                        <span className="picture_description">Picture: the countdown at Times Square in New York on New Year’s Eve</span>
                    </div>
                    <p className="text_space text_right">
                        Visiting New York City is one of the best memories in my life! <br/>
                        The first time, I  went to the countdown at Times Square in New York on New Year’s Eve with my friends! <br/>
                        It was so crowded at Times Square and my friends and me waited until the countdown was started<br/>
                        (we were wating for the countdown around 12 hours...), so we were so tired.<br/> But I think I had a valuable experience I had never experienced.<br/>
                        On the following day, my friends and me visit Grand Central Station and Liberty Island<br/>
                        that is famous for the Statue of Liberty.  The second time, <br/>I visted NYC to went sightseeing and enjoy some popular food in NYC. <br/>
                        If I have a chance, I would like to visit America and NYC again!
                    </p>
                </div>
                <div className="pictures_gallery">
                    <h1>Pictures gallery</h1>
                    <p>I'm going to share some of my pictures about my trips in America here!</p>
                    //6
                    <ImageGallery items={images} />
                </div>
            </div>
        </div>
    )
}

export default Trip;
Trip.jsxの中身はこんな感じです。
1、こちらではページ全体のCSSをインポートしています。
2、こちらではページ内で使う画像、イメージギャラリーで使う画像をインポートしています。
3、こちらではreact-image-galleryからImageGalleryコンポーネント、そしてそのCSSをインポートしています。
4、ImageGalleryコンポーネントのitemsの部分に指定する配列を定義しています。配列の中はオブジェクトで、プロパティはreact-image-gallery側で指定されています。(種類が多いのですが、色々選べてとても便利です!詳しくはこちらのドキュメントをご参照ください。)
今回はoriginal(イメージギャラリーで大きく表示される画像)、thumbnail(サムネイル)、description(画像の説明)の3つのプロパティを指定しました。(因みにインポートした画像をプロパティの値として使用する場合、画像指定部分を
`${Trip_img1}`
という風に記述しないとうまく表示されません。)
5、こちらでは、ページの表示部分をreturnしています。
6、ImageGalleryコンポーネントを表示させます。またこの時、items部分には4で定義した配列を指定してあげることで、イメージギャラリーを表示させることができます。
GitHub Pagesへのデプロイ
GitHub Pagesへのデプロイはこちらの記事を参考にさせて頂きました!![]()
ただ、僕の場合、サイトを作成し始める段階で、すでにコードをGitHubのリポジトリで管理していて、部分的に違うところもあったので、僕が行った手順を説明させて頂ければと思います。
1、gh-pagesをインストール
作業中のディレクトリ(React-RouterでWebサイトを作っているディレクトリ)に移動し、以下のコマンドを実行しました。
$ npm install gh-pages --save-dev
2、package.jsonに設定を追記
package.json内に"homepage"、"scripts"の中に"predeploy"と"deploy"の3つを追記しました。
"homepage"の中は"http://[自分のGitHubのユーザー名].github.io/[公開したいアプリ、サイトのリポジトリ名"を記述しました。
以下が実際の追記内容です。
{
  "homepage": "http://TaikiYamano.github.io/MyLifeInTheUS",
//省略
  },
  "scripts": {
//省略
    "predeploy": "npm run build",
    "deploy": "gh-pages -d build"
  },
3、GitHub Pagesにデプロイ
1と同じディレクトリで、以下のコマンドを実行し、サイトをGitHub Pagesにデプロイしました。
$ npm run deploy
4、GitHub Page側で表示の確認
ブラウザでGitHubを開き、今回のサイトを管理しているリポジトリを選択します。そうすると、「Code」や「Issues」などのタブが表示されるので、そこの一番右、「Settings」を選択します。
Settingsページに移動し、下の方にスクロールして行くと、「GitHub Pages」という項目があり、そこに
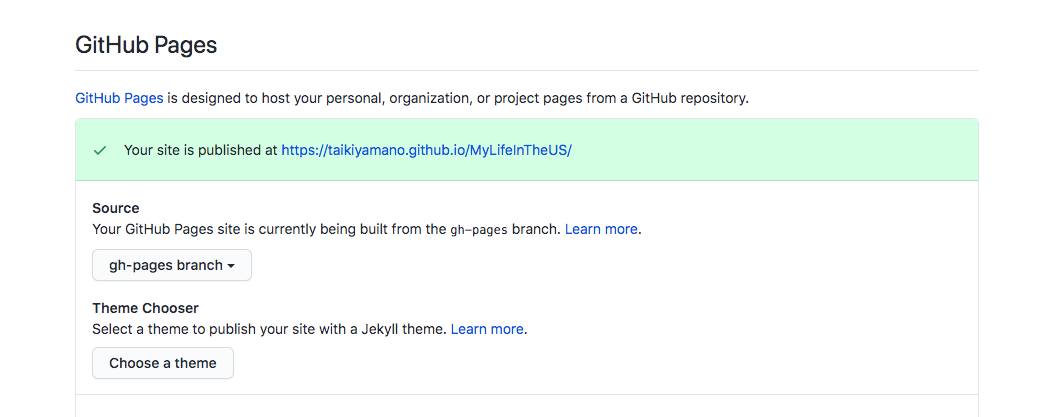
「Your site is published at [サイトのURL]」とあります。(表示されているサイトのURLはpackage.jsonの"homepage"に記述したURLと同じはずです。)そこをクリックすると、今回作成したサイトが表示されました。
また、GitHub Pagesの設定項目の「Source」の部分ではgh-pages branchとmaster branchを選択できるのですが、gh-pages branchを選択しました。(master branchを選択すると、公開されたサイトを別タブで開き、ページを何回かリロードするとなぜか404ページが表示されました![]() )
)
設定項目は以下のようになります。

最後に
今回、React-Routerのアウトプットとして1つ簡単なWebサイトを作成してみましたが、やはり何かを作ってみると知識の定着が早いなと個人的に感じました!
また、サイトのCSSがしょぼい割にCSSでのサイトデザインや、GitHub Pagesへのデプロイに時間が掛かってしまったのが、少し悔しかったところです![]()
デザインもダサいし、写真の読み込みが遅いなど改善点もあるので、今後少しずつ改善していけたらと思います!