はじめに
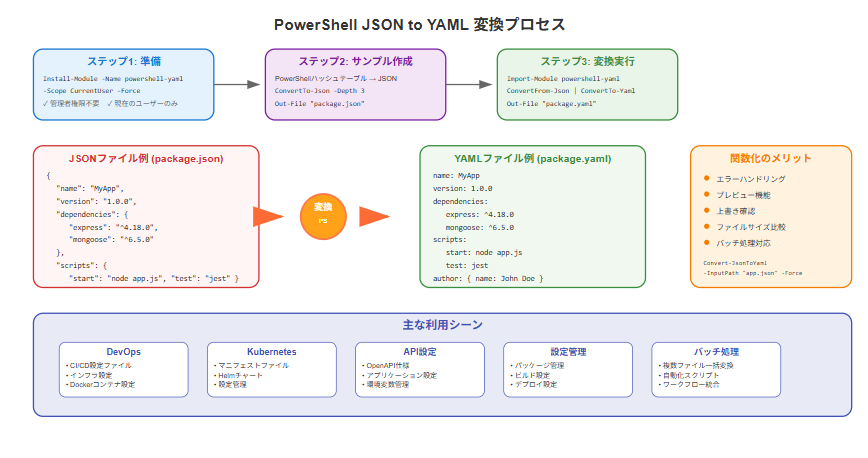
DevOpsやKubernetes環境では設定ファイルにYAMLが多用されますが、APIレスポンスやアプリケーション設定はJSONで提供されることが一般的です。PowerShellを使ってJSONをYAMLに効率的に変換する方法を、実際にファイルを作成しながら解説します。
筆者は Windows 11 上の PowerShell 5.1 で動作を確認した。
準備:モジュールのインストール
管理者権限が不要な方法でモジュールをインストールします:
# 現在のユーザー環境にインストール(推奨)
Install-Module -Name powershell-yaml -Scope CurrentUser -Force -AllowClobber

# インストール確認
Get-Module -ListAvailable powershell-yaml

サンプルファイルの作成と基本変換
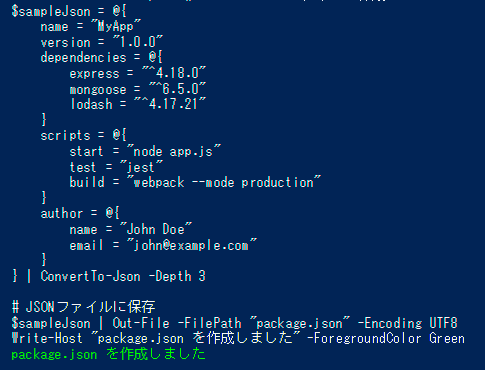
まずは実際に使用するサンプルJSONファイルを作成します。
# サンプルJSONファイルを作成
$sampleJson = @{
    name = "MyApp"
    version = "1.0.0"
    dependencies = @{
        express = "^4.18.0"
        mongoose = "^6.5.0"
        lodash = "^4.17.21"
    }
    scripts = @{
        start = "node app.js"
        test = "jest"
        build = "webpack --mode production"
    }
    author = @{
        name = "John Doe"
        email = "john@example.com"
    }
} | ConvertTo-Json -Depth 3

# JSONファイルに保存
$sampleJson | Out-File -FilePath "package.json" -Encoding UTF8
Write-Host "package.json を作成しました" -ForegroundColor Green
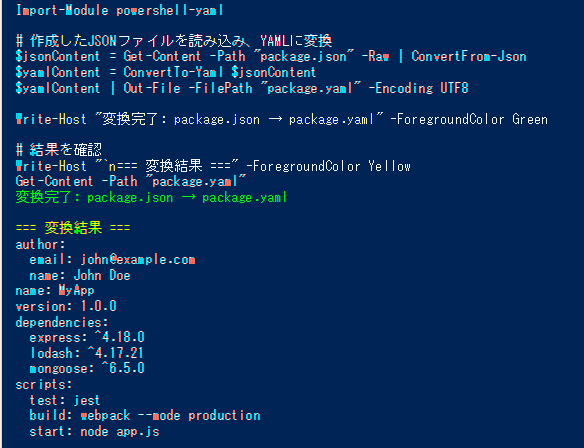
基本的な変換スクリプト
# モジュールをインポート
Import-Module powershell-yaml

# 作成したJSONファイルを読み込み、YAMLに変換
$jsonContent = Get-Content -Path "package.json" -Raw | ConvertFrom-Json
$yamlContent = ConvertTo-Yaml $jsonContent
$yamlContent | Out-File -FilePath "package.yaml" -Encoding UTF8

Write-Host "変換完了: package.json → package.yaml" -ForegroundColor Green

# 結果を確認
Write-Host "`n=== 変換結果 ===" -ForegroundColor Yellow
Get-Content -Path "package.yaml"
より複雑なサンプルファイルで試す
複雑な設定ファイルを作成して変換してみます。
# アプリケーション設定のサンプルを作成
$appConfig = @{
    application = @{
        name = "WebAPI"
        version = "2.1.0"
        port = 3000
        environment = "production"
        cors = @{
            enabled = $true
            origins = @("https://example.com", "https://app.example.com")
        }
    }
    database = @{
        type = "postgresql"
        host = "localhost"
        port = 5432
        name = "myapp_db"
        ssl = $true
        pool = @{
            min = 2
            max = 10
            idle = 30000
        }
    }
    features = @(
        @{
            name = "authentication"
            enabled = $true
            config = @{
                tokenExpiry = 3600
                refreshTokenExpiry = 604800
                algorithms = @("HS256", "RS256")
            }
        },
        @{
            name = "logging"
            enabled = $true
            config = @{
                level = "info"
                outputs = @("console", "file")
                rotation = @{
                    maxSize = "10MB"
                    maxFiles = 5
                }
            }
        }
    )
    monitoring = @{
        metrics = @{
            enabled = $true
            endpoint = "/metrics"
        }
        healthCheck = @{
            enabled = $true
            endpoint = "/health"
            timeout = 5000
        }
    }
} | ConvertTo-Json -Depth 5

# 複雑なJSONファイルを作成
$appConfig | Out-File -FilePath "app-config.json" -Encoding UTF8
Write-Host "app-config.json を作成しました" -ForegroundColor Green
変換関数の作成と実行
function Convert-JsonToYaml {
param(
[Parameter(Mandatory=$true)]
[string]$InputPath,
[Parameter(Mandatory=$false)]
[string]$OutputPath,
[switch]$Force,
[switch]$ShowPreview
)
# モジュールの確認とインポート
if (-not (Get-Module -ListAvailable powershell-yaml)) {
Write-Error "powershell-yamlモジュールがインストールされていません。"
return
}
Import-Module powershell-yaml -ErrorAction SilentlyContinue
# 入力ファイルの存在確認
if (-not (Test-Path $InputPath)) {
Write-Error "JSONファイルが見つかりません: $InputPath"
return
}
try {
# JSONファイルを読み込み、パース
Write-Host "変換中: $InputPath" -ForegroundColor Cyan
$jsonContent = Get-Content -Path $InputPath -Raw -Encoding UTF8
$parsedJson = $jsonContent | ConvertFrom-Json -ErrorAction Stop
# YAMLに変換
$yamlContent = ConvertTo-Yaml $parsedJson
# プレビュー表示
if ($ShowPreview) {
Write-Host "`n=== YAML変換プレビュー ===" -ForegroundColor Yellow
Write-Host $yamlContent
Write-Host "========================`n" -ForegroundColor Yellow
}
# 出力パスの設定
if (-not $OutputPath) {
$OutputPath = [System.IO.Path]::ChangeExtension($InputPath, ".yaml")
}
# 既存ファイルの確認
if ((Test-Path $OutputPath) -and -not $Force) {
$response = Read-Host "ファイル '$OutputPath' が存在します。上書きしますか? (y/N)"
if ($response -ne 'y' -and $response -ne 'Y') {
Write-Host "変換をキャンセルしました。"
return
}
}
# YAMLファイルに保存
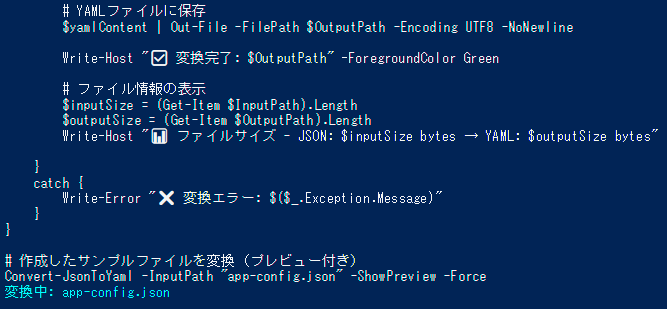
$yamlContent | Out-File -FilePath $OutputPath -Encoding UTF8 -NoNewline
Write-Host "✅ 変換完了: $OutputPath" -ForegroundColor Green
# ファイル情報の表示
$inputSize = (Get-Item $InputPath).Length
$outputSize = (Get-Item $OutputPath).Length
Write-Host "📊 ファイルサイズ - JSON: $inputSize bytes → YAML: $outputSize bytes"
}
catch {
Write-Error "❌ 変換エラー: $($_.Exception.Message)"
}
}
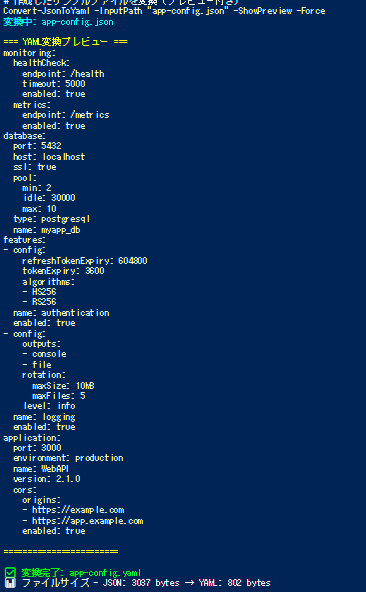
# 作成したサンプルファイルを変換(プレビュー付き)
Convert-JsonToYaml -InputPath "app-config.json" -ShowPreview -Force
まとめ
この記事では、PowerShellを使ってJSONからYAMLへの変換を、実際にファイルを作成しながら学びました。デモスクリプトを実行することで、変換の流れを体験でき、複数のデータ構造やバッチ処理による効率的な手法も確認できます。興味ありましたら試してみてください。
参考情報