前書き
Raspberry pi4bもjetson nanoも定価で全然売っておらず、買えてません。欲しい・・・
随分と間が空いてしまいましたが、前回の記事LINE BOT経由でパパの居場所(androidスマホ)を地図で教える(失敗編)の続きで成功編です。
ご指摘・ご質問あれば、コメントいただければと思います。
構成&動作
以下に構成図と簡単な動作を示します。
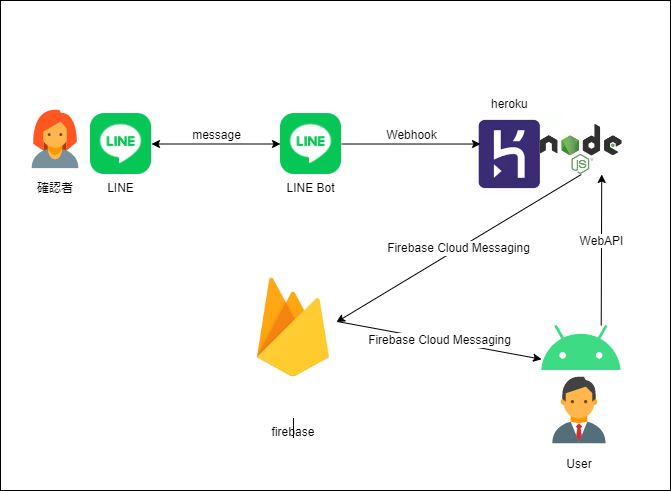
確認者がLINEで居場所を確認する場合は、LINE botへメッセージを送信します。
LINE botはLINE Messageを受信したら、Firebase Cloud Messagingを使用してAndroidアプリに通知します。
Androidアプリは通知を受け取ったら、現在の場所を取得して、WebAPI経由でherokuに現在地を送信します。
あとは、heroku→LINE bot→確認者の順に現在地を送り返していきます。
構築
環境の構築については、
前回の記事LINE BOT経由でRaspberry Piに接続したUSBカメラの画像を取得してみるを参照ください。
(なお、今回はRaspberry Pi以下の家のLAN環境の機材は一切不要です。)
追加でFirebaseを使用するので、Firebase上にプロジェクトを作成しておいてください。
(Googleアカウントがあれば、無料で作成できます。)
今回は、Cloud Messaging(Androidアプリへの通知に使用)と
Cloud Firestore(Cloud Messagingに使用するトークンの保存に使用)を使用します。
heroku上のコード
前回の記事LINE BOT経由でRaspberry Piに接続したUSBカメラの画像を取得してみるからの差分をメインに説明します。
herokuでは、nodejsでjavascriptを動かします。
以下、コードとなります。
const firebaseadmin = require('firebase-admin');
const { initializeApp, cert } = require('firebase-admin/app');
const { getFirestore } = require('firebase-admin/firestore');

/*
 * Initialize Firebase
 */
initializeApp({
    credential: cert({
        projectId: process.env.FIREBASE_PROJECT_ID,
        clientEmail: process.env.FIREBASE_CLIENT_EMAIL,
        privateKey: process.env.FIREBASE_PRIVATE_KEY.replace(/\\n/g, '\n')
    })
});

const db = getFirestore();
firebase SDKを使用するためにinitializeAppを呼び出して初期化しています。
firebase コンソールで発行された秘密鍵の情報を環境変数に設定して渡しています。
発行されたファイルをherokuに置いても良いです。
Cloud Firestoreを使用するので、インスタンスを取得します。
/**
 * FUNCTION FOR CHECKING URL TOKEN AUTHENTICATION
 */

const check_url_token = function (req, res, next) {
    if ((req.query.url_token !== 'undefined') && (req.query.url_token == process.env.URL_TOKEN)) {
        next()
    }
    else {
        res.status(401).end()
    }
}

/*
 * function is called when father's smartphone sended location information.
 */
app.post("/" + process.env.LOCATION_URL, check_url_token, express.json(), (req, res) => {
    console.log("LOCATION_URL called...");

    // case of register token
    if (('token' in req.body) && req.body.token != null) {
        // register token to firebase cloud firestore
        const locRef = db.collection('config').doc('location');

        locRef.set({ token: req.body.token })
            .then(ref => {
                console.log("registering token was succeed.");
            })
            .catch(error => {
                console.log("registering token was failed...:", error);
            });
    }
    // case of response getting location
    else if (('latitude' in req.body) && ('longitude' in req.body)
        && req.body.latitude != null && req.body.longitude != null) {
        console.log("reply of GET_LOCATION was received. latitude:" + req.body.latitude + " longitude: " + req.body.longitude + ".");

        // push api message
        getlocIDs.forEach((senderID) => {
            client.pushMessage(senderID, {
                type: "location",
                title: "パパの現在地",
                address: "パパの現在地",
                latitude: req.body.latitude,
                longitude: req.body.longitude,
            });

            // send message to owner
            sendOwner(senderID, "パパの現在地");
        });
        // delete all elements of getpicIDs
        getlocIDs.splice(0);
    }
    else {
        console.log("json data was not set...");
    }

    res.status(200).end()
});
Androidスマホより、POSTを受け付けるために追加したコードです。
POSTは2種類あります。
1.Cloud Messagingに使用するToken情報を通知。
2.現在地情報を通知。
1はFirebase Cloud MessagingでAndroidに向け、herokuから通知を行うのに必要なToken情報で、AndroidスマホアプリでFirebase SDKを初期化した際などに作成されます。この情報を知らないと、herokuからAndroidスマホアプリにMessagingが送信出来ないので、herokuに教えてあげる必要があります。
そのため、Androidスマホアプリから、Token情報を受け取ったら、Cloud Firestoreを使用して、Token情報を保存します。このToken情報は、AndroidスマホアプリにMessagingを送信するのに使用します。
2はFirebase Cloud Messagingで通知を受けた後に、Androidスマホアプリが現在地情報を取得して、通知するのに使用します。
現在地情報(経度と緯度)が通知されてきたら、LINEで「現在地情報」を要求してきたLINEメンバに取得した現在地情報(経度と緯度)を使用した地図を送付します。
1および2のどちらも、body部に情報を設定して、WebAPIのPOSTを実行します。
/*
 send notification message for getting location.
 */
function sendNotification() {
    // get token from location document.
    const locRef = db.collection('config').doc('location');
    locRef.get()
        .then(doc => {
            if (!doc.exists) {
                console.log('document location was not exist.');
            } else {
                const dbdata = doc.data()
                console.log('Document data:', dbdata);

                // get registration token
                if ("token" in dbdata) {
                    const message = {
                        data: {
                            action: 'GET_LOCATION'
                        },
                        token: dbdata.token
                    };

                    // Send a message to the device corresponding to the provided
                    // registration token.
                    firebaseadmin.messaging().send(message)
                        .then((response) => {
                            // Response is a message ID string.
                            console.log('Successfully sent message:', response);
                        })
                        .catch((error) => {
                            console.log('Error sending message:', error);
                        });
                } else {
                    console.log('token was not registerd');
                }
            }
        })
        .catch((error) => {
            console.log('getting document location was error.:', error);
        });
}
AndroidスマホアプリへCloud Messagingを送信する処理です。
Cloud Firestoreに保存しているTokenを取り出し、Firebase SDKのmessagingを使用して送信しています。
ソースコード一式は、tvca-line-botにありますので、詳細は見てください。
次は、Androidスマホアプリ側です。
Kotlinで作成しました。
必要な機能は以下。
・Cloud Messagingに使用するToken情報を取得し、herokuに通知。
・Cloud Messagingの通知が届いたら、現在地を取得しherokuにWebAPIで通知。
非常にシンプルです。
ただし、Activityがないと、コンパイル時にDefault Activityが無いと怒られるので、使用しないですが最初のプロジェクト作成時に空のActivityを選択しております。
// Top-level build file where you can add configuration options common to all sub-projects/modules.
plugins {
    id 'com.android.application' version '7.1.3' apply false
    id 'com.android.library' version '7.1.3' apply false
    id 'org.jetbrains.kotlin.android' version '1.6.21' apply false
    // this line was added for firebase
    id 'com.google.gms.google-services' version '4.3.10' apply false
}

task clean(type: Delete) {
    delete rootProject.buildDir
}
firabaseを使用するので、1行追加しています。
plugins {
    id 'com.android.application'
    id 'org.jetbrains.kotlin.android'
    // this line was added for firebase
    id 'com.google.gms.google-services'
}
・
(変更なしなので省略)
・
dependencies {
    // these lines were added for firebase
    implementation platform('com.google.firebase:firebase-bom:29.3.1')
    implementation 'com.google.firebase:firebase-analytics-ktx'
    implementation 'com.google.firebase:firebase-messaging-ktx'
    // these lines were added for location
    implementation 'com.google.android.gms:play-services-location:19.0.1'
    // these lines were added for worker
    implementation("androidx.work:work-runtime-ktx:2.7.1")

    implementation 'androidx.core:core-ktx:1.7.0'
    implementation 'androidx.appcompat:appcompat:1.4.1'
    implementation 'com.google.android.material:material:1.5.0'
    implementation 'androidx.constraintlayout:constraintlayout:2.1.3'
    testImplementation 'junit:junit:4.13.2'
    androidTestImplementation 'androidx.test.ext:junit:1.1.3'
    androidTestImplementation 'androidx.test.espresso:espresso-core:3.4.0'
}
firabaseを使用するので、plugins に1行追加しています。
dependenciesには、firabase用、現在地情報を取得用およびworkerスレッド用に追加しています。
<?xml version="1.0" encoding="utf-8"?>
<manifest xmlns:android="http://schemas.android.com/apk/res/android"
    package="com.example.whereareyou">
    <uses-permission android:name="android.permission.RECEIVE_BOOT_COMPLETED" />
    <uses-permission android:name="android.permission.FOREGROUND_SERVICE" />
    <uses-permission android:name="android.permission.ACCESS_COARSE_LOCATION"/>
    <uses-permission android:name="android.permission.ACCESS_FINE_LOCATION"/>
    <uses-permission android:name="android.permission.INTERNET" />

    <application
        android:allowBackup="true"
        android:icon="@mipmap/ic_launcher"
        android:label="@string/app_name"
        android:roundIcon="@mipmap/ic_launcher_round"
        android:supportsRtl="true"
        android:theme="@style/Theme.WhereAreYou">
        <activity
            android:name=".MainActivity"
            android:exported="true">
            <intent-filter>
                <action android:name="android.intent.action.MAIN" />

                <category android:name="android.intent.category.LAUNCHER" />
            </intent-filter>
        </activity>
        <receiver android:name="com.example.whereareyou.BootReceiver"
            android:exported="false">
            <intent-filter >
                <action android:name="android.intent.action.BOOT_COMPLETED"/>
            </intent-filter>
        </receiver>
        <service android:name="com.example.whereareyou.LocationService"
            android:exported="false">
            <intent-filter>
                <action android:name="com.google.firebase.MESSAGING_EVENT" />
            </intent-filter>
        </service>
    </application>

</manifest>
権限は5つ追加しています。
・RECEIVE_BOOT_COMPLETED:ブート完了のINTENTを受信できる権限
・FOREGROUND_SERVICE:フォアグラウンドのサービスのための権限
・ACCESS_COARSE_LOCATION:位置情報取得のための権限
・ACCESS_FINE_LOCATION:詳細な位置情報取得のための権限
・INTERNET:インターネットへ接続するための権限
アプリの設定では2つ追加しています。
BootReceiver:Android起動時に呼び出される
LocationService:Cloud Messagingを受信時に呼び出される
package com.example.whereareyou

import android.content.BroadcastReceiver
import android.content.Context
import android.content.Intent
import android.util.Log
import com.google.android.gms.tasks.OnCompleteListener
import com.google.firebase.messaging.FirebaseMessaging

class BootReceiver  : BroadcastReceiver() {
    override fun onReceive(context: Context, intent: Intent) {
        Log.d("WhereAreYou", "Receive : ${intent.action}")

        // send token to server in case
        FirebaseMessaging.getInstance().token.addOnCompleteListener(OnCompleteListener { task ->
            if (!task.isSuccessful) {
                Log.e("WhereAreYou", "Fetching FCM registration token failed", task.exception)
                return@OnCompleteListener
            }

            // Get new FCM registration token
            val token = task.result

            // Log
            Log.d("WhereAreYou", "Current token: $token")

            // send token
            sendDataToServer(context, postURL, "{\"token\":\"$token\"}")
        })
    }
}
AndroidManifest.xmlでintent-filterにandroid.intent.action.BOOT_COMPLETEDを指定しているので、起動時に呼び出されます。
FirebaseMessaging.getInstance().tokenで現在の登録トークンを取得します。トークンは、最初にアプリが動作したタイミングで作成されているので、作成済のトークンを取得します。取得は非同期になるためリスナーを登録し、取得完了後にherokuにトークンを送付します。
本来、BootReceiverクラスは不要ですが、トークン作成時にherokuへ送付に失敗してしまうと送信タイミングがなくなるので、起動時に念のため、毎回送付しています。
package com.example.whereareyou

import android.content.Context
import android.util.Log
import androidx.work.Data
import androidx.work.OneTimeWorkRequest
import androidx.work.WorkManager
import androidx.work.workDataOf

fun sendDataToServer(targetContext:Context, urldata: String, jsondata: String) {
    Log.d("WhereAreYou", "Send $jsondata to $urldata.")

    // set data for worker
    val inputData: Data = workDataOf("urldata" to urldata, "jsondata" to jsondata)
    val work = OneTimeWorkRequest.Builder(SendData::class.java)
        .setInputData(inputData)
        .build()
    WorkManager.getInstance(targetContext).beginWith(work).enqueue()
}
herokuにデータを送信する共通関数です。
第一引数にURL、第二引数にjsonデータを指定します。
サービスは起動後、10秒間に終了する処理は同期で、それ以上かかる場合はWorkerを作成してそっちにさせないといけないようなので、ネットワーク通信なので時間がかかることもあるかもしれないので、Worker作ってそっちで処理させてます。
package com.example.whereareyou

import android.content.Context
import android.util.Log
import androidx.work.Worker
import androidx.work.WorkerParameters
import java.net.URL
import javax.net.ssl.HttpsURLConnection

class SendData(appContext: Context, workerParams: WorkerParameters) : Worker(appContext, workerParams) {

    override fun doWork(): Result {
        Log.d("WhereAreYou", "Performing long running task in scheduled job")

        // get data from inputData
        val urldata = inputData.getString("urldata")
        val jsondata = inputData.getString("jsondata")

        if ((urldata == null) or (jsondata == null)) {
            Log.e("WhereAreYou", "urlata or jsondata were not set.")
            return Result.success()
        }
        Log.d("WhereAreYou", "jsondata: $jsondata urldata: $urldata.")

        // create HttpURLConnection
        val connection = URL(urldata).openConnection() as HttpsURLConnection
        try {
            // configure parameter
            connection.connectTimeout = 10000       // timeout before connection
            connection.readTimeout = 10000          // timeout for reading data
            connection.requestMethod = "POST"       // method
            connection.doOutput = true              // use body data
            connection.setChunkedStreamingMode(0)   // the body length is not known in advance
            connection.setRequestProperty("Content-type", "application/json; charset=utf-8")

            // write jsondata to body
            val outputStream = connection.outputStream
            outputStream.write(jsondata?.toByteArray())
            outputStream.flush()
            outputStream.close()

            // check response code
            val statusCode = connection.responseCode
            if (statusCode == HttpsURLConnection.HTTP_OK) {
                Log.d("WhereAreYou", "Sending data was succeed.")
            } else {
                Log.d("WhereAreYou", "Send Error statusCode: $statusCode.")
            }
        } catch (exception: Exception) {
            Log.e("WhereAreYou", exception.toString())
        } finally {
            connection.disconnect()
        }

        return Result.success()
    }
}
エラー処理が入っているので、長くなっていますが、やってることは簡単で、入力されたURLにこれまた入力されたJsonデータをPOSTで送るだけです。
package com.example.whereareyou

import android.Manifest
import android.content.pm.PackageManager
import android.location.Location
import android.util.Log
import androidx.core.app.ActivityCompat
import com.google.android.gms.location.FusedLocationProviderClient
import com.google.android.gms.location.LocationServices
import com.google.firebase.messaging.FirebaseMessagingService
import com.google.firebase.messaging.RemoteMessage

class LocationService : FirebaseMessagingService() {
    private lateinit var fusedLocationClient: FusedLocationProviderClient

    override fun onCreate(){
        super.onCreate()
        Log.d("WhereAreYou", "LocationService is started")
    }

    override fun onMessageReceived(remoteMessage: RemoteMessage) {
        Log.d("WhereAreYou", "From: ${remoteMessage.from}")

        // Check if message contains a data payload.
        if (remoteMessage.data.isNotEmpty()) {
            Log.d("WhereAreYou", "Message data payload: ${remoteMessage.data}")

            if ((ActivityCompat.checkSelfPermission(this, Manifest.permission.ACCESS_FINE_LOCATION)
                != PackageManager.PERMISSION_GRANTED) &&
                ActivityCompat.checkSelfPermission(this, Manifest.permission.ACCESS_COARSE_LOCATION)
                != PackageManager.PERMISSION_GRANTED) {
                Log.e("WhereAreYou", "Location permissions were luck.")
                return
            }

            fusedLocationClient = LocationServices.getFusedLocationProviderClient(this)
            fusedLocationClient.lastLocation.addOnSuccessListener { location : Location? ->
                if (location != null) {
                    Log.d("WhereAreYou",
                        "Location latitude: ${location.latitude} longitude : ${location.longitude}")

                    sendDataToServer(this, postURL,
                        "{\"latitude\":\"${location.latitude}\",\"longitude\":\"${location.longitude}\"}")

                } else {
                    Log.e("WhereAreYou", "Location is not available...")
                }
            }
        }
    }

    override fun onNewToken(token: String) {
        Log.d("WhereAreYou", "Refreshed token: $token")

        // send token
        sendDataToServer(this, postURL, "{\"token\":\"$token\"}")
    }

    override fun onDestroy() {
        super.onDestroy()
        Log.d("WhereAreYou", "LocationService is destroyed")
    }
}
FirebaseMessagingServiceを継承したクラスで、intent-filterにcom.google.firebase.MESSAGING_EVENTをしているので、Cloud Messagingを受信したらonMessageReceivedがコールされます。
ACCESS_FINE_LOCATIONとACCESS_COARSE_LOCATION権限が与えられていなかった場合、ログを出して終了します。
このプログラムでは、ユーザに権限の許可を求めるダイアログなどは出さないため、ユーザが手動でアプリに位置情報へのアクセス権限を与えてください。
権限があれば、現在地を取得し、トークンの送信でも使用していたsendDataToServerを呼び出して、現在地情報を送信します。
なお、onNewTokenは、トークンが新しく作成された場合に呼ばれるため、新しいトークンをherokuへ登録するために、sendDataToServerを呼び出しています。
ソースコード一式は、WhereAreYouにありますので、見てください。
総括
初めて、Androidスマホアプリを作成し、なかなか勉強になりました。
中でもFirebaseとか個人利用では無料枠で完了するので、本当に便利です。
この記事が少しでも、他の方の役に立てば幸いです。
その他
本作業中に誤って、firebase-adminsdkの秘密鍵情報とかのファイルを誤ってコミットしてしまい、GitGuardianからメールをいただきました。至急、漏洩した鍵を破棄して再発行し、githubにpushしていた分はgit resetを使用して戻し、herokuの環境変数に登録していた情報も再発行分に更新しました。
皆さんもお気を付けください。