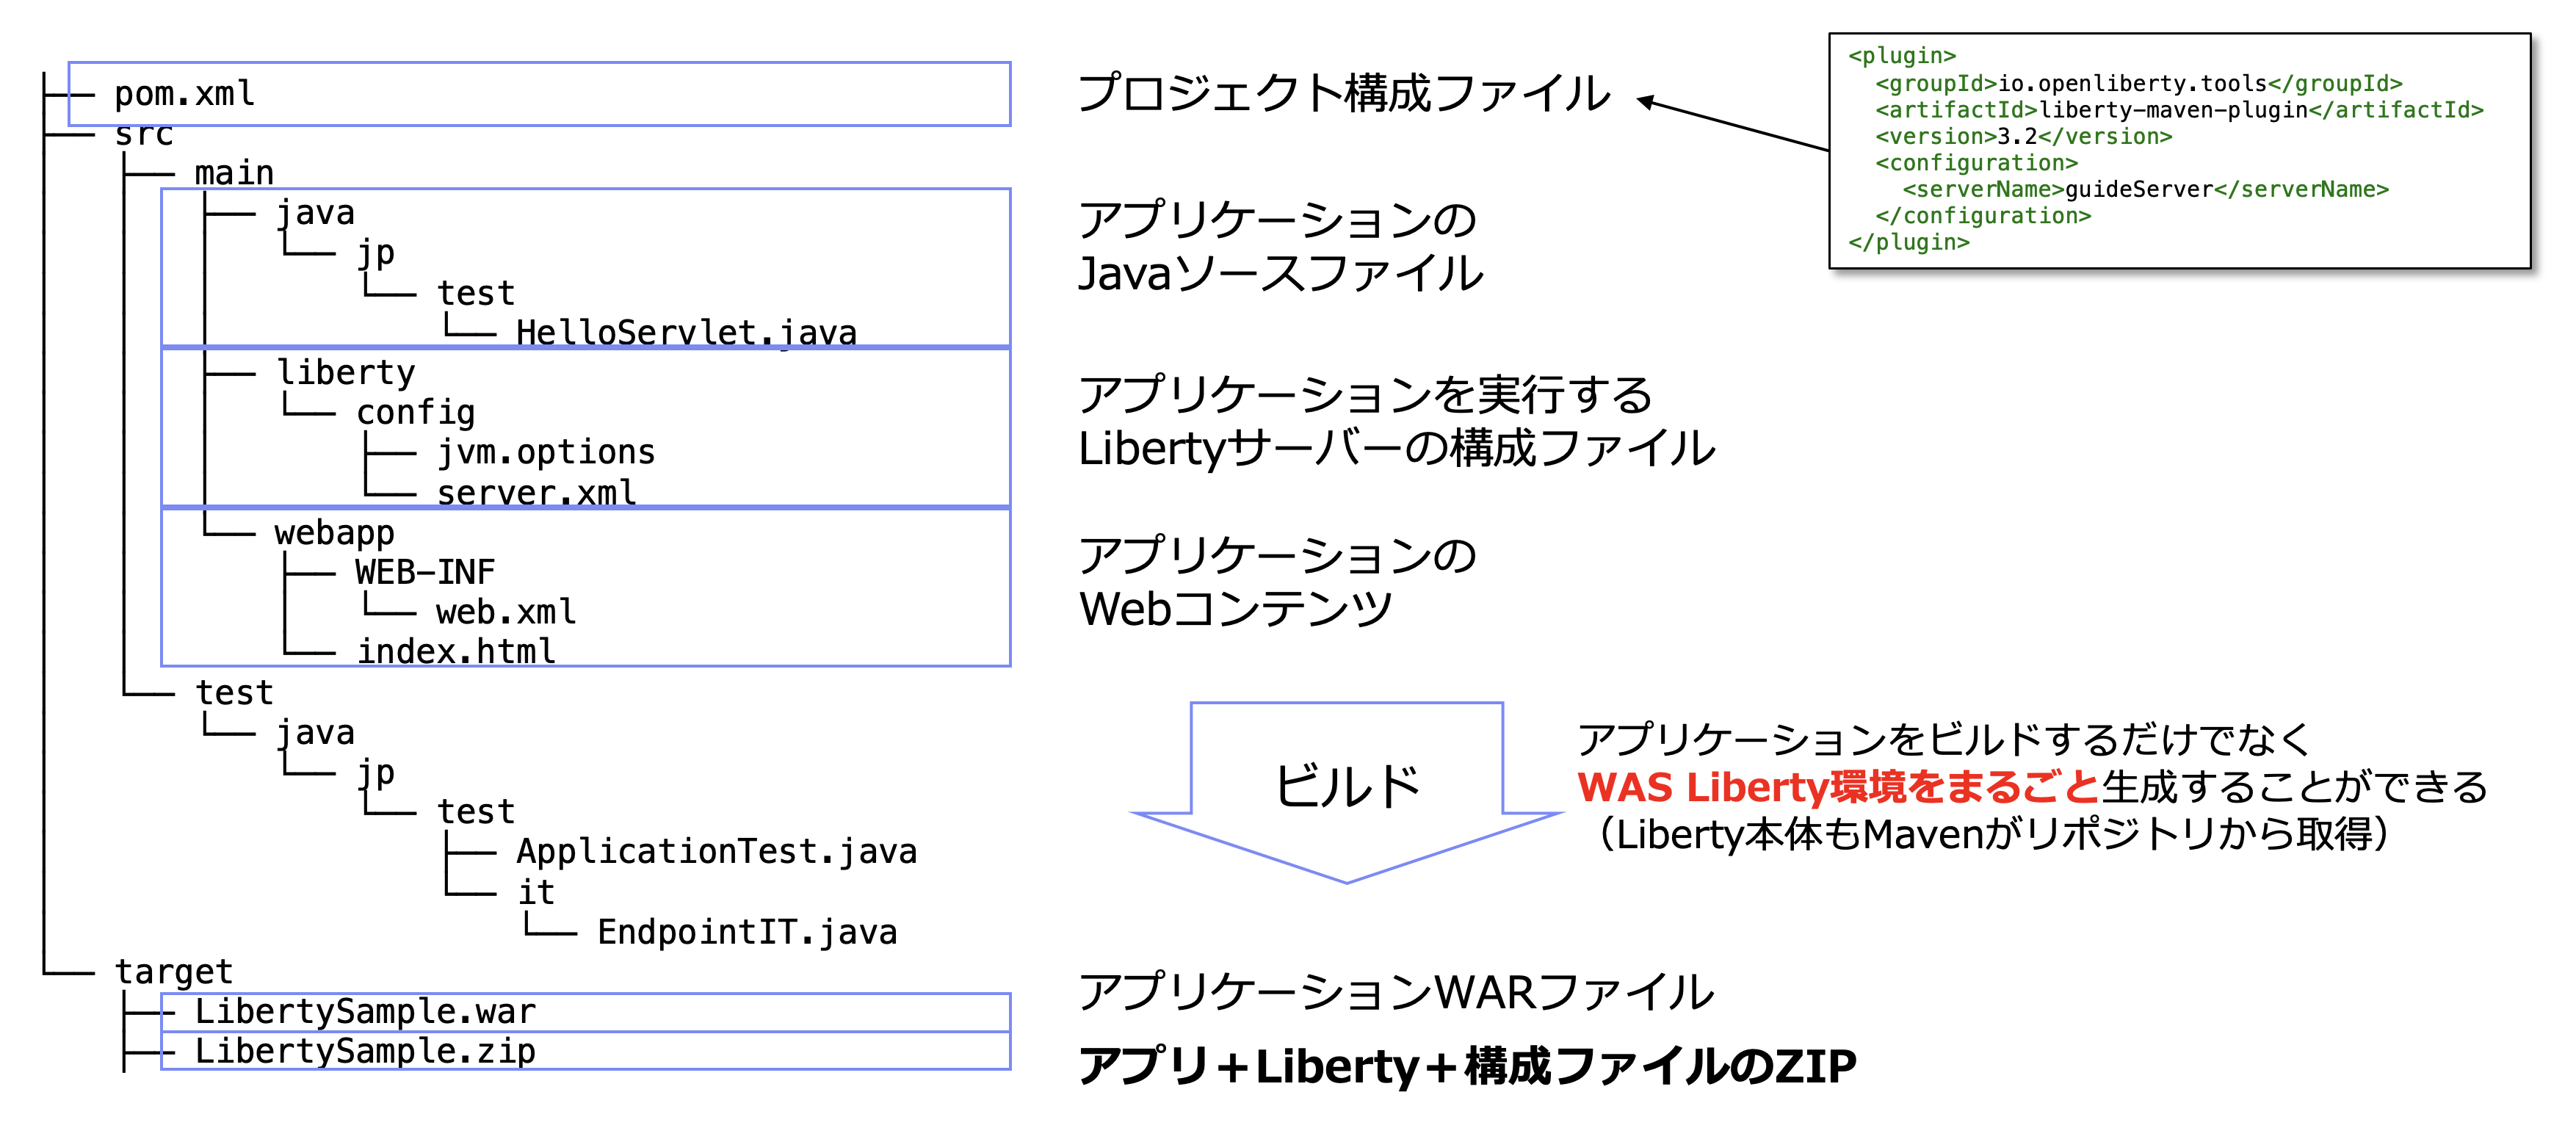
Libertyでは,Maven向けにプラグインが公開されており,アプリケーションのWARやEARをビルドするのと同時に,テスト用のLibertyをダウンロード・導入して,アプリケーションをデプロイしてテストしたり,アプリ+構成+Libertyをまとめたインストール用のZIPファイルを作成したりできます。これにより,アプリケーションとそれを動かすサーバー環境の構成を,一元的にGitなどで管理することができるようになります。
ただ,多くの企業ではアプリケーションとサーバー構成は異なるチームが管理していたり,また同じサーバーに異なるチームの開発するアプリケーションが同居していたりすることがあります。このような場合は,アプリケーションをビルドするMavenプロジェクトと,サーバーをビルドするMavenプロジェクトを分けたいということも多いでしょう。そのような場合は,マルチモジュール構成のMavenプロジェクトを作成することで対応できます。
プロジェクト全体図
プロジェクトは親プロジェクトとなるpom.xmlの下に,二つのWebアプリケーションプロジェクトsample-webapp1とsample-webapp2,Libertyの構成を管理するsample-libertyの三つの子プロジェクトのpom.xmlからなります。
├─ pom.xml
├─ sample-webapp1
│     ├─ pom.xml
│     └─ src
│           └─ main
│                 ├─ java
│                 └─ webapp
├─ sample-webapp2
│     ├─ pom.xml
│     └─ src
│           └─ main
│                 ├─ java
│                 └─ webapp
└─ sample-liberty
      ├─ pom.xml
      └─ src
            └─ main
                   └─ liberty
                          └─ config
プロジェクトの全体像は,こちらにおいてあります。
親プロジェクト
通常のpomパッケージングのpom.xmlです。
<project xmlns="http://maven.apache.org/POM/4.0.0"
	xmlns:xsi="http://www.w3.org/2001/XMLSchema-instance"
	xsi:schemaLocation="http://maven.apache.org/POM/4.0.0 https://maven.apache.org/xsd/maven-4.0.0.xsd">
	<modelVersion>4.0.0</modelVersion>
	<groupId>jp.sample.maven</groupId>
	<artifactId>sample-parent</artifactId>
	<version>1.0.0</version>
	<packaging>pom</packaging>
	<properties>
		<maven.compiler.source>8</maven.compiler.source>
		<maven.compiler.target>8</maven.compiler.target>
		<project.build.sourceEncoding>UTF-8</project.build.sourceEncoding>
	</properties>
	<modules>
		<module>sample-liberty</module>
		<module>sample-webapp1</module>
		<module>sample-webapp2</module>
	</modules>
	<dependencies>
		<dependency>
			<groupId>javax</groupId>
			<artifactId>javaee-api</artifactId>
			<version>8.0</version>
			<scope>provided</scope>
		</dependency>
	</dependencies>
</project>
ここで,全体に共通するpropertiesやdependenciesを記述しておきます。ここでは,Java SE 8/Java EE 8によるアプリケーションを指定しています。プロジェクトによって,適当に内容を変えてください。
こちらのプロジェクトについては,一度作れば変更することはほとんどないでしょうから,バージョンは1.0.0にしてあります。
Webアプリケーションプロジェクト
こちらも一般的なwarパッケージングを指定したWebアプリケーションのpom.xmlです。
<project xmlns="http://maven.apache.org/POM/4.0.0"
	xmlns:xsi="http://www.w3.org/2001/XMLSchema-instance"
	xsi:schemaLocation="http://maven.apache.org/POM/4.0.0 https://maven.apache.org/xsd/maven-4.0.0.xsd">
	<modelVersion>4.0.0</modelVersion>
	<parent>
		<groupId>jp.sample.maven</groupId>
		<artifactId>sample-parent</artifactId>
		<version>1.0.0</version>
	</parent>
	<artifactId>sample-webapp1</artifactId>
	<version>0.0.1-SNAPSHOT</version>
	<packaging>war</packaging>
	<build>
		<finalName>${project.artifactId}</finalName>
		<plugins>
			<plugin>
				<groupId>org.apache.maven.plugins</groupId>
				<artifactId>maven-war-plugin</artifactId>
				<version>3.3.1</version>
			</plugin>
		</plugins>
	</build>
</project>
バージョンは,このプロジェクト固有のものを適宜使用します。ここでは0.0.1-SNAPSHOTとしてあります。
Libertyプロジェクト
さて,いよいよLibertyの設定をおこなうプロジェクトのpom.xmlです。
<project xmlns="http://maven.apache.org/POM/4.0.0"
	xmlns:xsi="http://www.w3.org/2001/XMLSchema-instance"
	xsi:schemaLocation="http://maven.apache.org/POM/4.0.0 https://maven.apache.org/xsd/maven-4.0.0.xsd">
	<modelVersion>4.0.0</modelVersion>
	<parent>
		<groupId>jp.sample.maven</groupId>
		<artifactId>sample-parent</artifactId>
		<version>1.0.0</version>
	</parent>
	<artifactId>sample-liberty</artifactId>
	<version>0.1.0</version>
	<packaging>liberty-assembly</packaging>
	<dependencies>
		<dependency>
			<groupId>jp.sample.maven</groupId>
			<artifactId>sample-webapp1</artifactId>
			<version>[0.0.0,)</version>
			<type>war</type>
		</dependency>
		<dependency>
			<groupId>jp.sample.maven</groupId>
			<artifactId>sample-webapp2</artifactId>
			<version>[0.0.0,)</version>
			<type>war</type>
		</dependency>
	</dependencies>
	<build>
		<finalName>${project.artifactId}</finalName>
		<plugins>
			<plugin>
				<groupId>io.openliberty.tools</groupId>
				<artifactId>liberty-maven-plugin</artifactId>
				<version>3.3.4</version>
				<extensions>true</extensions>
				<configuration>
					<runtimeArtifact>
						<groupId>com.ibm.websphere.appserver.runtime</groupId>
						<artifactId>wlp-javaee8</artifactId>
						<version>21.0.0.6</version>
					</runtimeArtifact>
					<deployPackages>dependencies</deployPackages>
					<stripVersion>true</stripVersion>
					<packageType>zip</packageType>
					<include>minify</include>
				</configuration>
			</plugin>
		</plugins>
	</build>
</project>
ビルドのプラグインとしてliberty-maven-pluginが追加されています。
このプロジェクトでは,パッケージングとしてliberty-assemblyが指定されています。このパッケージングは,Libertyのプラグインが<extensions>true</extensions>で追加されていると使えるようになります。詳しい説明はこちらでされていますが,これを指定すると,Mavenの各種PhaseでLibertyプラグインの様々なGoalが自動的に実行されるようになります。
プロジェクトのdependenciesには,サーバーに追加するアプリケーションのプロジェクトを記述します。ここでは,依存先のプロジェクトのバージョンが変わってもいいように,任意のバージョンを表す<version>[0.0.0,)</version>で追加してあります。プラグインのconfigurationで<deployPackages>dependencies</deployPackages>を指定すると,サーバーのアプリケーションディレクトリにファイルがコピーされます。あとでサーバーの構成ファイルで指定しやすいように<stripVersion>true</stripVersion>を追加してバージョン番号がファイル名につかないようにしておきます。
<packageType>zip</packageType>を指定しておくと,packageのPhaseで実行されるliberty:packageのGoalで,サーバー環境をまるごと含んだZIPが生成されるようになります。<include>minify</include>を追加で指定することにより,作成されるZIPファイルには,サーバー構成で指定された機能だけを実行する最小限のファイルが格納されるようになり,ZIPファイルのサイズを減らすことができます。
ZIPファイルにパッケージするLibertyに,どのバージョン,どのインストールイメージを使用するかは<runtimeArtifact>を指定します。Mavenのセントラルレポジトリには,WebSphere LibertyおよびOpen Libertyの導入イメージが全バージョンおいてあります。ビルドを実行したときに,自動的にダウンロードがおこなわれてZIPの作成に使用されます。<groupId>にcom.ibm.websphere.appserver.runtimeを指定すると製品版のWebSphere Libertyが,io.openlibertyを指定するとOSS版のOpen Libertyが使用されます。どのようなartifactIdやversionが存在するのかは,リンク先のsearch.maven.orgの検索結果を参照してください。
ここでLibertyランタイムのバージョンを直接指定できることで,ランタイムの更新,つまりFixpack適用が非常に簡単になります。このpom.xmlファイルのバージョン番号を書き換え,バージョンコントロール・システムにコミットし,ビルドしてZIPを作成すれば,Fixpackの適用された導入ファイルが簡単に作成できます。これをテスト環境に展開して試験をおこない,問題なければ本番環境に展開して実行するようにすれば,アプリの更新と同様の手順でミドルウェアの更新ができるようになります。
サーバーの構成ファイルは,srcディレクトリの下にあるものが使われます。
<?xml version="1.0" encoding="UTF-8"?>
<server description="new server">

    <!-- Enable features -->
    <featureManager>
        <feature>webProfile-8.0</feature>
    </featureManager>

    <!-- To access this server from a remote client add a host attribute to the following element, e.g. host="*" -->
    <httpEndpoint id="defaultHttpEndpoint" host="*"
                  httpPort="9080"
                  httpsPort="9443" />

    <!-- Automatically expand WAR files and EAR files -->
    <applicationManager autoExpand="true"/>

    <!-- Default SSL configuration enables trust for default certificates from the Java runtime -->
    <keyStore password="password"></keyStore>
    <ssl id="defaultSSLConfig" trustDefaultCerts="true" />

    <webApplication location="sample-webapp1.war" contextRoot="/webapp1" />
    <webApplication location="sample-webapp2.war" contextRoot="/webapp2" />

</server>
ここで,依存先から提供されるWARファイルを<webApplication>で指定しています。
server.xmlと同じディレクトリには,環境変数を設定するserver.envファイルや,JVMの起動オプションを指定するjvm.opetionsなどのファイルも置くことができます。
ビルドの実行
親プロジェクトのpom.xmlがあるディレクトリでmvn packageを実行します。
これだけで,各WebアプリケーションプロジェクトのtargetディレクトリにWARファイルが作成され,Libertyプロジェクトのtargetディレクトリにはそれを取り込んだLiberty環境が作成され,ZIPのパッケージが作成されます。
$ ls -l sample-liberty/target/sample-liberty.zip
-rw-r-----  1 takakiyo  staff  76293901  9 27 08:04 sample-liberty/target/sample-liberty.zip
このZIPファイルを適当なディレクトリでUnzipするだけで,実行可能なLiberty環境ができあがります。展開したら,wlp/binディレクトリに移動して,serverコマンドでLibertyを起動します。
$ ./server run

Eclipse OpenJ9 VM バージョン 11.0.12+7 (ja_JP) で、defaultServer (WebSphere Application Server 21.0.0.6/wlp-1.0.53.cl210620210527-1900) を起動しています
[監査      ] CWWKE0001I: サーバー defaultServer が起動されました。
[監査      ] CWWKE0100I: この製品は、開発使用向け、および限定的な実動使用向けにライセンスが交付されています。 全ライセンス条項は以下で表示可能です: https://public.dhe.ibm.com/ibmdl/export/pub/software/websphere/wasdev/license/base_ilan/ilan/21.0.0.6/lafiles/ja.html
[監査      ] CWWKZ0058I: アプリケーションの dropins をモニター中です。
[監査      ] CWWKS4104A: LTPA 鍵が 0.696 秒で作成されました。 LTPA 鍵ファイル: /Users/takakiyo/tmp/wlp/usr/servers/defaultServer/resources/security/ltpa.keys
[監査      ] CWWKT0016I: Web アプリケーションが使用可能です (default_host): http://localhost:9080/webapp1/
[監査      ] CWWKT0016I: Web アプリケーションが使用可能です (default_host): http://localhost:9080/webapp2/
[監査      ] CWPKI0803A: SSL 証明書の作成に 1.134 秒かかりました。 SSL 鍵ファイル: /Users/takakiyo/tmp/wlp/usr/servers/defaultServer/resources/security/key.p12
[監査      ] CWWKZ0001I: アプリケーション sample-webapp2 が 1.241 秒で開始しました。
[監査      ] CWWKZ0001I: アプリケーション sample-webapp1 が 1.241 秒で開始しました。
[監査      ] CWWKF0012I: サーバーは次のフィーチャーをインストールしました。[appSecurity-2.0, appSecurity-3.0, beanValidation-2.0, cdi-2.0, distributedMap-1.0, ejbLite-3.2, el-3.0, jaspic-1.1, jaxrs-2.1, jaxrsClient-2.1, jdbc-4.2, jndi-1.0, jpa-2.2, jpaContainer-2.2, jsf-2.3, jsonb-1.0, jsonp-1.1, jsp-2.3, managedBeans-1.0, servlet-4.0, ssl-1.0, webProfile-8.0, websocket-1.1]。
[監査      ] CWWKF0011I: defaultServer サーバーは、Smarter Planet に対応する準備ができました。defaultServer サーバーは 8.063 秒で始動しました。
二つのWebアプリケーションが導入され, http://localhost:9080/webapp1/ と http://localhost:9080/webapp2/ で実行可能になっていることがわかります。runで実行されたサーバーはCtrl+Cで止めることができます。
^C[監査      ] CWWKE0085I: JVM が終了するため、サーバー defaultServer が停止しています。
[監査      ] CWWKE1100I: サーバーが静止するまで最大 30 秒間待機します。
[監査      ] CWWKT0017I: Web アプリケーションが削除されました (default_host): https://localhost:9443/webapp1/
[監査      ] CWWKT0017I: Web アプリケーションが削除されました (default_host): https://localhost:9443/webapp2/
[監査      ] CWWKZ0009I: アプリケーション sample-webapp1 は正常に停止しました。
[監査      ] CWWKZ0009I: アプリケーション sample-webapp2 は正常に停止しました。
[監査      ] CWWKE0036I: 6 分, 18.745 秒後にサーバー defaultServer が停止しました。
Libertyの構成ファイルでは,<feature>webProfile-8.0</feature>を指定してJava EE 8 Web ProfileのAPI全てが有効になるように指定しています。が,Gitにおいてあるサンプルプロジェクトでは,じつはJSPしか使っていません。そこで,server.xmlを修正してjsp-2.3のみを有効にしてみます。
    <!-- Enable features -->
    <featureManager>
        <feature>jsp-2.3</feature>
    </featureManager>
この状態で,再度mvn packageでZIPファイルを作成してみます。
$ ls -l sample-liberty/target/sample-liberty.zip
-rw-r-----  1 takakiyo  staff  34595085  9 27 09:36 sample-liberty/target/sample-liberty.zip
先ほどは76MバイトほどあったZIPファイルのサイズが,35Mバイト程度まで小さくなっています。当然,展開後の導入イメージのサイズも小さくなります。このように,パッケージを作成してLibertyを導入すると,ランタイムのサイズを最小限にするという効果もあります。