動機
Unityアプリケーションで、インターネット越しでのPC画面を共有をしようと考えました。
Vonageの公式ブログに、Unityの記事があるので、早速ためそうとしたところ、肝心のソースコードのリンクが切れており、404でした。
無いなら、Unityプラグインを作ろうとも思いましたが、画面共有機能の一般的な利用用途を考えると、全画面で表示させたほうが視認性が良く、必ずしもUnity内での完結が望ましいものではないという持論になりました。そこで、Windowsアプリケーションで画面共有機能を実装し、必要に応じて、Unityアプリケーション側へデータを連携する仕組みを実装する方向性で開発することにしました。また、公式のサンプルの再利用ができ短時間で目的達成できるだろうという目論見もあります。
できること
PC画面をインターネット越しで共有するWindows向けのアプリケーションの作成について紹介いたします。

Windowsアプリケーションは、プログラム言語として、C#、GUI開発ライブラリとして、WPF(Windows Presentation Foundation)を用いて開発しています。
WPF内にUNITYアプリケーションを埋め込み、相互に連携することで、インターネット越しで受信した画面を、WPFだけでなくUnity内の3D空間上に、画面共有の映像を表示させることができます。ビジネス用途以外での利用も想定した内容を目指した入門記事となります。
画面の右領域が、WPFの画面となっており、全体が受信画面、右下の画面が送信画面となっており、他にボタンUIを設置しています。画面の左領域が、UNITYアプリケーションとなっており、3D空間内のPCの液晶に画面を映しているものとなっています。
アプリケーションの全体構成
CPaaS「OpenTok Cloud」を使い、クライアントであるWindowsアプリケーション間でPC画面を共有します。
クライアントアプリケーションは、送信クライアントから、PC画面のストリームを受取り、名前付きパイプで、UNITYアプリケーションへデータを転送しています。
開発環境
| 種類 | 開発環境 | 備考 |
|---|---|---|
| CPaaS | Vongage Vide API | OpenTok.Client 2.23.2 |
| Windowsアプリケーション | Microsoft Visual Studio 2019 | WPF(.NET Framework4.8) |
| Unityアプリケーション | UNITY 2020.3.42f1 | Windowsスタンドアロンアプリケーション |
サンプルコード
完成サンプルプロジェクトコードをのせておきます。
Github
以降、開発の大まかな流れを記載しています。
VONAGE アカウントの作成
Video APIの利用には、API KEY、SESSION_ID、TOKENの3つが必要となります。
Webサイト「VONAGE」でアカウントを作成してください。
VONAGE Video APIのAPI KEYの作成
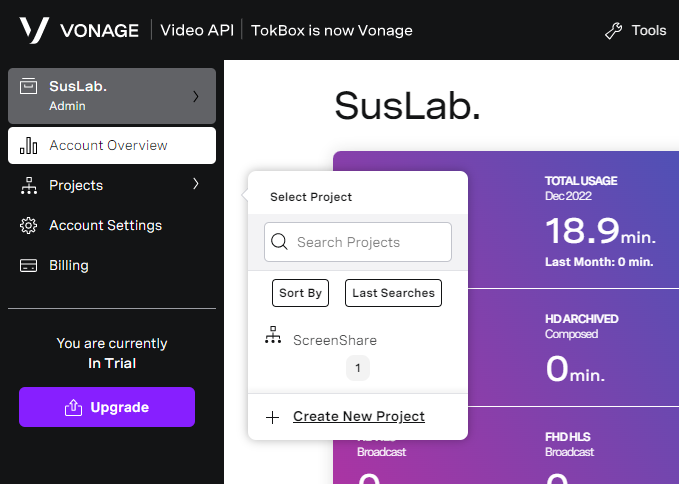
ログイン後、Account OvierView -> +Create New Projectで、新規にプロジェクトを作成します。

新規プロジェクトの作成後、画面が更新され表示される「PROJECT API KEY」 をメモしてください。

画面を下にスクロールすると、「Create Session ID」ボタンがあるので、押すと、「SESSION ID」が作られるので、メモしてください。
次に、Tokenを作成します。先ほど作成したSESSION IDを「Session ID」欄に入力し、条件を変更し、「Generate token」ボタンを押してください。そして、作成したToken情報をメモしてください。

これで、事前準備は終了です。
Windows Application
Visual Studio 2019を使用し、WPFアプリ(.NET Framework)を指定し、.NET Framework 4.8のWindowsアプリケーションを作成します。
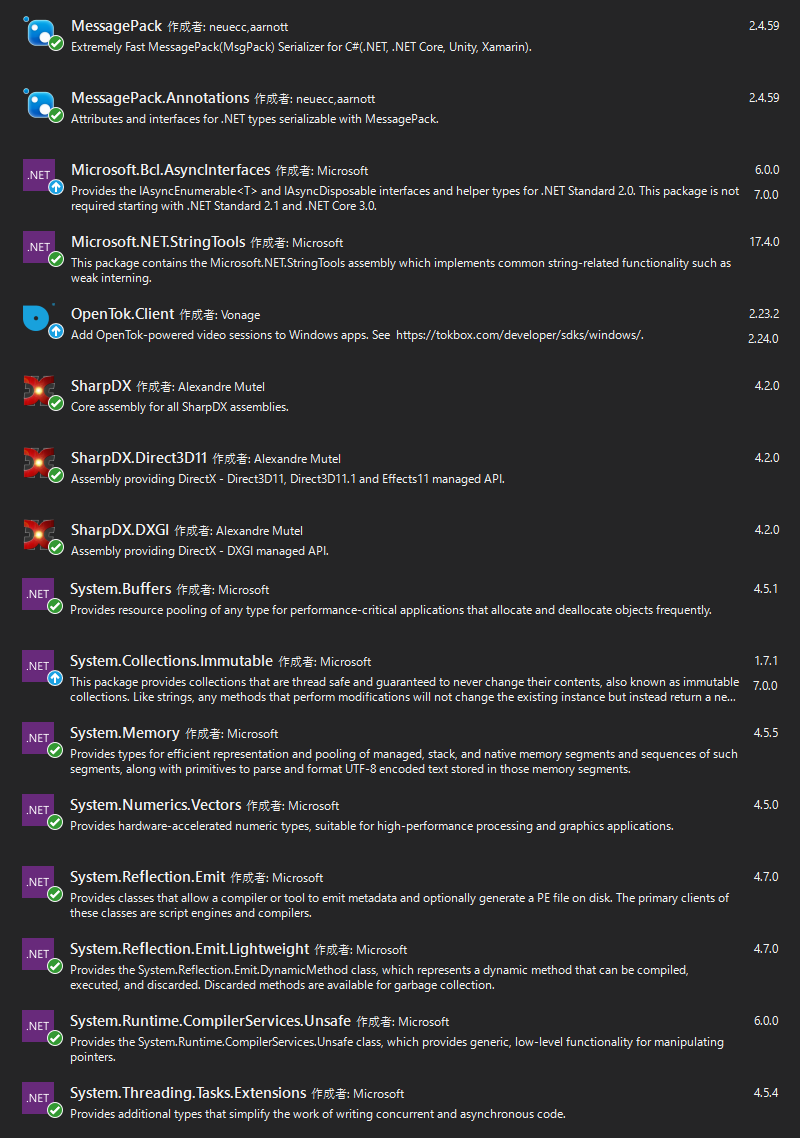
新規プロジェクト作成後、Nugetでパッケージを追加します。
下記参考図をのせておきます。

OpenTok経由による画面共有の実装
前述で取得した API KEY、SESSION_ID、TOKENの3つをプログラムコードに記載してください。
画面共有の送信には、IVideoCapturerを派生してカスタマイズした後述のScreenSharingCapturerを指定しています。
画面共有の受信には、IVideoRendererを派生してカスタマイズした後述のCustomVideoRendererを指定しています。
Init_Click アクション内の_capturer.AdapterNo = screenNum - 1; で
PCモニターの最後のもの(2画面の場合はセカンダリ)を画面共有するようにしています。
using OpenTok;
using System;
using System.Collections.Generic;
using System.Diagnostics;
using System.Windows;

namespace VongageVideoWinTest
{
   public partial class MainWindow : Window
   {
   #region << Field >>
       public const string API_KEY = "XXXX";
       public const string SESSION_ID = "XXXX";
       public const string TOKEN = "XXXX";

       protected ScreenSharingCapturer _capturer;
       protected Session   _session;
       protected Publisher _publisher;
       protected bool      _disconnect = false;
       protected Dictionary<Stream, Subscriber> _subscriberByStream = new Dictionary<Stream, Subscriber>();
       private Context _context;
   #endregion << Field >>

       public MainWindow() {
           InitializeComponent();
       }

       private void Init_Click(object sender, RoutedEventArgs e)
       {
           try{
               _context = new Context(new WPFDispatcher());
               _capturer = new ScreenSharingCapturer();
               var screenNum = _capturer.GetScreenNum;
               _capturer.AdapterNo = screenNum - 1;

               _publisher = new Publisher.Builder(_context) {
                   Renderer = _publisherVideo,
                   Capturer = _capturer,
                   HasAudioTrack = false
               }.Build();

               _publisher.VideoSourceType = VideoSourceType.Screen;
               _session = new Session.Builder(_context, API_KEY, SESSION_ID).Build();
               _session.Connected += Session_Connected;
               _session.Disconnected += Session_Disconnected;
               _session.Error += Session_Error;
               _session.StreamReceived += Session_StreamReceived;
               _session.StreamDropped += Session_StreamDropped;
           } catch (System.Exception err) {
               Trace.WriteLine(err.Message);
           }
       }

       private void MainWindow_Closing(object sender, System.ComponentModel.CancelEventArgs e)
       {
           foreach (var subscriber in _subscriberByStream.Values) {
               subscriber.Dispose();
           }
           _publisher?.Dispose();
           _session?.Dispose();
       }

       private void UpdateGridSize(int numberOfSubscribers)
       {
           int rows = Convert.ToInt32(Math.Round(Math.Sqrt(numberOfSubscribers)));
           int cols = rows == 0 ? 0 : Convert.ToInt32(Math.Ceiling(((double)numberOfSubscribers) / rows));
           _subscriberGrid.Columns = cols;
           _subscriberGrid.Rows = rows;
       }

       private void Connect_Click(object sender, RoutedEventArgs e)
       {
           try {
               if (_disconnect) {
                   _session.Unpublish(_publisher);
                   _session.Disconnect();
               } else {
                   _session.Connect(TOKEN);
               }
           }
           catch (OpenTokException ex) {
               Trace.WriteLine("OpenTokException " + ex.Message);
           }

           _disconnect = !_disconnect;
           _connectDisconnectButton.Content = _disconnect ? "Disconnect" : "Connect";
       }

   #region << Session >>

       private void Session_Connected(object sender, EventArgs e)
       {
           try {
               _session.Publish(_publisher);
           } catch (OpenTokException ex) {
               Trace.WriteLine("OpenTokException " + ex.Message);
           }
       }

       private void Session_Disconnected(object sender, EventArgs e)
       {
           _subscriberByStream.Clear();
           _subscriberGrid.Children.Clear();
       }

       private void Session_Error(object sender, Session.ErrorEventArgs e)
       {
           MessageBox.Show("Session error:" + e.ErrorCode, "Error", MessageBoxButton.OK, MessageBoxImage.Error);
       }

       private void Session_StreamReceived(object sender, Session.StreamEventArgs e)
       {
           var renderer = new CustomVideoRenderer();
           _subscriberGrid.Children.Add(renderer);

           UpdateGridSize(_subscriberGrid.Children.Count);
           var subscriber = new Subscriber.Builder(_context, e.Stream) {
               Renderer = renderer
           }.Build();

           _subscriberByStream.Add(e.Stream, subscriber);

           try {
               _session.Subscribe(subscriber);
           } catch (OpenTokException ex) {
               Trace.WriteLine("OpenTokException " + ex.Message);
           }
       }

       private void Session_StreamDropped(object sender, Session.StreamEventArgs e)
       {
           var subscriber = _subscriberByStream[e.Stream];
           if (subscriber != null) {
               _subscriberByStream.Remove(e.Stream);

               try {
                   _session.Unsubscribe(subscriber);
               } catch (OpenTokException ex) {
                   Trace.WriteLine("OpenTokException " + ex.Message);
               }

               _subscriberGrid.Children.Remove((UIElement)subscriber.VideoRenderer);
               UpdateGridSize(_subscriberGrid.Children.Count);
           }
       }
   #endregion << Session >>
   }
}
OpenTokの画面共有の送信
SharpDXを使い、PC画面の領域や、テクスチャを生成しています。
Timerで定期的に、IVideoFrameConsumerで、画面データをYuv420pで転送しています。
using OpenTok;
using SharpDX;
using SharpDX.Direct3D11;
using SharpDX.DXGI;
using System;
using System.Threading;

namespace VongageVideoWinTest
{
   public class ScreenSharingCapturer : IVideoCapturer
   {
   #region << Field >>
       const int FPS = 15;

       protected int _width;
       protected int _height;
       protected Timer _timer;
       protected IVideoFrameConsumer _frameConsumer;

       protected Texture2D _screenTexture;
       protected OutputDuplication _duplicatedOutput;
   #endregion << Field >>

       public int AdapterNo {
           get;
           set;
       }

       public int GetScreenNum {
           get => System.Windows.Forms.Screen.AllScreens.Length;
       }

       public ScreenSharingCapturer() {
       }

       public void Init(IVideoFrameConsumer frameConsumer) {
           this._frameConsumer = frameConsumer;
       }

       public void Start() {
           // Change the output number to select a different desktop
           int numOutput = 0;

           var factory = new Factory1();
           var adapter = factory.GetAdapter1(AdapterNo);
           var device = new SharpDX.Direct3D11.Device(adapter);

           var output = adapter.GetOutput(numOutput);
           var output1 = output.QueryInterface<Output1>();

           var desktopBounds = output.Description.DesktopBounds;
           _width = desktopBounds.Right - desktopBounds.Left;
           _height = desktopBounds.Bottom - desktopBounds.Top;

           var textureDesc = new Texture2DDescription {
               CpuAccessFlags = CpuAccessFlags.Read,
               BindFlags   = BindFlags.None,
               Format      = Format.B8G8R8A8_UNorm,
               Width       = _width,
               Height      = _height,
               OptionFlags = ResourceOptionFlags.None,
               MipLevels   = 1,
               ArraySize   = 1,
               SampleDescription = { Count = 1, Quality = 0 },
               Usage       = ResourceUsage.Staging
           };

           _screenTexture = new Texture2D(device, textureDesc);
           _duplicatedOutput = output1.DuplicateOutput(device);

           _timer = new Timer((Object stateInfo) => {
               try {
                   SharpDX.DXGI.Resource screenResource;
                   OutputDuplicateFrameInformation duplicateFrameInformation;

                   _duplicatedOutput.AcquireNextFrame(1000 / FPS, out duplicateFrameInformation, out screenResource);

                   using (var screenTexture2D = screenResource.QueryInterface<Texture2D>())
                       device.ImmediateContext.CopyResource(screenTexture2D, _screenTexture);

                   screenResource.Dispose();
                   _duplicatedOutput.ReleaseFrame();

                   var mapSource = device.ImmediateContext.MapSubresource(_screenTexture, 0, MapMode.Read,
                                                                          SharpDX.Direct3D11.MapFlags.None);

                   IntPtr[] planes = { mapSource.DataPointer };
                   int[] strides = { mapSource.RowPitch };

                   using (var frame = VideoFrame.CreateYuv420pFrameFromBuffer(PixelFormat.FormatArgb32, _width, _height,
                                                                              planes, strides)) {
                       _frameConsumer.Consume(frame);
                   }
                   device.ImmediateContext.UnmapSubresource(_screenTexture, 0);
               } catch (SharpDXException) {
               }
           }, null, 0, 1000 / FPS);

           output1.Dispose();
           output.Dispose();
           adapter.Dispose();
           factory.Dispose();
       }

       public void Stop() {
           if (_timer != null) {
               using (var timerDisposed = new ManualResetEvent(false)) {
                   _timer.Dispose(timerDisposed);
                   timerDisposed.WaitOne();
               }
           }
           _timer = null;
       }

       public void Destroy() {
           _duplicatedOutput?.Dispose();
           _screenTexture?.Dispose();
       }

       public void SetVideoContentHint(VideoContentHint contentHint) {
           if (_frameConsumer == null)
               throw new InvalidOperationException("Content hint can only be set after constructing the " +
                   "Publisher and Capturer.");
           _frameConsumer.SetVideoContentHint(contentHint);
       }

       public VideoContentHint GetVideoContentHint() {
           if (_frameConsumer != null)
               return _frameConsumer.GetVideoContentHint();
           return VideoContentHint.NONE;
       }

       public VideoCaptureSettings GetCaptureSettings() {
           var settings = new VideoCaptureSettings() {
               Width   = _width,
               Height  = _height,
               Fps     = FPS,
               MirrorOnLocalRender = false,
               PixelFormat = PixelFormat.FormatYuv420p,
           };
           return settings;
       }
   }
}
OpenTokの画面共有の取得
IVideoRendererを派生し、「RenderFrame」APIを実装することで、フレーム情報を取得します。
取得した情報は、WriteableBitmapに変換します。
ここで、画像へ様々なエフェクト効果をつけることもできます。
Unityアプリケーションとの連携には、WriteableBitmapから、BYTE配列変換します。
そして、バイト配列情報を転送します。
しかし、そのまま渡しただけでは、どのような情報か分からないため先頭に付加情報を付与して送ります。
そして、メモリマップファイルで、名前を「PIPE_APP_SHARE」にし、BYTE配列データを転送します。
| BIT | 内容 |
|---|---|
| 32 | 画像データ長 |
| 32 | 画面幅ピクセル数 |
| 32 | 画面高ピクセル数 |
| 可変長 | 画面データ |
namespace VongageVideoWinTest
{
   public class CustomVideoRenderer : Control, IVideoRenderer
   {
   #region << Field >>
       private int FrameWidth = -1;
       private int FrameHeight = -1;
       private WriteableBitmap VideoBitmap;
       protected int index = 1;
       protected const string PipeName = "PIPE_APP_SHARE";
       protected MemoryMappedFile _sharedMemory;
       protected MemoryMappedViewAccessor _accessor;
   #endregion << Field >>

       public bool IsSender {
           get;
           set;
       } = true;

       public bool EnableBlueFilter {
           get;
           set;
       }

       static CustomVideoRenderer() {
           DefaultStyleKeyProperty.OverrideMetadata(typeof(CustomVideoRenderer), new FrameworkPropertyMetadata(typeof(CustomVideoRenderer)));
       }

       public CustomVideoRenderer() {
           var brush = new ImageBrush() {
               Stretch = Stretch.UniformToFill
           };
           Background = brush;
       }

       ~CustomVideoRenderer() {
           _accessor?.Dispose();
           _sharedMemory?.Dispose();
       }

       public void RenderFrame(VideoFrame frame) {
           // WritableBitmap has to be accessed from a STA thread
           Dispatcher.BeginInvoke(new Action(() => {
               try {
                   if (frame.Width != FrameWidth || frame.Height != FrameHeight) {
                       FrameWidth = frame.Width;
                       FrameHeight = frame.Height;
                       VideoBitmap = new WriteableBitmap(FrameWidth, FrameHeight, 96, 96, PixelFormats.Bgr32, null);

                       if (Background is ImageBrush) {
                           ImageBrush b = (ImageBrush)Background;
                           b.ImageSource = VideoBitmap;
                       } else {
                           throw new Exception("Please use an ImageBrush as background in the SampleVideoRenderer control");
                       }
                   }

                   if (VideoBitmap != null) {
                       VideoBitmap.Lock();
                       {
                           IntPtr[] buffer = { VideoBitmap.BackBuffer };
                           int[] stride = { VideoBitmap.BackBufferStride };
                           frame.ConvertInPlace(OpenTok.PixelFormat.FormatArgb32, buffer, stride);

                           if (EnableBlueFilter) {
                               // This is a very slow filter just for demonstration purposes
                               IntPtr p = VideoBitmap.BackBuffer;
                               for (int y = 0; y < FrameHeight; y++) {
                                   for (int x = 0; x < FrameWidth; x++, p += 4) {
                                       Marshal.WriteInt32(p, Marshal.ReadInt32(p) & 0xff);
                                   }
                                   p += stride[0] - FrameWidth * 4;
                               }
                           }
                       }
                       VideoBitmap.AddDirtyRect(new Int32Rect(0, 0, FrameWidth, FrameHeight));
                       VideoBitmap.Unlock();

                       if (IsSender) {
                           SendImage(VideoBitmap);
                       }
                   }
               } finally {
                   frame.Dispose();
               }
           }));

       }

       public void SaveImage(WriteableBitmap bitmap, string fileName){
           try {
               using (var stream = new FileStream(fileName, FileMode.Create, FileAccess.Write)){
                   var encoder = new JpegBitmapEncoder();
                   encoder.Frames.Add(BitmapFrame.Create(bitmap));
                   encoder.Save(stream);
               }
           }
           catch {
           }
       }

       public void SendImage(WriteableBitmap bitmap) {
           try {
               var width = bitmap.PixelWidth;
               var height = bitmap.PixelHeight;
               var stride = width * ((bitmap.Format.BitsPerPixel + 7) / 8);

               var bitmapData = new byte[height * stride];

               bitmap.CopyPixels(bitmapData, stride, 0);

               if (_accessor == null) {
                   InitMemoryMapped();
               }

               var offset = sizeof(int);
               if (_accessor != null) {
                   _accessor.Write(0, bitmapData.Length);
                   _accessor.Write(offset, width);
                   _accessor.Write(offset*2, height);
                   _accessor.WriteArray(offset * 3, bitmapData, 0, bitmapData.Length);
               }
           }
           catch (System.Exception err) {
               Trace.WriteLine(err.Message);
           }
       }

       protected void InitMemoryMapped() {
           _sharedMemory = MemoryMappedFile.CreateNew(PipeName, 1920 * 1080 * 24);
           _accessor = _sharedMemory.CreateViewAccessor();
       }
   }
}
Windows Application内に、UNITYアプリケーションの埋め込み
Unity でビルドしたWindowsアプリケーションに対して、コマンドライン引数「-parentHWND」を指定し、Processで起動させるとアプリケーションに埋め込むことができます。
Unity Standalone Player command line arguments:--parentHWND delayed (Windows only)
ここでは、XAMLのGrid配下のUI領域に埋め込みました。
まずは、Unityアプリケーションの埋め込むUI(XAML)の記述になります。
<Grid>
   <!-- UNITY -->
   <Grid Grid.Column="0" x:Name="_grid"/>
   ・・・・
</Grid>
次に、Windowアプリケーション起動直後に、先ほどのGridの子供として、Unityアプリケーションパスを指定します。
※XAMLに対して、直接 UnityHost を指定すると、デザイナー表示中にPCへの負荷が上がるため、コードで生成し、挿入しています。
/// <summary>
/// Window_Loaded
/// </summary>
/// <param name="sender"></param>
/// <param name="e"></param>
private void Window_Loaded(object sender, RoutedEventArgs e)
{
   var appPath = GetCurrentAppDir();
   appPath = System.IO.Path.Combine(appPath, @"Unity\ShareScreenUnity.exe");

   if (!System.IO.File.Exists(appPath)) {
       return;
   }

   if (!System.ComponentModel.DesignerProperties.GetIsInDesignMode(this)) {
       _grid.Children.Add(new UnityHost{
           AppPath = appPath
       });
   }
}
最後に、UIウィンドウのソースコードになります。
using System;
using System.Diagnostics;
using System.Runtime.InteropServices;
using System.Threading;
using System.Windows.Interop;

namespace VongageVideoWinTest
{
   /// <summary>
   /// User32
   /// </summary>
   static class User32
   {
       [DllImport("user32.dll")]
       public static extern IntPtr FindWindowEx(IntPtr hParent, IntPtr hChildAfter, string pClassName, string pWindowName);

       [DllImport("user32.dll")]
       public static extern int SendMessage(IntPtr hWnd, int msg, IntPtr wParam, IntPtr lParam);

       [DllImport("user32.dll")]
       public static extern IntPtr PostMessage(IntPtr hWnd, UInt32 Msg, IntPtr wParam, IntPtr lParam);
   }

   /// <summary>
   /// UnityHost
   /// </summary>
   public class UnityHost : HwndHost
   {
   #region << Field >>
       private Process _childProcess;
       private HandleRef _childHandleRef;
       private const int WM_ACTIVATE = 0x0006;
       private const int WM_CLOSE = 0x0010;
       private readonly IntPtr WA_ACTIVE = new IntPtr(1);
   #endregion << Field >>

       /// <summary>
       /// AppPath
       /// </summary>
       public string AppPath {
           get;
           set;
       }

       /// <summary>
       /// BuildWindowCore
       /// </summary>
       /// <param name="hwndParent"></param>
       /// <returns></returns>
       protected override HandleRef BuildWindowCore(HandleRef hwndParent) {
           var cmdline = $"-parentHWND {hwndParent.Handle}";
           _childProcess = Process.Start(AppPath, cmdline);

           while (true) {
               var hwndChild = User32.FindWindowEx(hwndParent.Handle, IntPtr.Zero, null, null);
               if (hwndChild != IntPtr.Zero) {
                   User32.SendMessage(hwndChild, WM_ACTIVATE, WA_ACTIVE, IntPtr.Zero);

                   return _childHandleRef = new HandleRef(this, hwndChild);
               }
               Thread.Sleep(100);
           }
       }

       /// <summary>
       /// DestroyWindowCore
       /// </summary>
       /// <param name="hwnd"></param>
       protected override void DestroyWindowCore(HandleRef hwnd) {
           User32.PostMessage(_childHandleRef.Handle, WM_CLOSE, IntPtr.Zero, IntPtr.Zero);

           var counter = 30;
           while (!_childProcess.HasExited) {
               if (--counter < 0) {
                   Debug.WriteLine("Process not dead yet, killing...");
                   _childProcess.Kill();
               }
               Thread.Sleep(100);
           }
           _childProcess.Dispose();
       }
   }
}
UNITYアプリケーション
UNITY2020.3.42f1を使用し、Windowsスタンドアロンアプリケーションを作成しました。
UNITYアプリケーションでの画面共有データの取得
UGUIのRawImageに画面データを表示させることにしました。
まずは、Script起動後、メモリマップファイルの存在を確認します。
まだ、Windowアプリケーション側でメモリマップが作成できていない場合は、例外となるため、try / cahtchで捕捉し、ループで待ちます。
データをBYTE配列で取得後、クラス内のデータとして保持し、Unityのメインスレッド(Update関数)内で、Textureへ流し込んでいます。
using System.IO.MemoryMappedFiles;
using System.Threading;
using System.Threading.Tasks;
using UnityEngine;
using UnityEngine.UI;

public class ScreenShareScript : MonoBehaviour
{
#region << Field >>
    public RawImage shareImage;
    protected CancellationTokenSource _tokenSource = new CancellationTokenSource();
    protected const string PipeName = "PIPE_APP_SHARE";
    protected byte[] _data;
    protected Texture2D _tex;
    protected bool IsRun = false;
    protected int _width;
    protected int _height;
    private object lockTest = new object();
    protected bool _isUpdate = false;

#endregion << Field >>

    /// <summary>
    /// Start
    /// </summary>
    async void Start()
    {
        await Task.Run(() => {
            MemoryMappedFile sharedMemory = null;
            IsRun = true;

            while (IsRun) {
                try {
                    sharedMemory = MemoryMappedFile.OpenExisting(PipeName);
                    if (sharedMemory != null) {
                        break;
                    }
                } catch {
                }
                Thread.Sleep(1000);
            }


            MemoryMappedViewAccessor accessor = null;

            while (IsRun) {
                if (accessor == null) {
                    accessor = sharedMemory.CreateViewAccessor();
                }

                if (accessor != null) {
                    lock (lockTest) {
                        var offset = sizeof(int);
                        var size = accessor.ReadInt32(0);
                        var width = accessor.ReadInt32(offset);
                        var height = accessor.ReadInt32(offset * 2);

                        Debug.LogFormat("{0}x{1}, {2}", width, height, size);

                        if (_data == null || _data.Length < size) {
                            _data = new byte[size];
                        }

                        accessor.ReadArray<byte>(offset * 3, _data, 0, size);

                        _width = width;
                        _height = height;
                    }
                    _isUpdate = true;
                }
                Thread.Sleep(100);
            }
            accessor.Dispose();
        });
    }

    /// <summary>
    /// OnDestroy
    /// </summary>
    private void OnDestroy()
    {
        IsRun = false;
    }

    /// <summary>
    /// Update
    /// </summary>
    void Update()
    {
        if (!_isUpdate) {
            return;
        }

        _isUpdate = false;

        lock (lockTest) {
            if (_tex == null) {
                InitTexture(_width, _height);
            }

            if (_tex != null) {
                _tex.LoadRawTextureData(_data);
                _tex.Apply();
            }
        }
    }

    /// <summary>
    /// InitTexture
    /// </summary>
    /// <param name="width"></param>
    /// <param name="height"></param>
    protected void InitTexture(int width, int height) {
        _tex = new Texture2D(width, height, TextureFormat.BGRA32, false);
        if (shareImage != null) {
            shareImage.texture = _tex;
        }
    }
}
おわりに
いかがでしたでしょうか。
思っていたより、簡単できたのではないでしょうか。
改善余地は多々あると思いますので、よりよいご意見有りましたらお待ちしております。
